
User manual, English (US)
Page 5
... 5 Introduction 6 Playable Discs and Videotapes 7 Initial Setup and Use Before Using the TV/VCR/DVD 8 Hooking Up the TV/VCR/DVD 9-10 Optional Connections 11 Watching TV 12 Playing a Videotape 13 Playing a Disc 14 Description of Controls Remote Control Buttons 15-16 Front Panel 17 Rear Panel 18 TV Settings Menu Language,Auto Channel Programming . . . .19 Adding/Deleting Channels 20 Setting the Clock 21-24 Daylight-Savings Time 25 Status Displays, Picture Controls 26 Recording Videotape Recording 27 One-Touch Recording 28 Timer Recording 29-32 Timer Recording Auto Return 33...
... 5 Introduction 6 Playable Discs and Videotapes 7 Initial Setup and Use Before Using the TV/VCR/DVD 8 Hooking Up the TV/VCR/DVD 9-10 Optional Connections 11 Watching TV 12 Playing a Videotape 13 Playing a Disc 14 Description of Controls Remote Control Buttons 15-16 Front Panel 17 Rear Panel 18 TV Settings Menu Language,Auto Channel Programming . . . .19 Adding/Deleting Channels 20 Setting the Clock 21-24 Daylight-Savings Time 25 Status Displays, Picture Controls 26 Recording Videotape Recording 27 One-Touch Recording 28 Timer Recording 29-32 Timer Recording Auto Return 33...

User manual, English (US)
Page 6
... French Setup Menus • Forward/Reverse Searching; Discs • Audio Language choices * • Bit Rate display • Camera Angle * • Dolby Digital Sound * • Dual Playback • Dynamic Range Control • Fast/Paused/Slow/Step-by pressing SETUP on the disc DVD Disc Menus... While in this manual. In DVD mode, you cannot use the setup menus of the screen if you try the feature again. Some instructions explain how to select the TV/VCR SETUP menu...
... French Setup Menus • Forward/Reverse Searching; Discs • Audio Language choices * • Bit Rate display • Camera Angle * • Dolby Digital Sound * • Dual Playback • Dynamic Range Control • Fast/Paused/Slow/Step-by pressing SETUP on the disc DVD Disc Menus... While in this manual. In DVD mode, you cannot use the setup menus of the screen if you try the feature again. Some instructions explain how to select the TV/VCR SETUP menu...

User manual, English (US)
Page 7
... DVD Format/Logo Licensing Corporation. To play properly if the disc's recorded area is compatible with existing Video Home System (VHS) equipment. If these region symbols do not appear on your DVDs. Other videotapes may have the mark. The VCR of this TV/VCR/DVD. It will play on DVD players with Multiple Bit Rate (MBR: a file that are NTSC (which is not compatible with the same region code. DVD: Prerecorded Digital Video Discs Audio CDs Recordable...
... DVD Format/Logo Licensing Corporation. To play properly if the disc's recorded area is compatible with existing Video Home System (VHS) equipment. If these region symbols do not appear on your DVDs. Other videotapes may have the mark. The VCR of this TV/VCR/DVD. It will play on DVD players with Multiple Bit Rate (MBR: a file that are NTSC (which is not compatible with the same region code. DVD: Prerecorded Digital Video Discs Audio CDs Recordable...

User manual, English (US)
Page 10
.... C Hooking Up Your TV/VCR/DVD with an Indoor Antenna To install an indoor antenna or "rabbit ears" (not supplied), connect the antenna wire to the red and white AUDIO In Jacks on the back of the TV/VCR/DVD. HEADPHONE VIDEO L AUDIO R STANDBY-ON VOLUME PREV PLAY NEXT SEARCH STOP OPEN/CLOSE SOURCE CHANNEL DVD VCR/TV REC/OTR REW PLAY F.FWD STOP/EJECT HEADPHONE VIDEO L AUDIO R AUDIO VIDEO 3CH 4CH L R OUT IN IN ANT. Audio and video cables...
.... C Hooking Up Your TV/VCR/DVD with an Indoor Antenna To install an indoor antenna or "rabbit ears" (not supplied), connect the antenna wire to the red and white AUDIO In Jacks on the back of the TV/VCR/DVD. HEADPHONE VIDEO L AUDIO R STANDBY-ON VOLUME PREV PLAY NEXT SEARCH STOP OPEN/CLOSE SOURCE CHANNEL DVD VCR/TV REC/OTR REW PLAY F.FWD STOP/EJECT HEADPHONE VIDEO L AUDIO R AUDIO VIDEO 3CH 4CH L R OUT IN IN ANT. Audio and video cables...

User manual, English (US)
Page 11
... see if your disc is recorded in Dolby Digital 5.1 channel surround sound, you will not hear multi-channel sound even if you use a Mini-Disc or Digital Audio Tape deck to copy Dolby Digital 5.1 channel surround sound discs. • If the disc is not recorded in Dolby Digital, look for a Receiver that has a Digital Coaxial In jack. Details are on the TV/VCR/DVD. Also connect the cable to the Stereo's COAXIAL DIGITAL AUDIO IN jack. 3 If the Stereo is not Dolby Digital-compatible or if...
... see if your disc is recorded in Dolby Digital 5.1 channel surround sound, you will not hear multi-channel sound even if you use a Mini-Disc or Digital Audio Tape deck to copy Dolby Digital 5.1 channel surround sound discs. • If the disc is not recorded in Dolby Digital, look for a Receiver that has a Digital Coaxial In jack. Details are on the TV/VCR/DVD. Also connect the cable to the Stereo's COAXIAL DIGITAL AUDIO IN jack. 3 If the Stereo is not Dolby Digital-compatible or if...

User manual, English (US)
Page 14
.... 1 STANDBY-ON PICTURE SLEEP SELECT 123 CH. 456 789 +100 0 +10 SPEED C.RESET ZOOM VOL. To play MP3 or JPEG files, see page 52. MUTE RECORD PLAY STOP DISC MENU 2 5 6 3 Press OPEN/CLOSE A on the front of the unit during disc playback stops disc playback and switches the unit to play . Set a stereo (if applicable) to close the tray. Some DVDs are on the front of the side you want to TV/VCR mode. If a DVD menu appears...
.... 1 STANDBY-ON PICTURE SLEEP SELECT 123 CH. 456 789 +100 0 +10 SPEED C.RESET ZOOM VOL. To play MP3 or JPEG files, see page 52. MUTE RECORD PLAY STOP DISC MENU 2 5 6 3 Press OPEN/CLOSE A on the front of the unit during disc playback stops disc playback and switches the unit to play . Set a stereo (if applicable) to close the tray. Some DVDs are on the front of the side you want to TV/VCR mode. If a DVD menu appears...

User manual, English (US)
Page 20
... and the channel number appear in DVD mode. T2132_1102_0102_EN1_0303 3/3/05 10:18 AM Page 20 20 Adding/Deleting Channels You can be available. • This function will appear. 1 Press SETUP. 2 Press ▲ or ▼ to add or delete the channel. Or, you connected an Antenna (TV) or a Cable TV signal (CATV) to the TV/VCR/DVD. MUTE RECORD PLAY STOP DISC MENU DISPLAY SETUP TITLE ENTER RETURN CLEAR SEARCH MODE REPEAT REPEAT A-B MODE AUDIO SUBTITLE ANGLE...
... and the channel number appear in DVD mode. T2132_1102_0102_EN1_0303 3/3/05 10:18 AM Page 20 20 Adding/Deleting Channels You can be available. • This function will appear. 1 Press SETUP. 2 Press ▲ or ▼ to add or delete the channel. Or, you connected an Antenna (TV) or a Cable TV signal (CATV) to the TV/VCR/DVD. MUTE RECORD PLAY STOP DISC MENU DISPLAY SETUP TITLE ENTER RETURN CLEAR SEARCH MODE REPEAT REPEAT A-B MODE AUDIO SUBTITLE ANGLE...
User manual, English (US)
Page 24
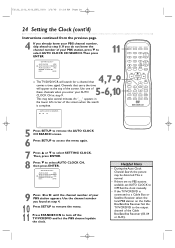
... the Cable Box/Satellite Receiver. MUTE RECORD PLAY STOP DISC MENU DISPLAY SETUP TITLE ENTER RETURN CLEAR SEARCH MODE REPEAT REPEAT A-B MODE AUDIO SUBTITLE ANGLE - - 5 Press SETUP to remove the AUTO CLOCK CH SEARCH screen. 6 Press SETUP to access the menu again. 7 Press ▲ or ▼ to select AUTO CLOCK CH, then press ENTER. - AUTO CLOCK [ON] B AUTO CLOCK CH SEARCH AUTO CLOCK CH [02] MANUAL CLOCK SET D.S.T. [OFF] 4,7-9 ● The TV/DVD/VCR will appear at step 4. 10 Press SETUP to remove the menu. 11 Press STANDBY-ON to OFF. Channels that...
... the Cable Box/Satellite Receiver. MUTE RECORD PLAY STOP DISC MENU DISPLAY SETUP TITLE ENTER RETURN CLEAR SEARCH MODE REPEAT REPEAT A-B MODE AUDIO SUBTITLE ANGLE - - 5 Press SETUP to remove the AUTO CLOCK CH SEARCH screen. 6 Press SETUP to access the menu again. 7 Press ▲ or ▼ to select AUTO CLOCK CH, then press ENTER. - AUTO CLOCK [ON] B AUTO CLOCK CH SEARCH AUTO CLOCK CH [02] MANUAL CLOCK SET D.S.T. [OFF] 4,7-9 ● The TV/DVD/VCR will appear at step 4. 10 Press SETUP to remove the menu. 11 Press STANDBY-ON to OFF. Channels that...

User manual, English (US)
Page 64
... DISPLAY SETUP TITLE ENTER RETURN CLEAR SEARCH MODE REPEAT REPEAT A-B MODE AUDIO SUBTITLE ANGLE RECORD PLAY STOP DISC MENU DISPLAY SETUP TITLE ENTER RETURN CLEAR SEARCH MODE REPEAT REPEAT A-B MODE AUDIO SUBTITLE ANGLE RECORD PLAY STOP DISC MENU DISPLAY SETUP TITLE ENTER RETURN CLEAR SEARCH MODE REPEAT REPEAT A-B MODE AUDIO SUBTITLE ANGLE ENTER INITIALIZE Initialize? T2132_1102_0102_EN2_0303 3/3/05 11:16 AM Page 64 64 Black Level,Virtual Surround, Initializing Black Level Adjust Black Level to remove the menu. NO YES 3 Press K or L to put the TV/VCR/DVD in Dolby Digital...
... DISPLAY SETUP TITLE ENTER RETURN CLEAR SEARCH MODE REPEAT REPEAT A-B MODE AUDIO SUBTITLE ANGLE RECORD PLAY STOP DISC MENU DISPLAY SETUP TITLE ENTER RETURN CLEAR SEARCH MODE REPEAT REPEAT A-B MODE AUDIO SUBTITLE ANGLE RECORD PLAY STOP DISC MENU DISPLAY SETUP TITLE ENTER RETURN CLEAR SEARCH MODE REPEAT REPEAT A-B MODE AUDIO SUBTITLE ANGLE ENTER INITIALIZE Initialize? T2132_1102_0102_EN2_0303 3/3/05 11:16 AM Page 64 64 Black Level,Virtual Surround, Initializing Black Level Adjust Black Level to remove the menu. NO YES 3 Press K or L to put the TV/VCR/DVD in Dolby Digital...

User manual, English (US)
Page 66
... TV screen, and playback may continue with its current track. • Specific Time playback is not possible with MP3 tracks. • Progressive JPEGs (JPEG files saved in the progressive format) will appear on recording. Or, you choose a track or file, press PLAY B or ENTER. MUTE RECORD PLAY STOP DISC MENU DISPLAY SETUP TITLE ENTER RETURN CLEAR SEARCH MODE REPEAT REPEAT A-B MODE AUDIO SUBTITLE ANGLE 2 3 1 When you use PLAY B to select another track. Then press { , B or ENTER to rotate a picture...
... TV screen, and playback may continue with its current track. • Specific Time playback is not possible with MP3 tracks. • Progressive JPEGs (JPEG files saved in the progressive format) will appear on recording. Or, you choose a track or file, press PLAY B or ENTER. MUTE RECORD PLAY STOP DISC MENU DISPLAY SETUP TITLE ENTER RETURN CLEAR SEARCH MODE REPEAT REPEAT A-B MODE AUDIO SUBTITLE ANGLE 2 3 1 When you use PLAY B to select another track. Then press { , B or ENTER to rotate a picture...

User manual, English (US)
Page 72
... DVD player of volume by suppressing loud sounds and raising low sounds. Choosing ON compresses the range of the TV/VCR/DVD. ● Before you selected DOLBY DIGITAL, press ENTER repeatedly to put the TV/VCR/DVD in DVD mode. Helpful Hints • Dolby Digital sound must be at the top of the TV/VCR/DVD. 1 Press SETUP once so the TV/VCR SETUP menu appears. - TV/VCR SETUP - DRC is Dolby Digital compatible. B TIMER PROGRAMMING SETTING CLOCK USER'S SET UP LANGUAGE [ENGLISH] ZERO RETURN 3-6 2 While playback is connected to a Stereo using...
... DVD player of volume by suppressing loud sounds and raising low sounds. Choosing ON compresses the range of the TV/VCR/DVD. ● Before you selected DOLBY DIGITAL, press ENTER repeatedly to put the TV/VCR/DVD in DVD mode. Helpful Hints • Dolby Digital sound must be at the top of the TV/VCR/DVD. 1 Press SETUP once so the TV/VCR SETUP menu appears. - TV/VCR SETUP - DRC is Dolby Digital compatible. B TIMER PROGRAMMING SETTING CLOCK USER'S SET UP LANGUAGE [ENGLISH] ZERO RETURN 3-6 2 While playback is connected to a Stereo using...

User manual, English (US)
Page 75
... 0 +10 SPEED C.RESET ZOOM VOL. PG13 - DVDs whose ratings exceed the level you begin, press SELECT to put the TV/VCR/DVD in DVD mode. Asterisks (*) will appear instead of the menu, then press ENTER. General Audience; MUTE RECORD PLAY STOP DISC MENU DISPLAY SETUP TITLE ENTER RETURN CLEAR SEARCH MODE REPEAT REPEAT A-B MODE AUDIO SUBTITLE ANGLE 3 Press sor B to select CUSTOM at the top of your 4-digit password. PARENTAL PARENTAL LEVEL ALL PASSWORD CHANGE ENTER Instructions continue on...
... 0 +10 SPEED C.RESET ZOOM VOL. PG13 - DVDs whose ratings exceed the level you begin, press SELECT to put the TV/VCR/DVD in DVD mode. Asterisks (*) will appear instead of the menu, then press ENTER. General Audience; MUTE RECORD PLAY STOP DISC MENU DISPLAY SETUP TITLE ENTER RETURN CLEAR SEARCH MODE REPEAT REPEAT A-B MODE AUDIO SUBTITLE ANGLE 3 Press sor B to select CUSTOM at the top of your 4-digit password. PARENTAL PARENTAL LEVEL ALL PASSWORD CHANGE ENTER Instructions continue on...

User manual, English (US)
Page 81
... audio settings of the TV/VCR/DVD. Make sure the disc is destroyed. • Adjust the tracking. TV/VCR/DVD does not display closed captions for TV programs. • Make sure closed captioning is available for Region 1 or ALL regions and is off the TV/VCR/DVD power for the timer recording. • Unplug the TV/VCR/DVD power cord for DVD mode. Details are using a Cable Box/Satellite Receiver, set a timer recording and the power is NTSC compatible. You cannot remove the tape from the TV/VCR/DVD...
... audio settings of the TV/VCR/DVD. Make sure the disc is destroyed. • Adjust the tracking. TV/VCR/DVD does not display closed captions for TV programs. • Make sure closed captioning is available for Region 1 or ALL regions and is off the TV/VCR/DVD power for the timer recording. • Unplug the TV/VCR/DVD power cord for DVD mode. Details are using a Cable Box/Satellite Receiver, set a timer recording and the power is NTSC compatible. You cannot remove the tape from the TV/VCR/DVD...

User manual, English (US)
Page 84
... 54 clear button 16 clock setting 21-24 closed captions 42 color 26 connections 9-11, 34 contents, table of 5 contrast 26 controls remote 15-16 tv/vcr/dvd 17 copyright protection 3, 34 counter 26, 37 daylight-savings time 25 disc menu button 16, 52 disc tray 14, 17 display button 15, 26, 62-63 display settings 70-71 duplication 34 dvd light 17 dvd video 7 ejecting a tape 81 enter button 16 fast forward search 40, 53 front panel 17...
... 54 clear button 16 clock setting 21-24 closed captions 42 color 26 connections 9-11, 34 contents, table of 5 contrast 26 controls remote 15-16 tv/vcr/dvd 17 copyright protection 3, 34 counter 26, 37 daylight-savings time 25 disc menu button 16, 52 disc tray 14, 17 display button 15, 26, 62-63 display settings 70-71 duplication 34 dvd light 17 dvd video 7 ejecting a tape 81 enter button 16 fast forward search 40, 53 front panel 17...

User manual, English
Page 4
... 4 Introduction 5 Playable Discs and Videotapes 6 Initial Setup and Use Before Using the TV/VCR/DVD 7 Hooking Up the TV/VCR/DVD 8-9 Optional Connections 10 Watching TV 11 Playing a Videotape 12 Playing a Disc 13 Description of Controls Remote Control Buttons 14-15 Front Panel 16 Rear Panel 17 TV Settings Menu Language, ResettingTV Channels 18 Adding/Deleting Channels 19 Setting the Clock 20-23 Daylight-Savings Time 24 Status Displays, Picture Controls 25 Recording Videotape Recording 26 One-Touch Recording 27 Timer Recording 28-31 Timer Recording Auto Return 32...
... 4 Introduction 5 Playable Discs and Videotapes 6 Initial Setup and Use Before Using the TV/VCR/DVD 7 Hooking Up the TV/VCR/DVD 8-9 Optional Connections 10 Watching TV 11 Playing a Videotape 12 Playing a Disc 13 Description of Controls Remote Control Buttons 14-15 Front Panel 16 Rear Panel 17 TV Settings Menu Language, ResettingTV Channels 18 Adding/Deleting Channels 19 Setting the Clock 20-23 Daylight-Savings Time 24 Status Displays, Picture Controls 25 Recording Videotape Recording 26 One-Touch Recording 27 Timer Recording 28-31 Timer Recording Auto Return 32...

User manual, English
Page 9
Audio and video cables are on page 33. HEADPHONE VIDEO L AUDIO R STANDBY-ON VOLUME PREV PLAY DV D NEXT STOP OPEN/CLOSE SEARCH SELECT CHANNEL DV D TV/VCR REC/OTR REW V C R PLAY F.FWD STOP/EJECT HEADPHONE VIDEO L AUDIO R AUDIO VIDEO 3CH 4CH L R OUT IN IN ANT. T0006UG_6006UG_EN_1.qx3 04.5.12 10:09 AM Page 9 Hooking Up the TV/VCR/DVD (cont'd) 9 C Hooking Up Your TV/VCR/DVD with an Indoor Antenna To install an indoor antenna or "rabbit ears" (not...
Audio and video cables are on page 33. HEADPHONE VIDEO L AUDIO R STANDBY-ON VOLUME PREV PLAY DV D NEXT STOP OPEN/CLOSE SEARCH SELECT CHANNEL DV D TV/VCR REC/OTR REW V C R PLAY F.FWD STOP/EJECT HEADPHONE VIDEO L AUDIO R AUDIO VIDEO 3CH 4CH L R OUT IN IN ANT. T0006UG_6006UG_EN_1.qx3 04.5.12 10:09 AM Page 9 Hooking Up the TV/VCR/DVD (cont'd) 9 C Hooking Up Your TV/VCR/DVD with an Indoor Antenna To install an indoor antenna or "rabbit ears" (not...

User manual, English
Page 26
...; or the Number buttons to select the channel you can change the tape speed by pressing the SPEED button while a recording is in the unit, make sure the unit is the slowest speed. MUTE RECORD PLAY STOP DISC MENU DISPLAY SETUP TITLE ENTER RETURN CLEAR SEARCH MODE REPEAT REPEAT A-B MODE AUDIO SUBTITLE ANGLE 6 To stop recording, press STOP C. 3 2 6 Tape Speeds This chart shows the recording/playback time for five minutes, the unit will start recording. Cassette type / Playback Time Tape Speed...
...; or the Number buttons to select the channel you can change the tape speed by pressing the SPEED button while a recording is in the unit, make sure the unit is the slowest speed. MUTE RECORD PLAY STOP DISC MENU DISPLAY SETUP TITLE ENTER RETURN CLEAR SEARCH MODE REPEAT REPEAT A-B MODE AUDIO SUBTITLE ANGLE 6 To stop recording, press STOP C. 3 2 6 Tape Speeds This chart shows the recording/playback time for five minutes, the unit will start recording. Cassette type / Playback Time Tape Speed...

User manual, English
Page 66
... in JPEG format. Play may continue with its current Track. • Specific Time playback is not available,"X" will appear on recording. T0006UG_6006UG_EN_2.qx3 04.5.12 10:09 AM Page 66 66 MP3/JPEG Playback The DVD Player will play in the order they were recorded, i.e. 1, 2, 3. MUTE RECORD PLAY STOP DISC MENU DISPLAY SETUP TITLE ENTER RETURN CLEAR SEARCH MODE REPEAT REPEAT A-B MODE AUDIO SUBTITLE ANGLE 2 3 ● Before you put the TV/VCR/DVD in DVD mode. Starting with...
... in JPEG format. Play may continue with its current Track. • Specific Time playback is not available,"X" will appear on recording. T0006UG_6006UG_EN_2.qx3 04.5.12 10:09 AM Page 66 66 MP3/JPEG Playback The DVD Player will play in the order they were recorded, i.e. 1, 2, 3. MUTE RECORD PLAY STOP DISC MENU DISPLAY SETUP TITLE ENTER RETURN CLEAR SEARCH MODE REPEAT REPEAT A-B MODE AUDIO SUBTITLE ANGLE 2 3 ● Before you put the TV/VCR/DVD in DVD mode. Starting with...
User manual, English
Page 77
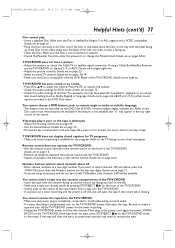
... does not eject, an authorized servicer may have a picture. • Adjust the antenna or check the Cable TV or satellite signal connection. able sound setting (such as camera angle or audio or subtitle language. • The feature must be available. You cannot choose a DVD feature, such as Dolby Digital) or language. Not all obstacles between the remote control and the TV/VCR/DVD. • Inspect and replace the batteries in the power cord again...
... does not eject, an authorized servicer may have a picture. • Adjust the antenna or check the Cable TV or satellite signal connection. able sound setting (such as camera angle or audio or subtitle language. • The feature must be available. You cannot choose a DVD feature, such as Dolby Digital) or language. Not all obstacles between the remote control and the TV/VCR/DVD. • Inspect and replace the batteries in the power cord again...
User manual, English
Page 80
... 53 clear button 15 clock setting 20-23 closed captions 41 color 25 connections 8-10, 33 contents, table of 4 contrast 25 controls remote 14-15 tv/vcr/dvd 16 copyright protection 3, 33 counter 25, 36 daylight-savings time 24 disc menu button 15, 51 disc tray 13, 16 display button 14, 25, 73 display settings 70-71 duplication 33 dvd light 16 dvd video 6 ejecting a tape 77 enter button 15 fast forward search 39, 52 front panel 16 glossary...
... 53 clear button 15 clock setting 20-23 closed captions 41 color 25 connections 8-10, 33 contents, table of 4 contrast 25 controls remote 14-15 tv/vcr/dvd 16 copyright protection 3, 33 counter 25, 36 daylight-savings time 24 disc menu button 15, 51 disc tray 13, 16 display button 14, 25, 73 display settings 70-71 duplication 33 dvd light 16 dvd video 6 ejecting a tape 77 enter button 15 fast forward search 39, 52 front panel 16 glossary...


