User Manual
Page 6
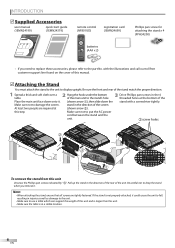
.... Žscrew holes front side Œ Œ To remove the stand from this step. INTRODUCTION 5 Supplied Accessories user manual (1EMN24199) quick start guide (1EMN24379) remote control (NF801UD) registration card (1EMN24699) Phillips pan screw for attaching the stand x 4 (FPH34200) batteries (AAA x 2) AAA AAA • If you remove it. stand in the...
.... Žscrew holes front side Œ Œ To remove the stand from this step. INTRODUCTION 5 Supplied Accessories user manual (1EMN24199) quick start guide (1EMN24379) remote control (NF801UD) registration card (1EMN24699) Phillips pan screw for attaching the stand x 4 (FPH34200) batteries (AAA x 2) AAA AAA • If you remove it. stand in the...
User Manual
Page 7
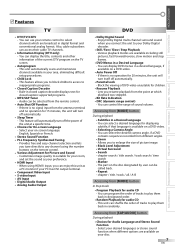
.... • Auto Shut Off Function - You can use your remote control to select channels which playback was stopped. • Bit Rate Indication • DRC (dynamic range control) - You can access their cable TV channels. • Information Display (DTV only) - Audio can shuffle the order...button During playback • Choices for audio CD - Allows you connect the unit to suitable for On-screen Language - The part on the remote control. • Various Adjustment for audio CD - This feature will turn off automatically. • Parental Lock - Customizes image quality to your...
.... • Auto Shut Off Function - You can use your remote control to select channels which playback was stopped. • Bit Rate Indication • DRC (dynamic range control) - You can access their cable TV channels. • Information Display (DTV only) - Audio can shuffle the order...button During playback • Choices for audio CD - Allows you connect the unit to suitable for On-screen Language - The part on the remote control. • Various Adjustment for audio CD - This feature will turn off automatically. • Parental Lock - Customizes image quality to your...

User Manual
Page 8
...Precaution 4 Trademark Information 5 Symbols Used in this Manual 5 Supplied Accessories 6 Attaching the Stand 6 Features 7 Control Panel 9 Rear Panel 9 Remote Control Function 10 Installing the Batteries 11 PREPARATION Antenna Connection 12 Connection to Cable Receiver or Satellite Box 12 External Device Connection 13 Cable Management... 16 Plug In the AC Power Cord 16 TV Functions Initial Setup 17 WATCHING TV Channel Selection 18 Volume Adjustment 18 Sleep Timer 18 Still Mode 19 Switching Each Input Mode 19 ...
...Precaution 4 Trademark Information 5 Symbols Used in this Manual 5 Supplied Accessories 6 Attaching the Stand 6 Features 7 Control Panel 9 Rear Panel 9 Remote Control Function 10 Installing the Batteries 11 PREPARATION Antenna Connection 12 Connection to Cable Receiver or Satellite Box 12 External Device Connection 13 Cable Management... 16 Plug In the AC Power Cord 16 TV Functions Initial Setup 17 WATCHING TV Channel Selection 18 Volume Adjustment 18 Sleep Timer 18 Still Mode 19 Switching Each Input Mode 19 ...
User Manual
Page 9
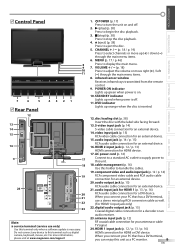
... 38) Press to turn the unit on . 10. infrared sensor window Receives infrared rays transmitted from the remote control. 9. POWER ON indicator Lights up red when power is on and off . 11. S-video input...as well. (For HDMI 1 input jack only) 22. For more information, please visit at www.magnavox.com/support 1. B (play) (p. 38) Press to this unit as ; Do not connect any...When you can enjoy this terminal such as a PC monitor. 9 EN INTRODUCTION PREPARATION WATCHING TV OPTIONAL SETTING OPERATING DVD DVD SETTING TROUBLESHOOTING INFORMATION audio input jack (p. 14 / p. 15) ...
... 38) Press to turn the unit on . 10. infrared sensor window Receives infrared rays transmitted from the remote control. 9. POWER ON indicator Lights up red when power is on and off . 11. S-video input...as well. (For HDMI 1 input jack only) 22. For more information, please visit at www.magnavox.com/support 1. B (play) (p. 38) Press to this unit as ; Do not connect any...When you can enjoy this terminal such as a PC monitor. 9 EN INTRODUCTION PREPARATION WATCHING TV OPTIONAL SETTING OPERATING DVD DVD SETTING TROUBLESHOOTING INFORMATION audio input jack (p. 14 / p. 15) ...
User Manual
Page 10
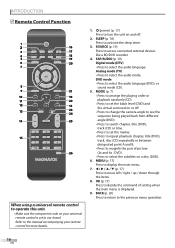
...) or time. • Press to set the black level (DVD) and the virtual surround on or off . 2. Analog mode (TV) • Press to move left / right / up / down through the items. 8. INTRODUCTION 5 Remote Control Function 1 2 16 3 17 4 18 5 19 6 20 7 8 9 21 10 10 11 22 12 12 13 23 24... 14 25 15 26 When using a universal remote control to operate this unit. • Make sure the component code on your remote control for more details. 1. DVD mode • Press to the previous menu operation. 10 EN BACK (p. 20) Press...
...) or time. • Press to set the black level (DVD) and the virtual surround on or off . 2. Analog mode (TV) • Press to move left / right / up / down through the items. 8. INTRODUCTION 5 Remote Control Function 1 2 16 3 17 4 18 5 19 6 20 7 8 9 21 10 10 11 22 12 12 13 23 24... 14 25 15 26 When using a universal remote control to operate this unit. • Make sure the component code on your remote control for more details. 1. DVD mode • Press to the previous menu operation. 10 EN BACK (p. 20) Press...

User Manual
Page 11
... ni-cad, ni-mh, etc) or old batteries with fresh ones. • If the device is not to select 10 or higher number of the remote control. FORMAT (p. 21) Press to select aspect ratio available for a long period of time, remove the batteries to prevent damage or injury from the main... channel. +10 button • Press to be used for the TV screen. 21. VOL + / - (p. 18) Press to eject the disc. 18. EJECT A (p. 38) Press to adjust the volume. 15. INFO (p. 20 / p. 43) Digital mode (DTV) &#...
... ni-cad, ni-mh, etc) or old batteries with fresh ones. • If the device is not to select 10 or higher number of the remote control. FORMAT (p. 21) Press to select aspect ratio available for a long period of time, remove the batteries to prevent damage or injury from the main... channel. +10 button • Press to be used for the TV screen. 21. VOL + / - (p. 18) Press to eject the disc. 18. EJECT A (p. 38) Press to adjust the volume. 15. INFO (p. 20 / p. 43) Digital mode (DTV) &#...
User Manual
Page 17
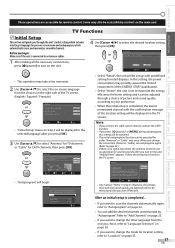
...• If you through a choice of picture and sound quality you adjusted will be memorized after you turn on the remote control to select "Antenna" for TV channels or "Cable" for retail displays. IN'' jack. Antenna Cable Skip Antenna Cable Or ANT.IN Select OK OK BACK... 1 After making all the necessary connections, press [y (power)] to ''ANT. IN" jack on page 22. • You can be accessible by remote control. Some may possibly exceed the limited requirement of the ENERGY STAR® qualification. • Select "Home", the unit is set autoprogram again. (...
...• If you through a choice of picture and sound quality you adjusted will be memorized after you turn on the remote control to select "Antenna" for TV channels or "Cable" for retail displays. IN'' jack. Antenna Cable Skip Antenna Cable Or ANT.IN Select OK OK BACK... 1 After making all the necessary connections, press [y (power)] to ''ANT. IN" jack on page 22. • You can be accessible by remote control. Some may possibly exceed the limited requirement of the ENERGY STAR® qualification. • Select "Home", the unit is set autoprogram again. (...
User Manual
Page 19
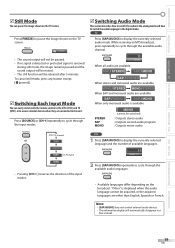
... SETTING OPERATING DVD DVD SETTING TROUBLESHOOTING INFORMATION 5 Still Mode You can easily switch with the remote control to the DTV (ATSC) and TV (NTSC) or to access external devices when they are other than English, Spanish or French. To cancel still mode, press any button ...detected or protected signal is available STEREO SAP MONO MONO (cannot be switched) : Outputs stereo-audio : Outputs second audio program : Outputs mono-audio DTV/TV channel Video Component HDMI1 (or PC input) HDMI2 • Pressing [CH ] reverses the direction of available languages. 11 English 1/3 2 Press [SAP...
... SETTING OPERATING DVD DVD SETTING TROUBLESHOOTING INFORMATION 5 Still Mode You can easily switch with the remote control to the DTV (ATSC) and TV (NTSC) or to access external devices when they are other than English, Spanish or French. To cancel still mode, press any button ...detected or protected signal is available STEREO SAP MONO MONO (cannot be switched) : Outputs stereo-audio : Outputs second audio program : Outputs mono-audio DTV/TV channel Video Component HDMI1 (or PC input) HDMI2 • Pressing [CH ] reverses the direction of available languages. 11 English 1/3 2 Press [SAP...

User Manual
Page 22
...some functions for the disc playback. For more details, see the reference page for closed caption, which displays the dialogue of a TV program or other information across the TV screen. (Refer to "Closed Caption" on page 46.) 22 EN 2 Use [Cursor K/L] to display the main menu. ...(Refer to "Autoprogram" on page 22.) • You can skip the undesired channels when selecting the channels using [CH + / -] on the remote control skips unavailable programs automatically. • If you connect the cable system directly, contact the CATV installer. • If you press [y(power)] or ...
...some functions for the disc playback. For more details, see the reference page for closed caption, which displays the dialogue of a TV program or other information across the TV screen. (Refer to "Closed Caption" on page 46.) 22 EN 2 Use [Cursor K/L] to display the main menu. ...(Refer to "Autoprogram" on page 22.) • You can skip the undesired channels when selecting the channels using [CH + / -] on the remote control skips unavailable programs automatically. • If you connect the cable system directly, contact the CATV installer. • If you press [y(power)] or ...
User Manual
Page 26
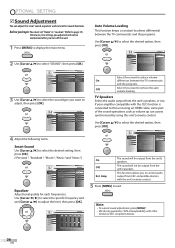
... ("Personal ", "Standard ", "Movie ", "Music "and "News ") PICTURE SOUND SETUP FEATURES LANGUAGE DVD Smart Sound Equalizer Auto Volume Leveling TV Speakers Personal Standard Movie Music News Equalizer Adjust tonal quality for each frequencies. Otherwise, the settings you want to reduce volume On differences between ...want to adjust, then press [OK]. "Ext. Amp": Operation is connected to this unit using this unit's remote control. Before you want to remove the auto volume leveling. PICTURE SOUND SETUP FEATURES LANGUAGE DVD Smart Sound Equalizer Auto Volume Leveling...
... ("Personal ", "Standard ", "Movie ", "Music "and "News ") PICTURE SOUND SETUP FEATURES LANGUAGE DVD Smart Sound Equalizer Auto Volume Leveling TV Speakers Personal Standard Movie Music News Equalizer Adjust tonal quality for each frequencies. Otherwise, the settings you want to reduce volume On differences between ...want to adjust, then press [OK]. "Ext. Amp": Operation is connected to this unit using this unit's remote control. Before you want to remove the auto volume leveling. PICTURE SOUND SETUP FEATURES LANGUAGE DVD Smart Sound Equalizer Auto Volume Leveling...

User Manual
Page 38
...playback does not start at which is set to the correct channel. 1 Press [y(power)] to eject the disc. Press and hold [EJECT A] on the TV screen when the operation is not a malfunction. • When you cannot remove the disc, you press [PAUSE F] in the pause mode, the disc ...a 2-layered disc, pictures may vary depending on the main unit. 5 Playback 5 Disc Menu Before you insert the disc. 5 Paused and Step-by remote control. Resume message will not work while the resume message appears. To play back is facing forward. 3 The unit switches to any other equipment which...
...playback does not start at which is set to the correct channel. 1 Press [y(power)] to eject the disc. Press and hold [EJECT A] on the TV screen when the operation is not a malfunction. • When you cannot remove the disc, you press [PAUSE F] in the pause mode, the disc ...a 2-layered disc, pictures may vary depending on the main unit. 5 Playback 5 Disc Menu Before you insert the disc. 5 Paused and Step-by remote control. Resume message will not work while the resume message appears. To play back is facing forward. 3 The unit switches to any other equipment which...
User Manual
Page 43
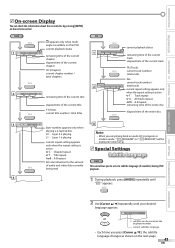
INTRODUCTION PREPARATION WATCHING TV OPTIONAL SETTING OPERATING DVD DVD SETTING TROUBLESHOOTING INFORMATION 5 On-screen Display You can be current repeat setting appears displayed instead of audio and video data ... " " appears. 2 Use [Cursor K/ L] repeatedly until your desired language appears. 1.ENG / 6 (SUBTITLE) subtitles can check the information about the current disc by pressing [INFO] on the remote control. DVD 1 11/16 0:00:00 - 0:03:30 appears only when multiangle is available on the DVD current playback status remaining time of the current...
INTRODUCTION PREPARATION WATCHING TV OPTIONAL SETTING OPERATING DVD DVD SETTING TROUBLESHOOTING INFORMATION 5 On-screen Display You can be current repeat setting appears displayed instead of audio and video data ... " " appears. 2 Use [Cursor K/ L] repeatedly until your desired language appears. 1.ENG / 6 (SUBTITLE) subtitles can check the information about the current disc by pressing [INFO] on the remote control. DVD 1 11/16 0:00:00 - 0:03:30 appears only when multiangle is available on the DVD current playback status remaining time of the current...
User Manual
Page 51
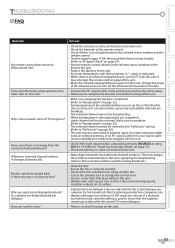
... or dusts on this unit. • Handle a disc with their polarities (+/- INTRODUCTION PREPARATION WATCHING TV OPTIONAL SETTING OPERATING DVD DVD SETTING TROUBLESHOOTING INFORMATION TROUBLESHOOTING 5 FAQ Question My remote control does not work. Answer • Check the antenna or cable connection to the main unit...autoprogram has been completed. (Refer to "Autoprogram" on the front of TV programs? If OK, then possible infrared sensor trouble. (Refer to "IR Signal Check" on page 54.) • Aim the remote control directly at the infrared sensor window on page 22.) • ...
... or dusts on this unit. • Handle a disc with their polarities (+/- INTRODUCTION PREPARATION WATCHING TV OPTIONAL SETTING OPERATING DVD DVD SETTING TROUBLESHOOTING INFORMATION TROUBLESHOOTING 5 FAQ Question My remote control does not work. Answer • Check the antenna or cable connection to the main unit...autoprogram has been completed. (Refer to "Autoprogram" on the front of TV programs? If OK, then possible infrared sensor trouble. (Refer to "IR Signal Check" on page 54.) • Aim the remote control directly at the infrared sensor window on page 22.) • ...
User Manual
Page 54
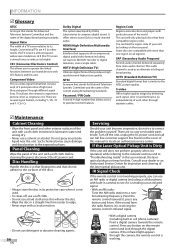
...With an AM radio: Tune the AM radio station to a nonbroadcasting frequency. SDTV (Standard Definition TV) Standard digital format that supports all regions). Point the remote control towards the remote control. INFORMATION 5 Glossary ATSC Acronym that allows access to parental control features. Password / PIN ... cloth immersed in camera) to locate an authorized service center. HDTV (High Definition TV) Ultimate digital format that have compatible region codes. IR Signal Check If the remote control is a video signal format that stands for inspection and cleaning of the discs...
...With an AM radio: Tune the AM radio station to a nonbroadcasting frequency. SDTV (Standard Definition TV) Standard digital format that supports all regions). Point the remote control towards the remote control. INFORMATION 5 Glossary ATSC Acronym that allows access to parental control features. Password / PIN ... cloth immersed in camera) to locate an authorized service center. HDTV (High Definition TV) Ultimate digital format that have compatible region codes. IR Signal Check If the remote control is a video signal format that stands for inspection and cleaning of the discs...
User Manual
Page 55
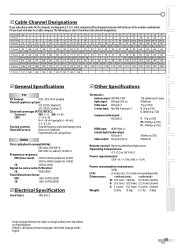
...;) Pb: 700mV p-p (75Ω) Pr: 700mV p-p (75Ω) 500mV p-p (75Ω) 500mV rms Remote control: Digital encoded infrared light system Operating temperature: 41°F (5°C) to 104°F (40°C) Power... requirements: 120V~ AC +/- 10%, 60Hz +/- 0.5% Power consumption (maximum): 160W LCD: 32 inches class (31.5 inches measured diagonally) Dimensions: W: 30.0 inches (760mm) 30.0 inches (760mm) ...with letters or letter-number combinations. INTRODUCTION PREPARATION WATCHING TV OPTIONAL SETTING OPERATING DVD DVD SETTING TROUBLESHOOTING INFORMATION 5 Cable...
...;) Pb: 700mV p-p (75Ω) Pr: 700mV p-p (75Ω) 500mV p-p (75Ω) 500mV rms Remote control: Digital encoded infrared light system Operating temperature: 41°F (5°C) to 104°F (40°C) Power... requirements: 120V~ AC +/- 10%, 60Hz +/- 0.5% Power consumption (maximum): 160W LCD: 32 inches class (31.5 inches measured diagonally) Dimensions: W: 30.0 inches (760mm) 30.0 inches (760mm) ...with letters or letter-number combinations. INTRODUCTION PREPARATION WATCHING TV OPTIONAL SETTING OPERATING DVD DVD SETTING TROUBLESHOOTING INFORMATION 5 Cable...

Product Spec Sheet
Page 3
... owners. © 2009 Magnavox. 32MD359B/F7 32" class LCD HDTV with Built-in inch (W x H x D): 38.39 x 25.55 x 8.78 inch • VESA wall mount compatible: 200 x 200 mm • Product weight (+stand) (lb): 24.2 lb Accessories • Included accessories: Power cord, User Manual, Quick start guide, Registration card, Remote Control, Batteries for remote control, Table top.... All Rights reserved. Packaging (lb): 43.12 • Box dimensions in DVD player Product specifications (continued) • Product weight (lb): 21.1 • Weight incl. www.magnavox.com
... owners. © 2009 Magnavox. 32MD359B/F7 32" class LCD HDTV with Built-in inch (W x H x D): 38.39 x 25.55 x 8.78 inch • VESA wall mount compatible: 200 x 200 mm • Product weight (+stand) (lb): 24.2 lb Accessories • Included accessories: Power cord, User Manual, Quick start guide, Registration card, Remote Control, Batteries for remote control, Table top.... All Rights reserved. Packaging (lb): 43.12 • Box dimensions in DVD player Product specifications (continued) • Product weight (lb): 21.1 • Weight incl. www.magnavox.com


