
User manual, English (US)
Page 2
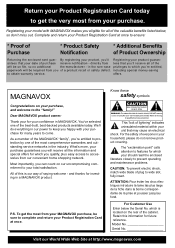
...service networks in our power to keep you of the privileges to your total satisfaction. serviceable parts inside. Refer servicing to complete and return your Product Registration Card at once. Complete and return your Product Registration Card at http://www.magnavox.com MAGNAVOX Congratulations on the rear ...should read the enclosed literature closely to prevent operating and maintenance problems. CAUTION: To prevent electric shock, match wide blade of plug to protection by one of electric shock, DO NOT remove cover or back.No user- Registering your product guarantees ...
...service networks in our power to keep you of the privileges to your total satisfaction. serviceable parts inside. Refer servicing to complete and return your Product Registration Card at once. Complete and return your Product Registration Card at http://www.magnavox.com MAGNAVOX Congratulations on the rear ...should read the enclosed literature closely to prevent operating and maintenance problems. CAUTION: To prevent electric shock, match wide blade of plug to protection by one of electric shock, DO NOT remove cover or back.No user- Registering your product guarantees ...
User manual, English (US)
Page 3
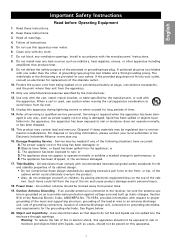
...replacement of the polarized or grounding-type plug. or D. Title/Stability - Power Lines - If an outside antenna is connected to the receiver, be regulated due to environmental considerations. Follow all servicing to grounding electrodes, and requirements for the grounding electrode. Do not use...obsolete outlet. 10. i English Important Safety Instructions Read before Operating Equipment 1. Keep these instructions. 2. The appliance does not appear to an antenna discharge unit, size of grounding connectors, location of the set and cause product damage and/or personal ...
...replacement of the polarized or grounding-type plug. or D. Title/Stability - Power Lines - If an outside antenna is connected to the receiver, be regulated due to environmental considerations. Follow all servicing to grounding electrodes, and requirements for the grounding electrode. Do not use...obsolete outlet. 10. i English Important Safety Instructions Read before Operating Equipment 1. Keep these instructions. 2. The appliance does not appear to an antenna discharge unit, size of grounding connectors, location of the set and cause product damage and/or personal ...
User manual, English (US)
Page 4
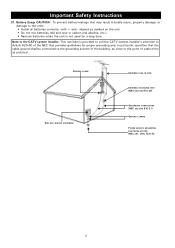
...: • Install all batteries correctly, with + and - aligned as practical. GROUND CLAMP ELECTRIC SERVICE EQUIPMENT ANTENNA LEAD IN WIRE ANTENNA DISCHARGE UNIT (NEC SECTION 810-20) GROUNDING CONDUCTORS (NEC SECTION 810-21) GROUND CLAMPS POWER SERVICE GROUNDING ELECTRODE SYSTEM (NEC ART. 250, PART H) ii Important Safety Instructions 21. To prevent battery leakage that the cable ground shall be connected to...
...: • Install all batteries correctly, with + and - aligned as practical. GROUND CLAMP ELECTRIC SERVICE EQUIPMENT ANTENNA LEAD IN WIRE ANTENNA DISCHARGE UNIT (NEC SECTION 810-20) GROUNDING CONDUCTORS (NEC SECTION 810-21) GROUND CLAMPS POWER SERVICE GROUNDING ELECTRODE SYSTEM (NEC ART. 250, PART H) ii Important Safety Instructions 21. To prevent battery leakage that the cable ground shall be connected to...
User manual, English (US)
Page 5
... 13 Connecting a Set-Top Box 14 Connecting a DVD Player 15 Connecting a DVD Player 16 Connecting a PC 17 USING THE OSD MENUS 20 Picture Menu 20 Sound Menu 21 Size Menu 22 PIP/PBP Menu 23 Parental Control Menu 24 Movie Rating 25 TV Rating 26 Channel Setup Menu 27 Channel Search 27 Favorite Channel List 28 Setup Menu 28 Closed Caption Menu 29 REPLACING THE INTERNAL LAMP 31 TROUBLESHOOTING 32 SPECIFICATIONS 33 MAGNAVOX LIMITED WARRANTY . . 34 USING THE TV 18 Turning on the TV 18 Turning off the TV 18 Changing Input Source 19 Changing Channels 19 Adjusting Volume 19...
... 13 Connecting a Set-Top Box 14 Connecting a DVD Player 15 Connecting a DVD Player 16 Connecting a PC 17 USING THE OSD MENUS 20 Picture Menu 20 Sound Menu 21 Size Menu 22 PIP/PBP Menu 23 Parental Control Menu 24 Movie Rating 25 TV Rating 26 Channel Setup Menu 27 Channel Search 27 Favorite Channel List 28 Setup Menu 28 Closed Caption Menu 29 REPLACING THE INTERNAL LAMP 31 TROUBLESHOOTING 32 SPECIFICATIONS 33 MAGNAVOX LIMITED WARRANTY . . 34 USING THE TV 18 Turning on the TV 18 Turning off the TV 18 Changing Input Source 19 Changing Channels 19 Adjusting Volume 19...
User manual, English (US)
Page 7
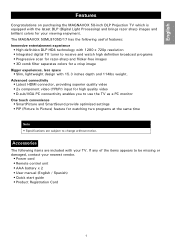
... x 720p resolution • Integrated digital TV tuner to change without notice. English Features Features Congratulations on purchasing the MAGNAVOX 50-inch DLP Projection TV which is equipped with 15.3 inches depth and 114lbs weight. The MAGNAVOX 50ML8105D/17 has the following items are subject to receive and watch high definition broadcast programs • Progressive scan for razor-sharp and flicker-free images • 3D comb filter separates colors for a crisp image Bigger...
... x 720p resolution • Integrated digital TV tuner to change without notice. English Features Features Congratulations on purchasing the MAGNAVOX 50-inch DLP Projection TV which is equipped with 15.3 inches depth and 114lbs weight. The MAGNAVOX 50ML8105D/17 has the following items are subject to receive and watch high definition broadcast programs • Progressive scan for razor-sharp and flicker-free images • 3D comb filter separates colors for a crisp image Bigger...

User manual, English (US)
Page 9
... 36 Digital 42 5 The recall button only returns you will be returned to the previously viewed channel. 3 Note: When this button is from the broadcasters. English Remote Control Buttons Remote Control Buttons INFO - Refer to "Favorite Channel List" on the program guide and the information banner are transmitted from a different time zone. 13 SLEEP: Press to set the sleep timer feature to turn it off . 2 3 Number buttons (0 ~ 9): Press to access a specific TV channel. 4 R (Recall): Press to switch to...
... 36 Digital 42 5 The recall button only returns you will be returned to the previously viewed channel. 3 Note: When this button is from the broadcasters. English Remote Control Buttons Remote Control Buttons INFO - Refer to "Favorite Channel List" on the program guide and the information banner are transmitted from a different time zone. 13 SLEEP: Press to set the sleep timer feature to turn it off . 2 3 Number buttons (0 ~ 9): Press to access a specific TV channel. 4 R (Recall): Press to switch to...

User manual, English (US)
Page 10
... broadcasters. POSITION: Press to change the picture size of the information on . Remote Control Buttons 15 INFO (Information): Press to show information about the current channel, closed caption availability, source, size ratio, SmartPicture SmartSound, and so on the program guide and the information banner are transmitted from a different time zone. 16 Dash key: Press to select additional digital and analog signals. The quality and accuracy...
... broadcasters. POSITION: Press to change the picture size of the information on . Remote Control Buttons 15 INFO (Information): Press to show information about the current channel, closed caption availability, source, size ratio, SmartPicture SmartSound, and so on the program guide and the information banner are transmitted from a different time zone. 16 Dash key: Press to select additional digital and analog signals. The quality and accuracy...

User manual, English (US)
Page 12
Lamp indicator Lamp failed (red) 10. Overview of menu item. • When OSD menu is powered off . 8. IR receiver Receive control signals from the remote control 6 Red: Internal temperature too high tor 11. POWER Turn power on • At power off, the LED flashes red/green for 10 seconds, flashes red for approximately 40 seconds and then turns red when the system is disabled, switch sequentially between all input sources. 7. Power indicator • Red: Stand-by • Flashing red: System being cooled down • The...
Lamp indicator Lamp failed (red) 10. Overview of menu item. • When OSD menu is powered off . 8. IR receiver Receive control signals from the remote control 6 Red: Internal temperature too high tor 11. POWER Turn power on • At power off, the LED flashes red/green for 10 seconds, flashes red for approximately 40 seconds and then turns red when the system is disabled, switch sequentially between all input sources. 7. Power indicator • Red: Stand-by • Flashing red: System being cooled down • The...
User manual, English (US)
Page 15
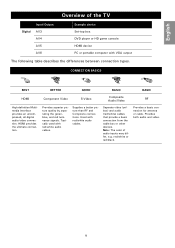
... the green, blue, and red luminance signals. Note: The color of the TV Input / Output Digital AV3 AV4 AV5 AV6 Example device Set-top box DVD player or HD game console HDMI device PC or portable computer with VGA output The following table describes the differences between connection types. Supplies a better picture than RF and Composite connections. red/white or red/black. English Overview of audio inputs may differ, e.g. Typically used with red/white audio cables. Provides a basic connection for antenna or cable. CONNECTION BASICS BEST...
... the green, blue, and red luminance signals. Note: The color of the TV Input / Output Digital AV3 AV4 AV5 AV6 Example device Set-top box DVD player or HD game console HDMI device PC or portable computer with VGA output The following table describes the differences between connection types. Supplies a better picture than RF and Composite connections. red/white or red/black. English Overview of audio inputs may differ, e.g. Typically used with red/white audio cables. Provides a basic connection for antenna or cable. CONNECTION BASICS BEST...

User manual, English (US)
Page 16
... picture quality. Connecting Cable TV/Antenna To view High Definition local broadcasts, connect your Cable TV to the Antenna In input on the rear panel. To view Analog Cable, connect your outdoor or indoor antenna to the Antenna In input on the rear panel. Making Connections Making Connections The following sections provide various examples to illustrate how to the headphone jack provided on the front panel. Component video provides the best picture quality while S-video delivers medium picture quality. S-Video Video L R 10 Antenna...
... picture quality. Connecting Cable TV/Antenna To view High Definition local broadcasts, connect your Cable TV to the Antenna In input on the rear panel. To view Analog Cable, connect your outdoor or indoor antenna to the Antenna In input on the rear panel. Making Connections Making Connections The following sections provide various examples to illustrate how to the headphone jack provided on the front panel. Component video provides the best picture quality while S-video delivers medium picture quality. S-Video Video L R 10 Antenna...

User manual, English (US)
Page 22
Making Connections Connecting a DVD Player To connect a DVD player to the TV using an HDMI cable. Note • If you are using an DVI-to the HDMI connector of the AV5 input using the HDMI input, connect the video output of the DVD player to -HDMI cable, there will be no audio out. Antenna in 16
Making Connections Connecting a DVD Player To connect a DVD player to the TV using an HDMI cable. Note • If you are using an DVI-to the HDMI connector of the AV5 input using the HDMI input, connect the video output of the DVD player to -HDMI cable, there will be no audio out. Antenna in 16

User manual, English (US)
Page 25
... TV, the power LED flashes red/green for 10 seconds, flashes red for approximately 40 seconds and then turns red when the system is powered off. Press the button again to restore sound. 19 Adjusting Volume To adjust volume, do the following methods to change channels: • Press the channel up or down buttons on the front panel or the remote control to switch to the previous or next channel. • Press the number keys on the remote control...
... TV, the power LED flashes red/green for 10 seconds, flashes red for approximately 40 seconds and then turns red when the system is powered off. Press the button again to restore sound. 19 Adjusting Volume To adjust volume, do the following methods to change channels: • Press the channel up or down buttons on the front panel or the remote control to switch to the previous or next channel. • Press the number keys on the remote control...
User manual, English (US)
Page 26
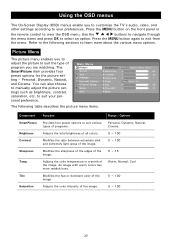
... the image. Using the OSD menus Using the OSD menus The On-Screen Display (OSD) menus enable you are watching. Picture Menu The picture menu enables you to adjust the picture to suit the type of program you to customize the TV's audio, video, and other settings according to view the OSD menu. You can also choose to select an option. Press the MENU button on the front panel or the remote control...
... the image. Using the OSD menus Using the OSD menus The On-Screen Display (OSD) menus enable you are watching. Picture Menu The picture menu enables you to adjust the picture to suit the type of program you to customize the TV's audio, video, and other settings according to view the OSD menu. You can also choose to select an option. Press the MENU button on the front panel or the remote control...
User manual, English (US)
Page 27
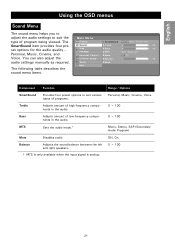
... audio quality - English Using the OSD menus Sound Menu The sound menu helps you to adjust the audio settings to suit various types of programs. Adjusts amount of high-frequency components in the audio. Range / Options Personal, Music, Cinema, Voice 0 ~ 100 0 ~ 100 Mono, Stereo, SAP (Secondary Audio Program) Off, On 0 ~ 100 21 Sets the audio mode.† Mute Disables audio. The following table describes the sound menu items. Main Menu Picture Sound Size PIP/PBP Parental Control Channel Setup Setup...
... audio quality - English Using the OSD menus Sound Menu The sound menu helps you to adjust the audio settings to suit various types of programs. Adjusts amount of high-frequency components in the audio. Range / Options Personal, Music, Cinema, Voice 0 ~ 100 0 ~ 100 Mono, Stereo, SAP (Secondary Audio Program) Off, On 0 ~ 100 21 Sets the audio mode.† Mute Disables audio. The following table describes the sound menu items. Main Menu Picture Sound Size PIP/PBP Parental Control Channel Setup Setup...

User manual, English (US)
Page 33
...- Component Tuner Mode Channel Search Manual Search Function Range / Options Specifies antenna or cable input for channels, and edit the favorite channels Main Menu Picture Sound Size PIP/PBP Parental Control Channel Setup Setup Exit Tuner Mode Antenna Cable Channel Search Press right Manual Search 30 Favorite Channel Edit Press right Reset Channel Back . See "Favorite - Auto Scanning Antenna RF Channel: 11 Major Number: 2 Auto Scanning Cable RF Channel: 11 RF Channel: 11 Digital signal auto scan OSD Analog signal auto scan OSD 27 channel list using this option...
...- Component Tuner Mode Channel Search Manual Search Function Range / Options Specifies antenna or cable input for channels, and edit the favorite channels Main Menu Picture Sound Size PIP/PBP Parental Control Channel Setup Setup Exit Tuner Mode Antenna Cable Channel Search Press right Manual Search 30 Favorite Channel Edit Press right Reset Channel Back . See "Favorite - Auto Scanning Antenna RF Channel: 11 Major Number: 2 Auto Scanning Cable RF Channel: 11 RF Channel: 11 Digital signal auto scan OSD Analog signal auto scan OSD 27 channel list using this option...

User manual, English (US)
Page 34
... the screen. to Exit 2. Use the / arrow keys to select Add to add the channel to the favorite channel list or Remove to remove a channel from the channel setup menu and press to edit the favorite channel list. To set up your selection. Press OK to confirm your favorite channels, do the following table describes the menu items: Main Menu Picture Sound Size PIP/PBP Parental Control Channel Setup Setup Exit OSD Hold Time Language Sleep Timer Closed Caption Time...
... the screen. to Exit 2. Use the / arrow keys to select Add to add the channel to the favorite channel list or Remove to remove a channel from the channel setup menu and press to edit the favorite channel list. To set up your selection. Press OK to confirm your favorite channels, do the following table describes the menu items: Main Menu Picture Sound Size PIP/PBP Parental Control Channel Setup Setup Exit OSD Hold Time Language Sleep Timer Closed Caption Time...

User manual, English (US)
Page 37
... the display interior. Replace a new lamp module then screw back the three screws on the lamp unit and pull the lamp module out. A Magnavox associate will be removed from the lamp module. 3. The part number for the Magnavox replacement lamp is turned off the unit and unplug it . The high temperature of the lamp could cause fire or electrical shock. • Do not remove the lamp except to cool...
... the display interior. Replace a new lamp module then screw back the three screws on the lamp unit and pull the lamp module out. A Magnavox associate will be removed from the lamp module. 3. The part number for the Magnavox replacement lamp is turned off the unit and unplug it . The high temperature of the lamp could cause fire or electrical shock. • Do not remove the lamp except to cool...
User manual, English (US)
Page 38
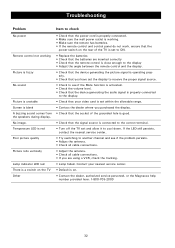
... the TV Other • Check that the power cord is properly connected. • Make sure the wall power outlet is working Picture is fuzzy No sound Picture is unstable Screen is a switch on . • Contact the dealer, authorized service personnel, or the Magnavox help number provided here: 1-800-705-2000 32 Temperature LED is red Poor picture quality Picture rolls vertically Lamp indicator LED red There is blank A buzzing sound comes from the speakers during display. No image.
... the TV Other • Check that the power cord is properly connected. • Make sure the wall power outlet is working Picture is fuzzy No sound Picture is unstable Screen is a switch on . • Contact the dealer, authorized service personnel, or the Magnavox help number provided here: 1-800-705-2000 32 Temperature LED is red Poor picture quality Picture rolls vertically Lamp indicator LED red There is blank A buzzing sound comes from the speakers during display. No image.

User manual, English (US)
Page 39
...): S-video & composite video + L/R audio • Output (front): earphones • RF input: ATSC/NTSC combo tuner • SPDIF coaxial digital audio output (ATSC only) • Analog audio output (L/R) Convenience • Local controls: front panel keypad • Ultra long lamp life: > 10,000 hours • User manual in 2 languages: English (US) and Spanish • OSD menu in 3 languages: English (US), Spanish, and French • Picture In Picture (PIP) • Ease of use: SmartSound control, SmartPicture control...
...): S-video & composite video + L/R audio • Output (front): earphones • RF input: ATSC/NTSC combo tuner • SPDIF coaxial digital audio output (ATSC only) • Analog audio output (L/R) Convenience • Local controls: front panel keypad • Ultra long lamp life: > 10,000 hours • User manual in 2 languages: English (US) and Spanish • OSD menu in 3 languages: English (US), Spanish, and French • Picture In Picture (PIP) • Ease of use: SmartSound control, SmartPicture control...

User manual, English (US)
Page 40
... replacement parts in exchange for the defective display. Magnavox authorized service centers will provide removal and installation of the parts under the specified labor warranty. (PTV screens carry a thirty (30) day replacement warranty.) EXCLUDED FROM WARRANTY COVERAGE Your warranty does not cover: • Labor charges for which vary from the date of sale, the limitation on the product, and installation or repair of antenna...
... replacement parts in exchange for the defective display. Magnavox authorized service centers will provide removal and installation of the parts under the specified labor warranty. (PTV screens carry a thirty (30) day replacement warranty.) EXCLUDED FROM WARRANTY COVERAGE Your warranty does not cover: • Labor charges for which vary from the date of sale, the limitation on the product, and installation or repair of antenna...


