

User manual, English (US)
Page 2
... to wide slot, fully insert. NEEDED ITHIN 10 W Dear MAGNAVOX product owner: Thank you for your model. And we'll do not remove product covering. REFER SERVICING TO QUALIFIED SERVICE PERSONNEL. CAUTION: To prevent electric shock, match wide blade of the cabinet. Model No Serial No Visit our World Wide Web Site at once. Warranty Owner Model Verification Confirmation Registration Registering your...
... to wide slot, fully insert. NEEDED ITHIN 10 W Dear MAGNAVOX product owner: Thank you for your model. And we'll do not remove product covering. REFER SERVICING TO QUALIFIED SERVICE PERSONNEL. CAUTION: To prevent electric shock, match wide blade of the cabinet. Model No Serial No Visit our World Wide Web Site at once. Warranty Owner Model Verification Confirmation Registration Registering your...
User manual, English (US)
Page 3
... Selection 30 Random MP3 Playback, Programmed MP3 Playback 31 Audio Language, Stereo Sound Mode 32 Subtitle Language 33 Camera Angles 34 DVD Player Setup and Features On-Screen Display 35 Parental Controls Password 36 Parental Controls Levels 37 Marker Setup Screen 38 Audio Controls 39 Display Controls 40-41 Language Controls 42-43 Black Level Settings, TruSurround Setting 44 Information You May Need Care and Maintenance, Glossary 45 Helpful Hints 46-47 Limited Warranty 48-49 Specifications 50 Index 51 Supplied...
... Selection 30 Random MP3 Playback, Programmed MP3 Playback 31 Audio Language, Stereo Sound Mode 32 Subtitle Language 33 Camera Angles 34 DVD Player Setup and Features On-Screen Display 35 Parental Controls Password 36 Parental Controls Levels 37 Marker Setup Screen 38 Audio Controls 39 Display Controls 40-41 Language Controls 42-43 Black Level Settings, TruSurround Setting 44 Information You May Need Care and Maintenance, Glossary 45 Helpful Hints 46-47 Limited Warranty 48-49 Specifications 50 Index 51 Supplied...
User manual, English (US)
Page 5
... some Audio Compact Discs. Access the DVD Player's Setup menu by the movie producers and will appear in a desired language * • Markers • MP3 Playback • Parental Controls* • Paused/Fast/Slow/Step- TruSurround technology is available on the DVD. This owner's manual describes two models: the MDV410 and the MDV430. The display panels of the TV screen if you try to access the features listed below...
... some Audio Compact Discs. Access the DVD Player's Setup menu by the movie producers and will appear in a desired language * • Markers • MP3 Playback • Parental Controls* • Paused/Fast/Slow/Step- TruSurround technology is available on the DVD. This owner's manual describes two models: the MDV410 and the MDV430. The display panels of the TV screen if you try to access the features listed below...
User manual, English (US)
Page 8
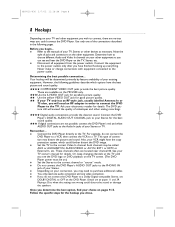
... Stereo or TV. Or, keep changing channels at the TV until you may distort the picture and sound. Use only one video connection. Determining the best possible connection... Playing a Disc when the settings are not possible, connect the DVD Player's red and white AUDIO OUT jacks to the correct Video In channel. G Set the TV to the Audio In jacks of jacks and connectors on the TV screen. (The DVD Player power must be called AUX or...
... Stereo or TV. Or, keep changing channels at the TV until you may distort the picture and sound. Use only one video connection. Determining the best possible connection... Playing a Disc when the settings are not possible, connect the DVD Player's red and white AUDIO OUT jacks to the correct Video In channel. G Set the TV to the Audio In jacks of jacks and connectors on the TV screen. (The DVD Player power must be called AUX or...
User manual, English (US)
Page 9
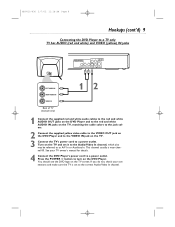
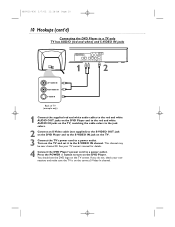
... near channel 00. If you do not, check your TV owner's manual for details. 4 Connect the DVD Player's power cord to a power outlet. You should see the DVD logo on the TV. 3 Connect the TV's power cord to a power outlet. MDV410/430 2/7/02 11:18 AM Page 9 Hookups (cont'd) 9 Connecting the DVD Player to a TV only TV has AUDIO (red and white) and VIDEO (yellow) IN jacks DIGITAL AUDIO OUT PCM/MULTICHANNEL R L Y Cr COMPONENT VIDEO...
... near channel 00. If you do not, check your TV owner's manual for details. 4 Connect the DVD Player's power cord to a power outlet. You should see the DVD logo on the TV. 3 Connect the TV's power cord to a power outlet. MDV410/430 2/7/02 11:18 AM Page 9 Hookups (cont'd) 9 Connecting the DVD Player to a TV only TV has AUDIO (red and white) and VIDEO (yellow) IN jacks DIGITAL AUDIO OUT PCM/MULTICHANNEL R L Y Cr COMPONENT VIDEO...
User manual, English (US)
Page 10
... red and white AUDIO IN jacks on the TV, matching the cable colors to the jack colors. 2 Connect an S-Video cable (not supplied) to the S-VIDEO OUT jack on the DVD Player and to the S-VIDEO IN jack on the TV screen. You should see the DVD logo on the TV. 3 Connect the TV's power cord to a power outlet. This channel may be near channel 00. Press the POWER y button to turn on the TV and set it to a power...
... red and white AUDIO IN jacks on the TV, matching the cable colors to the jack colors. 2 Connect an S-Video cable (not supplied) to the S-VIDEO OUT jack on the DVD Player and to the S-VIDEO IN jack on the TV screen. You should see the DVD logo on the TV. 3 Connect the TV's power cord to a power outlet. This channel may be near channel 00. Press the POWER y button to turn on the TV and set it to a power...
User manual, English (US)
Page 11
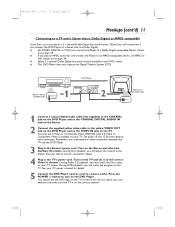
... adjust the volume at the Stereo. See your TV screen. G This DVD Player does not support the Digital Theater System (DTS). G Select 5.1 channel Dolby Digital Surround sound if available in the TV's power cord. During Audio CD playback, you play an MPEG audio disc and connect the Player to an MPEG-compatible Stereo, set it to a power outlet. G If you may use S-Video or Component Video (MDV430 only) if S-Video or Component Video is available on your TV owner's manual...
... adjust the volume at the Stereo. See your TV screen. G This DVD Player does not support the Digital Theater System (DTS). G Select 5.1 channel Dolby Digital Surround sound if available in the TV's power cord. During Audio CD playback, you play an MPEG audio disc and connect the Player to an MPEG-compatible Stereo, set it to a power outlet. G If you may use S-Video or Component Video (MDV430 only) if S-Video or Component Video is available on your TV owner's manual...
User manual, English (US)
Page 12
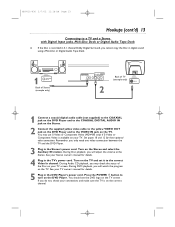
... DVD Player's power cord to a power outlet. If you will adjust the volume at your TV owner's manual for details. 4 Plug in COMPONENT VIDEO IN Y Cb/B-Y Cr/R-Y 1 Connect the supplied red and white audio cables to the red and white AUDIO OUT jacks on the DVD Player and to the red and white AUDIO IN jacks on pages 11 and 13. See your Stereo. During Disc playback, you will watch the program on the correct Component Video In channel...
... DVD Player's power cord to a power outlet. If you will adjust the volume at your TV owner's manual for details. 4 Plug in COMPONENT VIDEO IN Y Cb/B-Y Cr/R-Y 1 Connect the supplied red and white audio cables to the red and white AUDIO OUT jacks on the DVD Player and to the red and white AUDIO IN jacks on pages 11 and 13. See your Stereo. During Disc playback, you will watch the program on the correct Component Video In channel...
User manual, English (US)
Page 13
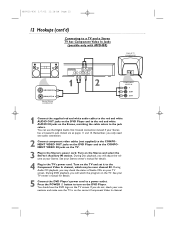
... may use S-Video or Component Video (MDV430 only) if S-Video or Component Video is on the correct channel. Turn on the TV screen . During Audio CD playback, you only need one video connection between the TV and the DVD Player. 3 Plug in the Stereo's power cord. Press the POWER y button to the correct Video In channel. You may check the status of TV (example only) VIDEO 1 L/MONO AUDIO R in VIDEO IN 1 Connect a coaxial digital audio cable (not supplied) to the COAXIAL jack...
... may use S-Video or Component Video (MDV430 only) if S-Video or Component Video is on the correct channel. Turn on the TV screen . During Audio CD playback, you only need one video connection between the TV and the DVD Player. 3 Plug in the Stereo's power cord. Press the POWER y button to the correct Video In channel. You may check the status of TV (example only) VIDEO 1 L/MONO AUDIO R in VIDEO IN 1 Connect a coaxial digital audio cable (not supplied) to the COAXIAL jack...
User manual, English (US)
Page 14
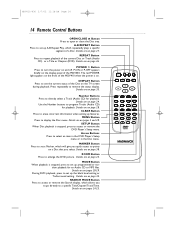
... Number buttons to program Tracks (Audio CD) for playback. Details are on pages 5 and 20. MODE Button When playback is stopped, press to directly select a Track (Audio CD) for playback. Details are on page 26. REPEAT Button Press to erase incorrect information when setting up A-B Repeat Play, which allows you to go directly to turn the power on page 23. Number Buttons Press to access or remove the DVD Player's Setup menu. CLEAR Button...
... Number buttons to program Tracks (Audio CD) for playback. Details are on pages 5 and 20. MODE Button When playback is stopped, press to directly select a Track (Audio CD) for playback. Details are on page 26. REPEAT Button Press to erase incorrect information when setting up A-B Repeat Play, which allows you to go directly to turn the power on page 23. Number Buttons Press to access or remove the DVD Player's Setup menu. CLEAR Button...
User manual, English (US)
Page 19
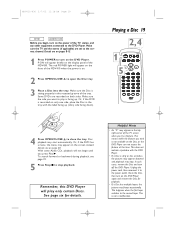
... when the power is on. 2 Press OPEN/CLOSE A to the correct channel. Some DVDs are set to open the Disc tray. 3 Place a Disc into the tray. Unplug the power cord, then reconnect it to close the tray. Playing a Disc 19 2,4 1 POWER REPEAT A-B OPEN/ CLOSE DISPLAY SKIP PAUSE 5 1 2 4 5 7 8 CLEAR 0 MENU AUDIO 3 SUBTITLE 6 ANGLE 9 SEARCH MODE +10 TITLE MODE ZOOM OK SETUP RETURN MARKER 4 Press OPEN/CLOSE A to the power outlet. See...
... when the power is on. 2 Press OPEN/CLOSE A to the correct channel. Some DVDs are set to open the Disc tray. 3 Place a Disc into the tray. Unplug the power cord, then reconnect it to close the tray. Playing a Disc 19 2,4 1 POWER REPEAT A-B OPEN/ CLOSE DISPLAY SKIP PAUSE 5 1 2 4 5 7 8 CLEAR 0 MENU AUDIO 3 SUBTITLE 6 ANGLE 9 SEARCH MODE +10 TITLE MODE ZOOM OK SETUP RETURN MARKER 4 Press OPEN/CLOSE A to the power outlet. See...
User manual, English (US)
Page 25
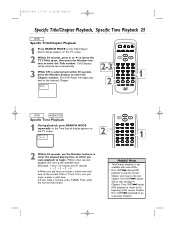
... POWER REPEAT A-B OPEN/ CLOSE DISPLAY SKIP PAUSE 2-3 2 1 2 4 5 7 8 CLEAR 0 MENU AUDIO 3 SUBTITLE 6 ANGLE 9 SEARCH MODE +10 TITLE MODE ZOOM OK SETUP RETURN MARKER 1 DVD AUDIO CD Specific Time Playback 1 During playback, press SEARCH MODE repeatedly so the Time Search display appears on the TV screen. 2 Within 30 seconds, press o or p to select the TT (Title) space, then press the Number buttons to enter the elapsed playing time at the selected Chapter. If it is selected...
... POWER REPEAT A-B OPEN/ CLOSE DISPLAY SKIP PAUSE 2-3 2 1 2 4 5 7 8 CLEAR 0 MENU AUDIO 3 SUBTITLE 6 ANGLE 9 SEARCH MODE +10 TITLE MODE ZOOM OK SETUP RETURN MARKER 1 DVD AUDIO CD Specific Time Playback 1 During playback, press SEARCH MODE repeatedly so the Time Search display appears on the TV screen. 2 Within 30 seconds, press o or p to select the TT (Title) space, then press the Number buttons to enter the elapsed playing time at the selected Chapter. If it is selected...
User manual, English (US)
Page 28
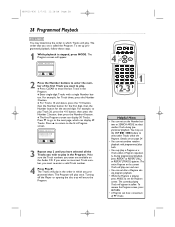
G Enter single-digit Tracks with programmed playback. • You may use the Number buttons or SEARCH MODE to play a Program or a Track within the Program. For example, to select another Track during program playback. • While the Program is stopped, press MODE. G The first Program screen can not alter a Program during programmed playback. POWER REPEAT A-B OPEN/ CLOSE DISPLAY SKIP PAUSE 4 1 2 4 5 7 8 CLEAR 0 MENU AUDIO 3 SUBTITLE 6 ANGLE 9 SEARCH MODE +10 TITLE MODE ZOOM OK 2-3 SETUP RETURN MARKER 1 Helpful Hints •...
G Enter single-digit Tracks with programmed playback. • You may use the Number buttons or SEARCH MODE to play a Program or a Track within the Program. For example, to select another Track during program playback. • While the Program is stopped, press MODE. G The first Program screen can not alter a Program during programmed playback. POWER REPEAT A-B OPEN/ CLOSE DISPLAY SKIP PAUSE 4 1 2 4 5 7 8 CLEAR 0 MENU AUDIO 3 SUBTITLE 6 ANGLE 9 SEARCH MODE +10 TITLE MODE ZOOM OK 2-3 SETUP RETURN MARKER 1 Helpful Hints •...
User manual, English (US)
Page 36
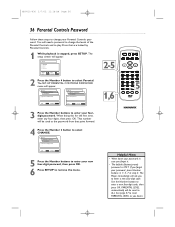
... reset PARENTAL LEVEL as the password from that are locked by Parental Controls. 1 While playback is 4737. The SET-UP PARENTAL CONTROLS PASSWORD menu will appear. EXIT: SETUP CANCEL: RETURN EXIT: SETUP CANCEL: RETURN 3 Press the Number buttons to enter your Parental Controls password. EXIT: SETUP CANCEL: RETURN 5 Press the Number buttons to enter your new four-digit password, then press OK. 6 Press SETUP to remove the menu. 2-5 1,6 POWER REPEAT A-B OPEN/ CLOSE DISPLAY SKIP PAUSE AUDIO 1 2 3 SUBTITLE 4 5 6 7 8 CLEAR 0 MENU OK ANGLE 9 SEARCH MODE...
... reset PARENTAL LEVEL as the password from that are locked by Parental Controls. 1 While playback is 4737. The SET-UP PARENTAL CONTROLS PASSWORD menu will appear. EXIT: SETUP CANCEL: RETURN EXIT: SETUP CANCEL: RETURN 3 Press the Number buttons to enter your Parental Controls password. EXIT: SETUP CANCEL: RETURN 5 Press the Number buttons to enter your new four-digit password, then press OK. 6 Press SETUP to remove the menu. 2-5 1,6 POWER REPEAT A-B OPEN/ CLOSE DISPLAY SKIP PAUSE AUDIO 1 2 3 SUBTITLE 4 5 6 7 8 CLEAR 0 MENU OK ANGLE 9 SEARCH MODE...
User manual, English (US)
Page 37
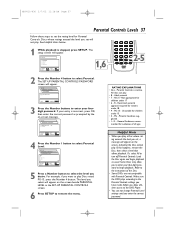
... may allow children access to the DVD Player. • You can play Discs rated PG-13, press the Number 4 button. SET-UP PARENTAL CONTROLS PARENTAL LEVEL ALL 8 7 [NC-17] 6 [R] 5 SELECT: / SET: OK EXIT: SETUP CANCEL: RETURN 5 Press a Number button to play . • 8 - PG-13 - Unsuitable for Parental Controls. Parental Guidance suggested. • 1- recommended for audiences of the Disc. • Some DVDs are not compatible with Parental Controls. SET-UP 1.LANGUAGE 2.DISPLAY 3.AUDIO 4.PARENTAL SELECT: / SET: OK EXIT: SETUP CANCEL: RETURN 1,6 AUDIO 1 2 3 SUBTITLE...
... may allow children access to the DVD Player. • You can play Discs rated PG-13, press the Number 4 button. SET-UP PARENTAL CONTROLS PARENTAL LEVEL ALL 8 7 [NC-17] 6 [R] 5 SELECT: / SET: OK EXIT: SETUP CANCEL: RETURN 5 Press a Number button to play . • 8 - PG-13 - Unsuitable for Parental Controls. Parental Guidance suggested. • 1- recommended for audiences of the Disc. • Some DVDs are not compatible with Parental Controls. SET-UP 1.LANGUAGE 2.DISPLAY 3.AUDIO 4.PARENTAL SELECT: / SET: OK EXIT: SETUP CANCEL: RETURN 1,6 AUDIO 1 2 3 SUBTITLE...
User manual, English (US)
Page 39
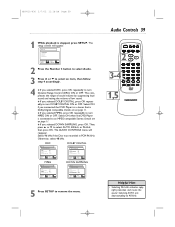
...you connected the DVD Player to turn Dynamic Range Control (DRC) ON or OFF. The AUDIO CONTROLS menu will appear. Otherwise, select 48 kHz. The setup screen will reappear. Audio Controls 39 POWER REPEAT A-B OPEN/ CLOSE DISPLAY SKIP PAUSE 2 1 2 4 5 7 8 3-4 CLEAR 0 MENU AUDIO 3 SUBTITLE 6 ANGLE 9 SEARCH MODE +10 TITLE MODE ZOOM OK SETUP RETURN MARKER 1,5 Helpful Hint • Selecting 96 kHz activates copyright protection and mutes the sound. Selecting AUTO sets downsampling to turn DOLBY DIGITAL ON or OFF. SET-UP 1.LANGUAGE 2.DISPLAY 3.AUDIO 4.PARENTAL...
...you connected the DVD Player to turn Dynamic Range Control (DRC) ON or OFF. The AUDIO CONTROLS menu will appear. Otherwise, select 48 kHz. The setup screen will reappear. Audio Controls 39 POWER REPEAT A-B OPEN/ CLOSE DISPLAY SKIP PAUSE 2 1 2 4 5 7 8 3-4 CLEAR 0 MENU AUDIO 3 SUBTITLE 6 ANGLE 9 SEARCH MODE +10 TITLE MODE ZOOM OK SETUP RETURN MARKER 1,5 Helpful Hint • Selecting 96 kHz activates copyright protection and mutes the sound. Selecting AUTO sets downsampling to turn DOLBY DIGITAL ON or OFF. SET-UP 1.LANGUAGE 2.DISPLAY 3.AUDIO 4.PARENTAL...
User manual, English (US)
Page 45
.... This connection provides the 5.1 channel surround sound as heard in movie theaters. Dolby Digital: A surround sound system that sends video to the edge. This format is not in use S-Video only if your DVD Player; VIDEO OUT Jack: Jack on the back of the DVD Player that provides 5.1 channel sound as described in full-width, with black bars at the stereo. Displays the video with full-height picture, with one side playing in...
.... This connection provides the 5.1 channel surround sound as heard in movie theaters. Dolby Digital: A surround sound system that sends video to the edge. This format is not in use S-Video only if your DVD Player; VIDEO OUT Jack: Jack on the back of the DVD Player that provides 5.1 channel sound as described in full-width, with black bars at the stereo. Displays the video with full-height picture, with one side playing in...
User manual, English (US)
Page 46
...; Use the remote control within 23 feet of the DVD Player. For example, you may be able to solve the problem yourself. You may have selected "soundtrack" playback on page 16. • Remove all obstacles between the DVD Player and the TV. If you need to help you with operations, please stay near channel 00. Details are on a DVD. low video cable (supplied), an optional S-Video cable, or optional component video (MDV430...
...; Use the remote control within 23 feet of the DVD Player. For example, you may be able to solve the problem yourself. You may have selected "soundtrack" playback on page 16. • Remove all obstacles between the DVD Player and the TV. If you need to help you with operations, please stay near channel 00. Details are on a DVD. low video cable (supplied), an optional S-Video cable, or optional component video (MDV430...
User manual, English (US)
Page 47
... 47 Helpful Hints (cont'd) 47 Distorted picture • Connect the DVD Player directly to ON. Not all DVDs contain audio or subtitles in use. The DVD Player turns off after 35 minutes. • If AUTO POWER OFF is activated, the DVD Player turns off the DVD Player when it is not a malfunction of the DVD Player. A prolonged still image, including TV station identification logos or video games, may be accessed or changed only when Disc play - A large DVD logo...
... 47 Helpful Hints (cont'd) 47 Distorted picture • Connect the DVD Player directly to ON. Not all DVDs contain audio or subtitles in use. The DVD Player turns off after 35 minutes. • If AUTO POWER OFF is activated, the DVD Player turns off the DVD Player when it is not a malfunction of the DVD Player. A prolonged still image, including TV station identification logos or video games, may be accessed or changed only when Disc play - A large DVD logo...

User manual, English (US)
Page 51
... 35 play button 15-16, 19 black level settings 34 play light (MDV410 only) . . . . .17 playing 19 camera angle 34 power chapters 25 button 14, 16 clear button 14 cord 18 coaxial jack . . . . . .11, 13, 18, 45 light (MDV410 only 17 color systems 56 program 28, 31 component video out jacks (MDV430 only)12, 18, 45 random 29, 31 connections 8-13 rear panel 18 contents, table of 3 region codes 6 controls, remote 14-15 remote control buttons 14...
... 35 play button 15-16, 19 black level settings 34 play light (MDV410 only) . . . . .17 playing 19 camera angle 34 power chapters 25 button 14, 16 clear button 14 cord 18 coaxial jack . . . . . .11, 13, 18, 45 light (MDV410 only 17 color systems 56 program 28, 31 component video out jacks (MDV430 only)12, 18, 45 random 29, 31 connections 8-13 rear panel 18 contents, table of 3 region codes 6 controls, remote 14-15 remote control buttons 14...


