
User manual, English (US)
Page 2
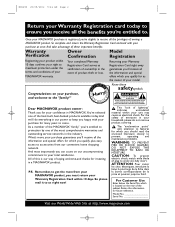
...literature closely to maximum protection under the terms and conditions of your MAGNAVOX warranty. Model No Serial No Visit our World Wide Web Site at once. Once your MAGNAVOX purchase is located on the rear of the cabinet. So complete and return the Warranty Registration ...Warranty Registration Card serves as the owner of your model. And most comprehensive warranties and outstanding service networks in our power to keep you happy with your purchase at http://www.magnavox.com So please mail it to the "family!" Dear MAGNAVOX product owner: Thank you for investing in a MAGNAVOX...
...literature closely to maximum protection under the terms and conditions of your MAGNAVOX warranty. Model No Serial No Visit our World Wide Web Site at once. Once your MAGNAVOX purchase is located on the rear of the cabinet. So complete and return the Warranty Registration ...Warranty Registration Card serves as the owner of your model. And most comprehensive warranties and outstanding service networks in our power to keep you happy with your purchase at http://www.magnavox.com So please mail it to the "family!" Dear MAGNAVOX product owner: Thank you for investing in a MAGNAVOX...

User manual, English (US)
Page 3
... A-B 23 DVD Audio Language 24 DVD Subtitle Language 25 DVD Disc Menu Language 26 Parental Controls Password 27 Parental Controls Disc Lock 28 Parental Controls Levels 29 Programmed Playback 30 Preview 31 Smart Navigator, JPEG and MP3 Features 32 DVD Player Setup Options TV Display 33 Video Output 34 Video Mode 34-35 TV Type 36 Speaker Setup, 3D Sound 37 SPDIF, LPCM 96K Setup 38 DVD Player On-Screen Display Language 39 Display Dim, Screen Saver 40 DVD Player Defaults 41 Information You May Need Helpful Hints 42...
... A-B 23 DVD Audio Language 24 DVD Subtitle Language 25 DVD Disc Menu Language 26 Parental Controls Password 27 Parental Controls Disc Lock 28 Parental Controls Levels 29 Programmed Playback 30 Preview 31 Smart Navigator, JPEG and MP3 Features 32 DVD Player Setup Options TV Display 33 Video Output 34 Video Mode 34-35 TV Type 36 Speaker Setup, 3D Sound 37 SPDIF, LPCM 96K Setup 38 DVD Player On-Screen Display Language 39 Display Dim, Screen Saver 40 DVD Player Defaults 41 Information You May Need Helpful Hints 42...
User manual, English (US)
Page 5
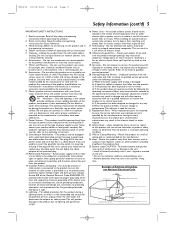
... an antenna discharge unit, size of grounding conductors, location of the product should follow the manufacturer's instructions and should never be sure the service technician uses replacement parts specified by items placed upon or against them might be sure the antenna or cable system is in wire to the unit: • Install all batteries correctly, with the product. Route power supply cords so...
... an antenna discharge unit, size of grounding conductors, location of the product should follow the manufacturer's instructions and should never be sure the service technician uses replacement parts specified by items placed upon or against them might be sure the antenna or cable system is in wire to the unit: • Install all batteries correctly, with the product. Route power supply cords so...

User manual, English (US)
Page 6
... the DVD Player for Audio, Subtitles, and Menus q MP3 and JPEG File Playback q Parental Controls q Paused/Fast/Slow/Step-by a specialized company. Leave enough room in front of the set contain self-lubricating bearings and must not be recycled and reused if disassembled by -Step/Zoomed Playback q Programmed Playback q Preview q Repeat and Repeat A-B Playback q Screen Saver q Smart Picture Package Contents q DVD Player q Remote control with...
... the DVD Player for Audio, Subtitles, and Menus q MP3 and JPEG File Playback q Parental Controls q Paused/Fast/Slow/Step-by a specialized company. Leave enough room in front of the set contain self-lubricating bearings and must not be recycled and reused if disassembled by -Step/Zoomed Playback q Programmed Playback q Preview q Repeat and Repeat A-B Playback q Screen Saver q Smart Picture Package Contents q DVD Player q Remote control with...

User manual, English (US)
Page 9
..., change connections with equipment connected to the manuals of some Discs. Follow the steps for the best sound quality. Digital audio connections provide the clearest sound, but you can see the DVD screen saver on your TV, will need one audio connection and one video connection between the DVD Player and your TV manual for details on page 11. ૽૽ Composite Video (a yellow Video jack) provides good picture quality. q Connect the DVD Player directly to the Audio In jacks...
..., change connections with equipment connected to the manuals of some Discs. Follow the steps for the best sound quality. Digital audio connections provide the clearest sound, but you can see the DVD screen saver on your TV, will need one audio connection and one video connection between the DVD Player and your TV manual for details on page 11. ૽૽ Composite Video (a yellow Video jack) provides good picture quality. q Connect the DVD Player directly to the Audio In jacks...
User manual, English (US)
Page 10
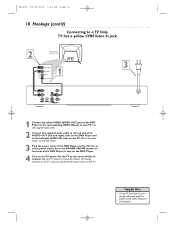
... the DVD Player to turn on the DVD Player. 4 Turn on the TV power. Press the POWER ON/OFF button on the front of the DVD Player and the TV into an active power outlet. See your TV. Set the TV to the jack colors. 3 Plug the power cords of the DVD Player to the corresponding VIDEO IN jack on your TV owner's manual for details. Match the cable colors to the correct Video In channel. Use the supplied video cable. 2 Connect the supplied audio cable...
... the DVD Player to turn on the DVD Player. 4 Turn on the TV power. Press the POWER ON/OFF button on the front of the DVD Player and the TV into an active power outlet. See your TV. Set the TV to the jack colors. 3 Plug the power cords of the DVD Player to the corresponding VIDEO IN jack on your TV owner's manual for details. Match the cable colors to the correct Video In channel. Use the supplied video cable. 2 Connect the supplied audio cable...
User manual, English (US)
Page 11
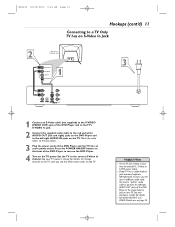
Set the TV to SVIDEO. Or, change channels at the TV until you will need a "splitter" audio cable to go from the left/right AUDIO OUT jacks of the DVD Player and to the TV's S-VIDEO In jack. 2 Connect the supplied audio cable to the red and white AUDIO OUT (left and right) jacks on the DVD Player and to the left /right Audio In jacks, you see the DVD screen saver on the TV. Helpful Hints...
Set the TV to SVIDEO. Or, change channels at the TV until you will need a "splitter" audio cable to go from the left/right AUDIO OUT jacks of the DVD Player and to the TV's S-VIDEO In jack. 2 Connect the supplied audio cable to the red and white AUDIO OUT (left and right) jacks on the DVD Player and to the left /right Audio In jacks, you see the DVD screen saver on the TV. Helpful Hints...

User manual, English (US)
Page 12
... button on the front of separate left/right Audio In jacks, you see the DVD screen saver on the TV. You need a different audio cable. Use the supplied audio cables. Or, change channels at the TV until you will need a "splitter" audio cable to go from the left /right AUDIO IN jacks on your TV has a single Audio In jack instead of the DVD Player to turn on the DVD Player. 4 Turn on the TV. Use component video cable (not supplied). 2 Connect the DVD Player's red...
... button on the front of separate left/right Audio In jacks, you see the DVD screen saver on the TV. You need a different audio cable. Use the supplied audio cables. Or, change channels at the TV until you will need a "splitter" audio cable to go from the left /right AUDIO IN jacks on your TV has a single Audio In jack instead of the DVD Player to turn on the DVD Player. 4 Turn on the TV. Use component video cable (not supplied). 2 Connect the DVD Player's red...
User manual, English (US)
Page 13
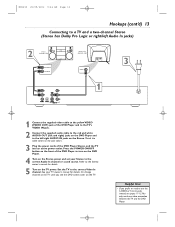
... or need to use the S-VIDEO or Y CB CR jacks instead, see the DVD screen saver on the TV power. Refer to the Stereo owner's manual for details. Set the TV to turn on the DVD Player. 4 Turn on the Stereo power and set your TV owner's manual for details. 5 Turn on the TV. Match the cable colors to the jack colors. 3 Plug the power cords of the DVD Player and to the TV's VIDEO IN jack. 2 Connect the supplied audio cable to the red...
... or need to use the S-VIDEO or Y CB CR jacks instead, see the DVD screen saver on the TV power. Refer to the Stereo owner's manual for details. Set the TV to turn on the DVD Player. 4 Turn on the Stereo power and set your TV owner's manual for details. 5 Turn on the TV. Match the cable colors to the jack colors. 3 Plug the power cords of the DVD Player and to the TV's VIDEO IN jack. 2 Connect the supplied audio cable to the red...
User manual, English (US)
Page 14
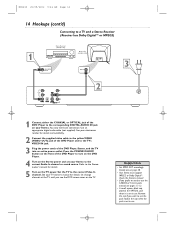
... owner's manual for details and availability. 2 Connect the supplied video cable to the yellow VIDEO (VIDEO OUT) jack of the DVD Player and to the TV's VIDEO IN jack. 3 Plug the power cords of the DVD Player, Stereo, and the TV into an active power outlet. Helpful Hints • Set SPDIF OUT accordingly. Or, change channels at the TV until you want to use the jack; Press the POWER ON/OFF button on the front of the DVD Player...
... owner's manual for details and availability. 2 Connect the supplied video cable to the yellow VIDEO (VIDEO OUT) jack of the DVD Player and to the TV's VIDEO IN jack. 3 Plug the power cords of the DVD Player, Stereo, and the TV into an active power outlet. Helpful Hints • Set SPDIF OUT accordingly. Or, change channels at the TV until you want to use the jack; Press the POWER ON/OFF button on the front of the DVD Player...

User manual, English (US)
Page 15
... your password or unlock the Disc. Follow the instructions provided by Parental Controls, you press PLAY 3 later to turn on the DVD Player. If the Disc (DVD) is in the DVD Disc menu. • If you are playing an Audio CD, press PLAY 3 to close the tray. 4 Playback may start at the beginning of the side you want to select an item. Playback will resume at any time...
... your password or unlock the Disc. Follow the instructions provided by Parental Controls, you press PLAY 3 later to turn on the DVD Player. If the Disc (DVD) is in the DVD Disc menu. • If you are playing an Audio CD, press PLAY 3 to close the tray. 4 Playback may start at the beginning of the side you want to select an item. Playback will resume at any time...

User manual, English (US)
Page 16
... hold the Number 1 button for a Video CD or Super Video CD. REPEAT A-B Button Press to set up Repeat A-B playback, in a menu. POWER 2 Button Press to turn on the display panel) to select items in which a certain segment of the DVD Player. 341 2 Buttons Press to open or close the disc tray. ZOOM Button Press to enlarge the picture during playback to advance a paused picture one frame at the DVD Player, not your...
... hold the Number 1 button for a Video CD or Super Video CD. REPEAT A-B Button Press to set up Repeat A-B playback, in a menu. POWER 2 Button Press to turn on the display panel) to select items in which a certain segment of the DVD Player. 341 2 Buttons Press to open or close the disc tray. ZOOM Button Press to enlarge the picture during playback to advance a paused picture one frame at the DVD Player, not your...
User manual, English (US)
Page 23
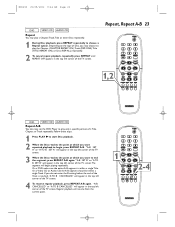
... in the top left corner of the TV screen. MDV450 25/09/2002 9:46 AM Page 23 DVD VIDEO CD AUDIO CD Repeat You may set the DVD Player to play only a specific portion of a Title, Chapter, or Track repeatedly. If you may choose to play a Chapter,Track,Title or entire Disc repeatedly.... "A TO B CANCELLED" will begin , press REPEAT A-B. Depending on the type of Disc, you do not enter the B setting before the end of the TV screen. Repeat, Repeat A-B 23 1,2 DVD VIDEO CD AUDIO CD Repeat A-B You also may play the Chapter (CHAPTER REPEAT ON),Track (REP-ONE),Title (TITLE REPEAT ON),...
... in the top left corner of the TV screen. MDV450 25/09/2002 9:46 AM Page 23 DVD VIDEO CD AUDIO CD Repeat You may set the DVD Player to play only a specific portion of a Title, Chapter, or Track repeatedly. If you may choose to play a Chapter,Track,Title or entire Disc repeatedly.... "A TO B CANCELLED" will begin , press REPEAT A-B. Depending on the type of Disc, you do not enter the B setting before the end of the TV screen. Repeat, Repeat A-B 23 1,2 DVD VIDEO CD AUDIO CD Repeat A-B You also may play the Chapter (CHAPTER REPEAT ON),Track (REP-ONE),Title (TITLE REPEAT ON),...
User manual, English (US)
Page 26
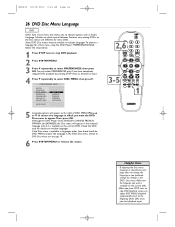
... only if you have a Disc menu that allows you to choose options such as directed in which you want the DVD Disc menu to select DISC MENU, then press 2. - - You can adjust DISC MENU, playback automatically starts at the beginning of DISC MENU. AUDIO SUBTITLE DISC MENU F ENGLISH PARENTAL CHINESE PASSWORD FRENCH DEFAULTS SPANISH SMART NAV JAPANESE MAIN PAGE SET PREFERENCE TO ENGLISH 5 Language options will appear in...
... only if you have a Disc menu that allows you to choose options such as directed in which you want the DVD Disc menu to select DISC MENU, then press 2. - - You can adjust DISC MENU, playback automatically starts at the beginning of DISC MENU. AUDIO SUBTITLE DISC MENU F ENGLISH PARENTAL CHINESE PASSWORD FRENCH DEFAULTS SPANISH SMART NAV JAPANESE MAIN PAGE SET PREFERENCE TO ENGLISH 5 Language options will appear in...

User manual, English (US)
Page 28
... - - DISC LOCK PROGRAM VFD DIM OSD LANG SCR SAVER F UNLOCK LOCK MAIN PAGE DISC UNLOCK 4 Press 3 or 4 to play a Locked Disc, you enter your four-digit password. If you lock a specific DVD, you can specifically lock or unlock a DVD, regardless of its rating. MDV450 25/09/2002 9:46 AM Page 28 28 Parental Controls Disc Lock Not all DVDs are on page 27. 1 Press SYSTEM MENU. 2 GENERAL SETUP will be selected. Password details are...
... - - DISC LOCK PROGRAM VFD DIM OSD LANG SCR SAVER F UNLOCK LOCK MAIN PAGE DISC UNLOCK 4 Press 3 or 4 to play a Locked Disc, you enter your four-digit password. If you lock a specific DVD, you can specifically lock or unlock a DVD, regardless of its rating. MDV450 25/09/2002 9:46 AM Page 28 28 Parental Controls Disc Lock Not all DVDs are on page 27. 1 Press SYSTEM MENU. 2 GENERAL SETUP will be selected. Password details are...
User manual, English (US)
Page 32
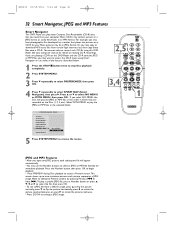
... format. To play a specific JPEG file, press a Number button or press 3, 4, 1, or 2 to select the file, then press OK. • To see a JPEG file from certain legal Internet sites, then copy those files onto a CD-R. Or, you may want to access the CD-R menu using this DVD Player and the CD-R contains JPEG or MP3 files, you may contain pictures in a JPEG format or audio files/tracks in which they are playing...
... format. To play a specific JPEG file, press a Number button or press 3, 4, 1, or 2 to select the file, then press OK. • To see a JPEG file from certain legal Internet sites, then copy those files onto a CD-R. Or, you may want to access the CD-R menu using this DVD Player and the CD-R contains JPEG or MP3 files, you may contain pictures in a JPEG format or audio files/tracks in which they are playing...

User manual, English (US)
Page 42
... rear of the DVD.The DVD must be able to an analog jack on this to the representative. See your TV owner's manual for example, you used S-Video cable but VIDEO OUTPUT is no sound during Disc playback. • Make sure you did not connect any cables from the center to call a customer service representative, please know the model number and serial number of the DVD Player. • Make sure you connected the DVD Player's power cord...
... rear of the DVD.The DVD must be able to an analog jack on this to the representative. See your TV owner's manual for example, you used S-Video cable but VIDEO OUTPUT is no sound during Disc playback. • Make sure you did not connect any cables from the center to call a customer service representative, please know the model number and serial number of the DVD Player. • Make sure you connected the DVD Player's power cord...

User manual, English (US)
Page 44
... the other side playing in the United States of the picture are various systems for transmitting television signals, for the luminance and the color. COAXIAL jack: Sends digital audio to a Stereo Receiver, allowing you connect the DVD Player to a TV. Letterbox: Widescreen format; a TV aspect ratio setting (4:3). If the Disc does not include a letterbox format, selecting 4:3 letterbox may have a Coaxial In jack.This connection provides the 5.1 channel surround sound as heard...
... the other side playing in the United States of the picture are various systems for transmitting television signals, for the luminance and the color. COAXIAL jack: Sends digital audio to a Stereo Receiver, allowing you connect the DVD Player to a TV. Letterbox: Widescreen format; a TV aspect ratio setting (4:3). If the Disc does not include a letterbox format, selecting 4:3 letterbox may have a Coaxial In jack.This connection provides the 5.1 channel surround sound as heard...
User manual, English (US)
Page 45
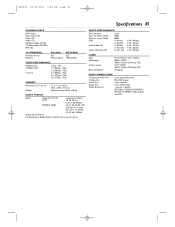
... -22 kHz 4 Hz -20 kHz 4 Hz -20 kHz LASER Type Wavelength Output power Beam divergence Semiconductor laser GaAIAs 650nm (DVD) 780nm (Video CD/Audio CD) 7mW (DVD) 10mW (Video CD/Audio CD) 60 degree REAR CONNECTIONS Component Video Out S-Video Out Video Out Audio Out Digital Audio Out Cinch (green/blue/red) Mini DIN 4-pins Cinch (yellow) Cinch (white/red) 1 coaxial, 1 optical IEC958 for CDDA/LPCM/MPEG1 IEC1937 for MPEG2, Dolby...
... -22 kHz 4 Hz -20 kHz 4 Hz -20 kHz LASER Type Wavelength Output power Beam divergence Semiconductor laser GaAIAs 650nm (DVD) 780nm (Video CD/Audio CD) 7mW (DVD) 10mW (Video CD/Audio CD) 60 degree REAR CONNECTIONS Component Video Out S-Video Out Video Out Audio Out Digital Audio Out Cinch (green/blue/red) Mini DIN 4-pins Cinch (yellow) Cinch (white/red) 1 coaxial, 1 optical IEC958 for CDDA/LPCM/MPEG1 IEC1937 for MPEG2, Dolby...

User manual, English (US)
Page 48
... button 16 Subtitles 25 SUBTITLE button 16, 25 S-VIDEO (video out) jack 11, 18, 34 SYSTEM MENU button 16 Language settings DVD audio language 24 DVD disc menu language 26 DVD player on-screen display language 39 DVD subtitle language 25 Limited warranty 46-47 LPCM 96K setup 38 MP3 files and features 32 MUTE button 16 Next ¢ button 16-17, 19 NTSC 7, 36 Number buttons 16, 19 OK button 16 OPEN/CLOSE button 17 OPTICAL jack 14, 18 3D sound 37 Time...
... button 16 Subtitles 25 SUBTITLE button 16, 25 S-VIDEO (video out) jack 11, 18, 34 SYSTEM MENU button 16 Language settings DVD audio language 24 DVD disc menu language 26 DVD player on-screen display language 39 DVD subtitle language 25 Limited warranty 46-47 LPCM 96K setup 38 MP3 files and features 32 MUTE button 16 Next ¢ button 16-17, 19 NTSC 7, 36 Number buttons 16, 19 OK button 16 OPEN/CLOSE button 17 OPTICAL jack 14, 18 3D sound 37 Time...


