User manual, English (US)
Page 3
... Canadian Users: This Class B digital apparatus complies with this copyright protection technology must be determined by Macrovision Corporation and is provided to call the Cable TV system installer's attention to possible eye injury. Special Information for Progressive Scan Use: Consumers should remove the cover or attempt to service this model 525p DVD player, please contact our customer service center. CAUTION: USE OF CONTROLS OR ADJUSTMENTS OR...
... Canadian Users: This Class B digital apparatus complies with this copyright protection technology must be determined by Macrovision Corporation and is provided to call the Cable TV system installer's attention to possible eye injury. Special Information for Progressive Scan Use: Consumers should remove the cover or attempt to service this model 525p DVD player, please contact our customer service center. CAUTION: USE OF CONTROLS OR ADJUSTMENTS OR...
User manual, English (US)
Page 4
... Front Panel 22 Rear Panel 23 Remote Control 24-25 Additional VCR Setup Channel Setup 26-27 Clock (VCR 28-29 Language (VCR 30 VCR Status Displays 31 Additional VCR Features Multi-Channel Television Sound 45-46 Hi-Fi Stereo 47 Disc Playback Features DVD Disc Menus 48 Fast Forward/Reverse Search 49 Title/Chapter Playback, Specific Time Playback . . . .50 Track Playback 51 Paused and Step-by-Step Playback, Resume 52 Repeat,A-B Repeat 53 Markers 54 Subtitles, Camera Angles 55 Parental Controls Password 56 Parental Levels 57 Audio Language, Stereo Sound Mode...
... Front Panel 22 Rear Panel 23 Remote Control 24-25 Additional VCR Setup Channel Setup 26-27 Clock (VCR 28-29 Language (VCR 30 VCR Status Displays 31 Additional VCR Features Multi-Channel Television Sound 45-46 Hi-Fi Stereo 47 Disc Playback Features DVD Disc Menus 48 Fast Forward/Reverse Search 49 Title/Chapter Playback, Specific Time Playback . . . .50 Track Playback 51 Paused and Step-by-Step Playback, Resume 52 Repeat,A-B Repeat 53 Markers 54 Subtitles, Camera Angles 55 Parental Controls Password 56 Parental Levels 57 Audio Language, Stereo Sound Mode...

User manual, English (US)
Page 5
... stopped. Available Disc Features... plays • Multi-Channel TV Sound • 19 Micron head • Recording: One-Touch and Timer • Repeat Play • Searching:Time, Index, Forward, and Reverse • Slow Motion • Still Picture • Tape Counter • Tracking Adjustment Disc Features • Audio Language choices* • Bit Rate display • Camera Angle * • Dolby Digital Sound* • DVD to use the features listed below. Not all DVDs have menus. If the DVD has a menu, access...
... stopped. Available Disc Features... plays • Multi-Channel TV Sound • 19 Micron head • Recording: One-Touch and Timer • Repeat Play • Searching:Time, Index, Forward, and Reverse • Slow Motion • Still Picture • Tape Counter • Tracking Adjustment Disc Features • Audio Language choices* • Bit Rate display • Camera Angle * • Dolby Digital Sound* • DVD to use the features listed below. Not all DVDs have menus. If the DVD has a menu, access...

User manual, English (US)
Page 7
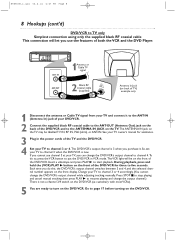
..., go to the lowest TV channel (01 or 02) and change connections with a Coaxial Digital Audio In jack, this audio connection, only Disc sound (no Disc in a single cable. Set PROGRESSIVE to its Component Video In channel. Follow the steps for both the DVD Player and the VCR.To see DVD features on the DVD/VCR's display panel. Before you get the TV on the correct Audio/Video In channel or channel 3 or 4. ● Set the Stereo to the...
..., go to the lowest TV channel (01 or 02) and change connections with a Coaxial Digital Audio In jack, this audio connection, only Disc sound (no Disc in a single cable. Set PROGRESSIVE to its Component Video In channel. Follow the steps for both the DVD Player and the VCR.To see DVD features on the DVD/VCR's display panel. Before you get the TV on the correct Audio/Video In channel or channel 3 or 4. ● Set the Stereo to the...
User manual, English (US)
Page 8
... ready to turn on the front of the DVD/VCR for assistance. 3 Plug in VCR mode.The VCR light will let you use the features of the TV and the DVD/VCR. 4 Set your TV to five seconds. If you cannot use channel 3 at your TV, you can change the DVD/VCR's output channel to channel 4.To do this, the DVD/VCR's output channel switches between 3 and 4, and the selected channel number appears on the DVD/VCR. Each time you...
... ready to turn on the front of the DVD/VCR for assistance. 3 Plug in VCR mode.The VCR light will let you use the features of the TV and the DVD/VCR. 4 Set your TV to five seconds. If you cannot use channel 3 at your TV, you can change the DVD/VCR's output channel to channel 4.To do this, the DVD/VCR's output channel switches between 3 and 4, and the selected channel number appears on the DVD/VCR. Each time you...
User manual, English (US)
Page 9
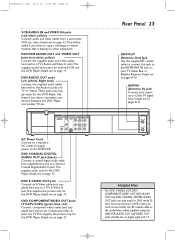
... VCR and the DVD Player. 1Cable Box/Satellite Receiver 2 DVD/VCR IN Cable TV / Satellite Signal OUT DIGITAL AUDIO OUT DVD AUDIO OUT S-VIDEO OUT COMPONENT VIDEO OUT Y DVD/VCR VCR AUDIO OUT AUDIO IN L L L COAXIAL R CB / PB R R VIDEO OUT VIDEO IN CR / PR RF coaxial cable ANT - H9660UD_1.qx4 04.4.14 4:47 PM Page 9 Hookups (cont'd) 9 DVD/VCR to record in VCR mode.The VCR light will not need the RF coaxial cable connection between the Cable Box/Satellite Receiver and the DVD/VCR as the one channel at a time...
... VCR and the DVD Player. 1Cable Box/Satellite Receiver 2 DVD/VCR IN Cable TV / Satellite Signal OUT DIGITAL AUDIO OUT DVD AUDIO OUT S-VIDEO OUT COMPONENT VIDEO OUT Y DVD/VCR VCR AUDIO OUT AUDIO IN L L L COAXIAL R CB / PB R R VIDEO OUT VIDEO IN CR / PR RF coaxial cable ANT - H9660UD_1.qx4 04.4.14 4:47 PM Page 9 Hookups (cont'd) 9 DVD/VCR to record in VCR mode.The VCR light will not need the RF coaxial cable connection between the Cable Box/Satellite Receiver and the DVD/VCR as the one channel at a time...
User manual, English (US)
Page 10
... Satellite signal to the DVD/VCR's ANT-IN (Antenna In) jack. 2 Use an RF coaxial cable (as the DVD/VCR's output channel (03 or 04). Remember... Follow these steps: 1) Put the Cable Box/Satellite Receiver on the TV. The DVD/VCR's output channel is channel 3 when the DVD/VCR is set to the DVD/VCR's output channel (03 or 04). Set the TV to the Cable Box/Satellite Receiver output channel (03 or 04). 2) Press VCR to put the DVD/VCR in VCR mode.The VCR light...
... Satellite signal to the DVD/VCR's ANT-IN (Antenna In) jack. 2 Use an RF coaxial cable (as the DVD/VCR's output channel (03 or 04). Remember... Follow these steps: 1) Put the Cable Box/Satellite Receiver on the TV. The DVD/VCR's output channel is channel 3 when the DVD/VCR is set to the DVD/VCR's output channel (03 or 04). Set the TV to the Cable Box/Satellite Receiver output channel (03 or 04). 2) Press VCR to put the DVD/VCR in VCR mode.The VCR light...
User manual, English (US)
Page 11
... ANT - To help you see VCR or DVD playback on the TV screen. If the TV has a single AUDIO IN jack, use the white audio cable to connect the DVD/VCR's white DVD/VCR AUDIO OUT (left /right AUDIO OUT jacks of the TV and the DVD/VCR to a power outlet.Turn on the TV. The VIDEO IN jack on the TV is OFF and P.SCAN does not appear on the DVD/VCR. Make sure PROGRESSIVE is usually...
... ANT - To help you see VCR or DVD playback on the TV screen. If the TV has a single AUDIO IN jack, use the white audio cable to connect the DVD/VCR's white DVD/VCR AUDIO OUT (left /right AUDIO OUT jacks of the TV and the DVD/VCR to a power outlet.Turn on the TV. The VIDEO IN jack on the TV is OFF and P.SCAN does not appear on the DVD/VCR. Make sure PROGRESSIVE is usually...
User manual, English (US)
Page 12
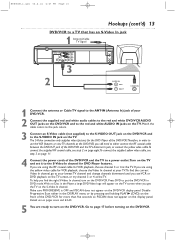
... to turn on Progressive Scan at the DVD/VCR, you see step 3 on the TV. SCAN does not appear on the TV are ready to the red and white AUDIO IN jacks on page 11. The Component Video In jacks on the display panel. To help you find the right Component Video In channel, turn on the DVD/VCR. Press DVD to put the DVD/VCR in DVD mode.With no Disc in the Player, a large DVD Video...
... to turn on Progressive Scan at the DVD/VCR, you see step 3 on the TV. SCAN does not appear on the TV are ready to the red and white AUDIO IN jacks on page 11. The Component Video In jacks on the display panel. To help you find the right Component Video In channel, turn on the DVD/VCR. Press DVD to put the DVD/VCR in DVD mode.With no Disc in the Player, a large DVD Video...
User manual, English (US)
Page 13
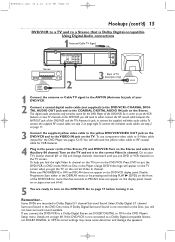
... display panel. The S-Video connection only supplies video (picture) for the DVD Player of your lowest TV channel and change channels downward until you see step 3 on page 11. 4 Connect the power cords of the DVD/VCR and the TV to a power outlet.Turn on the TV and set it to a TV that has an S-Video In jack 1 Antenna/Cable TV Signal DIGITAL AUDIO OUT DVD AUDIO OUT S-VIDEO OUT COMPONENT VIDEO OUT Y DVD/VCR VCR AUDIO OUT AUDIO IN L L L COAXIAL R CB / PB R R VIDEO OUT VIDEO...
... display panel. The S-Video connection only supplies video (picture) for the DVD Player of your lowest TV channel and change channels downward until you see step 3 on page 11. 4 Connect the power cords of the DVD/VCR and the TV to a power outlet.Turn on the TV and set it to a TV that has an S-Video In jack 1 Antenna/Cable TV Signal DIGITAL AUDIO OUT DVD AUDIO OUT S-VIDEO OUT COMPONENT VIDEO OUT Y DVD/VCR VCR AUDIO OUT AUDIO IN L L L COAXIAL R CB / PB R R VIDEO OUT VIDEO...
User manual, English (US)
Page 14
... still need the yellow video cable or RF coaxial cable for VCR features. 4 Connect the power cords of your Stereo manual for the DVD Player, see VCR or DVD playback on the TV screen. Turn on the Stereo and set it to page 17 before turning on the DVD/VCR. Go to the correct Auxiliary or Source mode. Or, simply go to turn on the DVD/VCR. Check your DVD/VCR. 2 Connect the supplied red and white audio cables to...
... still need the yellow video cable or RF coaxial cable for VCR features. 4 Connect the power cords of your Stereo manual for the DVD Player, see VCR or DVD playback on the TV screen. Turn on the Stereo and set it to page 17 before turning on the DVD/VCR. Go to the correct Auxiliary or Source mode. Or, simply go to turn on the DVD/VCR. Check your DVD/VCR. 2 Connect the supplied red and white audio cables to...
User manual, English (US)
Page 15
... use component video cable or S-Video cable instead for the DVD Player, see pages 12-13.You will not have surround sound available. Make sure PROGRESSIVE is not recorded on . Some DVDs are ready to turn on the Stereo. Select Dolby Digital 5.1 channel Surround Sound in Dolby Digital 5.1 channel Surround Sound. H9660UD_1.qx4 04.4.14 4:47 PM Page 15 Hookups (cont'd) 15 DVD/VCR to a TV and to a Stereo that is not connected to a Dolby Digital-compatible Stereo, set DOLBY DIGITAL to ON in the DVD Player's Setup menu...
... use component video cable or S-Video cable instead for the DVD Player, see pages 12-13.You will not have surround sound available. Make sure PROGRESSIVE is not recorded on . Some DVDs are ready to turn on the Stereo. Select Dolby Digital 5.1 channel Surround Sound in Dolby Digital 5.1 channel Surround Sound. H9660UD_1.qx4 04.4.14 4:47 PM Page 15 Hookups (cont'd) 15 DVD/VCR to a TV and to a Stereo that is not connected to a Dolby Digital-compatible Stereo, set DOLBY DIGITAL to ON in the DVD Player's Setup menu...
User manual, English (US)
Page 23
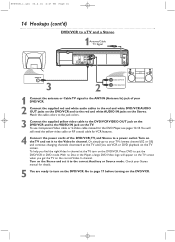
... only useful in DVD mode.To have sound and picture in VCR mode, you want to a TV's S-Video In jack.This supplies the picture only for the DVD Player. DVD COMPONENT VIDEO OUT Jacks (Y CB/PB CR/PR) (green, blue, red) Connect component video cables (not supplied) here and to a Stereo's Coaxial Digital Audio In jack.This supplies audio only for the DVD Player. ANT-IN (Antenna In) jack Connect your TV, Cable Box, or Satellite Receiver. Details...
... only useful in DVD mode.To have sound and picture in VCR mode, you want to a TV's S-Video In jack.This supplies the picture only for the DVD Player. DVD COMPONENT VIDEO OUT Jacks (Y CB/PB CR/PR) (green, blue, red) Connect component video cables (not supplied) here and to a Stereo's Coaxial Digital Audio In jack.This supplies audio only for the DVD Player. ANT-IN (Antenna In) jack Connect your TV, Cable Box, or Satellite Receiver. Details...
User manual, English (US)
Page 24
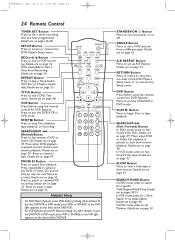
...-Touch Recording. TIMER SET STANDBY-ON SETUP AUDIO SUBTITLE ANGLE REC(ord) I Button Press to set up A-B Repeat. VCR Button Press before using the remote control for a specific Title/Chapter/Track/Time. PAUSE k Button Press to fast forward the tape. Details are on page 53. STOP PLAY SEARCH REW NA508 1 4 PAUSE 23 56 SEARCH FF SPEED SLOW 789 ZOOM SEARCH MODE +10 0 Helpful Hints • For DVD Player features, press DVD before pressing other buttons.To put the DVD/VCR...
...-Touch Recording. TIMER SET STANDBY-ON SETUP AUDIO SUBTITLE ANGLE REC(ord) I Button Press to set up A-B Repeat. VCR Button Press before using the remote control for a specific Title/Chapter/Track/Time. PAUSE k Button Press to fast forward the tape. Details are on page 53. STOP PLAY SEARCH REW NA508 1 4 PAUSE 23 56 SEARCH FF SPEED SLOW 789 ZOOM SEARCH MODE +10 0 Helpful Hints • For DVD Player features, press DVD before pressing other buttons.To put the DVD/VCR...
User manual, English (US)
Page 56
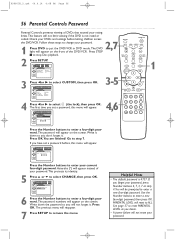
... have set a password, this menu will appear on the screen. QUICK SETUP PLAYER MENU TV ASPECT DOLBY DIGITAL ENGLISH 4:3 LETTER BOX ON TIMER SET STANDBY-ON SETUP AUDIO SUBTITLE ANGLE REC PREV/ CH TITLE REPEAT C-RESET CLEAR MODE REPEAT A-B NEXT/ CH RETURN DISPLAY VCR DVD DISC MENU OK OK 3 Press sor B to enter a new four-digit password, then press OK. If you desire. • A power failure will not erase your password. Helpful Hints • The default password is not rated or coded. Use the Number buttons to select CUSTOM...
... have set a password, this menu will appear on the screen. QUICK SETUP PLAYER MENU TV ASPECT DOLBY DIGITAL ENGLISH 4:3 LETTER BOX ON TIMER SET STANDBY-ON SETUP AUDIO SUBTITLE ANGLE REC PREV/ CH TITLE REPEAT C-RESET CLEAR MODE REPEAT A-B NEXT/ CH RETURN DISPLAY VCR DVD DISC MENU OK OK 3 Press sor B to enter a new four-digit password, then press OK. If you desire. • A power failure will not erase your password. Helpful Hints • The default password is not rated or coded. Use the Number buttons to select CUSTOM...
User manual, English (US)
Page 62
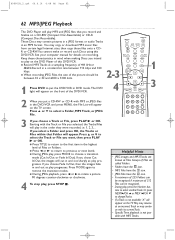
TIMER SET STANDBY-ON SETUP AUDIO SUBTITLE ANGLE REC PREV/ CH TITLE REPEAT C-RESET CLEAR MODE REPEAT A-B NEXT/ CH RETURN 2-3 DISPLAY VCR DVD DISC MENU OK 4 STOP PLAY SEARCH REW NA508 1 4 PAUSE 23 56 SEARCH FF SPEED SLOW 789 ZOOM SEARCH MODE +10 0 1 3 3 If you selected, the Tracks/Files will cut in the highest level of the picture should be recognized. • During play on recording. If you select a Folder and press OK, the Tracks...
TIMER SET STANDBY-ON SETUP AUDIO SUBTITLE ANGLE REC PREV/ CH TITLE REPEAT C-RESET CLEAR MODE REPEAT A-B NEXT/ CH RETURN 2-3 DISPLAY VCR DVD DISC MENU OK 4 STOP PLAY SEARCH REW NA508 1 4 PAUSE 23 56 SEARCH FF SPEED SLOW 789 ZOOM SEARCH MODE +10 0 1 3 3 If you selected, the Tracks/Files will cut in the highest level of the picture should be recognized. • During play on recording. If you select a Folder and press OK, the Tracks...

User manual, English (US)
Page 74
... remote control directly at the DVD Player only if you used the supplied black RF coaxial cable, make sure the TV is set correctly according to your TV owner's manual for use the VCR, press VCR, then try the other VCR feature buttons. If there has been a power failure, it off. The remote control will be happy to assist you want to play is set to channel 3 or 4 (the output channel of the DVD/VCR). Check your connection...
... remote control directly at the DVD Player only if you used the supplied black RF coaxial cable, make sure the TV is set correctly according to your TV owner's manual for use the VCR, press VCR, then try the other VCR feature buttons. If there has been a power failure, it off. The remote control will be happy to assist you want to play is set to channel 3 or 4 (the output channel of the DVD/VCR). Check your connection...
User manual, English (US)
Page 76
... connections between the DVD/VCR,TV, antenna/Cable TV signal, and Cable Box/Satellite Receiver (if applicable). Move the DVD/VCR away from the TV. Details are possible. Or, reset channels at the TV. Press VCR or SOURCE so the VCR light appears on the display panel. • Make sure the VCR clock is on page 44. • TVs placed too close to put the DVD/VCR in VCR mode. The VCR will not perform a timer recording. • Make...
... connections between the DVD/VCR,TV, antenna/Cable TV signal, and Cable Box/Satellite Receiver (if applicable). Move the DVD/VCR away from the TV. Details are possible. Or, reset channels at the TV. Press VCR or SOURCE so the VCR light appears on the display panel. • Make sure the VCR clock is on page 44. • TVs placed too close to put the DVD/VCR in VCR mode. The VCR will not perform a timer recording. • Make...
User manual, English (US)
Page 77
... a picture that is completely connected to delay the recording.The will disappear from the display panel.Then, press STOP/EJECT CA on the front of the tape when putting it in the VCR. Set your TV to channel 03 or 04, then make your channel selections at the Satellite Receiver. • With many Satellite Receiver hookups, if you use audio and video cables to connect your DVD/VCR to your TV screen briefly...
... a picture that is completely connected to delay the recording.The will disappear from the display panel.Then, press STOP/EJECT CA on the front of the tape when putting it in the VCR. Set your TV to channel 03 or 04, then make your channel selections at the Satellite Receiver. • With many Satellite Receiver hookups, if you use audio and video cables to connect your DVD/VCR to your TV screen briefly...
User manual, English (US)
Page 80
... parental controls 56-57 password 56 pause button 24, 43, 52, 59 play button 18-19, 22, 24 player menu 66 playing discs 19 playing tapes 18 power cord 23 on light 22 prev w/ch pbutton 25, 51 program 60 quick setup 65, 66, 68 random 61 rear panel 23 rec (record) button 24, 32, 34 rec (record) light 21 record button 22, 32 recording basic 32 one channel/watching another . . .33 prevention 32 timer 36-38 remote control batteries...
... parental controls 56-57 password 56 pause button 24, 43, 52, 59 play button 18-19, 22, 24 player menu 66 playing discs 19 playing tapes 18 power cord 23 on light 22 prev w/ch pbutton 25, 51 program 60 quick setup 65, 66, 68 random 61 rear panel 23 rec (record) button 24, 32, 34 rec (record) light 21 record button 22, 32 recording basic 32 one channel/watching another . . .33 prevention 32 timer 36-38 remote control batteries...


