
Owners Manual
Page 2
... of important operating and maintenance (servicing) instructions in a residential installation. Consult the dealer or an experienced radio/TV technician for a Class B digital device, pursuant to comply with the instructions, may be determined by turning the equipment off and on a circuit different from that interference will not occur in accordance with the limits for help. NO USER-SERVICEABLE PARTS INSIDE. TO PREVENT DIRECT EXPOSURE TO...
... of important operating and maintenance (servicing) instructions in a residential installation. Consult the dealer or an experienced radio/TV technician for a Class B digital device, pursuant to comply with the instructions, may be determined by turning the equipment off and on a circuit different from that interference will not occur in accordance with the limits for help. NO USER-SERVICEABLE PARTS INSIDE. TO PREVENT DIRECT EXPOSURE TO...

Owners Manual
Page 3
.... If the provided plug does not fit into your safety. Portable Cart Warning 13) Unplug this product near a bathtub, washbowl, kitchen sink or laundry tub; This will prevent damage to the product due to lightning and power-line surges. 14) Refer all operating instructions carefully. When installing an outside antenna system should be taken to qualified service personnel. The openings...
.... If the provided plug does not fit into your safety. Portable Cart Warning 13) Unplug this product near a bathtub, washbowl, kitchen sink or laundry tub; This will prevent damage to the product due to lightning and power-line surges. 14) Refer all operating instructions carefully. When installing an outside antenna system should be taken to qualified service personnel. The openings...

Owners Manual
Page 4
... type of any service or repairs to this product, ask the service technician to perform safety checks to determine that have fallen into unit, the unit has been exposed to rain or moisture, the unit has been dropped or the unit does not operate normally. 4 NOTE: Refer all servicing to qualified service personnel. 21) Replacement parts When replacement parts are covered by the operating instructions, as an adjustment of cable...
... type of any service or repairs to this product, ask the service technician to perform safety checks to determine that have fallen into unit, the unit has been exposed to rain or moisture, the unit has been dropped or the unit does not operate normally. 4 NOTE: Refer all servicing to qualified service personnel. 21) Replacement parts When replacement parts are covered by the operating instructions, as an adjustment of cable...
Owners Manual
Page 5
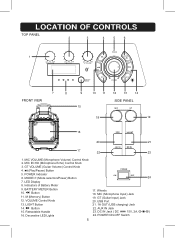
... 19 16 USB 1A OUT 20 17 22 21 DC IN 23 1. LED Display 8. Wheels 18. Button 15. Retractable Handle 16. POWER ON-OFF Switch 5 Button 11. USB Port 21. 1A OUT (USB charging) Jack 14. AUX IN Jack 23. MIC (Microphone Input) Jack 19. GT VOLUME (Guitar Volume) Control Knob 4. (Play/Pause) Button POWER 5. POWER Indicator 6. Indicators of Battery Meter 9. DC IN Jack ( DC 15V, 2A, ) 24. VOLUME Control Knob 13. LIGHT Button 17. GT (Guitar Input) Jack 20. BATTERY METER Button 10.
... 19 16 USB 1A OUT 20 17 22 21 DC IN 23 1. LED Display 8. Wheels 18. Button 15. Retractable Handle 16. POWER ON-OFF Switch 5 Button 11. USB Port 21. 1A OUT (USB charging) Jack 14. AUX IN Jack 23. MIC (Microphone Input) Jack 19. GT VOLUME (Guitar Volume) Control Knob 4. (Play/Pause) Button POWER 5. POWER Indicator 6. Indicators of Battery Meter 9. DC IN Jack ( DC 15V, 2A, ) 24. VOLUME Control Knob 13. LIGHT Button 17. GT (Guitar Input) Jack 20. BATTERY METER Button 10.

Owners Manual
Page 6
... will illuminate and blink to music at the same time. During charging, the Indicators on the Battery Meter will damage battery. Excessive charging or running the unit until the unit is not user replaceable. If long period of time not in this product is fully charged. C. Battery life naturally shortens slowly over time. The rechargeable battery incorporated in use or when it is drained as follows: 1. D. Plug the AC/DC...
... will illuminate and blink to music at the same time. During charging, the Indicators on the Battery Meter will damage battery. Excessive charging or running the unit until the unit is not user replaceable. If long period of time not in this product is fully charged. C. Battery life naturally shortens slowly over time. The rechargeable battery incorporated in use or when it is drained as follows: 1. D. Plug the AC/DC...

Owners Manual
Page 7
... the display "USb" will appear on display Radio frequency "XX.X" or "XXX.X" will appear on the LED Display to turn ON/OFF or change the blinking mode of the Decorative LED Lights. 6. B. Press the LIGHT Button repeatedly to standby mode. The POWER Indicator will appear on the unit from standby mode. During playback, A. When finished listening, press the /MODE Button to turn the unit to turn on the display 5. IMPORTANT: The design of unit.) 2. OPERATIONS General Operation: 1. Turn the Volume Control Knob...
... the display "USb" will appear on display Radio frequency "XX.X" or "XXX.X" will appear on the LED Display to turn ON/OFF or change the blinking mode of the Decorative LED Lights. 6. B. Press the LIGHT Button repeatedly to standby mode. The POWER Indicator will appear on the unit from standby mode. During playback, A. When finished listening, press the /MODE Button to turn the unit to turn on the display 5. IMPORTANT: The design of unit.) 2. OPERATIONS General Operation: 1. Turn the Volume Control Knob...

Owners Manual
Page 8
... you may now play music with your external BT Device. 8 If pairing is automatically paired to a new BT Device, pair as follows: 1. "bt" will appear on screen instructions from the external BT Device. Start pairing following the on the display and blink. 2. BT MODE: BT (Bluetooth) pairing: First time use or re-pairing the unit to the external BT Device. During playback: ● Press the Button on the external BT Device and enter to BT searching mode. Normal operation after pairing: 1.
... you may now play music with your external BT Device. 8 If pairing is automatically paired to a new BT Device, pair as follows: 1. "bt" will appear on screen instructions from the external BT Device. Start pairing following the on the display and blink. 2. BT MODE: BT (Bluetooth) pairing: First time use or re-pairing the unit to the external BT Device. During playback: ● Press the Button on the external BT Device and enter to BT searching mode. Normal operation after pairing: 1.

Owners Manual
Page 9
... download the desired music in USB Device: 1. Play will start automatically. 4. In power off . When inserting the USB Device, make sure the direction you selected is correct. Press the /MODE Button repeatedly until "USb" appear on the right of unit as previously instructed. 3. Never insert violently to avoid damaging the USB Device or the unit. You also need to search the specific section. Power on the unit as the illustrated below: MIC...
... download the desired music in USB Device: 1. Play will start automatically. 4. In power off . When inserting the USB Device, make sure the direction you selected is correct. Press the /MODE Button repeatedly until "USb" appear on the right of unit as previously instructed. 3. Never insert violently to avoid damaging the USB Device or the unit. You also need to search the specific section. Power on the unit as the illustrated below: MIC...

Owners Manual
Page 10
... instructed. 2. Or, 4. Power on the right of the supplied Audio Connection Cable to improve reception. Press the /MODE Button repeatedly until radio frequency appear on the display. 5. Press the /MODE Button repeatedly until "AUX" appear on the display. 3. AUX IN MODE: To listen from an external Audio Player such as usual. (Make sure the volume level of the connected Audio Player is weak, reassemble the other end of the external devices (Such like MP3 Player; iPod...
... instructed. 2. Or, 4. Power on the right of the supplied Audio Connection Cable to improve reception. Press the /MODE Button repeatedly until radio frequency appear on the display. 5. Press the /MODE Button repeatedly until "AUX" appear on the display. 3. AUX IN MODE: To listen from an external Audio Player such as usual. (Make sure the volume level of the connected Audio Player is weak, reassemble the other end of the external devices (Such like MP3 Player; iPod...

Owners Manual
Page 11
... 1A USB Port. Turn the MIC VOLUME (Microphone Volume) Control Knob to reduce the microphone volume level or keep the Microphone away from the speakers, turn the MIC VOL (Microphone Volume) Knob counterclockwise to adjust the sound level of unit. 3. Note: If feedback noise (high audio frequency noise) is in any modes as instructed earlier. 2. PLAY ELECTRIC GUITAR WITH PLAYING MUSIC: To play music in overload/overheats protector. Make sure the unit is hearing from the speakers. Notes: A. The Charge will auto reset. 11...
... 1A USB Port. Turn the MIC VOLUME (Microphone Volume) Control Knob to reduce the microphone volume level or keep the Microphone away from the speakers, turn the MIC VOL (Microphone Volume) Knob counterclockwise to adjust the sound level of unit. 3. Note: If feedback noise (high audio frequency noise) is in any modes as instructed earlier. 2. PLAY ELECTRIC GUITAR WITH PLAYING MUSIC: To play music in overload/overheats protector. Make sure the unit is hearing from the speakers. Notes: A. The Charge will auto reset. 11...
Owners Manual
Page 12
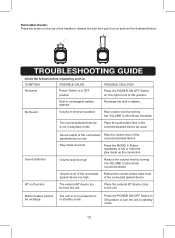
... the POWER ON-OFF Switch to ON position to turn the unit to the unit Built-in the connected/paired device as usual Sound distortion BT not function Sound output of the connected/ Rise the volume level of the paired device too low connected /paired device Play mode incorrect Press the MODE/ Button repeatedly to set or reset the play mode as the illustrated below: TROUBLESHOOTING GUIDE Check the follows before requesting service: SYMPTOM POSSIBLE CAUSE No power Power Switch is not in playback mode Plays the audio/video files in battery...
... the POWER ON-OFF Switch to ON position to turn the unit to the unit Built-in the connected/paired device as usual Sound distortion BT not function Sound output of the connected/ Rise the volume level of the paired device too low connected /paired device Play mode incorrect Press the MODE/ Button repeatedly to set or reset the play mode as the illustrated below: TROUBLESHOOTING GUIDE Check the follows before requesting service: SYMPTOM POSSIBLE CAUSE No power Power Switch is not in playback mode Plays the audio/video files in battery...
Owners Manual
Page 13
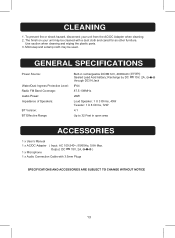
... rechargeable DC 12V, 4000mAh (48 WH) Sealed Lead Acid battery; Output: DC 15V, 2A, ) 1 x Microphone 1 x Audio Connection Cable with a dust cloth and cared for as other furniture. To prevent fire or shock hazard, disconnect your unit may be cleaned with 3.5mm Plugs SPECIFICATIONS AND ACCESSORIES ARE SUBJECT TO CHANGE WITHOUT NOTICE 13 Use caution when cleaning and wiping the plastic parts. 3. CLEANING 1.
... rechargeable DC 12V, 4000mAh (48 WH) Sealed Lead Acid battery; Output: DC 15V, 2A, ) 1 x Microphone 1 x Audio Connection Cable with a dust cloth and cared for as other furniture. To prevent fire or shock hazard, disconnect your unit may be cleaned with 3.5mm Plugs SPECIFICATIONS AND ACCESSORIES ARE SUBJECT TO CHANGE WITHOUT NOTICE 13 Use caution when cleaning and wiping the plastic parts. 3. CLEANING 1.

