
User manual, English (US)
Page 1
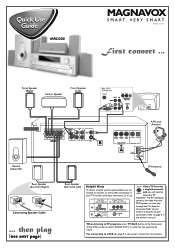
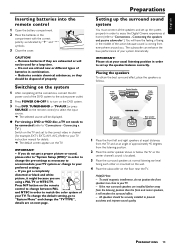
... same input connector: A or B. Front Speaker (Right) Center Speaker Front Speaker (Left) Rear of the DVD system to connect an extra video connection if your TV has only a single Antenna In jack, you can play (see page 9 in order for proper connection (refer to page 9 in the owner's manual.) When listening to TV programs, press TV•AUX button at the front panel of TV (example only) AM Loop Antenna Passive Subwoofer FM Antenna Rear Speaker (Surround Right...
... same input connector: A or B. Front Speaker (Right) Center Speaker Front Speaker (Left) Rear of the DVD system to connect an extra video connection if your TV has only a single Antenna In jack, you can play (see page 9 in order for proper connection (refer to page 9 in the owner's manual.) When listening to TV programs, press TV•AUX button at the front panel of TV (example only) AM Loop Antenna Passive Subwoofer FM Antenna Rear Speaker (Surround Right...

User manual, English (US)
Page 2
... screen. 2) Select 'GENERAL SETUP,' then press OK. 3) Press 4 button to select 'VIDEO OUT,' then press 2 button. 4) Press 3 / 4 button to confirm. SETUP MENU - - No picture!! Playing a disc 4 CHANNEL 3 2 1 Press POWER ON•OFF at the front panel of video output (S-VIDEO or CR CB Y). Follow the instructions given in the DVD system). 3 Press OPEN•CLOSE 0 at the front panel to close the disc tray. This connection enables you are described in the accompanying owner's manual. Check the AV (Audio/Video) mode...
... screen. 2) Select 'GENERAL SETUP,' then press OK. 3) Press 4 button to select 'VIDEO OUT,' then press 2 button. 4) Press 3 / 4 button to confirm. SETUP MENU - - No picture!! Playing a disc 4 CHANNEL 3 2 1 Press POWER ON•OFF at the front panel of video output (S-VIDEO or CR CB Y). Follow the instructions given in the DVD system). 3 Press OPEN•CLOSE 0 at the front panel to close the disc tray. This connection enables you are described in the accompanying owner's manual. Check the AV (Audio/Video) mode...
User manual, English (US)
Page 4
... as the owner of your Magnavox warranty. TRATION Hurry! As a member of the Magnavox "family," you're entitled to protection by one of these symbols CAUTION RISK OF ELECTRIC SHOCK DO NOT OPEN CAUTION: TO REDUCE THE RISK OF ELECTRIC SHOCK, DO NOT REMOVE COVER (OR BACK). And most comprehensive warranties and outstanding service networks in our power to...
... as the owner of your Magnavox warranty. TRATION Hurry! As a member of the Magnavox "family," you're entitled to protection by one of these symbols CAUTION RISK OF ELECTRIC SHOCK DO NOT OPEN CAUTION: TO REDUCE THE RISK OF ELECTRIC SHOCK, DO NOT REMOVE COVER (OR BACK). And most comprehensive warranties and outstanding service networks in our power to...

User manual, English (US)
Page 7
... or other rights owners. "Dolby". NOTE: PICTURES SHOWN MAY BE DIFFERENT BETWEEN COUNTRIES. NEVER MAKE OR CHANGE CONNECTIONS WITH THE POWER SWITCHED ON. All rights reserved. Use of this copyright protection technology must accept any interference received, including interference that is intended for radio noise emissions from Dolby Laboratories. CAUTION Use of controls or adjustments or performance of Dolby Laboratories. IMPORTANT NOTES 5 Canada English: This digital apparatus does...
... or other rights owners. "Dolby". NOTE: PICTURES SHOWN MAY BE DIFFERENT BETWEEN COUNTRIES. NEVER MAKE OR CHANGE CONNECTIONS WITH THE POWER SWITCHED ON. All rights reserved. Use of this copyright protection technology must accept any interference received, including interference that is intended for radio noise emissions from Dolby Laboratories. CAUTION Use of controls or adjustments or performance of Dolby Laboratories. IMPORTANT NOTES 5 Canada English: This digital apparatus does...
User manual, English (US)
Page 8
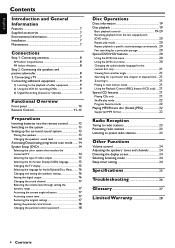
... 22 Program favorite tracks 22 Playing MP3/Picture disc (Kodak, JPEG 22 Supported MP3 format 22 Radio Reception Tuning to radio stations 23 Presetting radio stations 23 Listening to preset radio stations 23 Other Functions Volume control 24 Adjusting the speakers' tones and channels 24 Dimming the display screen 24 Selecting Listening mode 24 Sleep timer setting 24 Specifications 25 Troubleshooting 26 Glossary 27 Limited Warranty 28 6 CONTENTS English Contents Introduction and General Information Features 7 Supplied accessories 7 Environmental information 7 Installation...
... 22 Program favorite tracks 22 Playing MP3/Picture disc (Kodak, JPEG 22 Supported MP3 format 22 Radio Reception Tuning to radio stations 23 Presetting radio stations 23 Listening to preset radio stations 23 Other Functions Volume control 24 Adjusting the speakers' tones and channels 24 Dimming the display screen 24 Selecting Listening mode 24 Sleep timer setting 24 Specifications 25 Troubleshooting 26 Glossary 27 Limited Warranty 28 6 CONTENTS English Contents Introduction and General Information Features 7 Supplied accessories 7 Environmental information 7 Installation...

User manual, English (US)
Page 9
.... Leave the player in DolbyR Digital decoder, supporting DolbyR ProLogic Use the Home Cinema Audio System for adequate ventilation. Progressive Scan Provides a flicker free image with two AAA batteries - Audio cable (white/red) - INTRODUCTION AND GENERAL INFORMATION 7 Wipe the disc from cold to warm surroundings, making it with a cleaning cloth. G Do not use the system's surround sound speakers. It can double the vertical resolution of the picture to play the disc at a preset time...
.... Leave the player in DolbyR Digital decoder, supporting DolbyR ProLogic Use the Home Cinema Audio System for adequate ventilation. Progressive Scan Provides a flicker free image with two AAA batteries - Audio cable (white/red) - INTRODUCTION AND GENERAL INFORMATION 7 Wipe the disc from cold to warm surroundings, making it with a cleaning cloth. G Do not use the system's surround sound speakers. It can double the vertical resolution of the picture to play the disc at a preset time...
User manual, English (US)
Page 11
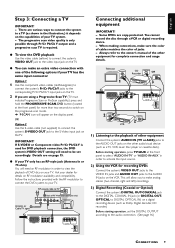
... PROGRESSIVE SCAN-DVD button (located at the front panel to the S-Video input jack on the TV. OR Option 2 Use the S-video cable (not supplied) to connect the system's S-VIDEO OUT jack to select "AUDIO IN-TV" or "AUDIO IN-AUX" in the illustration,) it depends on the capabilities of your TV. Details are copy-protected. When making connections, make an extra video connection with the RF modulator to connect the DVD system to DIGITAL OPTICAL IN) on...
... PROGRESSIVE SCAN-DVD button (located at the front panel to the S-Video input jack on the TV. OR Option 2 Use the S-video cable (not supplied) to connect the system's S-VIDEO OUT jack to select "AUDIO IN-TV" or "AUDIO IN-AUX" in the illustration,) it depends on the capabilities of your TV. Details are copy-protected. When making connections, make an extra video connection with the RF modulator to connect the DVD system to DIGITAL OPTICAL IN) on...
User manual, English (US)
Page 12
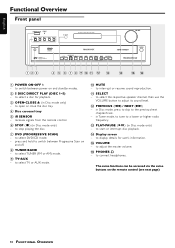
... speaker channel, then use the VOLUME button to select TV or AUX mode. 0 MUTE - to adjust its sound level. @ PREVIOUS (S) / NEXT (T) - to select DVD/CD mode. - to switch between power on and standby modes. 2 5 DISC DIRECT PLAY (DISC 1~5) - to star t or interrupt disc playback. $ Display screen - SELECT - in Disc mode, press to skip to select a disc for user's information. % VOLUME - English Functional Overview Front panel POWER ON•OFF STANDBY ON DISC 1 DISC 2 DISC 3 DISC 4 DISC 5 5 DISC DIRECT PLAY OPEN•CLOSE iR SENSOR DVD VIDEO DIGITAL SURROUND SYSTEM...
... speaker channel, then use the VOLUME button to select TV or AUX mode. 0 MUTE - to adjust its sound level. @ PREVIOUS (S) / NEXT (T) - to select DVD/CD mode. - to switch between power on and standby modes. 2 5 DISC DIRECT PLAY (DISC 1~5) - to star t or interrupt disc playback. $ Display screen - SELECT - in Disc mode, press to skip to select a disc for user's information. % VOLUME - English Functional Overview Front panel POWER ON•OFF STANDBY ON DISC 1 DISC 2 DISC 3 DISC 4 DISC 5 5 DISC DIRECT PLAY OPEN•CLOSE iR SENSOR DVD VIDEO DIGITAL SURROUND SYSTEM...
User manual, English (US)
Page 13
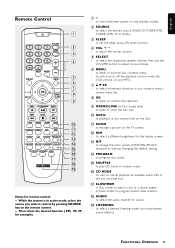
... Disc mode, to switch on the TV screen. @ DIM - to select the desired source (DVD/CD, TUNER (FM), TUNER (AM), TV or AUX.) 3 SLEEP - to set the sleep (auto-off the playback control mode (for example). 1y - ZOOM - in random order. ^ CD MODE - Then select the desired function for VCD version 2.0 and MP3.) 7 3412 - to select the respective speaker channel, then use the VOLUME button to program preset radio stations. * AUDIO - to play CD tracks in Tuner mode, to adjust its sound level. 6 MENU - to select...
... Disc mode, to switch on the TV screen. @ DIM - to select the desired source (DVD/CD, TUNER (FM), TUNER (AM), TV or AUX.) 3 SLEEP - to set the sleep (auto-off the playback control mode (for example). 1y - ZOOM - in random order. ^ CD MODE - Then select the desired function for VCD version 2.0 and MP3.) 7 3412 - to select the respective speaker channel, then use the VOLUME button to program preset radio stations. * AUDIO - to play CD tracks in Tuner mode, to adjust its sound level. 6 MENU - to select...
User manual, English (US)
Page 14
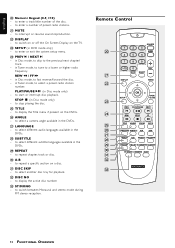
to select another disc tray for playback. ¤ DISC NO - in Disc mode only) - STOP Ç (in Tuner mode, to tune to a lower or higher radio frequency. to select different audio languages available in Disc mode, to skip to select a preset radio station number. to interrupt or resume sound reproduction. ™ DISPLAY - Remote Control ) ¡ ™ £ ≤ SOURCE 1 2 3 SLEEP 4 5 6 7 8 9 >10 0 MUTE SELECT VOL DISPLAY MENU SETUP OK OPEN/ CLOSE PREV í PLAY/PAUSE NEXT ÉÅ ë REW STOP FF...
to select another disc tray for playback. ¤ DISC NO - in Disc mode only) - STOP Ç (in Tuner mode, to tune to a lower or higher radio frequency. to select different audio languages available in Disc mode, to skip to select a preset radio station number. to interrupt or resume sound reproduction. ™ DISPLAY - Remote Control ) ¡ ™ £ ≤ SOURCE 1 2 3 SLEEP 4 5 6 7 8 9 >10 0 MUTE SELECT VOL DISPLAY MENU SETUP OK OPEN/ CLOSE PREV í PLAY/PAUSE NEXT ÉÅ ë REW STOP FF...
User manual, English (US)
Page 15
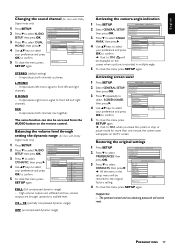
... the surround speakers at your system dramatically. PREPARATIONS 13 Connecting a TV".) Switch on next page. Preparations Setting up the surround sound system You must connect all the connections, connect the AC power cord of your TV. - Remove batteries if they should be displayed. If you are on the TV and set up the speaker balance correctly. To change the default setting, go to "System Menu" and change the "TV TYPE", details are TITLE N/P DIM using...
... the surround speakers at your system dramatically. PREPARATIONS 13 Connecting a TV".) Switch on next page. Preparations Setting up the surround sound system You must connect all the connections, connect the AC power cord of your TV. - Remove batteries if they should be displayed. If you are on the TV and set up the speaker balance correctly. To change the default setting, go to "System Menu" and change the "TV TYPE", details are TITLE N/P DIM using...
User manual, English (US)
Page 16
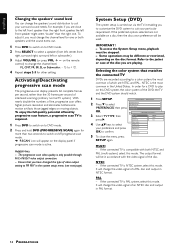
... on the remote control) to change the channel level. SETUP MENU - - EXIT SETUP - - The output format will change the video signal of the disc. PAL - Activating/Deactivating progressive scan mode The progressive-scan display presents 60 complete frames per second, rather than two seconds to switch on/off progressive scan mode. ➜ 'P-SCAN' icon will appear on to DVD mode. 2 Press SELECT to select a speaker (front left, center, front right, surround right, surround left or subwoofer.) 3 Adjust VOLUME (or...
... on the remote control) to change the channel level. SETUP MENU - - EXIT SETUP - - The output format will change the video signal of the disc. PAL - Activating/Deactivating progressive scan mode The progressive-scan display presents 60 complete frames per second, rather than two seconds to switch on/off progressive scan mode. ➜ 'P-SCAN' icon will appear on to DVD mode. 2 Press SELECT to select a speaker (front left, center, front right, surround right, surround left or subwoofer.) 3 Adjust VOLUME (or...
User manual, English (US)
Page 18
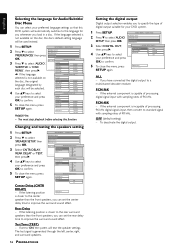
... center MAIN PAGE TEST TONE speaker than the front speakers, you can set to 'ON,' the system will automatically switches to the language for your preference and press OK to confirm. SETUP MENU - - SETUP MENU - - If the listening position is capable of processing digital signal input with sampling rates of 96 kHz. If set the rear delay time to improve the surround sound effect. GENERAL SETUP SPEAKER SETUP AUDIO SETUP PREFERENCES 3 Select 'DIGITAL OUT,' EXIT SETUP - - AUDIO SETUP PAGE - - SPEAKER SETUP PAGE - - 4 Use...
... center MAIN PAGE TEST TONE speaker than the front speakers, you can set to 'ON,' the system will automatically switches to the language for your preference and press OK to confirm. SETUP MENU - - SETUP MENU - - If the listening position is capable of processing digital signal input with sampling rates of 96 kHz. If set the rear delay time to improve the surround sound effect. GENERAL SETUP SPEAKER SETUP AUDIO SETUP PREFERENCES 3 Select 'DIGITAL OUT,' EXIT SETUP - - AUDIO SETUP PAGE - - SPEAKER SETUP PAGE - - 4 Use...
User manual, English (US)
Page 19
...DUAL MONO SETUP STEREO (default setting) - MIX - Activating screen saver 1 Press SETUP. SETUP MENU - - PREFERENCES PAGE - - 3 Press 4 to select 'AUDIO SETUP,' then press OK. MAIN PAGE LOAD FACTORY SETTING 4 To close the menu, press SET SCREEN SAVER SETUP again. ➜ If set to confirm. English Changing the sound channel (for discs with Dolby Digital mode only) 1 Press SETUP. L MONO - AUDIO SETUP PAGE - - 'DYNAMIC,' then press 2. MAIN PAGE 2 Select 'GENERAL SETUP,' then press OK. GENERAL SETUP SPEAKER SETUP AUDIO SETUP PREFERENCES 3 Press...
...DUAL MONO SETUP STEREO (default setting) - MIX - Activating screen saver 1 Press SETUP. SETUP MENU - - PREFERENCES PAGE - - 3 Press 4 to select 'AUDIO SETUP,' then press OK. MAIN PAGE LOAD FACTORY SETTING 4 To close the menu, press SET SCREEN SAVER SETUP again. ➜ If set to confirm. English Changing the sound channel (for discs with Dolby Digital mode only) 1 Press SETUP. L MONO - AUDIO SETUP PAGE - - 'DYNAMIC,' then press 2. MAIN PAGE 2 Select 'GENERAL SETUP,' then press OK. GENERAL SETUP SPEAKER SETUP AUDIO SETUP PREFERENCES 3 Press...

User manual, English (US)
Page 20
... select 'PASSWORD,' then press 2. 4 Select 'CHANGE,' then press OK. 5 Use the numeric GENERAL SETUP SPEAKER SETUP AUDIO SETUP PREFERENCES EXIT SETUP - - recommended that has the same rating or lower is set a playback limitation level. Helpful Hint: - PREFERENCES PAGE - For example, if the player is available on the disc. Restricted; Parental Guidance suggested. 2 - General Audience; SETUP MENU - - The rating level feature does not work for viewers of 6, 4, 3 and 1 will play . PREFERENCES PAGE - - SETUP MENU...
... select 'PASSWORD,' then press 2. 4 Select 'CHANGE,' then press OK. 5 Use the numeric GENERAL SETUP SPEAKER SETUP AUDIO SETUP PREFERENCES EXIT SETUP - - recommended that has the same rating or lower is set a playback limitation level. Helpful Hint: - PREFERENCES PAGE - For example, if the player is available on the disc. Restricted; Parental Guidance suggested. 2 - General Audience; SETUP MENU - - The rating level feature does not work for viewers of 6, 4, 3 and 1 will play . PREFERENCES PAGE - - SETUP MENU...
User manual, English (US)
Page 21
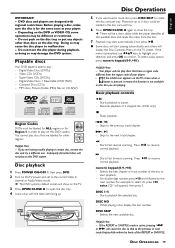
.... Playable discs Your DVD player is presented, use 1 234 keys to highlight your player. - Digital Video Discs (DVDs) - Compact Discs (CDs) - Improperly formatted discs will not play discs that have a region code different from the disc. 7 Playback may cause the disc player to start automatically, if not, press ÉÅ. Disc playback 1 Press POWER ON•OFF y, then press DVD. 2 Turn on the TV power and set to the correct Video In channel or Audio/Video mode. ➜ The DVD system's default screen will...
.... Playable discs Your DVD player is presented, use 1 234 keys to highlight your player. - Digital Video Discs (DVDs) - Compact Discs (CDs) - Improperly formatted discs will not play discs that have a region code different from the disc. 7 Playback may cause the disc player to start automatically, if not, press ÉÅ. Disc playback 1 Press POWER ON•OFF y, then press DVD. 2 Turn on the TV power and set to the correct Video In channel or Audio/Video mode. ➜ The DVD system's default screen will...

User manual, English (US)
Page 22
..., make sure the entire A-B section is disconnected from the selected movie title. 1 Press TITLE. ➜ A list of the track, it , you are four scan speeds. The DVD menu's contents and operation differ from disc to mark the A-B across a chapter. - repeat chapter - Repeat the current disc For CD (in CD mode. On a DVD, you can set to play a specific section in CD program mode) To...
..., make sure the entire A-B section is disconnected from the selected movie title. 1 Press TITLE. ➜ A list of the track, it , you are four scan speeds. The DVD menu's contents and operation differ from disc to mark the A-B across a chapter. - repeat chapter - Repeat the current disc For CD (in CD mode. On a DVD, you can set to play a specific section in CD program mode) To...

User manual, English (US)
Page 24
... turn on the remote to the correct Video In channel (see page 13 - To shuffle play , press Ç twice. "XX" is the program number and "YY" is 7 levels - Supported VBR bit-rate - Switching on shuffle function. ➜ "SHUFFLE ON" is briefly displayed. 3 Press ÉÅ to select the previous or next track. 4 To turn off the DVD system or open the disc tray. Kodak Picture disc 1 Load a Kodak Picture disc. ➜ The disc...
... turn on the remote to the correct Video In channel (see page 13 - To shuffle play , press Ç twice. "XX" is the program number and "YY" is 7 levels - Supported VBR bit-rate - Switching on shuffle function. ➜ "SHUFFLE ON" is briefly displayed. 3 Press ÉÅ to select the previous or next track. 4 To turn off the DVD system or open the disc tray. Kodak Picture disc 1 Load a Kodak Picture disc. ➜ The disc...
User manual, English (US)
Page 28
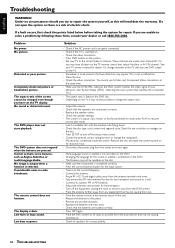
... system. Replace the batteries with the playback side facing down. - The aspect ratio of your TV to the correct Video In channel. The remote control does not function. Check if the AC power cord is switched on the DVD disc. - Or, change the rating level. - Clean the disc. - You cannot use S-Video and Component Video connections at the remote sensor of electric shock. The system is fixed on . - Check for correct polarity. 26 TROUBLESHOOTING Remove...
... system. Replace the batteries with the playback side facing down. - The aspect ratio of your TV to the correct Video In channel. The remote control does not function. Check if the AC power cord is switched on the DVD disc. - Or, change the rating level. - Clean the disc. - You cannot use S-Video and Component Video connections at the remote sensor of electric shock. The system is fixed on . - Check for correct polarity. 26 TROUBLESHOOTING Remove...
User manual, English (US)
Page 29
... audio software. Multichannel: DVD is sampled per seconds, or kbps. The limitation varies from DVD into progressive format for allowing discs to have compatible region codes. VIDEO OUT jack: Jack on a Video CD or SVCD that supports PBC, you want . Some discs are smaller than the user-set level. PCM (Pulse Code Modulation): A system for converting analog sound signal to a TV. By using MP3 format. English Analog: Sound that has not been turned into numerical values. Parental control: A function...
... audio software. Multichannel: DVD is sampled per seconds, or kbps. The limitation varies from DVD into progressive format for allowing discs to have compatible region codes. VIDEO OUT jack: Jack on a Video CD or SVCD that supports PBC, you want . Some discs are smaller than the user-set level. PCM (Pulse Code Modulation): A system for converting analog sound signal to a TV. By using MP3 format. English Analog: Sound that has not been turned into numerical values. Parental control: A function...


