
User manual, English
Page 4
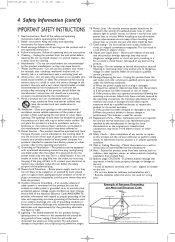
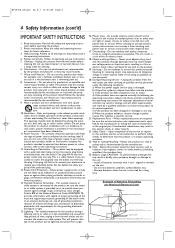
... operate normally by the operating instructions. Unauthorized substitutions may be equipped with them , paying particular attention to provide some protection against them might be fatal. 17. Mount the product to overturn. 10. Cleaning - Do not use this product on the unit. • Do not mix batteries (old/new, carbon/alkaline, etc...
... operate normally by the operating instructions. Unauthorized substitutions may be equipped with them , paying particular attention to provide some protection against them might be fatal. 17. Mount the product to overturn. 10. Cleaning - Do not use this product on the unit. • Do not mix batteries (old/new, carbon/alkaline, etc...
User manual, English
Page 5
... Safety Information 3-4 Contents 5 Introduction 6 Getting Started Playable Discs 7 General Information 8 Hookups 9-17 Recording from External Devices (DVD 17 Initial Setup 18-19 Basic Play and Recording Quick Videotape Playback 20 Quick Disc Playback 21 Quick Disc Recording 22 Controls Remote Control 23-24 Display Panel (VCR 25 Front Panel 26 Rear Panel 27 Advanced Installation TV Channel...
... Safety Information 3-4 Contents 5 Introduction 6 Getting Started Playable Discs 7 General Information 8 Hookups 9-17 Recording from External Devices (DVD 17 Initial Setup 18-19 Basic Play and Recording Quick Videotape Playback 20 Quick Disc Playback 21 Quick Disc Recording 22 Controls Remote Control 23-24 Display Panel (VCR 25 Front Panel 26 Rear Panel 27 Advanced Installation TV Channel...

User manual, English
Page 9
... the Stereo to the correct Video In channel or channel 3. See pages 17 and 44 for a simple connection. Follow the steps for the first time, complete the Initial Setup.This sets up everything. When you see and hear the Recorder on the TV screen. This may be called AUX or AUXILIARY IN... red/white audio cables or with your existing equipment, find your Antenna or Cable TV signal already.You can use the DVD or VCR features of a Disc or Videocassette playing on the Recorder for the hookup you have only an RF-style jack, usually labeled Antenna In or 75 ohm. Never make or...
... the Stereo to the correct Video In channel or channel 3. See pages 17 and 44 for a simple connection. Follow the steps for the first time, complete the Initial Setup.This sets up everything. When you see and hear the Recorder on the TV screen. This may be called AUX or AUXILIARY IN... red/white audio cables or with your existing equipment, find your Antenna or Cable TV signal already.You can use the DVD or VCR features of a Disc or Videocassette playing on the Recorder for the hookup you have only an RF-style jack, usually labeled Antenna In or 75 ohm. Never make or...
User manual, English
Page 17
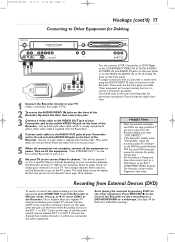
... protected. This will connect similarly, but this page (with the Recorder.) 4 Connect audio cables to the AUDIO OUT jacks of the Recorder. E9490UD_EN.qx3 04.9.21 11:53 AM Page 17 Hookups (cont'd) 17 Connecting to Other Equipment for Dubbing You can connect a VCR, Camcorder, or DVD Player to the COMPONENT VIDEO IN (Y PB PR), S-VIDEO...
... protected. This will connect similarly, but this page (with the Recorder.) 4 Connect audio cables to the AUDIO OUT jacks of the Recorder. E9490UD_EN.qx3 04.9.21 11:53 AM Page 17 Hookups (cont'd) 17 Connecting to Other Equipment for Dubbing You can connect a VCR, Camcorder, or DVD Player to the COMPONENT VIDEO IN (Y PB PR), S-VIDEO...

User manual, English
Page 22
... Audio (sound) to see TV channels through the Recorder. 6 Press CHANNEL +/- If you finalize it. See pages 18 and 19 and 28. See page 34. See page 17. To resume recording, press DVD REC I to close the disc tray.The Index 8 Picture Screen will reappear after a few seconds. Follow the ...steps on page 55.You cannot record or edit a DVD+R after you plan to play the Disc on a DVD+RW, choose the last Empty Title...
... Audio (sound) to see TV channels through the Recorder. 6 Press CHANNEL +/- If you finalize it. See pages 18 and 19 and 28. See page 34. See page 17. To resume recording, press DVD REC I to close the disc tray.The Index 8 Picture Screen will reappear after a few seconds. Follow the ...steps on page 55.You cannot record or edit a DVD+R after you plan to play the Disc on a DVD+RW, choose the last Empty Title...

User manual, English
Page 26
...Touch Recording. RECORD I Button (VCR) Press to start DVD to VCR or VCR to DVD duplication. PLAY B Button (DVD) Press to CAM1 in DVD mode. See pages 44 and 73. IR (infrared) Remote Sensor Receives a signal from your Recorder's ...DVD Display Panel Shows Disc status in VCR mode. VCR Light This light appears when the Recorder is in VCR mode. Point the remote here, not at your Recorder from a distance. SV (S-Video),VIDEO and AUDIO IN jacks Use these jacks when connecting a Camcorder or other equipment, set the Recorder to start a Disc recording. See page 17. When recording...
...Touch Recording. RECORD I Button (VCR) Press to start DVD to VCR or VCR to DVD duplication. PLAY B Button (DVD) Press to CAM1 in DVD mode. See pages 44 and 73. IR (infrared) Remote Sensor Receives a signal from your Recorder's ...DVD Display Panel Shows Disc status in VCR mode. VCR Light This light appears when the Recorder is in VCR mode. Point the remote here, not at your Recorder from a distance. SV (S-Video),VIDEO and AUDIO IN jacks Use these jacks when connecting a Camcorder or other equipment, set the Recorder to start a Disc recording. See page 17. When recording...

User manual, English
Page 27
... See page 13. Electrostatic discharge may damage the unit permanently. • You only need one audio and one video connection to the Recorder. This supplies the picture for both DVD and VCR modes. EXT2 Jacks VIDEO IN jack (yellow) Connect a video cable from the audio out jacks of the jacks. See page.... EXT2 S-VIDEO IN jack Use an S-video cable (not supplied) to connect this jack to the Component Video Out jacks of other equipment. See page 17. EXT2 S-VIDEO OUT jack Connect an S-Video cable here and to the TV's Video In jack. COMPONENT VIDEO IN (Y PB PR) jacks (red, ...
... See page 13. Electrostatic discharge may damage the unit permanently. • You only need one audio and one video connection to the Recorder. This supplies the picture for both DVD and VCR modes. EXT2 Jacks VIDEO IN jack (yellow) Connect a video cable from the audio out jacks of the jacks. See page.... EXT2 S-VIDEO IN jack Use an S-video cable (not supplied) to connect this jack to the Component Video Out jacks of other equipment. See page 17. EXT2 S-VIDEO OUT jack Connect an S-Video cable here and to the TV's Video In jack. COMPONENT VIDEO IN (Y PB PR) jacks (red, ...

User manual, English
Page 60
...[] [] [] Enter code 4 Press L to select Parental level, then press B. 5 Press K or L or the Number buttons to select a rating, then press OK. NC-17 6 - PG 1 - W X YZ a ~ 1 2 1en off no off Access control Auto resume Finalize disc Child lock 2 Parental level Change country Change code s 6 ...SYSTEM MENU to remove the menus. 1,6 1-5 3,5 Helpful Hints • The rating numbers compare to standard U.S. Press DVD so the DVD light appears on the front of the Recorder. 1 Press SYSTEM MENU. E9490UD_EN.qx3 04.9.21 10:54 AM Page 60 60 Access Control (cont'd) Parental Level ...
...[] [] [] Enter code 4 Press L to select Parental level, then press B. 5 Press K or L or the Number buttons to select a rating, then press OK. NC-17 6 - PG 1 - W X YZ a ~ 1 2 1en off no off Access control Auto resume Finalize disc Child lock 2 Parental level Change country Change code s 6 ...SYSTEM MENU to remove the menus. 1,6 1-5 3,5 Helpful Hints • The rating numbers compare to standard U.S. Press DVD so the DVD light appears on the front of the Recorder. 1 Press SYSTEM MENU. E9490UD_EN.qx3 04.9.21 10:54 AM Page 60 60 Access Control (cont'd) Parental Level ...

User manual, English
Page 74
... panel if you want to stop recording. 2 1 Helpful Hints • No DVD features are available while the VCR is recording from your Camcorder or other devices. See page 17. G There is not in the disc tray. Press VCR so the VCR light appears on the VCR display panel. 3 Press STOP C to record from. G The DVD Recorder is no disc in use...
... panel if you want to stop recording. 2 1 Helpful Hints • No DVD features are available while the VCR is recording from your Camcorder or other devices. See page 17. G There is not in the disc tray. Press VCR so the VCR light appears on the VCR display panel. 3 Press STOP C to record from. G The DVD Recorder is no disc in use...

User manual, English
Page 84
...69. Details are on pages 9-17. If the Disc is bad (scratched, warped, etc.) or if the Recorder cannot read the Disc, you complete the Initial Setup. For VCR features, you should turn on your TV and set a timer recording, reset the timer recording. Another DVD Player shows the Index Picture ...may not show the entire system menu on the Recorder's display panel.This appears in addition to occur. • If you adjust the clock after you try to dub or record copyrighted material onto a DVD+R or DVD+RW using the Recorder. The VCR will appear on the TV screen. See pages 9-...
...69. Details are on pages 9-17. If the Disc is bad (scratched, warped, etc.) or if the Recorder cannot read the Disc, you complete the Initial Setup. For VCR features, you should turn on your TV and set a timer recording, reset the timer recording. Another DVD Player shows the Index Picture ...may not show the entire system menu on the Recorder's display panel.This appears in addition to occur. • If you adjust the clock after you try to dub or record copyrighted material onto a DVD+R or DVD+RW using the Recorder. The VCR will appear on the TV screen. See pages 9-...
User manual, English
Page 86
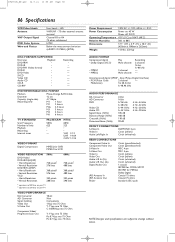
...04.9.21 10:55 AM Page 86 86 Specifications VCR Video Heads Antenna VHF Output Signal DVD Color System Wow and Flutter Four heads - Sony ...% 17.1" (W) x 3.9" (H) x 10.3" (D) (435mm x 100mm x 262mm) 11.0 lbs. (5.0 kg) AUDIO FORMAT Compressed digital • Dolby Digital (AC-3) • MPEG1 • MPEG2 Play Multi-channel 2-channel Multi-channel Recording 2-...SUPPORTED Disc type DVD+RW DVD+R DVD-RW (Video format) DVD-R DVD-Video SVCD Video CD Audio CD CD-R CD-RW Playback Recording DVD+REWRITABLE DISC FORMAT Medium Diameter Capacity (single side) Recording time Phase-Change ...
...04.9.21 10:55 AM Page 86 86 Specifications VCR Video Heads Antenna VHF Output Signal DVD Color System Wow and Flutter Four heads - Sony ...% 17.1" (W) x 3.9" (H) x 10.3" (D) (435mm x 100mm x 262mm) 11.0 lbs. (5.0 kg) AUDIO FORMAT Compressed digital • Dolby Digital (AC-3) • MPEG1 • MPEG2 Play Multi-channel 2-channel Multi-channel Recording 2-...SUPPORTED Disc type DVD+RW DVD+R DVD-RW (Video format) DVD-R DVD-Video SVCD Video CD Audio CD CD-R CD-RW Playback Recording DVD+REWRITABLE DISC FORMAT Medium Diameter Capacity (single side) Recording time Phase-Change ...

User manual, English
Page 88
...unlock 58 M1 - buttons 23 user preference settings . . . . .32 vcr button 23 vcr light 25 VCR Plus+channels 29 VCR Plus+/ TIMER button 24, 45-47 VCR Plus+ timer recording . .46 vcr status display 68 vcr rec I button . . . . .22, 24, 43 dvd recorder features menu . . .62 editing 53-54 erase disc 53 erase this ... 51, 54 glossary 79-80 helpful hints 81-84 hidden chapter 54 hi-fi stereo sound 77, 82 home videotape duplication . .17 hookups 9-17 index picture screen 34 index search 76 information boxes 35 initial setup 18-19 insert chapter marker 54 installation 28-31 "IS TV...
...unlock 58 M1 - buttons 23 user preference settings . . . . .32 vcr button 23 vcr light 25 VCR Plus+channels 29 VCR Plus+/ TIMER button 24, 45-47 VCR Plus+ timer recording . .46 vcr status display 68 vcr rec I button . . . . .22, 24, 43 dvd recorder features menu . . .62 editing 53-54 erase disc 53 erase this ... 51, 54 glossary 79-80 helpful hints 81-84 hidden chapter 54 hi-fi stereo sound 77, 82 home videotape duplication . .17 hookups 9-17 index picture screen 34 index search 76 information boxes 35 initial setup 18-19 insert chapter marker 54 installation 28-31 "IS TV...
User manual, English (US)
Page 4
... dealer or local power company. If you to cords at right. 15. If the plug still fails to fit, contact your electrician to be fatal. 17. If an outside antenna or cable system is damaged, b) If liquid has spilled or objects have been adhered to keep it from overheating. An outside...
... dealer or local power company. If you to cords at right. 15. If the plug still fails to fit, contact your electrician to be fatal. 17. If an outside antenna or cable system is damaged, b) If liquid has spilled or objects have been adhered to keep it from overheating. An outside...

User manual, English (US)
Page 5
...Started Playable Discs 7 General Information 8 Hookups 9-17 Initial Setup 18-19 Basic Play and Recording Quick Videotape Playback 20 Quick Disc Playback 21 Quick Disc Recording 22 Controls Remote Control 23-24 Display Panel (VCR 25 Front Panel 26 Rear Panel 27 Advanced ...Language Settings 66 Night Mode, Remote Control Used 67 VCR Displays VCR Status Displays 68 VCR Recording Options Videotape Recording 69 Record One Channel/Watch Another (VCR 70 One-Touch Recording (VCR 71 Rerecording (Tape Duplication 72 DVD to Videotape Duplication 73 Tape Playback Features Tape Counter ...
...Started Playable Discs 7 General Information 8 Hookups 9-17 Initial Setup 18-19 Basic Play and Recording Quick Videotape Playback 20 Quick Disc Playback 21 Quick Disc Recording 22 Controls Remote Control 23-24 Display Panel (VCR 25 Front Panel 26 Rear Panel 27 Advanced ...Language Settings 66 Night Mode, Remote Control Used 67 VCR Displays VCR Status Displays 68 VCR Recording Options Videotape Recording 69 Record One Channel/Watch Another (VCR 70 One-Touch Recording (VCR 71 Rerecording (Tape Duplication 72 DVD to Videotape Duplication 73 Tape Playback Features Tape Counter ...

User manual, English (US)
Page 9
Progressive Scan Component Video has the highest quality, but use the DVD or VCR features of this Recorder, you chose. This may be the jack to the power outlets only after you have finished ... to the PHONO IN jack of your memories by copying a videotape to do not connect the Recorder to another VCR, then connect the VCR to a TV.Your VCR may have con- Hookups 9 nected your TV (or TV and Stereo).You will not use ... or 75 ohm. Special connections may have the copy protection system, which you connect the Recorder directly to the power outlet. See pages 17 and 44 for details.
Progressive Scan Component Video has the highest quality, but use the DVD or VCR features of this Recorder, you chose. This may be the jack to the power outlets only after you have finished ... to the PHONO IN jack of your memories by copying a videotape to do not connect the Recorder to another VCR, then connect the VCR to a TV.Your VCR may have con- Hookups 9 nected your TV (or TV and Stereo).You will not use ... or 75 ohm. Special connections may have the copy protection system, which you connect the Recorder directly to the power outlet. See pages 17 and 44 for details.

User manual, English (US)
Page 17
....8.3 11:55 AM Page 17 Hookups (cont'd) 17 Connecting to Other Equipment for DVD+R or DVD+RW recording.) Helpful Hints • Most prerecorded videotapes and DVDs are copy protected. Use the IN jacks on the rear of the Recorder. Use an RCA-style video cable, which you see the Recorder's logo on the front ...panel. Choose CAM1 if you use the EXT 1 or EXT 2 jacks on the rear of the Recorder to start recording on a DVD+R/DVD+RW or a videotape. (See page 44 for Dubbing You can connect a VCR, Camcorder, or DVD Player to the COMPONENT VIDEO IN (Y PB PR), S-VIDEO IN, VIDEO IN, and AUDIO IN...
....8.3 11:55 AM Page 17 Hookups (cont'd) 17 Connecting to Other Equipment for DVD+R or DVD+RW recording.) Helpful Hints • Most prerecorded videotapes and DVDs are copy protected. Use the IN jacks on the rear of the Recorder. Use an RCA-style video cable, which you see the Recorder's logo on the front ...panel. Choose CAM1 if you use the EXT 1 or EXT 2 jacks on the rear of the Recorder to start recording on a DVD+R/DVD+RW or a videotape. (See page 44 for Dubbing You can connect a VCR, Camcorder, or DVD Player to the COMPONENT VIDEO IN (Y PB PR), S-VIDEO IN, VIDEO IN, and AUDIO IN...

User manual, English (US)
Page 22
... it. If the Disc is empty and has no recordings,"EMPTY DISC" will appear. To record material playing on page 55.You cannot record or edit a DVD+R after you connected to select an Empty Title box.You cannot overwrite recordings on the display panel. See page 17. To edit your Cable Box/Satellite Receiver or the...
... it. If the Disc is empty and has no recordings,"EMPTY DISC" will appear. To record material playing on page 55.You cannot record or edit a DVD+R after you connected to select an Empty Title box.You cannot overwrite recordings on the display panel. See page 17. To edit your Cable Box/Satellite Receiver or the...

User manual, English (US)
Page 26
... playing on the other equipment to DVD duplication. See page 22. RECORD I Button (DVD) Press to select DVD mode or VCR mode.The DVD light appears in DVD mode. When recording material that is in DVD mode. See page 76. SOURCE Button Press to start Disc playback. See page 17. See page 71. PLAY B Button (DVD) Press to playback. See page...
... playing on the other equipment to DVD duplication. See page 22. RECORD I Button (DVD) Press to select DVD mode or VCR mode.The DVD light appears in DVD mode. When recording material that is in DVD mode. See page 76. SOURCE Button Press to start Disc playback. See page 17. See page 71. PLAY B Button (DVD) Press to playback. See page...

User manual, English (US)
Page 27
... Jack Use the supplied RF coaxial cable to connect this jack to the Audio In jacks of optional video equipment (for both DVD and VCR modes. See page 14. See page 17. Rear Panel 27 EXT1 DIGITAL COMPONENT AUDIO AUDIO OUT VIDEO IN IN Y PB L COAXIAL PR R S-VIDEO AUDIO OUT COMPONENT ... supply power to the Audio In jacks of other equipment. AUDIO OUT Jacks / Left (white) and Right (red) Connect audio cables here and to the Recorder. For example, if you want to the TV's Video In jack. COMPONENT VIDEO OUT (Y PB PR) jacks (red, green, blue) Connect component video ...
... Jack Use the supplied RF coaxial cable to connect this jack to the Audio In jacks of optional video equipment (for both DVD and VCR modes. See page 14. See page 17. Rear Panel 27 EXT1 DIGITAL COMPONENT AUDIO AUDIO OUT VIDEO IN IN Y PB L COAXIAL PR R S-VIDEO AUDIO OUT COMPONENT ... supply power to the Audio In jacks of other equipment. AUDIO OUT Jacks / Left (white) and Right (red) Connect audio cables here and to the Recorder. For example, if you want to the TV's Video In jack. COMPONENT VIDEO OUT (Y PB PR) jacks (red, green, blue) Connect component video ...

User manual, English (US)
Page 60
... play the Disc. Select "0" (- -) to play . ● Before you begin, make sure the Recorder is in the Recorder. NC-17 6 - PG-13 3 - See page 55. All Discs will not play . Press DVD so the DVD light appears on the front of the Recorder. 1 Press SYSTEM MENU. Higher rated Discs will play . Enter the four-digit code... Number buttons to select a rating, then press OK. movie ratings as follows: 7 - PG 1 - G • Finalize disc will appear in this menu only when a non-finalized DVD+R is in DVD mode.
... play the Disc. Select "0" (- -) to play . ● Before you begin, make sure the Recorder is in the Recorder. NC-17 6 - PG-13 3 - See page 55. All Discs will not play . Press DVD so the DVD light appears on the front of the Recorder. 1 Press SYSTEM MENU. Higher rated Discs will play . Enter the four-digit code... Number buttons to select a rating, then press OK. movie ratings as follows: 7 - PG 1 - G • Finalize disc will appear in this menu only when a non-finalized DVD+R is in DVD mode.


