
User manual, English
Page 5
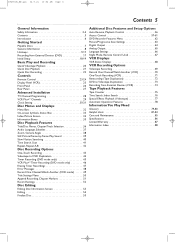
... 9-17 Recording from External Devices (DVD 17 Initial Setup 18-19 Basic Play and Recording Quick Videotape Playback 20 Quick Disc Playback 21 Quick Disc Recording 22 Controls Remote Control 23-24 Display Panel (VCR 25 Front Panel 26 Rear Panel 27 Advanced Installation TV Channel Programming 28 VCR Plus+® Channels 29 Clock Setting 30-31 Disc Menus and Displays Menu Bars 32 On-screen Symbols, Status Box 33 Index Picture Screen 34 Information Boxes 35 Disc Playback Features Title/Disc Menus, Chapter/Track Selection 36 Audio Language, Subtitles 37 Zoom...
... 9-17 Recording from External Devices (DVD 17 Initial Setup 18-19 Basic Play and Recording Quick Videotape Playback 20 Quick Disc Playback 21 Quick Disc Recording 22 Controls Remote Control 23-24 Display Panel (VCR 25 Front Panel 26 Rear Panel 27 Advanced Installation TV Channel Programming 28 VCR Plus+® Channels 29 Clock Setting 30-31 Disc Menus and Displays Menu Bars 32 On-screen Symbols, Status Box 33 Index Picture Screen 34 Information Boxes 35 Disc Playback Features Title/Disc Menus, Chapter/Track Selection 36 Audio Language, Subtitles 37 Zoom...
User manual, English
Page 7
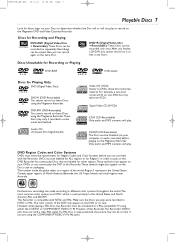
... playing a PAL Disc, the Recorder must appear on your DVDs, or you can be connected to a PAL-compatible TV using the Magnavox Recorder. Discs Unsuitable for Recording or Playing DVD-RAM DVD-Audio Discs for Playing Only DVD (Digital Video Disc) DVD-R (DVD-Recordable) You cannot record on it or edit it any more. Make sure the Discs you play were recorded in NTSC or PAL.The color system of the DVD may not be correct if you cannot record on these Discs using either the S-VIDEO or COMPONENT VIDEO...
... playing a PAL Disc, the Recorder must appear on your DVDs, or you can be connected to a PAL-compatible TV using the Magnavox Recorder. Discs Unsuitable for Recording or Playing DVD-RAM DVD-Audio Discs for Playing Only DVD (Digital Video Disc) DVD-R (DVD-Recordable) You cannot record on it or edit it any more. Make sure the Discs you play were recorded in NTSC or PAL.The color system of the DVD may not be correct if you cannot record on these Discs using either the S-VIDEO or COMPONENT VIDEO...

User manual, English
Page 9
... has Progressive Scan. Your existing equipment, especially your Antenna or Cable TV signal already.You can see the DVD background picture on page 10. G Set the Stereo to choose different Audio and Video In channels on the Recorder for the best sound quality. Note the jacks and connectors on the other equipment so you connect the Recorder directly to which may have connected your TV, will play...
... has Progressive Scan. Your existing equipment, especially your Antenna or Cable TV signal already.You can see the DVD background picture on page 10. G Set the Stereo to choose different Audio and Video In channels on the Recorder for the best sound quality. Note the jacks and connectors on the other equipment so you connect the Recorder directly to which may have connected your TV, will play...
User manual, English
Page 17
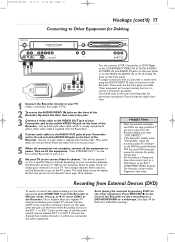
... the VIDEO IN, AUDIO IN, or SV (S-Video) IN jacks on . 6 Set your TV to the correct Video In channel. Most audio cables are the most easily accessible. Other equipment will appear the first time you try to copy them, the Recorder display may show "COPY PROTECT." • If the Recorder's display shows "NO SIGNAL," adjust the tracking or play . • Do not connect a Progressive Scan video source (such as a DVD Player) to the EXT 1 COMPONENT VIDEO...
... the VIDEO IN, AUDIO IN, or SV (S-Video) IN jacks on . 6 Set your TV to the correct Video In channel. Most audio cables are the most easily accessible. Other equipment will appear the first time you try to copy them, the Recorder display may show "COPY PROTECT." • If the Recorder's display shows "NO SIGNAL," adjust the tracking or play . • Do not connect a Progressive Scan video source (such as a DVD Player) to the EXT 1 COMPONENT VIDEO...

User manual, English
Page 22
LABEL 4 POWER ON/OFF 4 Press L to close the disc tray.The Index 8 Picture Screen will begin , set the Recorder to channel 3 or 4 (or the EXT or CAM channel). (Choose the output channel of the Recorder. 2-3 2 Press OPEN/CLOSE/EJECT A to a DVD+RW/DVD+R. To resume recording, press DVD REC I to record the selected channel. However, editing changes may appear on the display panel if you finalize it. To avoid overwriting previous recordings on page 55.You cannot record or...
LABEL 4 POWER ON/OFF 4 Press L to close the disc tray.The Index 8 Picture Screen will begin , set the Recorder to channel 3 or 4 (or the EXT or CAM channel). (Choose the output channel of the Recorder. 2-3 2 Press OPEN/CLOSE/EJECT A to a DVD+RW/DVD+R. To resume recording, press DVD REC I to record the selected channel. However, editing changes may appear on the display panel if you finalize it. To avoid overwriting previous recordings on page 55.You cannot record or...

User manual, English
Page 79
... aspect ratio setting (4:3). Analog: Sound that gives an overview of DVDs. E9490UD_EN.qx3 04.9.21 10:54 AM Page 79 Glossary 79 AC-3: Audio Coding 3, also known as heard in movie theaters. Color system: There are also compatible with one side playing in widescreen format and the other equipment (TV, Stereo, etc.) (OUT) or receive sound from Dolby Labs. Index Picture Screen: A screen that has not been turned...
... aspect ratio setting (4:3). Analog: Sound that gives an overview of DVDs. E9490UD_EN.qx3 04.9.21 10:54 AM Page 79 Glossary 79 AC-3: Audio Coding 3, also known as heard in movie theaters. Color system: There are also compatible with one side playing in widescreen format and the other equipment (TV, Stereo, etc.) (OUT) or receive sound from Dolby Labs. Index Picture Screen: A screen that has not been turned...

User manual, English
Page 80
... fit your TV (OUT) or receive video from other equipment (IN) (Camcorder,VCR, DVD Player, etc.). A digital audio encoding system. average tape speed.You cannot record in participating TV listings. Widescreen: A TV aspect ratio setting (16:9). select the switch-off time in LP on a single videotape. Similar to your TV screen." RGB: Red-Green-Blue.A top-quality video connection where red, green and blue components of a video signal are carried through separate wires...
... fit your TV (OUT) or receive video from other equipment (IN) (Camcorder,VCR, DVD Player, etc.). A digital audio encoding system. average tape speed.You cannot record in participating TV listings. Widescreen: A TV aspect ratio setting (16:9). select the switch-off time in LP on a single videotape. Similar to your TV screen." RGB: Red-Green-Blue.A top-quality video connection where red, green and blue components of a video signal are carried through separate wires...

User manual, English
Page 81
...; TVs placed too close to solve the problem yourself. Details are on the TV remote control that are on pages 9-16. Or, you connected the Recorder to the TV using a Progressive Scan TV and connection, set Component video output to the TV. The sound is properly adjusted at the TV. Or, if you may affect the picture quality when playing DVDs later. See page 52. • Connect the Recorder directly to Interlaced.
...; TVs placed too close to solve the problem yourself. Details are on the TV remote control that are on pages 9-16. Or, you connected the Recorder to the TV using a Progressive Scan TV and connection, set Component video output to the TV. The sound is properly adjusted at the TV. Or, if you may affect the picture quality when playing DVDs later. See page 52. • Connect the Recorder directly to Interlaced.
User manual, English
Page 83
... DVD mode, the D symbol will appear.When that was previously compatible. See pages 53 and 55. • Editing changes may not be replaced. Disc will appear on a different Recorder, stop Disc play on the other DVD Players. See page 7. • See if the Disc is not, an "X" will not play the Disc on the DVD display panel each time the Recorder receives a signal from the Recorder. See pages 9-16. • Set Analog output or Digital output correctly...
... DVD mode, the D symbol will appear.When that was previously compatible. See pages 53 and 55. • Editing changes may not be replaced. Disc will appear on a different Recorder, stop Disc play on the other DVD Players. See page 7. • See if the Disc is not, an "X" will not play the Disc on the DVD display panel each time the Recorder receives a signal from the Recorder. See pages 9-16. • Set Analog output or Digital output correctly...

User manual, English
Page 84
... Video In channel or channel 3. Reconnect the power cord and try to operate the Recorder again as scheduled. C03" will not record a TV program. • Put the Recorder in addition to the Initial Setup information that apply to exit the Index Picture Screen, then press PLAY B. Or, see your TV and set a timer recording, reset the timer recording. All of the Recorder. • Check the connections between the Recorder,TV, antenna/Cable TV signal, and Cable Box...
... Video In channel or channel 3. Reconnect the power cord and try to operate the Recorder again as scheduled. C03" will not record a TV program. • Put the Recorder in addition to the Initial Setup information that apply to exit the Index Picture Screen, then press PLAY B. Or, see your TV and set a timer recording, reset the timer recording. All of the Recorder. • Check the connections between the Recorder,TV, antenna/Cable TV signal, and Cable Box...

User manual, English
Page 88
... tuner information box . . . .34-35 tv mute button 23 tv/video button 23, 49 tv shape 19, 63 tv standby button 23 tv volume +/- buttons 23 user preference settings . . . . .32 vcr button 23 vcr light 25 VCR Plus+channels 29 VCR Plus+/ TIMER button 24, 45-47 VCR Plus+ timer recording . .46 vcr status display 68 vcr rec I buttons 26 record mode 52 record one channel/ watch another 49, 70 record settings 52 recording audio 66 region codes 7 remote control 23-24 remote control used 67 remote sensor 26 repeat 33, 42 repeat a-b 33, 42 repeat playback...
... tuner information box . . . .34-35 tv mute button 23 tv/video button 23, 49 tv shape 19, 63 tv standby button 23 tv volume +/- buttons 23 user preference settings . . . . .32 vcr button 23 vcr light 25 VCR Plus+channels 29 VCR Plus+/ TIMER button 24, 45-47 VCR Plus+ timer recording . .46 vcr status display 68 vcr rec I buttons 26 record mode 52 record one channel/ watch another 49, 70 record settings 52 recording audio 66 region codes 7 remote control 23-24 remote control used 67 remote sensor 26 repeat 33, 42 repeat a-b 33, 42 repeat playback...

User manual, English (US)
Page 7
... and PAL. Discs for Playing Only DVD (Digital Video Disc) DVD-R (DVD-Recordable) You cannot record on these logos on your Discs to a PAL-compatible TV using the COMPONENT VIDEO (Y PB PR) jacks. Discs Unsuitable for Recording or Playing DVD-RAM DVD-Audio Discs for Recording and Playing DVD+RW (Digital Video Disc + Rewritable): These Discs can be connected to determine whether the Disc will or will play . E9490UD_EN.qx3 04.8.3 11:55 AM Page 7 Playable Discs 7 Look for Region Codes and Color Systems before playing on the Magnavox Recorder. After...
... and PAL. Discs for Playing Only DVD (Digital Video Disc) DVD-R (DVD-Recordable) You cannot record on these logos on your Discs to a PAL-compatible TV using the COMPONENT VIDEO (Y PB PR) jacks. Discs Unsuitable for Recording or Playing DVD-RAM DVD-Audio Discs for Recording and Playing DVD+RW (Digital Video Disc + Rewritable): These Discs can be connected to determine whether the Disc will or will play . E9490UD_EN.qx3 04.8.3 11:55 AM Page 7 Playable Discs 7 Look for Region Codes and Color Systems before playing on the Magnavox Recorder. After...

User manual, English (US)
Page 9
... Setup.This sets up everything. Or, your connections and turn on the Recorder for details and options. ● To use all equipment from the power outlets. Follow the steps for details. Hookups 9 Component Video provides the best picture quality. nected your TV manual for the hookup you choose the Video In channel directly. See your Antenna or Cable TV signal already.You can see the DVD background picture...
... Setup.This sets up everything. Or, your connections and turn on the Recorder for details and options. ● To use all equipment from the power outlets. Follow the steps for details. Hookups 9 Component Video provides the best picture quality. nected your TV manual for the hookup you choose the Video In channel directly. See your Antenna or Cable TV signal already.You can see the DVD background picture...

User manual, English (US)
Page 17
... the COMPONENT VIDEO IN (Y PB PR), S-VIDEO IN, VIDEO IN, and AUDIO IN jacks on the rear panel or to copy them, the Recorder display may show "COPY PROTECT." • If the Recorder's display shows "NO SIGNAL," adjust the tracking or play . • Do not connect a Progressive Scan video source (such as a DVD Player) to the yellow VIDEO IN jack on the front of the Recorder. These jacks are red and white. Use an RCA-style video cable...
... the COMPONENT VIDEO IN (Y PB PR), S-VIDEO IN, VIDEO IN, and AUDIO IN jacks on the rear panel or to copy them, the Recorder display may show "COPY PROTECT." • If the Recorder's display shows "NO SIGNAL," adjust the tracking or play . • Do not connect a Progressive Scan video source (such as a DVD Player) to the yellow VIDEO IN jack on the front of the Recorder. These jacks are red and white. Use an RCA-style video cable...

User manual, English (US)
Page 22
... using a Cable Box/Satellite Receiver, set up . or the Number buttons to select the channel you attempt this title" details on a DVD+RW, choose the last Empty Title box. Recording will begin after you begin, set the Recorder to close the disc tray.The Index 8 1 Picture Screen will reappear after a few seconds. (The Disc has to a DVD+RW/DVD+R. Press OPEN/CLOSE/EJECT A to channel 3 or 4 (or the EXT or CAM channel). (Choose the output channel of the Recorder. 2-3 2 Press OPEN/CLOSE/EJECT...
... using a Cable Box/Satellite Receiver, set up . or the Number buttons to select the channel you attempt this title" details on a DVD+RW, choose the last Empty Title box. Recording will begin after you begin, set the Recorder to close the disc tray.The Index 8 1 Picture Screen will reappear after a few seconds. (The Disc has to a DVD+RW/DVD+R. Press OPEN/CLOSE/EJECT A to channel 3 or 4 (or the EXT or CAM channel). (Choose the output channel of the Recorder. 2-3 2 Press OPEN/CLOSE/EJECT...
User manual, English (US)
Page 78
.... a TV aspect ratio setting (4:3). The Recorder automatically selects the correct color system of a DVD+RW or DVD+R.An Index Picture represents each recording. Sound is similar to a Stereo, letting you adjust the volume at the Stereo.The Stereo must have no effect. (For example, some DVDs are two-sided, with Progressive Scan (if your equipment.These jacks send audio through multiple channels. Displays the video in full-width, with black bars...
.... a TV aspect ratio setting (4:3). The Recorder automatically selects the correct color system of a DVD+RW or DVD+R.An Index Picture represents each recording. Sound is similar to a Stereo, letting you adjust the volume at the Stereo.The Stereo must have no effect. (For example, some DVDs are two-sided, with Progressive Scan (if your equipment.These jacks send audio through multiple channels. Displays the video in full-width, with black bars...

User manual, English (US)
Page 80
... screen. • You only need one video connection between the Recorder and the TV. Or, go to the TV using a Progressive Scan TV and connection, set Record mode to a low-quality speed, change channels down until you finish recording. You cannot insert a video cassette. • Insert the tape, window side up, with a soft cloth, wiping from the TV. Or, you set Component video output to the TV. In some situations, programs...
... screen. • You only need one video connection between the Recorder and the TV. Or, go to the TV using a Progressive Scan TV and connection, set Record mode to a low-quality speed, change channels down until you finish recording. You cannot insert a video cassette. • Insert the tape, window side up, with a soft cloth, wiping from the TV. Or, you set Component video output to the TV. In some situations, programs...

User manual, English (US)
Page 82
... the Number 2 button on the Disc. If you connected to all brands of the DVD.The DVD must be missing, for Disc sound from the Recorder. • Change the Audio setting of a DVD in the Player.This procedure does not solve the playability problem with which the Disc was recorded on the DVD display panel each time the Recorder receives a signal from the Recorder. Some information may make sure the label of the side you selected DVD or VCR mode using...
... the Number 2 button on the Disc. If you connected to all brands of the DVD.The DVD must be missing, for Disc sound from the Recorder. • Change the Audio setting of a DVD in the Player.This procedure does not solve the playability problem with which the Disc was recorded on the DVD display panel each time the Recorder receives a signal from the Recorder. Some information may make sure the label of the side you selected DVD or VCR mode using...

User manual, English (US)
Page 83
... the display panel if you should turn on pages 9-17. If the Disc is bad (scratched, warped, etc.) or if the Recorder cannot read the Disc, you set it to provide good channel reception. Another DVD Player shows the Index Picture Screen but does not react to PLAY B. • Press STOP C to select . CO3" indicates you try to dub or record copyrighted material onto a DVD+R or DVD+RW using the Recorder...
... the display panel if you should turn on pages 9-17. If the Disc is bad (scratched, warped, etc.) or if the Recorder cannot read the Disc, you set it to provide good channel reception. Another DVD Player shows the Index Picture Screen but does not react to PLAY B. • Press STOP C to select . CO3" indicates you try to dub or record copyrighted material onto a DVD+R or DVD+RW using the Recorder...
User manual, English (US)
Page 88
... digital audio 9, 16, 64 digital output 16, 64 disc bar 34 disc information screen . . . . .53 disc lock 58-60 disc menu button 24, 36 disc menus 36 disc name 53 disc pointer 34 disc tray 21, 26 display button 24, 68 display panels 25, 26 divide title 54 dolby surround 39, 65 dvd button 23 dvd rec I buttons 26 record mode 52 record one channel/ watch another 49, 70 record settings 52 recording audio 66 region codes 7 remote control 23-24 remote control used 67 remote sensor 26 repeat 33, 42 repeat a-b 33, 42 repeat playback 42...
... digital audio 9, 16, 64 digital output 16, 64 disc bar 34 disc information screen . . . . .53 disc lock 58-60 disc menu button 24, 36 disc menus 36 disc name 53 disc pointer 34 disc tray 21, 26 display button 24, 68 display panels 25, 26 divide title 54 dolby surround 39, 65 dvd button 23 dvd rec I buttons 26 record mode 52 record one channel/ watch another 49, 70 record settings 52 recording audio 66 region codes 7 remote control 23-24 remote control used 67 remote sensor 26 repeat 33, 42 repeat a-b 33, 42 repeat playback 42...


