
User manual, English (US)
Page 3
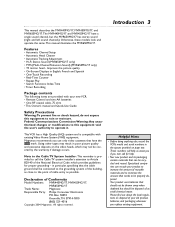
... operate it. Your product uses batteries that have a single sound channel, but should not be thrown away when depleted but the MVR650MG/17 has stereo sound (right and left sound channels). Improves the picture quality • On-Screen Displays in the spaces provided on page two. Using other tapes may not be properly disposed. Helpful Hints • Before doing anything else, record the VCR's model and serial numbers in English...
... operate it. Your product uses batteries that have a single sound channel, but should not be thrown away when depleted but the MVR650MG/17 has stereo sound (right and left sound channels). Improves the picture quality • On-Screen Displays in the spaces provided on page two. Using other tapes may not be properly disposed. Helpful Hints • Before doing anything else, record the VCR's model and serial numbers in English...
User manual, English (US)
Page 12
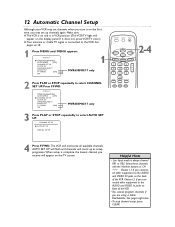
... time, you are using a Cable Box/Satellite. B TIMER PROGRAMMING AUTO REPEAT [OFF] CHANNEL SET UP CLOCK SET LANGUAGE SELECT AUDIO OUT TV STEREO [ON] SAP MVR650MG/17 only 1 2 Press PLAY or STOP repeatedly to select AUTO SET UP. TIMER PROGRAMMING AUTO REPEAT [OFF] B CHANNEL SET UP CLOCK SET LANGUAGE SELECT AUDIO OUT TV STEREO [ON] SAP MVR650MG/17 only 3 Press PLAY or STOP repeatedly to select CHANNEL SET UP. See pages six-10. 1 Press MENU until MENU appears. - M E N U - Helpful Hints • Line Input mode is connected to the VCR. CHANNEL SET UP B AUTO SET...
... time, you are using a Cable Box/Satellite. B TIMER PROGRAMMING AUTO REPEAT [OFF] CHANNEL SET UP CLOCK SET LANGUAGE SELECT AUDIO OUT TV STEREO [ON] SAP MVR650MG/17 only 1 2 Press PLAY or STOP repeatedly to select AUTO SET UP. TIMER PROGRAMMING AUTO REPEAT [OFF] B CHANNEL SET UP CLOCK SET LANGUAGE SELECT AUDIO OUT TV STEREO [ON] SAP MVR650MG/17 only 3 Press PLAY or STOP repeatedly to select CHANNEL SET UP. See pages six-10. 1 Press MENU until MENU appears. - M E N U - Helpful Hints • Line Input mode is connected to the VCR. CHANNEL SET UP B AUTO SET...
User manual, English (US)
Page 19
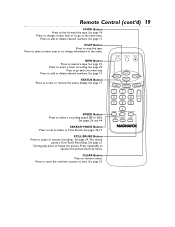
... picture frame by frame. See page 13. POWER VCR/TV EJECT REW PLAY STOP F.FWD MENU STATUS CLEAR 1 2 3 4 5 6 CH 7 8 9 SPEED Button Press to set an Index or Time Search. See pages 24 and 44. 0 SPEED SEARCH MODE STILL/PAUSE REC MEMORY SLOW SEARCH MODE Button Press to select a recording speed (SP or SLP). REW Button Press to erase a timer recording. Press to rewind a tape. STATUS Button Press to add or delete channel numbers...
... picture frame by frame. See page 13. POWER VCR/TV EJECT REW PLAY STOP F.FWD MENU STATUS CLEAR 1 2 3 4 5 6 CH 7 8 9 SPEED Button Press to set an Index or Time Search. See pages 24 and 44. 0 SPEED SEARCH MODE STILL/PAUSE REC MEMORY SLOW SEARCH MODE Button Press to select a recording speed (SP or SLP). REW Button Press to erase a timer recording. Press to rewind a tape. STATUS Button Press to add or delete channel numbers...
User manual, English (US)
Page 23
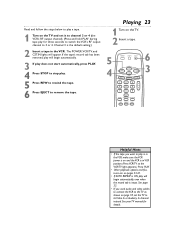
... VCR/TV light appears.) Press PLAY. • Other playback options and features are on the TV. 2 Insert a tape. 5 4 POWER VCR/TV EJECT 6 REW PLAY STOP F.FWD MENU STATUS CLEAR 1 2 3 4 5 6 CH 7 8 9 0 SPEED SEARCH MODE STILL/PAUSE REC MEMORY SLOW 3 Helpful Hints • If the tape you used audio and video cables to connect the VCR to the TV as shown on page 10, set it to channel 3 or 4 (the VCR's RF output channel). (Press and hold PLAY during tape play...
... VCR/TV light appears.) Press PLAY. • Other playback options and features are on the TV. 2 Insert a tape. 5 4 POWER VCR/TV EJECT 6 REW PLAY STOP F.FWD MENU STATUS CLEAR 1 2 3 4 5 6 CH 7 8 9 0 SPEED SEARCH MODE STILL/PAUSE REC MEMORY SLOW 3 Helpful Hints • If the tape you used audio and video cables to connect the VCR to the TV as shown on page 10, set it to channel 3 or 4 (the VCR's RF output channel). (Press and hold PLAY during tape play...
User manual, English (US)
Page 26
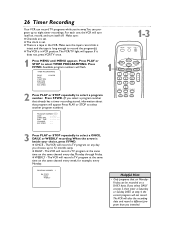
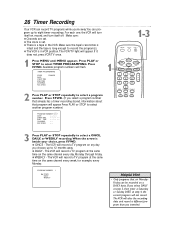
...: q Channels are set . If it does not, press VCR/TV once. 1 Press MENU until MENU appears. Press F.FWD. TIMER PROGRAMMING PROG. q There is in the VCR. The VCR will record a TV program at step 4, the correct program will alter the recording date and record a different program than you choose, up to select another program number.) 1-3 POWER VCR/TV EJECT REW PLAY STOP F.FWD MENU STATUS CLEAR 1 2 3 4 5 6 CH 7 8 9 0 SPEED SEARCH MODE STILL/PAUSE REC MEMORY SLOW PROGRAM NUMBER 1 DATE - - / - - Make...
...: q Channels are set . If it does not, press VCR/TV once. 1 Press MENU until MENU appears. Press F.FWD. TIMER PROGRAMMING PROG. q There is in the VCR. The VCR will record a TV program at step 4, the correct program will alter the recording date and record a different program than you choose, up to select another program number.) 1-3 POWER VCR/TV EJECT REW PLAY STOP F.FWD MENU STATUS CLEAR 1 2 3 4 5 6 CH 7 8 9 0 SPEED SEARCH MODE STILL/PAUSE REC MEMORY SLOW PROGRAM NUMBER 1 DATE - - / - - Make...
User manual, English (US)
Page 27
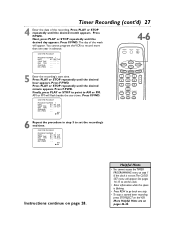
... TIME PROGRAM PROGRAM NUMBER 1 DATE 0 5 / 0 4 TUE START TIME 0 7 : 3 0 P M END TIME CHANNEL - - Press F.FWD. AM BPM Instructions continue on the VCR. Finally, press PLAY or STOP to point to set the recording's end time. AM BPM 4-6 POWER VCR/TV EJECT REW PLAY STOP F.FWD MENU STATUS CLEAR 1 2 3 4 5 6 CH 7 8 9 0 SPEED SEARCH MODE STILL/PAUSE REC MEMORY SLOW 6 Repeat the procedure in advance. REC SPEED - - More Helpful Hints are on pages 42-43. REC SPEED - - Helpful Hints • You cannot access...
... TIME PROGRAM PROGRAM NUMBER 1 DATE 0 5 / 0 4 TUE START TIME 0 7 : 3 0 P M END TIME CHANNEL - - Press F.FWD. AM BPM Instructions continue on the VCR. Finally, press PLAY or STOP to point to set the recording's end time. AM BPM 4-6 POWER VCR/TV EJECT REW PLAY STOP F.FWD MENU STATUS CLEAR 1 2 3 4 5 6 CH 7 8 9 0 SPEED SEARCH MODE STILL/PAUSE REC MEMORY SLOW 6 Repeat the procedure in advance. REC SPEED - - More Helpful Hints are on pages 42-43. REC SPEED - - Helpful Hints • You cannot access...
User manual, English (US)
Page 31
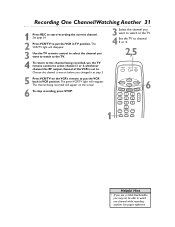
... to channel 3 or 4. 2,5 POWER VCR/TV EJECT 5 Press VCR/TV on the screen. 6 To stop recording, press STOP. 1 REW PLAY STOP F.FWD MENU STATUS CLEAR 1 2 3 4 5 6 CH 7 8 9 0 SPEED SEARCH MODE STILL/PAUSE REC MEMORY SLOW 6 Helpful Hint • If you use the TV remote control to select channel 3 or 4, whichever channel the RF output channel of the VCR is set to watch one channel while recording another. The VCR/TV light will disappear. 3 Use the TV remote control to...
... to channel 3 or 4. 2,5 POWER VCR/TV EJECT 5 Press VCR/TV on the screen. 6 To stop recording, press STOP. 1 REW PLAY STOP F.FWD MENU STATUS CLEAR 1 2 3 4 5 6 CH 7 8 9 0 SPEED SEARCH MODE STILL/PAUSE REC MEMORY SLOW 6 Helpful Hint • If you use the TV remote control to select channel 3 or 4, whichever channel the RF output channel of the VCR is set to watch one channel while recording another. The VCR/TV light will disappear. 3 Use the TV remote control to...
User manual, English (US)
Page 32
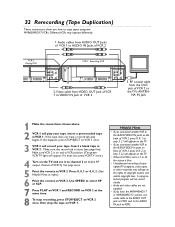
... VCR position. (The green VCR/TV light will play begins. Press 0, 0, 1 or 0, 0, 2. (See Helpful Hints at right.) 6 Point the remote at VCR 2. A copy-protected program will record your tape. Insert a prerecorded tape in VCR 2. If this happens, press STOP/EJECT on VCR 1 once. 3 VCR 2 will not record clearly. • Audio and video cables are not supplied. • If you have a record tab, play your tape. Helpful Hints • If you connected another VCR to the AUDIO/VIDEO...
... VCR position. (The green VCR/TV light will play begins. Press 0, 0, 1 or 0, 0, 2. (See Helpful Hints at right.) 6 Point the remote at VCR 2. A copy-protected program will record your tape. Insert a prerecorded tape in VCR 2. If this happens, press STOP/EJECT on VCR 1 once. 3 VCR 2 will not record clearly. • Audio and video cables are not supplied. • If you have a record tab, play your tape. Helpful Hints • If you connected another VCR to the AUDIO/VIDEO...
User manual, English (US)
Page 42
... resetting the recording(s). • Finish programming a timer recording at the VCR's remote sensor. 42 Helpful Hints If you turn off the VCR without a record tab is inserted (when the power is off for about five minutes.This is normal. Set up channels and reset the clock before the recording ends, the VCR will stop, eject the tape, and turn itself off.The red TIMER light will not remind you call a customer service representative, please know the model number...
... resetting the recording(s). • Finish programming a timer recording at the VCR's remote sensor. 42 Helpful Hints If you turn off the VCR without a record tab is inserted (when the power is off for about five minutes.This is normal. Set up channels and reset the clock before the recording ends, the VCR will stop, eject the tape, and turn itself off.The red TIMER light will not remind you call a customer service representative, please know the model number...
User manual, English (US)
Page 43
... once.) • Adjust the tracking. Never force the tape into the VCR. • If a timer recording is set and the VCR power is used audio and video cables to connect the VCR to the TV's AUDIO IN jacks. If it in the VCR. Move the VCR away from the TV. The reception on all channels is protected by method claims of certain U.S. Line Input • If you accidentally enter Line Input mode (LineIn Rear...
... once.) • Adjust the tracking. Never force the tape into the VCR. • If a timer recording is set and the VCR power is used audio and video cables to connect the VCR to the TV's AUDIO IN jacks. If it in the VCR. Move the VCR away from the TV. The reception on all channels is protected by method claims of certain U.S. Line Input • If you accidentally enter Line Input mode (LineIn Rear...

User manual, English (US)
Page 48
... access 21 speed button 19, 24 rewind, eject, off 38 menu button 18 standard play 24, 44 status button 17, 19 batteries 5 number buttons 18 status display 17 stereo cassette compartment 20 on-screen status displays 17 broadcast ch button 18 one channel/watching another ..31 light 20 display panel 20 prevention 5 recording duplication 32 timer 26-30 cancelling 29 remote control correcting 30 eject button 18 buttons 18-19 setting 26-28 sensor 5, 21 tracking 38 f.fwd button 19, 21 using...
... access 21 speed button 19, 24 rewind, eject, off 38 menu button 18 standard play 24, 44 status button 17, 19 batteries 5 number buttons 18 status display 17 stereo cassette compartment 20 on-screen status displays 17 broadcast ch button 18 one channel/watching another ..31 light 20 display panel 20 prevention 5 recording duplication 32 timer 26-30 cancelling 29 remote control correcting 30 eject button 18 buttons 18-19 setting 26-28 sensor 5, 21 tracking 38 f.fwd button 19, 21 using...
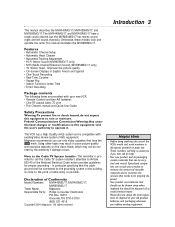
User manual, English
Page 3
Improves the picture quality • On-Screen Displays in the spaces provided on page two. Magnavox recommends you use only video cassettes that the cable ground shall be connected to the grounding system of the building, as close to the point of cable entry as small chemical waste. in poor picture quality and excessive deposits on disposal of Conformity Model Numbers: MVR440MG/17, MVR450MG/17...
Improves the picture quality • On-Screen Displays in the spaces provided on page two. Magnavox recommends you use only video cassettes that the cable ground shall be connected to the grounding system of the building, as close to the point of cable entry as small chemical waste. in poor picture quality and excessive deposits on disposal of Conformity Model Numbers: MVR440MG/17, MVR450MG/17...

User manual, English
Page 19
... back one menu step. See pages 24 and 44. 0 SPEED SEARCH MODE STILL/PAUSE REC MEMORY SLOW SEARCH MODE Button Press to remove menus. Press to access or remove the status display. STATUS Button Press to add or delete channel numbers. See page 24. Press repeatedly to fast forward the tape. See page 13. See page 35. Remote Control (cont'd) 19 F.FWD Button Press to advance the picture frame...
... back one menu step. See pages 24 and 44. 0 SPEED SEARCH MODE STILL/PAUSE REC MEMORY SLOW SEARCH MODE Button Press to remove menus. Press to access or remove the status display. STATUS Button Press to add or delete channel numbers. See page 24. Press repeatedly to fast forward the tape. See page 13. See page 35. Remote Control (cont'd) 19 F.FWD Button Press to advance the picture frame...
User manual, English
Page 26
... time on the same channel every day, Monday through Friday. q DAILY - The VCR will turn itself on the same channel every week, for example, every Monday. q The clock is a tape in VCR position.The VCR/TV light will alter the recording date and record a different program than you intended. q There is set . Press PLAY or STOP to select a program number. Press F.FWD. (If you select a program number that already has a timer recording...
... time on the same channel every day, Monday through Friday. q DAILY - The VCR will turn itself on the same channel every week, for example, every Monday. q The clock is a tape in VCR position.The VCR/TV light will alter the recording date and record a different program than you intended. q There is set . Press PLAY or STOP to select a program number. Press F.FWD. (If you select a program number that already has a timer recording...

User manual, English
Page 27
...ONE TIME PROGRAM PROGRAM NUMBER 1 DATE 0 5 / 0 4 TUE START TIME END TIME CHANNEL - - ONE TIME PROGRAM PROGRAM NUMBER 1 DATE 0 5 / 0 4 TUE START TIME 0 7 : 3 0 P M END TIME 0 8 : 3 0 P M CHANNEL - - Press F.FWD. You cannot program the VCR to set .The CLOCK SET menu will appear. Press PLAY or STOP repeatedly until the desired month appears. Press F.FWD. Press F.FWD. Press PLAY or STOP repeatedly until the desired hour appears. AM BPM 4-6 POWER VCR/TV EJECT REW PLAY STOP F.FWD MENU STATUS CLEAR 1 2 3 4 5 6 CH 7 8 9 0 SPEED SEARCH MODE STILL...
...ONE TIME PROGRAM PROGRAM NUMBER 1 DATE 0 5 / 0 4 TUE START TIME END TIME CHANNEL - - ONE TIME PROGRAM PROGRAM NUMBER 1 DATE 0 5 / 0 4 TUE START TIME 0 7 : 3 0 P M END TIME 0 8 : 3 0 P M CHANNEL - - Press F.FWD. You cannot program the VCR to set .The CLOCK SET menu will appear. Press PLAY or STOP repeatedly until the desired month appears. Press F.FWD. Press F.FWD. Press PLAY or STOP repeatedly until the desired hour appears. AM BPM 4-6 POWER VCR/TV EJECT REW PLAY STOP F.FWD MENU STATUS CLEAR 1 2 3 4 5 6 CH 7 8 9 0 SPEED SEARCH MODE STILL...

User manual, English
Page 31
... to channel 3 or 4. 2,5 POWER VCR/TV EJECT 5 Press VCR/TV on the screen. 6 To stop recording, press STOP. 1 REW PLAY STOP F.FWD MENU STATUS CLEAR 1 2 3 4 5 6 CH 7 8 9 0 SPEED SEARCH MODE STILL/PAUSE REC MEMORY SLOW 6 Helpful Hint • If you use the TV remote control to select channel 3 or 4, whichever channel the RF output channel of the VCR is set to put the VCR in VCR position. See pages eight-nine. The channel being recorded, use a Cable Box/Satellite...
... to channel 3 or 4. 2,5 POWER VCR/TV EJECT 5 Press VCR/TV on the screen. 6 To stop recording, press STOP. 1 REW PLAY STOP F.FWD MENU STATUS CLEAR 1 2 3 4 5 6 CH 7 8 9 0 SPEED SEARCH MODE STILL/PAUSE REC MEMORY SLOW 6 Helpful Hint • If you use the TV remote control to select channel 3 or 4, whichever channel the RF output channel of the VCR is set to put the VCR in VCR position. See pages eight-nine. The channel being recorded, use a Cable Box/Satellite...

User manual, English
Page 32
... MVR450MG/17, connect one audio cable to the AUDIO OUT jack on VCR1 and to the AUDIO IN jack on VCR2. Press 0, 0, 1 or 0, 0, 2. (See Helpful Hints at right.) 6 Point the remote at VCR 2. 32 Rerecording (Tape Duplication) These instructions show you connected another VCR to the AUDIO/VIDEO In jacks on and in VCR position. (The green VCR/TV light will play begins. Make sure VCR 2 is intact (see page five). Use SPEED...
... MVR450MG/17, connect one audio cable to the AUDIO OUT jack on VCR1 and to the AUDIO IN jack on VCR2. Press 0, 0, 1 or 0, 0, 2. (See Helpful Hints at right.) 6 Point the remote at VCR 2. 32 Rerecording (Tape Duplication) These instructions show you connected another VCR to the AUDIO/VIDEO In jacks on and in VCR position. (The green VCR/TV light will play begins. Make sure VCR 2 is intact (see page five). Use SPEED...

User manual, English
Page 42
... a timer recording is restored. Set up channels and reset the clock before resetting the recording(s). • Finish programming a timer recording at the VCR's remote sensor. Tape cannot be removed. • Make sure the power plug is connected to begin. • If, after programming a timer recording, you turn off for a timer recording), the VCR will eject the tape.The TIMER light will blink. If you need to solve the problem yourself. See pages 14-15 to the remote. • Install new batteries (preferably alkaline) in Stop mode...
... a timer recording is restored. Set up channels and reset the clock before resetting the recording(s). • Finish programming a timer recording at the VCR's remote sensor. Tape cannot be removed. • Make sure the power plug is connected to begin. • If, after programming a timer recording, you turn off for a timer recording), the VCR will eject the tape.The TIMER light will blink. If you need to solve the problem yourself. See pages 14-15 to the remote. • Install new batteries (preferably alkaline) in Stop mode...

User manual, English
Page 43
... is used audio and video cables to connect the VCR to the TV as shown on your TV manual for a timer recording. • Make sure the tape has a record tab. Adjust channel 3 or 4 at the TV. • Set the VCR to the TV's AUDIO IN jacks. Move the VCR away from the TV. Or, your TV again. But, if the VCR status display indicates you are receiving a stereo signal, you used on programs...
... is used audio and video cables to connect the VCR to the TV as shown on your TV manual for a timer recording. • Make sure the tape has a record tab. Adjust channel 3 or 4 at the TV. • Set the VCR to the TV's AUDIO IN jacks. Move the VCR away from the TV. Or, your TV again. But, if the VCR status display indicates you are receiving a stereo signal, you used on programs...

User manual, English
Page 47
... access 21 speed button 19, 24 rewind, eject, off 38 menu button 18 standard play 24, 44 status button 17, 19 batteries 5 number buttons 18 status display 17 stereo cassette compartment 20 on-screen status displays 17 broadcast ch button 18 one channel/watching another ..31 light 20 display panel 20 prevention 5 recording duplication 32 timer 26-30 cancelling 29 remote control correcting 30 eject button 18 buttons 18-19 setting 26-28 sensor 5, 21 tracking 38 f.fwd button 19, 21 using...
... access 21 speed button 19, 24 rewind, eject, off 38 menu button 18 standard play 24, 44 status button 17, 19 batteries 5 number buttons 18 status display 17 stereo cassette compartment 20 on-screen status displays 17 broadcast ch button 18 one channel/watching another ..31 light 20 display panel 20 prevention 5 recording duplication 32 timer 26-30 cancelling 29 remote control correcting 30 eject button 18 buttons 18-19 setting 26-28 sensor 5, 21 tracking 38 f.fwd button 19, 21 using...


