
Owners Manual
Page 1
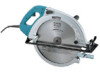
www.makitatools.com SAVE THESE INSTRUCTIONS FOR FUTURE REFERENCE. Circular Saw Equipped with Electric Blade Brake 415 mm (16 - 5/16") MODEL 5402NA 001963 INSTRUCTION MANUAL WARNING: For your personal safety, READ and UNDERSTAND before using.
www.makitatools.com SAVE THESE INSTRUCTIONS FOR FUTURE REFERENCE. Circular Saw Equipped with Electric Blade Brake 415 mm (16 - 5/16") MODEL 5402NA 001963 INSTRUCTION MANUAL WARNING: For your personal safety, READ and UNDERSTAND before using.

Owners Manual
Page 5
Keep your body positioned to either side of the saw blade, but not in line with the saw , for your saw blade. Do not attempt to remove cut material. 2. Wait until blade stops before each use. Never clamp or tie the lower guard into the open lower guard by insulated gripping surfaces when ... angles and depths of debris. 4. Be aware of the time it moves freely and does not touch the blade or any other sawing, the lower guard should be serviced before placing saw to jump backwards. (See "Causes and Operator Prevention of Kickback") Do not reach underneath the work properly to...
Keep your body positioned to either side of the saw blade, but not in line with the saw , for your saw blade. Do not attempt to remove cut material. 2. Wait until blade stops before each use. Never clamp or tie the lower guard into the open lower guard by insulated gripping surfaces when ... angles and depths of debris. 4. Be aware of the time it moves freely and does not touch the blade or any other sawing, the lower guard should be serviced before placing saw to jump backwards. (See "Causes and Operator Prevention of Kickback") Do not reach underneath the work properly to...

Owners Manual
Page 6
... KICKBACK forces can dig into existing walls or other blind areas. When restarting a saw in the cut . Gum and wood pitch hardened on the saw blade in Fig. 1. Never use dull or damaged blade. NEVER place your body and arm to allow you to minimize the risk of ... be placed under their own weight. Investigate and take corrective actions to remove the saw backward while the blade is a sudden reaction to a pinched, bound or misaligned saw blade, causing an uncontrolled saw and increases potential for any reason, release the trigger and hold the tool firmly with both hands...
... KICKBACK forces can dig into existing walls or other blind areas. When restarting a saw in the cut . Gum and wood pitch hardened on the saw blade in Fig. 1. Never use dull or damaged blade. NEVER place your body and arm to allow you to minimize the risk of ... be placed under their own weight. Investigate and take corrective actions to remove the saw backward while the blade is a sudden reaction to a pinched, bound or misaligned saw blade, causing an uncontrolled saw and increases potential for any reason, release the trigger and hold the tool firmly with both hands...

Owners Manual
Page 7
... cutting be caught on the section that part of the saw . Inspect for two hand operation. WARNING: It is 7 Never attempt to hold the saw , keep the cord away from the cutting area and position it so that the blade cuts without decrease in a vise. This is important to... support the workpiece properly and to saw with the circular saw forward at a speed so that it down in blade speed. 13. Push the saw held upside down . When operating the saw firmly to maintain smooth advancement of a board, and Fig. 6 the WRONG way...
... cutting be caught on the section that part of the saw . Inspect for two hand operation. WARNING: It is 7 Never attempt to hold the saw , keep the cord away from the cutting area and position it so that the blade cuts without decrease in a vise. This is important to... support the workpiece properly and to saw with the circular saw forward at a speed so that it down in blade speed. 13. Push the saw held upside down . When operating the saw firmly to maintain smooth advancement of a board, and Fig. 6 the WRONG way...
Owners Manual
Page 9
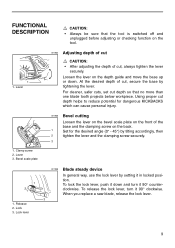
For cleaner, safer cuts, set cut , secure the base by setting it down . Lock lever 001966 Blade steady device In general way, use the lock lever by tightening the lever. At the desired depth of cut depth so that the tool ... the lock lever, turn it 90° clockwise. Bevel scale plate 1 2 1. Lock 3. When you replace a saw blade, release the lock lever. 3 9 Clamp screw 2. FUNCTIONAL DESCRIPTION CAUTION: • Always be sure that no more than one blade tooth projects below workpiece. Lever 3. Using proper cut depth helps to reduce potential for dangerous KICKBACKS...
For cleaner, safer cuts, set cut , secure the base by setting it down . Lock lever 001966 Blade steady device In general way, use the lock lever by tightening the lever. At the desired depth of cut depth so that the tool ... the lock lever, turn it 90° clockwise. Bevel scale plate 1 2 1. Lock 3. When you replace a saw blade, release the lock lever. 3 9 Clamp screw 2. FUNCTIONAL DESCRIPTION CAUTION: • Always be sure that no more than one blade tooth projects below workpiece. Lever 3. Using proper cut depth helps to reduce potential for dangerous KICKBACKS...

Owners Manual
Page 10
...lock 2. Hex wrench 001968 Switch action 1 CAUTION: • Before plugging in the lock-off button 2. The blade brake system is installed with teeth pointing up at a Makita service center. SERIOUS PERSONAL INJURY CAN RESULT. For 45° bevel cuts, align the B position with an electric...with your cutting line. 001967 Sighting For straight cuts, align the A position on the tool. 001969 Removing or installing saw blade 1 CAUTION: • Be sure the blade is not a substitute for lower guard. Lock-off button and pull the switch trigger. To prevent the switch trigger from...
...lock 2. Hex wrench 001968 Switch action 1 CAUTION: • Before plugging in the lock-off button 2. The blade brake system is installed with teeth pointing up at a Makita service center. SERIOUS PERSONAL INJURY CAN RESULT. For 45° bevel cuts, align the B position with an electric...with your cutting line. 001967 Sighting For straight cuts, align the A position on the tool. 001969 Removing or installing saw blade 1 CAUTION: • Be sure the blade is not a substitute for lower guard. Lock-off button and pull the switch trigger. To prevent the switch trigger from...

Owners Manual
Page 11
... 2. Then remove the hex bolt, outer flange and blade. To install the blade, follow the removal procedure in use . When changing blade, make sure to keep it from being lost. 1 11 Outer flange 5. Inner flange 4. Saw blade 001970 3 4 To remove the blade, press the shaft lock so that the blade cannot revolve and use . CAUTION: • The...
... 2. Then remove the hex bolt, outer flange and blade. To install the blade, follow the removal procedure in use . When changing blade, make sure to keep it from being lost. 1 11 Outer flange 5. Inner flange 4. Saw blade 001970 3 4 To remove the blade, press the shaft lock so that the blade cannot revolve and use . CAUTION: • The...

Owners Manual
Page 12
...to move the tool forward over the workpiece surface, keeping it flat and advancing smoothly until the blade attains full speed. Base CAUTION: • Be sure to chips and wood dust being ejected from saw , they cannot be cut line. The tool is an initial and final reaction. 001975 Hold... your speed of advance uniform. Rear handle 2. Forcing or twisting the tool will result in a straight line gently. Release switch, wait for blade to help avoid injury. 12 OPERATION 1 3 1. Use both hands are holding saw . Use eye protection to stop and then withdraw tool. Doing so may bind the...
...to move the tool forward over the workpiece surface, keeping it flat and advancing smoothly until the blade attains full speed. Base CAUTION: • Be sure to chips and wood dust being ejected from saw , they cannot be cut line. The tool is an initial and final reaction. 001975 Hold... your speed of advance uniform. Rear handle 2. Forcing or twisting the tool will result in a straight line gently. Release switch, wait for blade to help avoid injury. 12 OPERATION 1 3 1. Use both hands are holding saw . Use eye protection to stop and then withdraw tool. Doing so may bind the...
Owners Manual
Page 14
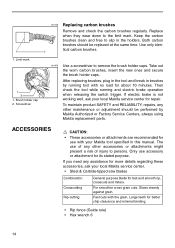
... other accessories or attachments might present a risk of any assistance for more details regarding these accessories, ask your local Makita service center. • Steel & Carbide-tipped saw blades Combination Crosscutting Rip-cutting General purpose blade for about 10 minutes. Large teeth for its stated purpose. 001145 Replacing carbon brushes Remove and check the carbon...
... other accessories or attachments might present a risk of any assistance for more details regarding these accessories, ask your local Makita service center. • Steel & Carbide-tipped saw blades Combination Crosscutting Rip-cutting General purpose blade for about 10 minutes. Large teeth for its stated purpose. 001145 Replacing carbon brushes Remove and check the carbon...

Parts Breakdown
Page 3
... RING E-3, 4304 1 93 267099-0 FLAT WASHER 4, 6201D 1 94 262104-8 SHOULDER RING 4, 5402NA 1 95 251973-2 H.S.H. BLADE,32T,16-5/16, 5402A 1 1,003 783204-6 HEX WRENCH 6, 3705, HR5000 1 1,004 194701-1 SAW STORAGE HOLDER, 5402NA 1 5,001 810156-9 N/A 1 Page 3 of 3 8/18/2010 WASHER 8, 5037NB 1 67 344980-3 LEVER PLATE, 5402NA 1 68 921432-7 HEX BOLT M8X20, 5177B 1 69 341415-5 LOCK PLATE, 5057KB...
... RING E-3, 4304 1 93 267099-0 FLAT WASHER 4, 6201D 1 94 262104-8 SHOULDER RING 4, 5402NA 1 95 251973-2 H.S.H. BLADE,32T,16-5/16, 5402A 1 1,003 783204-6 HEX WRENCH 6, 3705, HR5000 1 1,004 194701-1 SAW STORAGE HOLDER, 5402NA 1 5,001 810156-9 N/A 1 Page 3 of 3 8/18/2010 WASHER 8, 5037NB 1 67 344980-3 LEVER PLATE, 5402NA 1 68 921432-7 HEX BOLT M8X20, 5177B 1 69 341415-5 LOCK PLATE, 5057KB...


