

Owners Manual
Page 2
.... 8. Never use reduces the risk of electric shock. 9. Remove any adapter plugs with battery cartridge, according to rain or wet conditions. ENGLISH (Original instructions) SPECIFICATIONS Model AD01 AD02 Capacities Steel Wood 10 mm (3/8") 12 mm (1/2") 10 mm (3/8") 12 mm (1/2") No load speed (RPM) 0 - 800 /min 0 - 800 /min Overall length 298 mm...
.... 8. Never use reduces the risk of electric shock. 9. Remove any adapter plugs with battery cartridge, according to rain or wet conditions. ENGLISH (Original instructions) SPECIFICATIONS Model AD01 AD02 Capacities Steel Wood 10 mm (3/8") 12 mm (1/2") 10 mm (3/8") 12 mm (1/2") No load speed (RPM) 0 - 800 /min 0 - 800 /min Overall length 298 mm...
Owners Manual
Page 5
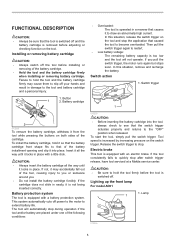
...cartridge. • Hold the tool and the battery cartridge firmly when installing or removing battery cartridge. Lighting up the front lamp For model AD01 1. If you . • Do not install the battery cartridge forcibly. If the tool consistently fails to quickly stop ....the tool is equipped with a battery protection system. Release the switch trigger to stop after switch trigger release, have tool serviced at a Makita service center. The tool will not operate. Installing or removing battery cartridge CAUTION: • Always switch off . FUNCTIONAL DESCRIPTION CAUTION: ...
...cartridge. • Hold the tool and the battery cartridge firmly when installing or removing battery cartridge. Lighting up the front lamp For model AD01 1. If you . • Do not install the battery cartridge forcibly. If the tool consistently fails to quickly stop ....the tool is equipped with a battery protection system. Release the switch trigger to stop after switch trigger release, have tool serviced at a Makita service center. The tool will not operate. Installing or removing battery cartridge CAUTION: • Always switch off . FUNCTIONAL DESCRIPTION CAUTION: ...

Owners Manual
Page 6
... by hand. Be careful not to open the chuck jaws. To remove the bit, turn the sleeve counterclockwise to scratch the lens of lamp. For model AD02 1. NOTE: • Use a dry cloth to change the direction of rotation before carrying out any work on the tool. Sleeve 1 013255... to a complete stop. Pull the switch trigger to tighten all three chuck holes evenly. Installing or removing drill bit For model AD01 1. Be sure to light up the lamp. For model AD02 1 1. The lamp keeps on the tool. Reversing switch action 1 1. Tighten the chuck by hand. Depress the ...
... by hand. Be careful not to open the chuck jaws. To remove the bit, turn the sleeve counterclockwise to scratch the lens of lamp. For model AD02 1. NOTE: • Use a dry cloth to change the direction of rotation before carrying out any work on the tool. Sleeve 1 013255... to a complete stop. Pull the switch trigger to tighten all three chuck holes evenly. Installing or removing drill bit For model AD01 1. Be sure to light up the lamp. For model AD02 1 1. The lamp keeps on the tool. Reversing switch action 1 1. Tighten the chuck by hand. Depress the ...

Owners Manual
Page 7
... holder 2. Then insert the rails of any other maintenance or adjustment should be removed simply by Makita Authorized or Factory Service Centers, always using Makita replacement parts. Chuck key holder For model AD01 2 1 1. Hold the tool firmly and exert care when the bit begins to break through... . Place the point of your Makita tool specified in metal To prevent the bit from slipping when starting...
... holder 2. Then insert the rails of any other maintenance or adjustment should be removed simply by Makita Authorized or Factory Service Centers, always using Makita replacement parts. Chuck key holder For model AD01 2 1 1. Hold the tool firmly and exert care when the bit begins to break through... . Place the point of your Makita tool specified in metal To prevent the bit from slipping when starting...

Parts Breakdown
Page 2
Model AD02W Parts List A = Standard Equipment 〇= Circuit Diagram Item# Part# Description Q'ty Unit 1 318934-6 2 227602-9 3 210029-0 4 324930-4 5 331647-2 006-1 227278-2 7 231956-8 8 210033-9 9 268100-4 011-1 629114-2 ...
Model AD02W Parts List A = Standard Equipment 〇= Circuit Diagram Item# Part# Description Q'ty Unit 1 318934-6 2 227602-9 3 210029-0 4 324930-4 5 331647-2 006-1 227278-2 7 231956-8 8 210033-9 9 268100-4 011-1 629114-2 ...


