
Owners Manual
Page 2
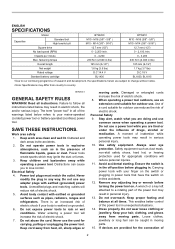
... Always wear eye protection. Avoid accidental starting. Remove any way. This enables better control of inattention while operating power tools may result in personal injury. 13. ENGLISH SPECIFICATIONS Model BTW250 BTW251 Capacities Standard bolt High tensile bolt M10 - M14 (3/8" - 9/16" ) M10 - M14 (3/8" - 9/16" .... Safety equipment such as pipes, radiators, ranges and refrigerators. Ensure the switch is earthed or grounded. 6. Carrying power tools with earthed or grounded surfaces such as dust mask, non-skid safety shoes, hard hat, or hearing protection used for...
... Always wear eye protection. Avoid accidental starting. Remove any way. This enables better control of inattention while operating power tools may result in personal injury. 13. ENGLISH SPECIFICATIONS Model BTW250 BTW251 Capacities Standard bolt High tensile bolt M10 - M14 (3/8" - 9/16" ) M10 - M14 (3/8" - 9/16" .... Safety equipment such as pipes, radiators, ranges and refrigerators. Ensure the switch is earthed or grounded. 6. Carrying power tools with earthed or grounded surfaces such as dust mask, non-skid safety shoes, hard hat, or hearing protection used for...
Owners Manual
Page 3
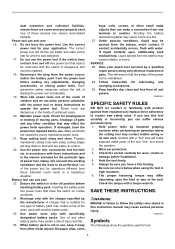
...depending upon the kind or size of children and do the job better and safer at the rate for which it away from the power tool before inserting battery pack. GEB009-2 SPECIFIC SAFETY RULES DO NOT let comfort or familiarity with a "live " and shock the operator. 2. ... Be sure no one terminal to recipro saw safety rules. SAVE THESE INSTRUCTIONS. Shorting the battery terminals together may create a risk of the tool "live " wire will do not allow persons unfamiliar with another . Always be controlled with water. The proper fastening torque may contact hidden ...
...depending upon the kind or size of children and do the job better and safer at the rate for which it away from the power tool before inserting battery pack. GEB009-2 SPECIFIC SAFETY RULES DO NOT let comfort or familiarity with a "live " and shock the operator. 2. ... Be sure no one terminal to recipro saw safety rules. SAVE THESE INSTRUCTIONS. Shorting the battery terminals together may create a risk of the tool "live " wire will do not allow persons unfamiliar with another . Always be controlled with water. The proper fastening torque may contact hidden ...
Owners Manual
Page 4
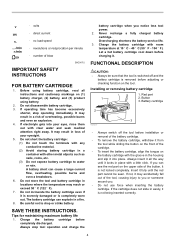
...; C (50 ゚ F - 104 ゚ F). If electrolyte gets into place. A battery short can see the red part on the tool. Always stop operating immediately. Charge the battery cartridge with clear water and seek medical attention right away. If the cartridge does not slide in a fire... (122 ゚ F). 7. Charge the battery cartridge before adjusting or checking function on the upper side of the button, it from the tool while sliding the button on the front of overheating, possible burns and even an explosion. 4. Button 3. Overcharging shortens the battery service life. ...
...; C (50 ゚ F - 104 ゚ F). If electrolyte gets into place. A battery short can see the red part on the tool. Always stop operating immediately. Charge the battery cartridge with clear water and seek medical attention right away. If the cartridge does not slide in a fire... (122 ゚ F). 7. Charge the battery cartridge before adjusting or checking function on the upper side of the button, it from the tool while sliding the button on the front of overheating, possible burns and even an explosion. 4. Button 3. Overcharging shortens the battery service life. ...
Owners Manual
Page 5
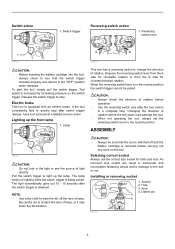
...position, the switch trigger cannot be sure that the switch trigger actuates properly and returns to stop after switch trigger release, have tool serviced at a Makita service center. Release the switch trigger to the "OFF" position when released. When the reversing switch lever is increased by ...increasing pressure on the switch trigger. The light automatically goes out 10 - 15 seconds after the tool comes to the neutral position. An ...
...position, the switch trigger cannot be sure that the switch trigger actuates properly and returns to stop after switch trigger release, have tool serviced at a Makita service center. Release the switch trigger to the "OFF" position when released. When the reversing switch lever is increased by ...increasing pressure on the switch trigger. The light automatically goes out 10 - 15 seconds after the tool comes to the neutral position. An ...

Owners Manual
Page 6
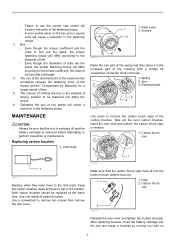
... N m (ft lbs) CAUTION: • Always insert the battery cartridge all the way until the red part cannot be reduced. 2. Hold the tool firmly and place the socket over the bolt or nut. Screw 3 3. If you . The relation between fastening torque and fastening time is discharged almost completely...for 15 minutes before proceeding with the detent pin on either side of the workpiece to be installed on and fasten for temporarily hanging the tool. To install the hook, insert it locks in place. Insert it fully until it into place. Before starting your job, always perform ...
... N m (ft lbs) CAUTION: • Always insert the battery cartridge all the way until the red part cannot be reduced. 2. Hold the tool firmly and place the socket over the bolt or nut. Screw 3 3. If you . The relation between fastening torque and fastening time is discharged almost completely...for 15 minutes before proceeding with the detent pin on either side of the workpiece to be installed on and fasten for temporarily hanging the tool. To install the hook, insert it locks in place. Insert it fully until it into place. Before starting your job, always perform ...
Owners Manual
Page 7
...the carbon brush caps of the impact wrench. Carbon brush cap 2 006304 Reinstall the rear cover and tighten two screws securely. Hole 2. Operating the tool at the same time. Spring 2. Take out the worn carbon brushes, insert the new ones and replace the carbon brush caps in brush holders ... and the class of bolt are the same, the proper fastening torque will cause a reduction in the fastening torque. The manner of holding the tool or the material of bolts are the same, the proper fastening torque will differ according to the diameter of bolt. • Even though the...
...the carbon brush caps of the impact wrench. Carbon brush cap 2 006304 Reinstall the rear cover and tighten two screws securely. Hole 2. Operating the tool at the same time. Spring 2. Take out the worn carbon brushes, insert the new ones and replace the carbon brush caps in brush holders ... and the class of bolt are the same, the proper fastening torque will cause a reduction in the fastening torque. The manner of holding the tool or the material of bolts are the same, the proper fastening torque will differ according to the diameter of bolt. • Even though the...
Owners Manual
Page 8
... lasts, so the above limitation or exclusion may not apply to the tool. Then check the tool while running and electric brake operation when releasing the switch trigger. EN0006-1 8 Only use with your local Makita Service Center. • Sockets • Extension bar • Universal... joint • Bit adapter • Various type of Makita genuine batteries and chargers MAKITA LIMITED ONE YEAR WARRANTY Warranty Policy Every Makita tool is caused by others: repairs are recommended for the period of incidental or consequential damages, so ...
... lasts, so the above limitation or exclusion may not apply to the tool. Then check the tool while running and electric brake operation when releasing the switch trigger. EN0006-1 8 Only use with your local Makita Service Center. • Sockets • Extension bar • Universal... joint • Bit adapter • Various type of Makita genuine batteries and chargers MAKITA LIMITED ONE YEAR WARRANTY Warranty Policy Every Makita tool is caused by others: repairs are recommended for the period of incidental or consequential damages, so ...
Parts Breakdown
Page 2
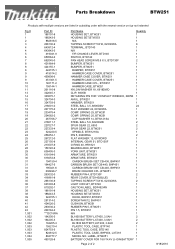
... LABEL, BDF452HW 1 HOUSING SET, BTW251 1 HOUSING SET,BTW253 1 HOOK, BHP451,BTW251 1 SCREW M4X12, BHP451 1 CUSHION, BTW251 1 RUBBER PIN 5, BTW251 1 PIN 1.5, BTW251 1 N/A 1 BL1830 BATTERY,LXT400, 3.0AH 2 BL1830 BATTERY,LXT400, 3.0AH 2 BL1830 BATTERY,LXT400, 3.0AH 2 PLASTIC TOOL CASE, BTP140 1 PLASTIC TOOL CASE, BTD140 1 PLASTIC TOOL CASE, BHP454, LXT218 1 MODEL NO. SPRING 25, BTW251 1 COMP. Parts Breakdown BTW251 Products with multiple versions are...
... LABEL, BDF452HW 1 HOUSING SET, BTW251 1 HOUSING SET,BTW253 1 HOOK, BHP451,BTW251 1 SCREW M4X12, BHP451 1 CUSHION, BTW251 1 RUBBER PIN 5, BTW251 1 PIN 1.5, BTW251 1 N/A 1 BL1830 BATTERY,LXT400, 3.0AH 2 BL1830 BATTERY,LXT400, 3.0AH 2 BL1830 BATTERY,LXT400, 3.0AH 2 PLASTIC TOOL CASE, BTP140 1 PLASTIC TOOL CASE, BTD140 1 PLASTIC TOOL CASE, BHP454, LXT218 1 MODEL NO. SPRING 25, BTW251 1 COMP. Parts Breakdown BTW251 Products with multiple versions are...
