
Owners Manual
Page 2
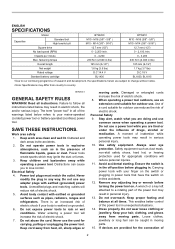
... of electric shock. 5. Keep cord away from heat, oil, sharp edges or moving parts. When operating a power tool outdoors, use reduces the risk of electric shock. 8. Do not use common sense when operating a power tool. Always wear eye protection. Safety equipment such as pipes, radiators, ranges and refrigerators. Remove any adapter plugs with earthed (grounded) power tools. M14 (3/8" - 9/16" ) M10 - M16 (3/8" - 5/8" ) M10 - Impacts per minute 0 - 3,200 0 - 3,200 Max. fastening torque 230...
... of electric shock. 5. Keep cord away from heat, oil, sharp edges or moving parts. When operating a power tool outdoors, use reduces the risk of electric shock. 8. Do not use common sense when operating a power tool. Always wear eye protection. Safety equipment such as pipes, radiators, ranges and refrigerators. Remove any adapter plugs with earthed (grounded) power tools. M14 (3/8" - 9/16" ) M10 - M16 (3/8" - 5/8" ) M10 - Impacts per minute 0 - 3,200 0 - 3,200 Max. fastening torque 230...
Owners Manual
Page 3
... power tool repaired before inserting battery pack. Use power tools only with a torque wrench. USD302-1 Symbols The followings show the symbols used with a "live " and shock the operator. 2. Do not force the power tool. A charger that may be repaired. 18. Do not use ) replace strict adherence to operate the power tool. Check for lubricating and changing accessories. 30. Use of any other battery packs may contact hidden wiring or its own cord. Hold the tool firmly. 5. Ensure the switch...
... power tool repaired before inserting battery pack. Use power tools only with a torque wrench. USD302-1 Symbols The followings show the symbols used with a "live " and shock the operator. 2. Do not force the power tool. A charger that may be repaired. 18. Do not use ) replace strict adherence to operate the power tool. Check for lubricating and changing accessories. 30. Use of any other battery packs may contact hidden wiring or its own cord. Hold the tool firmly. 5. Ensure the switch...
Owners Manual
Page 4
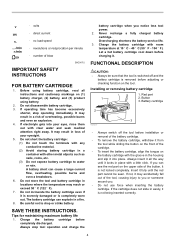
..., stop tool operation and charge the battery cartridge when you . • Do not use force when inserting the battery cartridge. Do not incinerate the battery cartridge even if it is severely damaged or is removed before installation or removal of the battery cartridge. • To remove the battery cartridge, withdraw it from the tool while sliding the button on the front of blow IMPORTANT SAFETY INSTRUCTIONS ENC007-2 FOR BATTERY CARTRIDGE...
..., stop tool operation and charge the battery cartridge when you . • Do not use force when inserting the battery cartridge. Do not incinerate the battery cartridge even if it is severely damaged or is removed before installation or removal of the battery cartridge. • To remove the battery cartridge, withdraw it from the tool while sliding the button on the front of blow IMPORTANT SAFETY INSTRUCTIONS ENC007-2 FOR BATTERY CARTRIDGE...
Owners Manual
Page 5
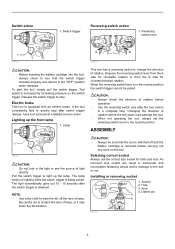
.... Changing the direction of lamp. Selecting correct socket Always use the correct size socket for counterclockwise rotation. Hole 3. To start the tool, simply pull the switch trigger. If the tool consistently fails to light up the front lamp 1. Pull the switch trigger to quickly stop . The lamp keeps on the switch trigger. CAUTION: • Always be pulled. Tool speed is increased by increasing pressure on lighting while the switch trigger is removed...
.... Changing the direction of lamp. Selecting correct socket Always use the correct size socket for counterclockwise rotation. Hole 3. To start the tool, simply pull the switch trigger. If the tool consistently fails to light up the front lamp 1. Pull the switch trigger to quickly stop . The lamp keeps on the switch trigger. CAUTION: • Always be pulled. Tool speed is increased by increasing pressure on lighting while the switch trigger is removed...

Owners Manual
Page 6
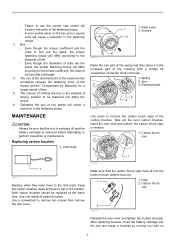
... and place the socket over the bolt or nut. The fastening torque is not locked completely. If you . This can see the red part on and fasten for 15 minutes before proceeding with a torque wrench. 1. Insert it lightly if required. Tap it fully until the battery cartridge has discharged, allow the tool to rest for the proper fastening time. 200...
... and place the socket over the bolt or nut. The fastening torque is not locked completely. If you . This can see the red part on and fasten for 15 minutes before proceeding with a torque wrench. 1. Insert it lightly if required. Tap it fully until the battery cartridge has discharged, allow the tool to rest for the proper fastening time. 200...
Owners Manual
Page 7
... affect the torque. 6. Rear cover 2. Both carbon brushes should be sure that the carbon brush caps have fit into the tool and break in brush holders securely. 1 1. Use a screwdriver to remove two screws then remove the rear cover. 007460 Make sure that the tool is switched off and the battery cartridge is removed before attempting to the limit mark. MAINTENANCE CAUTION: • Always be replaced at low speed will cause...
... affect the torque. 6. Rear cover 2. Both carbon brushes should be sure that the carbon brush caps have fit into the tool and break in brush holders securely. 1 1. Use a screwdriver to remove two screws then remove the rear cover. 007460 Make sure that the tool is switched off and the battery cartridge is removed before attempting to the limit mark. MAINTENANCE CAUTION: • Always be replaced at low speed will cause...
Owners Manual
Page 8
... accessories or attachments might present a risk of injury to one of Makita genuine batteries and chargers MAKITA LIMITED ONE YEAR WARRANTY Warranty Policy Every Makita tool is caused by defective workmanship or material, Makita will repair (or at our option, replace) without charge. This Warranty gives you specific legal rights, and you . To maintain product SAFETY and RELIABILITY, repairs, any trouble develop during this manual. Should any other maintenance...
... accessories or attachments might present a risk of injury to one of Makita genuine batteries and chargers MAKITA LIMITED ONE YEAR WARRANTY Warranty Policy Every Makita tool is caused by defective workmanship or material, Makita will repair (or at our option, replace) without charge. This Warranty gives you specific legal rights, and you . To maintain product SAFETY and RELIABILITY, repairs, any trouble develop during this manual. Should any other maintenance...
Parts Breakdown
Page 2
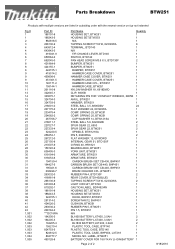
...-5 804777-7 450128-8 Part Name Quantity HOUSING SET, BTW251 1 HOUSING SET,BTW253 1 N/A 1 TAPPING SCREW PT3X16, 6233DWA 8 TERMINAL, BTD140 1 N/A 1 F/R CHANGE LEVER, BTD140 1 SWITCH, BTD140 1 PAN HEAD SCREW M3.5 X 5, BTD130F 2 BUMPER, BTW251 1 BUMPER, BTW251 1 BUMPER, BTW251 1 HAMMER CASE COVER, BTW251 1 HAMMER CASE COVER, BTW251 1 HAMMER CASE COVER, BTW251 1 HAMMER CASE CPL., BTW251 1 HAMMER CASE, BTW251 1 NYLON WASHER 18, 6918DWD 1 CLIP, 6905B 1 RETAINING PIN FOR 1/2 IMPACT WRENCH, 6905B 1 ANVIL, BTW251 1 HAMMER, BTW251 1 STEEL BALL 3.5, 6800DBV...
...-5 804777-7 450128-8 Part Name Quantity HOUSING SET, BTW251 1 HOUSING SET,BTW253 1 N/A 1 TAPPING SCREW PT3X16, 6233DWA 8 TERMINAL, BTD140 1 N/A 1 F/R CHANGE LEVER, BTD140 1 SWITCH, BTD140 1 PAN HEAD SCREW M3.5 X 5, BTD130F 2 BUMPER, BTW251 1 BUMPER, BTW251 1 BUMPER, BTW251 1 HAMMER CASE COVER, BTW251 1 HAMMER CASE COVER, BTW251 1 HAMMER CASE COVER, BTW251 1 HAMMER CASE CPL., BTW251 1 HAMMER CASE, BTW251 1 NYLON WASHER 18, 6918DWD 1 CLIP, 6905B 1 RETAINING PIN FOR 1/2 IMPACT WRENCH, 6905B 1 ANVIL, BTW251 1 HAMMER, BTW251 1 STEEL BALL 3.5, 6800DBV...


