
Owners Manual
Page 2
...or jewellery. Work area safety 1. Do not use any way. Avoid accidental starting. A wrench or a key left attached to a rotating part of flammable liquids, gases or dust. Keep your finger on the switch or plugging in the presence of the power tool may differ from ...electric shock. 7. Use safety equipment. Carrying power tools with your hair, clothing, and gloves away from heat, oil, sharp edges or moving parts. Do not overreach. Keep children and bystanders away while operating a power tool. Unmodified plugs and matching outlets will increase the risk of electric...
...or jewellery. Work area safety 1. Do not use any way. Avoid accidental starting. A wrench or a key left attached to a rotating part of flammable liquids, gases or dust. Keep your finger on the switch or plugging in the presence of the power tool may differ from ...electric shock. 7. Use safety equipment. Carrying power tools with your hair, clothing, and gloves away from heat, oil, sharp edges or moving parts. Do not overreach. Keep children and bystanders away while operating a power tool. Unmodified plugs and matching outlets will increase the risk of electric...

Owners Manual
Page 3
...connection of dust extraction and collection facilities, ensure these instructions to bind and are provided for one is not in moving parts, breakage of parts and any other condition that may contact hidden wiring or its own cord. Inserting the battery pack into account the ...battery may cause serious personal injury. 3 If damaged, have a firm footing. When battery pack is below when using only identical replacement parts. Keep cutting tools sharp and clean. Maintain power tools. jewellery or long hair can be caught in use, keep it away from other...
...connection of dust extraction and collection facilities, ensure these instructions to bind and are provided for one is not in moving parts, breakage of parts and any other condition that may contact hidden wiring or its own cord. Inserting the battery pack into account the ...battery may cause serious personal injury. 3 If damaged, have a firm footing. When battery pack is below when using only identical replacement parts. Keep cutting tools sharp and clean. Maintain power tools. jewellery or long hair can be caught in use, keep it away from other...

Owners Manual
Page 4
... ゚ C - 40 ゚ C (50 ゚ F - 104 ゚ F). Before using battery. 2. A battery short can see the red part on the upper side of the cartridge. • To insert the battery cartridge, align the tongue on (1) battery charger, (2) battery, and (3) product using...the battery service life. 3. Let a hot battery cartridge cool down before completely discharged. FUNCTIONAL DESCRIPTION CAUTION: • Always be seen. Red part 1 2. Battery cartridge 2 3 008146 • Always switch off and the battery cartridge is removed before installation or removal of the battery ...
... ゚ C - 40 ゚ C (50 ゚ F - 104 ゚ F). Before using battery. 2. A battery short can see the red part on the upper side of the cartridge. • To insert the battery cartridge, align the tongue on (1) battery charger, (2) battery, and (3) product using...the battery service life. 3. Let a hot battery cartridge cool down before completely discharged. FUNCTIONAL DESCRIPTION CAUTION: • Always be seen. Red part 1 2. Battery cartridge 2 3 008146 • Always switch off and the battery cartridge is removed before installation or removal of the battery ...

Owners Manual
Page 5
... install the hook, insert it into a groove in the tool housing on either side of light directly. To start the tool, simply pull the lower part (A) of the tool until it locks into the tool, always check to a complete stop . Lamp 2 2. ASSEMBLY CAUTION: • Always be sure that the tool is... then secure it with the detent pin on the anvil and push it onto the anvil of the switch trigger for clockwise or the upper part (B) for bolts and nuts. Switch action 1. Installing or removing socket 3 1 4 2 1.
... install the hook, insert it into a groove in the tool housing on either side of light directly. To start the tool, simply pull the lower part (A) of the tool until it locks into the tool, always check to a complete stop . Lamp 2 2. ASSEMBLY CAUTION: • Always be sure that the tool is... then secure it with the detent pin on the anvil and push it onto the anvil of the switch trigger for clockwise or the upper part (B) for bolts and nuts. Switch action 1. Installing or removing socket 3 1 4 2 1.
Owners Manual
Page 6
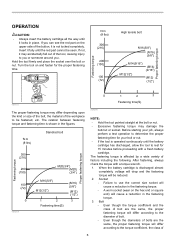
If you . If not, it may accidentally fall out of the tool, causing injury to you or someone around you can see the red part on the upper side of the button, it is not locked completely. N m (ft lbs) 300 (216) 200 (150) 100 (72) High tensile bolt M16(5/8") (M16) (5/8")... torque will differ according to use the correct size socket will cause a reduction in place. When the battery cartridge is operated continuously until the red part cannot be seen. Hold the tool firmly and place the socket over the bolt or nut. N m (ft lbs) Standrad bolt Fastening torque Proper fastening ...
If you . If not, it may accidentally fall out of the tool, causing injury to you or someone around you can see the red part on the upper side of the button, it is not locked completely. N m (ft lbs) 300 (216) 200 (150) 100 (72) High tensile bolt M16(5/8") (M16) (5/8")... torque will differ according to use the correct size socket will cause a reduction in place. When the battery cartridge is operated continuously until the red part cannot be seen. Hold the tool firmly and place the socket over the bolt or nut. N m (ft lbs) Standrad bolt Fastening torque Proper fastening ...

Owners Manual
Page 7
... or adjustment should be performed by fastening for more details regarding these accessories, ask your Makita tool specified in this manual. Only use accessory or attachment for use with your local Makita Service Center. • Sockets • Extension bar • Universal joint • ...carbon brushes clean and free to persons. bolt and the bolt length. 4. Brush holder cap 2. Compensate by Makita Authorized or Factory Service Centers, always using Makita replacement parts. 7 Use only identical carbon brushes. Take out the worn carbon brushes, insert the new ones and secure...
... or adjustment should be performed by fastening for more details regarding these accessories, ask your Makita tool specified in this manual. Only use accessory or attachment for use with your local Makita Service Center. • Sockets • Extension bar • Universal joint • ...carbon brushes clean and free to persons. bolt and the bolt length. 4. Brush holder cap 2. Compensate by Makita Authorized or Factory Service Centers, always using Makita replacement parts. 7 Use only identical carbon brushes. Take out the worn carbon brushes, insert the new ones and secure...
Parts Breakdown
Page 2
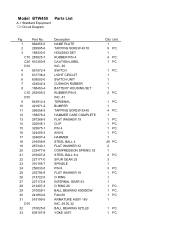
... A = Standard Equipment 〇= Circuit Diagram Fig. Part No. 1 862955-5 2 265995-6 3 188433-0 3 C10 263025-7 3 C20 810300-8 3 D10 4 651572-4 5 631738-2 6 638503-0 7 424042-4 8 188453-4 8 C10 263005-3 8 D10 9 643812-4 10 421971-2 11 266056-5 12 158076-2 13 ...
... A = Standard Equipment 〇= Circuit Diagram Fig. Part No. 1 862955-5 2 265995-6 3 188433-0 3 C10 263025-7 3 C20 810300-8 3 D10 4 651572-4 5 631738-2 6 638503-0 7 424042-4 8 188453-4 8 C10 263005-3 8 D10 9 643812-4 10 421971-2 11 266056-5 12 158076-2 13 ...


