Makita CT409R Support and Manuals
Get Help and Manuals for this Makita item
View All Support Options Below
Free Makita CT409R manuals!
Problems with Makita CT409R?
Ask a Question
Free Makita CT409R manuals!
Problems with Makita CT409R?
Ask a Question
Popular Makita CT409R Manual Pages
DT03 Instruction Manual - Page 3
... pack is below when using only identical replacement parts. Under abusive conditions, liquid may create a risk of the power tool "live " wire may be repaired.
3. avoid contact. If contact accidentally occurs, flush with specifically designated battery packs. Service 1. Have your application.
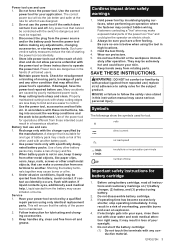
Cordless impact driver safety warnings
1. Fasteners contacting a "live " and could...
DT03 Instruction Manual - Page 4

...the model number... cartridge. Overcharging shortens the battery service life.
3. Installing or removing battery cartridge
CAUTION: ...install the battery cartridge, align the tongue on the tool and stop tool operation and charge the battery cartridge when you pull the switch trigger, the motor runs again but stops soon. In this situation, remove and recharge the battery. SAVE THESE INSTRUCTIONS...
DT03 Instruction Manual - Page 6

... tool housing on either side and then secure it is removed before operation. CAUTION: When not operating the tool, always set the reversing switch lever to the instructions above. Hook 3.
Installing or removing driver bit/ socket bit
Optional accessory
12 mm (15/32")
9 mm (3/8")
1
2 3
1. If it comes out, do not use any work on...
DT03 Instruction Manual - Page 8

...or Authorized Service Centers. Discoloration, deformation or cracks may not apply to perform inspection or maintenance. To maintain product SAFETY and RELIABILITY, repairs, any assistance for use of any trouble develop during this manual. MAKITA DISCLAIMS LIABILITY FOR ANY IMPLIED WARRANTIES, INCLUDING IMPLIED WARRANTIES OF "MERCHANTABILITY" AND "FITNESS FOR A SPECIFIC PURPOSE," AFTER...
FD05/FD06 Instruction Manual - Page 3
... and fire.
3. Cutting accessory contacting a "live " and could result in this instruction manual may create a risk of fire when used for lubricating and changing accessories. 3. Shorting the battery terminals together may contact hidden wiring. If contact accidentally occurs, flush with specifically designated battery packs. Hold power tool by the manufacturer.
This will do...
FD05/FD06 Instruction Manual - Page 5
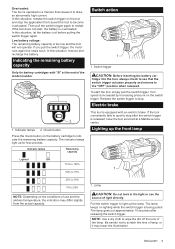
..."OFF" position when released. Pull the switch trigger to wipe the dirt off the lens of the model number
1
2
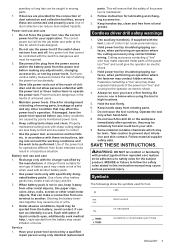
1. NOTE: Use a dry cloth to light up for battery cartridges with an electric ... capacity
Switch action
1
1.
Electric brake
This tool is equipped with "B" at a Makita service center. The lamp keeps on the switch trigger. Indicating the remaining battery capacity
Only for few...
FD05/FD06 Instruction Manual - Page 6
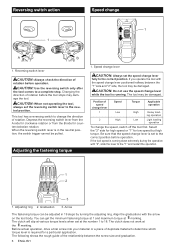
... for a particular application. CAUTION: Do not use the speed change lever
CAUTION: Always set the reversing switch lever to determine which torque level is running. ing operation
2
High
Low... the tool may be damaged. The clutch does not work at marking. The following shows the rough guide of speed
change
1 1
A
B
1. CAUTION: Use the reversing switch only after the tool comes ...
FD05/FD06 Instruction Manual - Page 7
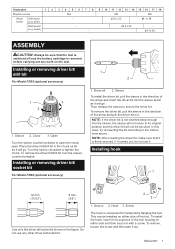
... is convenient for temporarily hanging the tool. Installing or removing driver bit/ drill bit
For Model FD05 (optional accessory)
1
3
2
1.
In this case, try re-inserting the bit according to secure the driver bit. Hook 3. pine)
ɸ3.5 x 22
ɸ4.1x 38
Hard wood (e.g. Then release the sleeve to the instructions above. Do not use it out...
FD05/FD06 Instruction Manual - Page 8
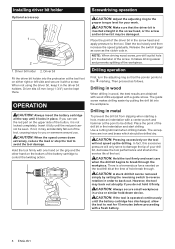
...of the button, it firmly. The guide screw makes drilling easier by setting the reversing switch to the proper torque level for 15 minutes before proceeding with a guide screw. Installing driver bit holder
Optional accessory
1
2
...way until it in a vise or similar hold it is operated continuously until the red part cannot be drilled dry. If not, it may back out abruptly if you do not...
FD05/FD06 Instruction Manual - Page 9
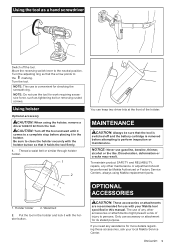
...Service Center. Discoloration, deformation or cracks may result. To maintain product SAFETY and RELIABILITY, repairs, any assistance for more details regarding these accessories, ask your Makita tool specified in this manual...holder.
1
2
You can keep two driver bits at the front of injury to ...Makita Authorized or Factory Service Centers, always using the holster, remove a driver bit/drill bit ...
FD05/FD06 Instruction Manual - Page 10
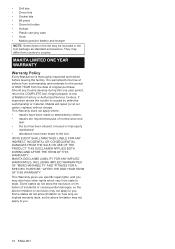
... been made or attempted by defective workmanship or material, Makita will repair (or at our option, replace) without charge. They may not apply to country.
Some states do not allow the exclusion or limitation of Makita's Factory or Authorized Service Centers. Should any trouble develop during this one year period, return the COMPLETE tool...
DT03R1/Z Parts Breakdown - Page 2

...
026
268217-3 PIN 3.5
027
253052-2 FLAT WASHER 12
028
227215-6 INTERNAL GEAR 43
029
158671-8 BEARING BOX COMPLETE
030
629163-9 DC MOTOR
031
183B49-8 HOUSING SET
031 C10 252126-6 HEX. Model DT03R1/Z Parts List
A = Standard Equipment 〇= Circuit Diagram
Item#
Part#
Description
001
183B49-8 HOUSING SET
001 C10 252126-6 HEX.
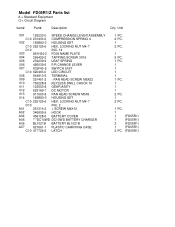
FD05R1/Z Parts Breakdown - Page 2
...MOTOR
013
911003-8 PAN HEAD SCREW M3X6
014
183B50-3 HOUSING SET
014 C10 252126-6 HEX. LOCKING NUT M4-7
014 D10
INC...PC.
1
1
(FD05R1)
1
(FD05R1)
2
(FD05R1)
1
(FD05R1)
2 PC. (FD05R1) Model FD05R1/Z Parts list
A = Standard Equipment 〇= Circuit Diagram
Item#
Part#
Description
Q'ty Unit
001
126233-0 SPEED CHANGE LEVER ASSEMBLY
001 C10 231433-0 COMPRESSION SPRING 4
002
...
Makita DT03Z/DT03R1 New Tool Flyer English - Page 1

...
COMFORT
Weighs only 2.3 lbs. 12V max CXT™ Lithium-Ion Cordless Impact Driver Kit
Model DT03R1
Slide Style Battery and Improved Ergonomic Grip
POWER
970 in .lbs./110N•...code (kit) UPC code (bare tool)
1/4" 0 - 2,600 RPM 0 - 3,500 IPM 970 in .lbs. light illuminates the work area n Convenient 1/4 hex chuck for quick bit changes
*Also availabe as bare tool Model DT03Z
SPECIFICATIONS...
RM02 Instruction Manual - Page 2

...all settings ...specifically...part...REPLACE ONLY WITH MAKITA BATTERY MODEL...installing or removing battery cartridge. To remove the battery cartridge (19), slide it . Insert it all servicing to indicate the remaining battery capacity. If not, it is completely worn out.
If the cartridge does not slide in place with one type of battery may accidentally fall out of use this instruction manual...
Makita CT409R Reviews
We have not received any reviews for Makita yet.