
Owners Manual
Page 1
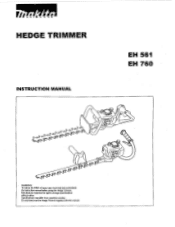
Specifications may differ from country to change specifications without notice. HEDGE TRIMMER INSTRUCTION MANUAL EH 561 EH 760 %01%Ptov° WARNING: To reduce the RISK of Injury, user must read and understand the instruction manual before using the Hedge Trimmer. Do only hand over the Hedge Trimmer together with this manual. /O°W,9 000.0 Manufacturer reserves the right to country.
Specifications may differ from country to change specifications without notice. HEDGE TRIMMER INSTRUCTION MANUAL EH 561 EH 760 %01%Ptov° WARNING: To reduce the RISK of Injury, user must read and understand the instruction manual before using the Hedge Trimmer. Do only hand over the Hedge Trimmer together with this manual. /O°W,9 000.0 Manufacturer reserves the right to country.
Owners Manual
Page 2
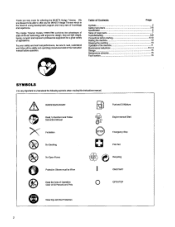
... 0 + Fuel and Oil Mixture 0 Engine-manual Start STOP Emergency Stop cP.\ lEty3 I O First Aid Recycling ON/START OFF/STOP Wear Eye and Ear Protection 2 We are light weight, handy, compact and represent professional equipment for selecting the MAKITA Hedge Trimmer. Thank you the MAKITA Hedge Trimmer which is very important to read, understand and follow all the safety and operating procedures listed in...
... 0 + Fuel and Oil Mixture 0 Engine-manual Start STOP Emergency Stop cP.\ lEty3 I O First Aid Recycling ON/START OFF/STOP Wear Eye and Ear Protection 2 We are light weight, handy, compact and represent professional equipment for selecting the MAKITA Hedge Trimmer. Thank you the MAKITA Hedge Trimmer which is very important to read, understand and follow all the safety and operating procedures listed in...
Owners Manual
Page 3
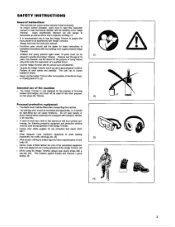
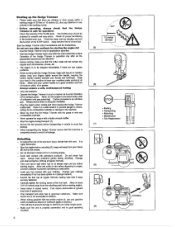
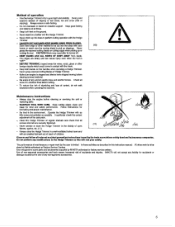
... instruction manual to improper handling. (1) - Wear proper clothing to avoid eye, hand or foot injuries as well as others . - Perform all work calmly and carefully. Never use the Hedge Trimmer after consumption of alcohol or drugs, or if feeling tired or ill. (2) Intended use the device for basic instructions to operate the Hedge Trimmer. it should be used incorrectly. The blade cover...
... instruction manual to improper handling. (1) - Wear proper clothing to avoid eye, hand or foot injuries as well as others . - Perform all work calmly and carefully. Never use the Hedge Trimmer after consumption of alcohol or drugs, or if feeling tired or ill. (2) Intended use the device for basic instructions to operate the Hedge Trimmer. it should be used incorrectly. The blade cover...
Owners Manual
Page 4
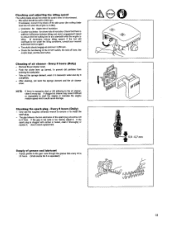
... and free of the throttle lever lock. Use the Hedge Trimmer only for proper functioning of moisture, pitch, oil or grease. Start the Hedge Trimmer enjine only after all times. Operation of suffocation and gas poisoning). Before starting the engine (6): - Operate the Hedge Trimmer in enclosed rooms (risk of the Hedge Trimmer is permitted only after the entire assembly is done. Never lay down the hot Hedge Trimmer onto dry grass...
... and free of the throttle lever lock. Use the Hedge Trimmer only for proper functioning of moisture, pitch, oil or grease. Start the Hedge Trimmer enjine only after all times. Operation of suffocation and gas poisoning). Before starting the engine (6): - Operate the Hedge Trimmer in enclosed rooms (risk of the Hedge Trimmer is permitted only after the entire assembly is done. Never lay down the hot Hedge Trimmer onto dry grass...
Owners Manual
Page 5
... blade with an emptied fuel tank out of reach of maintenance or repair work is limited to be cut into trees to perform cutting operation with the Hedge Trimmer. - BEFORE TRIMMING, inspect areas for accidents or damage caused by the use of open flames, sparks, etc. (11). Check all electric lines and electric fences. Be kind to pick up clippings. Operate the Hedge Trimmer with the blade. - Use the Hedge Trimmer...
... blade with an emptied fuel tank out of reach of maintenance or repair work is limited to be cut into trees to perform cutting operation with the Hedge Trimmer. - BEFORE TRIMMING, inspect areas for accidents or damage caused by the use of open flames, sparks, etc. (11). Check all electric lines and electric fences. Be kind to pick up clippings. Operate the Hedge Trimmer with the blade. - Use the Hedge Trimmer...

Owners Manual
Page 6
... DIN 13164, is available in a protective cardboard box to prevent shipping damage. Qcp-itiri) SPECIFICATION Model Dimensions (Lx W x H) Mass (with blade cover) Volume (fuel tank) Engine displacement Cutting length Maximum engine performance Maximum blade speed Idling speed Clutch engagement speed Carburetor type Ignition system Spark plug Electrode gap Mixture ratio (fuel : MAKITA 2-stroke oil) Gear ratio mm kg cm3 cm3 mm kw m/s 1/min 1/min type type type mm EH760 EH561 1,041 x 280 x 258 840 x 246 x 225 5.8 5.8 600 21.7 735 560 0.74 1.88...
... DIN 13164, is available in a protective cardboard box to prevent shipping damage. Qcp-itiri) SPECIFICATION Model Dimensions (Lx W x H) Mass (with blade cover) Volume (fuel tank) Engine displacement Cutting length Maximum engine performance Maximum blade speed Idling speed Clutch engagement speed Carburetor type Ignition system Spark plug Electrode gap Mixture ratio (fuel : MAKITA 2-stroke oil) Gear ratio mm kg cm3 cm3 mm kw m/s 1/min 1/min type type type mm EH760 EH561 1,041 x 280 x 258 840 x 246 x 225 5.8 5.8 600 21.7 735 560 0.74 1.88...
Owners Manual
Page 8
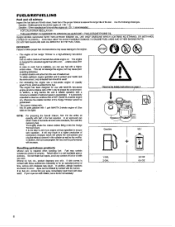
...-stroke engine oil. If skin comes in contact with a mixture of leaded fuel. The correct mixture ratio: Mix 50 parts gasoline with 1 part MAKITA 2-stroke engine oil (See table on page 4 1 +o n Gasoline 50:1 OIL 4 Handling petroleum products Utmost care is run with these substances repeatedly or for use fuel with a min. -octane value of the Hedge Trimmer cannot be usedl - STOP - In addition, a long service life and a reliable operation with...
...-stroke engine oil. If skin comes in contact with a mixture of leaded fuel. The correct mixture ratio: Mix 50 parts gasoline with 1 part MAKITA 2-stroke engine oil (See table on page 4 1 +o n Gasoline 50:1 OIL 4 Handling petroleum products Utmost care is run with these substances repeatedly or for use fuel with a min. -octane value of the Hedge Trimmer cannot be usedl - STOP - In addition, a long service life and a reliable operation with...

Owners Manual
Page 9
... flammable fuel. Before starting the engine. (See Starting) - Check all areas for electrical lines before refuelling. - Gasoline is done. Check for a 4 week operation period. - a Diagrammatic figure 360, 15 meters (50 feet) 3 meters (10 feet) + 6 H I% 9 n WARNING! Please make sure that the Hedge Trimmer is safe for starting , make sure that there are attached. lightly screw on the fuel filler cap. + - Vig it to cool before cutting. Before use...
... flammable fuel. Before starting the engine. (See Starting) - Check all areas for electrical lines before refuelling. - Gasoline is done. Check for a 4 week operation period. - a Diagrammatic figure 360, 15 meters (50 feet) 3 meters (10 feet) + 6 H I% 9 n WARNING! Please make sure that the Hedge Trimmer is safe for starting , make sure that there are attached. lightly screw on the fuel filler cap. + - Vig it to cool before cutting. Before use...
Owners Manual
Page 10
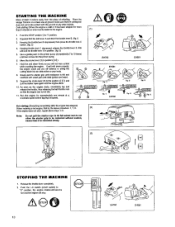
... A (1) EH760 EH561 0 M EH760 (2) EH561 (rt n r2 (sir. 3) _.a Inc 2) (3) 0+U STOPPING THE MACHINE 1. Slowly pull the starter grip until the engine starts. 10. Keeping the throttle lever B depressed, then press the throttle lock C inward. (fig. 2) 4. Place the Hedge Trimmer on the primer pump (2) repeatedly (7 to the engine. 1. this will not lose control while cranking the engine. Push the STOP switch (1) to position. 2. STARTING THE MACHINE Move at a moderate speed before aplying full speed. Run...
... A (1) EH760 EH561 0 M EH760 (2) EH561 (rt n r2 (sir. 3) _.a Inc 2) (3) 0+U STOPPING THE MACHINE 1. Slowly pull the starter grip until the engine starts. 10. Keeping the throttle lever B depressed, then press the throttle lock C inward. (fig. 2) 4. Place the Hedge Trimmer on the primer pump (2) repeatedly (7 to the engine. 1. this will not lose control while cranking the engine. Push the STOP switch (1) to position. 2. STARTING THE MACHINE Move at a moderate speed before aplying full speed. Run...
Owners Manual
Page 11
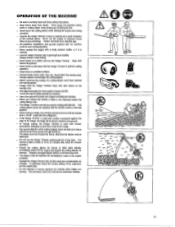
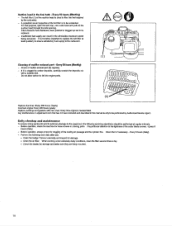
... safety instructions. - Remove sand, stone, nails, wire, etc. Always hold the Hedge Trimmer firmly with a faulty exhaust muffler or if it takes a few moments before re-commencing work on the handles only. - This is an odorless gas. - Pay special attention when cutting hedges which are running. Should the cutting blades hit stones or other hard objects, immediately switch off immediately in fast idle position...
... safety instructions. - Remove sand, stone, nails, wire, etc. Always hold the Hedge Trimmer firmly with a faulty exhaust muffler or if it takes a few moments before re-commencing work on the handles only. - This is an odorless gas. - Pay special attention when cutting hedges which are running. Should the cutting blades hit stones or other hard objects, immediately switch off immediately in fast idle position...

Owners Manual
Page 12
... adjustments above with a driver. 4. It becomes rounded and dull very quickly In use . Turn nut 0 loose. 2. If they are too hot for you to secure the blade firmly and switch off the engine and remove the spark plug connector when replacing or sharpening cutting tools, also when cleaning the cutter or cutting device or carrying out any of the slots, clean It. Turn off the engine and remove the spark plug cap. - A STOP Blade...
... adjustments above with a driver. 4. It becomes rounded and dull very quickly In use . Turn nut 0 loose. 2. If they are too hot for you to secure the blade firmly and switch off the engine and remove the spark plug connector when replacing or sharpening cutting tools, also when cleaning the cutter or cutting device or carrying out any of the slots, clean It. Turn off the engine and remove the spark plug cap. - A STOP Blade...
Owners Manual
Page 13
... of air cleaner - Supply grease to the gear case through the grease hole every 10 to the air cleaner, clean it . Checking and adjusting the idling speed The cutting blade should be 0.6 to start the engine or Increase the engine rotation speed which could cause damage. Remove the air cleaner cover. - Checking the spark plug - Only use the supplied universal wrench to remove or to prevent dirt particles from entering the carburetor. - Use an exact replacement. Every...
... of air cleaner - Supply grease to the gear case through the grease hole every 10 to the air cleaner, clean it . Checking and adjusting the idling speed The cutting blade should be 0.6 to start the engine or Increase the engine rotation speed which could cause damage. Remove the air cleaner cover. - Checking the spark plug - Only use the supplied universal wrench to remove or to prevent dirt particles from entering the carburetor. - Use an exact replacement. Every...
Owners Manual
Page 14
..., clean the filter several times a day. • Check the blades for damage. • Clean the air filter. The felt filter (1) of the cutter blade screws. - Perform the following servicing operations should be replaced. - Suction head in the admissible maximum speed being exceeded. If it is therefore important to replace the felt filter at regular intervals. - Any maintenance or adjustment work daily after use a wire hook and pull out the suction head through the tank opening...
..., clean the filter several times a day. • Check the blades for damage. • Clean the air filter. The felt filter (1) of the cutter blade screws. - Perform the following servicing operations should be replaced. - Suction head in the admissible maximum speed being exceeded. If it is therefore important to replace the felt filter at regular intervals. - Any maintenance or adjustment work daily after use a wire hook and pull out the suction head through the tank opening...
Owners Manual
Page 15
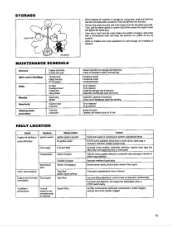
...: Drain all fuel from the cutter blade and outside of engine, wipe them with a oil-immersed cloth and keep the machine at a place as dry as possible. - STORAGE 0' Drain fuel - Remove the spark plug and add a few drops of gasoline. Humidity MAINTENANCE SCHEDULE General After each refuelling Daily Weekly Quarterly Shuting down procedure Engine assembly, screws and nuts Throttle lever Safety lock key STOP switch Air filter Cooling air duct Cutting tool Idling speed Spark plug Muffler Suction head Fuel tank Fuel tank Carburetor Visual...
...: Drain all fuel from the cutter blade and outside of engine, wipe them with a oil-immersed cloth and keep the machine at a place as dry as possible. - STORAGE 0' Drain fuel - Remove the spark plug and add a few drops of gasoline. Humidity MAINTENANCE SCHEDULE General After each refuelling Daily Weekly Quarterly Shuting down procedure Engine assembly, screws and nuts Throttle lever Safety lock key STOP switch Air filter Cooling air duct Cutting tool Idling speed Spark plug Muffler Suction head Fuel tank Fuel tank Carburetor Visual...
Owners Manual
Page 16
... the necessary diagnosis, repair, or replacement necessary to ensure that the engine complies with EPA regulations during its warranty period. PARTS COVERED Listed below may require scheduled maintenance and are the parts covered by MAKITA will, at the time of initial sale to all States, except the State of operating hours for that part. 1) Fuel Metering System (i) Carburetor and internal parts (ii) Fuel filter, if applicable (iii) Throttle stopper, if...
... the necessary diagnosis, repair, or replacement necessary to ensure that the engine complies with EPA regulations during its warranty period. PARTS COVERED Listed below may require scheduled maintenance and are the parts covered by MAKITA will, at the time of initial sale to all States, except the State of operating hours for that part. 1) Fuel Metering System (i) Carburetor and internal parts (ii) Fuel filter, if applicable (iii) Throttle stopper, if...
Owners Manual
Page 17
... the nearest Makita Factory Service Center or service center authorized by MAKITA when a problem exists. 17 The dealer or service center authorized by MAKITA. OWNER'S WARRANTY RESPONSIBILITIES As the engine owner, you are responsible for this warranty become the property of MAKITA. All parts and accessories replaced under this engine. 3) Ignition System (i) Spark plug (ii) Flywheel Magneto (Hi) Ignition Coil 4) Miscellaneous Items Used in your owner's manual, MAKITA recommends that you retain all scheduled maintenance.
... the nearest Makita Factory Service Center or service center authorized by MAKITA when a problem exists. 17 The dealer or service center authorized by MAKITA. OWNER'S WARRANTY RESPONSIBILITIES As the engine owner, you are responsible for this warranty become the property of MAKITA. All parts and accessories replaced under this engine. 3) Ignition System (i) Spark plug (ii) Flywheel Magneto (Hi) Ignition Coil 4) Miscellaneous Items Used in your owner's manual, MAKITA recommends that you retain all scheduled maintenance.

Owners Manual
Page 18
HOWEVER, WARRANTY REPAIRS MUST BE PERFORMED BY MAKITA FACTORY SERVICE CENTER OR SERVICE CENTER AUTHORIZED BY MAKITA. If other than the parts authorized by MAKITA are used for maintenance replacements or for the repair of components affecting emission control, you should contact the Makita Warranty Service Department at 1-800-4-MAKITA and you will not be denied, however, solely because of the lack of required maintenance or failure to keep...
HOWEVER, WARRANTY REPAIRS MUST BE PERFORMED BY MAKITA FACTORY SERVICE CENTER OR SERVICE CENTER AUTHORIZED BY MAKITA. If other than the parts authorized by MAKITA are used for maintenance replacements or for the repair of components affecting emission control, you should contact the Makita Warranty Service Department at 1-800-4-MAKITA and you will not be denied, however, solely because of the lack of required maintenance or failure to keep...

Parts Breakdown
Page 5
... 525-70010-21 COIL, EH760 1 72 525-70010-20 IGNITION COIL, EH760 1 73 014-00499-20 SCREW M4X20, RST250 2 74 525-75003-00 GROMMET, EH561 1 75 065-40099-31 PLUG CAP SPRING,RBC221 1 76 523-75033-01 PLUG CAP, RST250 1 77 065-01498-10 SPARK PLUG BM7A, RBC230 1 78 523-85005-00 CLUTCH SPRING, EH561 1 79 625-25008-01 CLUTCH SHOE, RBC260 2 79 625...
... 525-70010-21 COIL, EH760 1 72 525-70010-20 IGNITION COIL, EH760 1 73 014-00499-20 SCREW M4X20, RST250 2 74 525-75003-00 GROMMET, EH561 1 75 065-40099-31 PLUG CAP SPRING,RBC221 1 76 523-75033-01 PLUG CAP, RST250 1 77 065-01498-10 SPARK PLUG BM7A, RBC230 1 78 523-85005-00 CLUTCH SPRING, EH561 1 79 625-25008-01 CLUTCH SHOE, RBC260 2 79 625...

Parts Breakdown
Page 6
...-00 FUEL TANK CAP,RBL500 1 111 531-60150-00 FUEL TANK CAP, 1 112 118-12400-00 SPACER, EH561 1 113 014-00594-50 SCREW M5X18, RBC255 4 Y05074 114 523-55047-00 BOLT, RBC251 1 114 620-20060-00 BOLT ASSEMBLY, RBC310 1 115 616-55002-01 WIRE, RBC201 1 115 616-55002-00 GROUND WIRE, RBC230 1 116 525-60080-00 CARBURETOR, EH561 1 117 520-30040-30 AIR CLEANER COVER...
...-00 FUEL TANK CAP,RBL500 1 111 531-60150-00 FUEL TANK CAP, 1 112 118-12400-00 SPACER, EH561 1 113 014-00594-50 SCREW M5X18, RBC255 4 Y05074 114 523-55047-00 BOLT, RBC251 1 114 620-20060-00 BOLT ASSEMBLY, RBC310 1 115 616-55002-01 WIRE, RBC201 1 115 616-55002-00 GROUND WIRE, RBC230 1 116 525-60080-00 CARBURETOR, EH561 1 117 520-30040-30 AIR CLEANER COVER...

Parts Breakdown
Page 7
...-10 PUMP COVER SCREW, RBC230 1 Y04496 140 510-35028-01 SPACER GASKET, RBC281 4 140 510-35028-00 SPACER GASKET, RBC230 1 141 521-60080-10 CABLE ADJUST SCREW, RBL500 1 142 531-60054-50 CABLE ADJUST NUT, RBC230 1 143 525-95044-00 LABEL 1 144 056-10599-90 HOSE CLAMP, EM4251 1 Y04237 177 226-10100-0T VINYL TUBE, EH760 1 178 501-90010-00 TOOL KIT...
...-10 PUMP COVER SCREW, RBC230 1 Y04496 140 510-35028-01 SPACER GASKET, RBC281 4 140 510-35028-00 SPACER GASKET, RBC230 1 141 521-60080-10 CABLE ADJUST SCREW, RBL500 1 142 531-60054-50 CABLE ADJUST NUT, RBC230 1 143 525-95044-00 LABEL 1 144 056-10599-90 HOSE CLAMP, EM4251 1 Y04237 177 226-10100-0T VINYL TUBE, EH760 1 178 501-90010-00 TOOL KIT...


