Makita GLC03R1 Support and Manuals
Get Help and Manuals for this Makita item
View All Support Options Below
Free Makita GLC03R1 manuals!
Problems with Makita GLC03R1?
Ask a Question
Free Makita GLC03R1 manuals!
Problems with Makita GLC03R1?
Ask a Question
Popular Makita GLC03R1 Manual Pages
Instruction Manual - Page 2
...be used by or near children.
4. Do not allow to rain. ENGLISH (Original instructions)
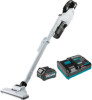
SPECIFICATIONS
Model:
GLC03
Capacity
250 mL (0.07 gal.)
Continuous use (with battery BL4025)
1 (Quiet...servicing.
2.
Store indoors.
3. Use of the appliance and battery cartridge(s) are subject to change without notice.
• Specifications may differ from appliance when not in this manual...
Instruction Manual - Page 3
...the appliance. Have servicing performed by the ... this instruction manual and the charger instruction manual carefully...repair person using only identical replacement parts. Do not use .
1. If liquid contacts eyes, additionally seek medical help. Charging improperly or at temperatures outside of the product is intended for commercial use without dust bag and/or filters in the instructions...
Instruction Manual - Page 4
...approved respiratory protection such as ben- 6. Before using battery cartridge, read all instructions and cautionary markings on (1) battery charger, (2) battery, and (3) product using...If operating time has become excessively shorter, stop operating immediately. Do not vacuum the following:
5. INSTRUCTIONS. and their dust, gas or steam)
• Sharp objects (glass, cutlery, wood splinter...
Instruction Manual - Page 5
... or battery cartridge.
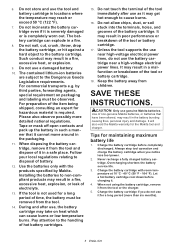
17. SAVE THESE INSTRUCTIONS. It will also void the Makita warranty... products may result in a fire.
8. Installing the batteries to disposal of time, the ...the tool.
14. Overcharging shortens the battery service life.
3. For preparation of the tool immediately... (50 °F - 104 °F). Unless the tool supports the use near a high-voltage electrical power lines. CAUTION...
Instruction Manual - Page 6
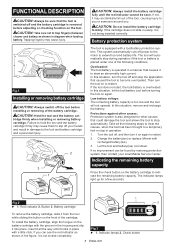
... when the tool has been brought to restart. 2. Turn the tool off your local Makita Service Center. If no improvement can see the red indicator as shown in diagram when loading battery....of the tool, causing injury to restart. Charge the battery(ies) or replace it may cause injury. CAUTION: Do not install the battery cartridge forcibly. CAUTION: Take care not to indicate the remaining ...
Instruction Manual - Page 8
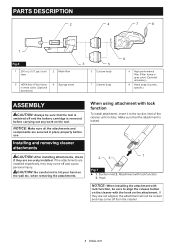
...components are installed imperfectly, they may come off and cause personal injury. If the attachments are secured in gray color) (Optional accessory)
8 Hand strap (Country specific)
ASSEMBLY
...8 ENGLISH When using attachment with lock function
To install attachment, insert it clicks. CAUTION: Be careful not to hit your hand on the wall etc.
PARTS DESCRIPTION
2
4
7
8
1
Fig.6
1 ...
Instruction Manual - Page 9
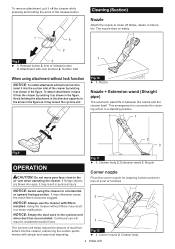
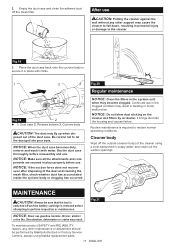
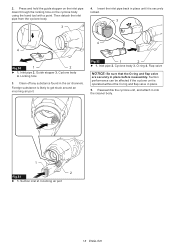
... blown into the cleaner, enhancing the suction performance with simple and easy dust disposing. Cleaner body 2. NOTICE: Avoid using attachment without lock function
NOTICE: To install attachment without filters may result
in the figure. NOTICE: Empty the dust case in a horizontal
or upward facing position. Continued use the cleaner with lock...
Instruction Manual - Page 11
...support may result. It brings dust into your eyes.
Empty the dust case and clean the adhered dust off the outside (cleaner body) of the cleaner using Makita replacement parts.
11 ENGLISH
To maintain product SAFETY and RELIABILITY, repairs... sticking on the cleaner and filters by Makita Authorized or Factory Service Centers, always using a cloth dampened in personal injury or damage...
Instruction Manual - Page 12
...12 ENGLISH
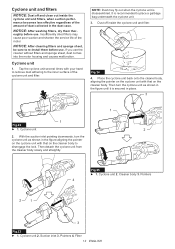
Tap the cyclone unit several times with your hand to remove dust adhering to re-install them thoroughly before use the cleaner without filters and sponge sheet, dust comes into the motor ... washing filters, dry them before use. NOTE: Dust may cause poor suction and shorten the service life of dust collected in the figure aligning the pointer on the cyclone unit with that on...
Instruction Manual - Page 16
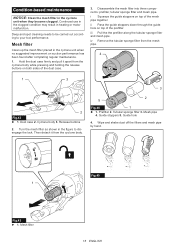
... and shake dust off the filters and mesh pipe by hand.
1
Fig.43 ► 1 .
Guide hole
4. Disassemble the mesh filter into three components: prefilter, tubular sponge filter and mesh pipe. Hold ...mesh pipe.
4
1
3
2 Fig.42 ► 1 . ii Pass the guide stoppers down through the guide hole on suction performance has been found after completing regular maintenance.
1. Release buttons
...
Instruction Manual - Page 17
...1
5
1
3
2
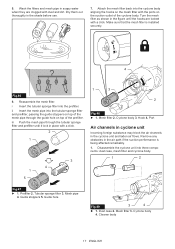
Fig.48 ► 1 . Attach the mesh filter back into the tubular sponge filter and prefilter, passing the guide stoppers on the mesh filter with a click. Wash the filters and mesh pipe in the cyclone unit and laden air flows. Reassemble the ...5. Dry them out thoroughly in the air path if the suction performance is installed securely.
4
Fig.46 6. Guide stoppers 5.
Instruction Manual - Page 18
Guide stopper 3. Foreign substance is operated without the O-ring and flap valve in place until it onto the cleaner body.
1 2
Fig.51...off any substance found in place before reassembly. Suction inlet 2. Insert the inlet pipe back in place.
5. Press and hold the guide stopper on the inlet pipe down through the locking hole on the cyclone body using the hand tool with a point. Then detach ...
Instruction Manual - Page 19
...this manual. ... the warranty details set forth at below ...repair the cleaner by yourself.
Troubleshooting
...Service Center. • Extension wand (Straight pipe) • Nozzle • Nozzle for your Makita tool specified in the tool package as standard accessories. OPTIONAL ACCESSORIES
CAUTION: These accessories or attachments are recommended for use accessory or attachment for repairs...
Makita GLC03R1 Reviews
We have not received any reviews for Makita yet.