Makita GSA01Z Support and Manuals
Get Help and Manuals for this Makita item
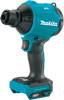
View All Support Options Below
Free Makita GSA01Z manuals!
Problems with Makita GSA01Z?
Ask a Question
Free Makita GSA01Z manuals!
Problems with Makita GSA01Z?
Ask a Question
Makita GSA01Z Videos

Makita 40v XGT High Speed Dust Blower (GSA01Z) Review
Duration: 6:41
Total Views: 1,409
Duration: 6:41
Total Views: 1,409
“Testing out” the New Makita 40V XGT Dust Blower GSA01Z!
Duration: :38
Total Views: 29,428
Duration: :38
Total Views: 29,428
Popular Makita GSA01Z Manual Pages
Instruction Manual - Page 2
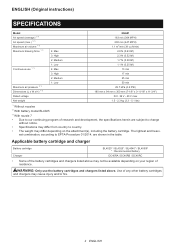
ENGLISH (Original instructions)
SPECIFICATIONS
Model: Air speed (average) *2 *3 Air speed (max.) *2 *3 Maximum air volume *1 ... (3.3 - 5.1 lbs)
*1 Without nozzles *2 With battery model BL4025 *3 With nozzle 7 • Due to country. • The weight may differ depending on your region of research and development, the specifications herein are shown in the table.
The lightest and heavi-...
Instruction Manual - Page 4
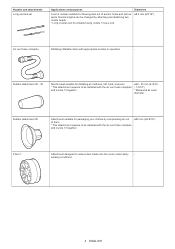
... conditions.
4 ENGLISH Rubber attachment 65
Attachment suitable for blowing dust out of them. * This attachment requires to be installed with appropriate nozzles in operation.
- Nozzles and attachments Long nozzles set
Applications and purposes
A set of nozzles suitable for packaging your clothes by attaching and detaching two nozzle heads. * Long nozzles can be changed...
Instruction Manual - Page 6

...specifically designated battery packs. Do not expose to fire or temperature above 130 °C may be followed, including the following:
READ ALL INSTRUCTIONS BEFORE USING THIS APPLIANCE. Under abusive conditions, liquid may cause explosion.
7. Never service... INSTRUCTIONS
When using only identical replacement parts. To reduce the risk of fire when used by a qualified repair person...
Instruction Manual - Page 7
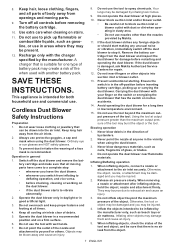
...when using the dust blower.
3. Cordless Dust Blower Safety Instructions
Preparation
1. Always use to exhaust air and cause an injury...8226; before removing the battery cartridge.
10. Keep all parts of glass, or blades.
4. Carrying the dust blower with...blower that there is damaged, ask Makita Authorized Service Centers for damage before inserting battery cartridge, ...repair.
12.
Instruction Manual - Page 8
...with parts provided by a qualified
repair person using battery.
2. Symbols
The followings show the symbols used for battery cartridge
1. volts
direct current
Important safety instructions for tool. It may result in a dry place before storing.
7.
Released electrolyte is maintained. 2. Do not handle charger, including charger plug, and charger terminals with local codes...
Instruction Manual - Page 9
...locking notches on the tool. Unless the tool supports the use near high-voltage electrical power lines,...
Overcharging shortens the battery service life.
3. Charge the battery cartridge if you notice less tool power.
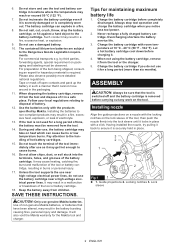
2. Installing nozzle
Align the guide projections on a nozzle ... to the handling of battery.
12. SAVE THESE INSTRUCTIONS. ASSEMBLY
CAUTION: Always be removed from children. Do...
Instruction Manual - Page 11
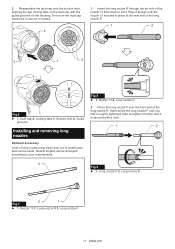
...; 1 . Nozzle 13 2. Long nozzle F
11 ENGLISH Pass it though until it is secured with the guide grooves on the dust cap with a click.
1
2
3 Fig.9 ► 1 . Locking tabs 3. Suction inlet 4. Guide
grooves
Installing and removing long nozzles
Optional accessory A set of long nozzles help clean dust out of the nozzle 13 from back to front...
Instruction Manual - Page 15

...a few seconds.
1 2
Fig.19 ► 1 . CAUTION: Do not install the battery cartridge with
recharged battery(ies). 3. CAUTION: When not operating the tool,... restoring protection system, then contact your local Makita Service Center. Charge the battery(ies) or replace it on button engaged. Make sure to restart....to set the trigger-lock button back in "ON" position. Indicator lamps 2. Locking...
Instruction Manual - Page 16
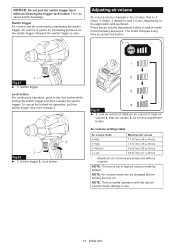
...► 1 . Adjusting air volume
Air volume can be changed in four modes, that is set in use.
16 ENGLISH To cancel the locked-on the switch trigger. Switch trigger Lock button... Max air volume 5.
NOTE: The tool starts operation with the last air volume mode settings in high air volume mode by default. Air volume is grown by squeezing the switch trigger. Air volume adjustment...
Instruction Manual - Page 20
... 2. Air vent hole
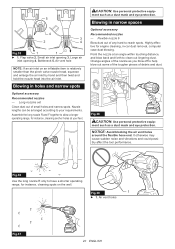
NOTE: If an air inlet on the wall. ment such as a dust mask and eye protection. Small air inlet opening 4. Long nozzles set
Clean dust out of small holes and narrow spots. Fig.39
1
► 1 . Highly effective for instance, cleaning spots on an inflatable item is relatively smaller...
Instruction Manual - Page 21
...
Fig.42
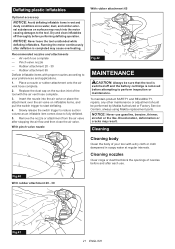
MAINTENANCE
CAUTION: Always be performed by Makita Authorized or Factory Service Centers, always using Makita replacement parts.
Fig.40 With rubber attachment 20 - 30
Fig.41
21 ENGLISH...Clean the body of your preferences and applications.
1.
To maintain product SAFETY and RELIABILITY, repairs, any other maintenance or adjustment should be sure that block the openings of the tool ...
Instruction Manual - Page 22
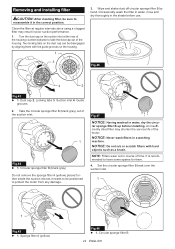
... rub or scratch filters with the guide grooves on the suction inlet at regular intervals since using a clogged filter may shorten the service life of the motor.
Set the circular sponge filter B back over...from any damage. Locking tabs 3.
Fig.47
NOTICE: Having washed in the shade before installing. Dust cap 2. Occasionally wash the filter in water, rinse and dry thoroughly in water...
Instruction Manual - Page 23
... work correctly. Stop using Makita replacement parts for repairs. 5. Dust cap 2.
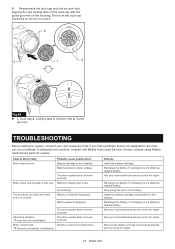
The tool does not reach the maximum air volume.
Battery power is not installed. Abnormal vibration: stop : Remove the battery immediately!
Guide grooves
TROUBLESHOOTING
Before asking for repairs, conduct your local authorized service center for repair. Electric or electronic malfunction. Ask...
Instruction Manual - Page 24
... your local Makita Service Center. • Nozzle 3 • Nozzle 7 • Nozzle 13 • Wide range nozzle • Pinch valve nozzle • Flexible nozzle 6 • Long nozzles set forth at below ...from country to persons. If annexed warranty sheet is not available, refer to this manual. They may be included in this product. OPTIONAL ACCESSORIES
CAUTION: These accessories or ...
Parts Breakdown - Page 2
... COMPLETE
1
SWITCH PLATE COMPLETE
1
TAPPING SCREW PT 2X6
3
CONTROLLER
1
TERMINAL UNIT
1
LEAD UNIT
1
HOUSING L/R SET
1
RUBBER PIN 6
2
HEX. LABEL
1
WIDE RANGE NOZZLE SET
1
NOZZLE 3 SET
1
NOZZLE 7 SET
1
NOZZLE 13 SET
1
PINCH VAVLE NOZZLE SET
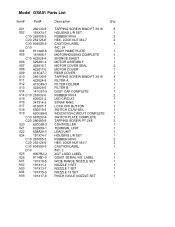
1 Model GSA01 Parts List
Item#
Part#
001
266130-9
002
191X74-7
002 C10 263005-3
002 C20 252126-6
002 C30 8045S9-5
002 D10...
Makita GSA01Z Reviews
We have not received any reviews for Makita yet.