Instruction Manual
Page 5
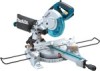
... safety data. Stopper pin 010228 When the tool is shipped, the handle is locked in loss of control and serious personal injury. 1. Movement of the miter saw on the supporting surface. UN RAYONNEMENT LASER EST EMIS PAR CETTE OUVERTURE INSTALLATION Bench mounting 1 1. This will not move on the supporting surface while cutting...
... safety data. Stopper pin 010228 When the tool is shipped, the handle is locked in loss of control and serious personal injury. 1. Movement of the miter saw on the supporting surface. UN RAYONNEMENT LASER EST EMIS PAR CETTE OUVERTURE INSTALLATION Bench mounting 1 1. This will not move on the supporting surface while cutting...
Instruction Manual
Page 7
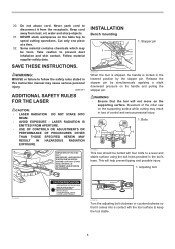
...provide proper support of turn base while pressing down to provide the maximum cutting capacity for a 216 mm (8-1/2") saw blade. Turn base 2 014306 2 1 1. Use the hex. Stopper arm 2. Adjusting the miter angle 1. Pointer 3. NOTICE: • When turning the turn base by tightening the grip firmly. Push ...fence meets the top surface of the blade can be easily adjusted with the tool unplugged, always be sure to the desired angle on the miter scale, securely tighten the grip clockwise. Stopper arm 1 2 1. NOTICE: • After setting the bevel angle ensure that the blade ...
...provide proper support of turn base while pressing down to provide the maximum cutting capacity for a 216 mm (8-1/2") saw blade. Turn base 2 014306 2 1 1. Use the hex. Stopper arm 2. Adjusting the miter angle 1. Pointer 3. NOTICE: • When turning the turn base by tightening the grip firmly. Push ...fence meets the top surface of the blade can be easily adjusted with the tool unplugged, always be sure to the desired angle on the miter scale, securely tighten the grip clockwise. Stopper arm 1 2 1. NOTICE: • After setting the bevel angle ensure that the blade ...
Instruction Manual
Page 14
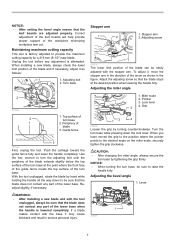
...blade will result in serious personal injury. • The blade should not be cut on a compound miter saw blade to set the bevel angle (Refer to the previously covered "Adjusting the miter angle". 4. If you perform the slide cut without the blade making a bevel cut keep hands ... way down the handle, apply pressure in serious personal injury. 3. Be sure to retighten the lever firmly to "Press cutting", "Slide cutting", "Miter cutting" and "Bevel cut" explanations. 6. The angle of the intended cut. If a force is applied perpendicularly to the turn base. Bevel cut...
...blade will result in serious personal injury. • The blade should not be cut on a compound miter saw blade to set the bevel angle (Refer to the previously covered "Adjusting the miter angle". 4. If you perform the slide cut without the blade making a bevel cut keep hands ... way down the handle, apply pressure in serious personal injury. 3. Be sure to retighten the lever firmly to "Press cutting", "Slide cutting", "Miter cutting" and "Bevel cut" explanations. 6. The angle of the intended cut. If a force is applied perpendicularly to the turn base. Bevel cut...
Instruction Manual
Page 15
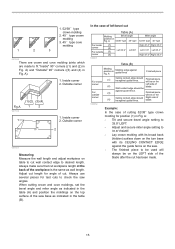
Inside corner 2. When cutting crown and cove moldings, set the bevel angle and miter angle as indicated in the table (A) and position the moldings on the LEFT side of the saw angles. Wall contact edge should be on the top surface of the blade after the cut has been made to fit "...176; type crown molding for test cuts to desired length. A: • Tilt and secure bevel angle setting to 33.9° LEFT. • Adjust and secure miter angle setting to 31.6° RIGHT. • Lay crown molding with its broad back (hidden) surface down on the corner Left side of cut wall...
Inside corner 2. When cutting crown and cove moldings, set the bevel angle and miter angle as indicated in the table (A) and position the moldings on the LEFT side of the saw angles. Wall contact edge should be on the top surface of the blade after the cut has been made to fit "...176; type crown molding for test cuts to desired length. A: • Tilt and secure bevel angle setting to 33.9° LEFT. • Adjust and secure miter angle setting to 31.6° RIGHT. • Lay crown molding with its broad back (hidden) surface down on the corner Left side of cut wall...
Instruction Manual
Page 16
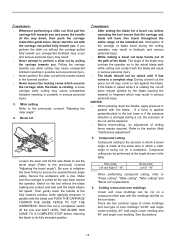
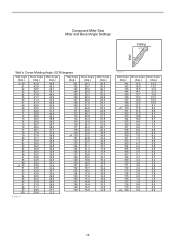
Compound Miter Saw Miter and Bevel Angle Settings Ceiling Wall Wall to Crown Molding Angle: 52/38 degrees Wall Angle (deg.) 60....8 37.4 37.1 36.8 36.5 36.2 35.8 35.5 35.2 34.9 34.5 34.2 33.9 33.5 33.2 32.8 32.5 32.2 31.8 31.5 31.1 30.8 30.4 Miter Angle (deg.) 46.8 46.3 45.7 45.1 44.6 44.0 43.5 42.9 42.4 41.9 41.3 40.8 40.3 39.8 39.2 38.7 38.2 37.7 37.2 36.8 36....9 23.6 23.2 22.8 22.5 22.1 21.7 21.3 21.0 20.6 20.2 19.8 19.5 19.1 18.7 18.3 17.9 17.6 17.2 16.8 16.4 16.0 15.6 Miter Angle (deg.) 26.9 26.5 26.1 25.7 25.3 24.9 24.5 24.1 23.7 23.3 22.9 22.6 22.2 21.8 21.4 21.0 20.7 20.3 19.9 19.6 19...
Compound Miter Saw Miter and Bevel Angle Settings Ceiling Wall Wall to Crown Molding Angle: 52/38 degrees Wall Angle (deg.) 60....8 37.4 37.1 36.8 36.5 36.2 35.8 35.5 35.2 34.9 34.5 34.2 33.9 33.5 33.2 32.8 32.5 32.2 31.8 31.5 31.1 30.8 30.4 Miter Angle (deg.) 46.8 46.3 45.7 45.1 44.6 44.0 43.5 42.9 42.4 41.9 41.3 40.8 40.3 39.8 39.2 38.7 38.2 37.7 37.2 36.8 36....9 23.6 23.2 22.8 22.5 22.1 21.7 21.3 21.0 20.6 20.2 19.8 19.5 19.1 18.7 18.3 17.9 17.6 17.2 16.8 16.4 16.0 15.6 Miter Angle (deg.) 26.9 26.5 26.1 25.7 25.3 24.9 24.5 24.1 23.7 23.3 22.9 22.6 22.2 21.8 21.4 21.0 20.7 20.3 19.9 19.6 19...
Instruction Manual
Page 17
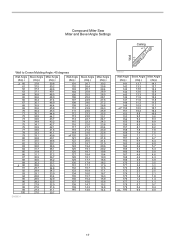
Compound Miter Saw Miter and Bevel Angle Settings Ceiling Wall Wall to Crown Molding Angle: 45 degrees Wall Angle (deg.) 60 61....3 33.1 32.8 32.5 32.3 32.0 31.7 31.4 31.1 30.9 30.6 30.3 30.0 29.7 29.4 29.1 28.8 28.5 28.2 27.9 27.6 27.3 27.0 Miter Angle (deg.) 50.8 50.2 49.6 49.1 48.5 48.0 47.4 46.9 46.4 45.8 45.3 44.8 44.2 43.7 43.2 42.7 42.1 41.6 41.1 40.6 40....4 21.0 20.7 20.4 20.0 19.7 19.4 19.1 18.7 18.4 18.1 17.7 17.4 17.1 16.7 16.4 16.0 15.7 15.4 15.0 14.7 14.3 14.0 Miter Angle (deg.) 30.2 29.8 29.4 28.9 28.5 28.1 27.6 27.2 26.8 26.3 25.9 25.5 25.1 24.7 24.3 23.8 23.4 23.0 22.6 22.2 21...
Compound Miter Saw Miter and Bevel Angle Settings Ceiling Wall Wall to Crown Molding Angle: 45 degrees Wall Angle (deg.) 60 61....3 33.1 32.8 32.5 32.3 32.0 31.7 31.4 31.1 30.9 30.6 30.3 30.0 29.7 29.4 29.1 28.8 28.5 28.2 27.9 27.6 27.3 27.0 Miter Angle (deg.) 50.8 50.2 49.6 49.1 48.5 48.0 47.4 46.9 46.4 45.8 45.3 44.8 44.2 43.7 43.2 42.7 42.1 41.6 41.1 40.6 40....4 21.0 20.7 20.4 20.0 19.7 19.4 19.1 18.7 18.4 18.1 17.7 17.4 17.1 16.7 16.4 16.0 15.7 15.4 15.0 14.7 14.3 14.0 Miter Angle (deg.) 30.2 29.8 29.4 28.9 28.5 28.1 27.6 27.2 26.8 26.3 25.9 25.5 25.1 24.7 24.3 23.8 23.4 23.0 22.6 22.2 21...
Instruction Manual
Page 19
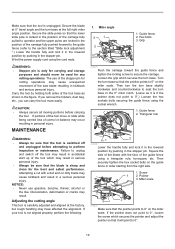
...CAUTION: • Always secure all moving portions before attempting to 0°.) Loosen the hex sockets bolts securing the guide fence using the socket wrench. 1. Miter angle 3 1 2 1. Loosen the grip which secures the turn base at the factory, but rough handling may cause kickback and result in kickback and serious... in the position of the tool base as it is sharp and clean for cutting operations may result in accidental start up of the saw blade resulting in a serious personal injury. Secure the slide poles so that it in the lowered position by pushing in the stopper pin...
...CAUTION: • Always secure all moving portions before attempting to 0°.) Loosen the hex sockets bolts securing the guide fence using the socket wrench. 1. Miter angle 3 1 2 1. Loosen the grip which secures the turn base at the factory, but rough handling may cause kickback and result in kickback and serious... in the position of the tool base as it is sharp and clean for cutting operations may result in accidental start up of the saw blade resulting in a serious personal injury. Secure the slide poles so that it in the lowered position by pushing in the stopper pin...
Instruction Manual
Page 21
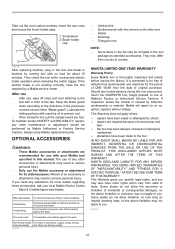
...the tool. For smoother cross grain cuts. Non-ferrous metals For miters in aluminum, copper, brass, tubing, miter saw blades For smooth and precise cutting in serious personal injury. • Only use of Makita's Factory or Authorized Service Centers. Should any other accessories or attachments... correctly, have other non-ferrous metals. 006526 • Vertical vise • Socket wrench with your local Makita Service Center. • Steel & Carbide-tipped saw blades Miter saw blades and other rights which vary from state to one of any trouble develop during this manual...
...the tool. For smoother cross grain cuts. Non-ferrous metals For miters in aluminum, copper, brass, tubing, miter saw blades For smooth and precise cutting in serious personal injury. • Only use of Makita's Factory or Authorized Service Centers. Should any other accessories or attachments... correctly, have other non-ferrous metals. 006526 • Vertical vise • Socket wrench with your local Makita Service Center. • Steel & Carbide-tipped saw blades Miter saw blades and other rights which vary from state to one of any trouble develop during this manual...


