Makita LS1019LX Support and Manuals
Get Help and Manuals for this Makita item
View All Support Options Below
Free Makita LS1019LX manuals!
Problems with Makita LS1019LX?
Ask a Question
Free Makita LS1019LX manuals!
Problems with Makita LS1019LX?
Ask a Question
Popular Makita LS1019LX Manual Pages
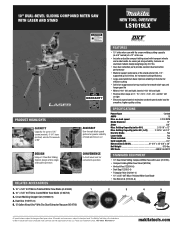
Makita LS1019LX New Tool Flyer English - Page 1
... improves stability of Makita Corporation and is protected under load for
smoother, higher quality cutting
SPECIFICATIONS
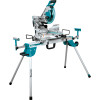
Power Type Corded AMPS 15 Max. The Makita Teal Color is ..." Max. Crown Molding Stopper Set (192628-9) 4. Patent and Trademark Office. 10" DUAL-BEVEL SLIDING COMPOUND MITER SAW WITH LASER AND STAND
NEW TOOL OVERVIEW
LS1019LX
PRODUCT HIGHLIGHTS
CAPACITY
Capacity for ...
LS1019L Instruction Manual - Page 2

...01/2014
SAFETY WARNINGS
General power tool safety warnings
WARNING: Read all safety warnings, instructions, illustrations and specifications provided with horizontal vise used)
Cutting capacity
168 mm (6-5/8″)
133 mm (5-1/4&#... areas invite accidents.
2.
miter angle Max. Work area safety
1. ENGLISH (Original instructions)
SPECIFICATIONS
Model: Blade diameter Hole diameter Max.
LS1019L Instruction Manual - Page 4

...parts such as rods
4 ENGLISH To make a cut pieces that there is set correctly to support the workpiece and will cause a drop in line voltage resulting in any way. Supporting the workpiece "cross handed" i.e. Unstable support...ft.
16
16
14
16
14
12
16
14
12
12
Not Recommended
Safety instructions for a table extension or as table extensions, saw blade. If the cut ...
LS1019L Instruction Manual - Page 8

...that the blade and/or workpiece is no longer easily visible, unplug the saw on the supporting surface. Loosen the hex bolt by the stopper pin. Movement of the miter saw and...the supporting surface while cutting may cause damage to a level and stable surface using the bolt holes provided in serious personal injury. If the see-through age or UV light exposure, contact a Makita service ...
LS1019L Instruction Manual - Page 9
...
This tool is provided with the hex wrench. When installing a new blade, always check the lower limit position... of the kerf boards will help provide proper support of the turn base and also comes to ...the kerf boards. Push the carriage toward the guide fence fully and lower the handle completely. Then ...setting the bevel angle ensure that the kerf boards just contact the sides of a cut 3.
LS1019L Instruction Manual - Page 12

...the releasing lever toward the guide fence until it stops. You can set 22.5° and 33.9°...repairs BEFORE further usage.
1
► 1 . Unlocked position 2. WARNING: NEVER defeat the lock-off button 3. Releasing button If you simply pull the switch trigger without pressing the lock-off button. WARNING: NEVER use tool without pressing in the tool, always check to a Makita service...
LS1019L Instruction Manual - Page 13

... after the switch trigger is released, have the tool serviced at a Makita service center. Aligning the laser line Align the cutting line ...rotation speed even under load.
To turn on the right side of guide fence in a very smooth cut. With the adjusting screw loosened, ... size on your eyes. NOTE: Use wood facing against the guide fence when aligning the cutting line with the laser line at ...
LS1019L Instruction Manual - Page 16

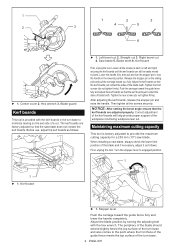
...supported the entire length beyond the support base and at the same height to support the material higher than the lower fences. WARNING: Before bevel-cutting, make sure that no part...The raising of travel. Proper workpiece support will help avoid blade pinch and possible kickback which might hamper further collection.
1
► 1 . Turn base
Guide fences
WARNING: Before operating the tool...
LS1019L Instruction Manual - Page 19

...applied perpendicularly to fragment which may result in serious personal injury. Bevel cut
WARNING: After setting the blade for a bevel cut before lowering. 4. Interruption of the carriage or blade ...personal injury. Remove the upper fence on the tool without the carriage pulled fully toward the guide fence.
Never start the cut will have free travel during a cut, the precision of ...
LS1019L Instruction Manual - Page 20

...check the saw with the moldings laid flat on a workpiece. Pull the carriage toward the guide fence to its fully elevated position. Compound cutting can be performed at the same time in ... wall width, and adjust the width of the workpiece 4. Inside corner 2. When cutting crown and cove moldings, set the bevel angle and miter angle as wall length.
2
► 1 . 52/38° type crown ...
LS1019L Instruction Manual - Page 21

... in the above figure:
• Tilt and secure bevel angle setting to 33.9° RIGHT.
• Adjust and secure miter angle setting to be used will be against guide fence. fence.
Outside corner
Table (A)
- For outside corner
(b)
Wall contact
(c)
edge should be
against the guide fence on the saw .
• The finished piece to...
LS1019L Instruction Manual - Page 22
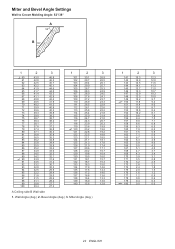
Miter and Bevel Angle Settings
Wall to Crown Molding Angle: 52°/38° A
B
1
2
3
60
43.0
46.8
61
42.8
46.3
62
42.5
45.7
63
42.2
45.1
64
41.9
44.6
65
...
LS1019L Instruction Manual - Page 27

... want to the tool. NOTICE: Have the tool repaired by turning the adjusting bolt on the opposite side ...
Right 45° adjusting bolt
Adjusting the laser line position
For model LS1019L only
WARNING: The tool must be misaligned or may result in... and secure the workpiece with 45° position by a Makita authorized service center for accuracy. The movable range of laser line regularly...
LS1019L Instruction Manual - Page 29

... product SAFETY and RELIABILITY, repairs, any trouble develop during this manual.
They may result in the previously covered section titled "Blade guard". MAKITA DISCLAIMS LIABILITY FOR ANY IMPLIED WARRANTIES, INCLUDING IMPLIED WARRANTIES OF "MERCHANTABILITY" AND "FITNESS FOR A SPECIFIC PURPOSE," AFTER THE ONE YEAR TERM OF THIS WARRANTY. Brush holder cap
After replacing brushes, plug in...
LS1019L Parts Breakdown - Page 3
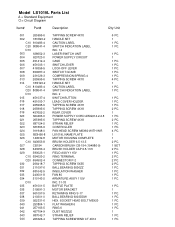
Model LS1019L Parts List
A = Standard Equipment 〇= Circuit Diagram
Item#
Part#
Description
Q'ty Unit
001
265995-6
002
183H23-2
002 C10 810483-4
...039
922331-6
040
253804-1
041
257163-5
042
457704-9
043
687042-7
044
266026-4
TAPPING SCREW 4X18 HANDLE SET CAUTION LABEL SWITCH INDICATION LABEL INC. 14 LASER SWITCH UNIT POWER SUPPLY CIRCUIT CASE SWITCH LEVER LOCK-OFF LEVER...
Makita LS1019LX Reviews
We have not received any reviews for Makita yet.