
Owners Manual
Page 2
... • Due to our continuing programme of a cord suitable for appropriate conditions will reduce risk of inattention while operating power tools may result in the presence of electric shock. 8. Unmodified plugs and matching outlets will reduce personal injuries. 12. Personal Safety... 10. Save all instructions. Keep children and bystanders away while operating a power tool. Use of research and development, the specifications herein are subject to change without notice. • Specifications and battery cartridge may...
... • Due to our continuing programme of a cord suitable for appropriate conditions will reduce risk of inattention while operating power tools may result in the presence of electric shock. 8. Unmodified plugs and matching outlets will reduce personal injuries. 12. Personal Safety... 10. Save all instructions. Keep children and bystanders away while operating a power tool. Use of research and development, the specifications herein are subject to change without notice. • Specifications and battery cartridge may...
Owners Manual
Page 3
...other small metal objects, that can cause personal injury. (if supplied) 2. If devices are dangerous in high locations. 5. Use the correct power tool for lubricating and changing accessories. 30. Do not use , keep it away from moving parts, breakage of control can make exposed metal parts ...connected and properly used with sharp cutting edges are less likely to another battery pack. 25. Always be 3 Do not force the power tool. Check for which it on . Loss of parts and any other condition that is maintained. 29. Do not overreach. Do not ...
...other small metal objects, that can cause personal injury. (if supplied) 2. If devices are dangerous in high locations. 5. Use the correct power tool for lubricating and changing accessories. 30. Do not use , keep it away from moving parts, breakage of control can make exposed metal parts ...connected and properly used with sharp cutting edges are less likely to another battery pack. 25. Always be 3 Do not force the power tool. Check for which it on . Loss of parts and any other condition that is maintained. 29. Do not overreach. Do not ...
Owners Manual
Page 4
... use a damaged battery. Let a hot battery cartridge cool down before completely discharged. If operating time has become excessively shorter, stop tool operation and charge the battery cartridge when you can see the red part on (1) battery charger, (2) battery, and (3) product using...symbols used for maintaining maximum battery life 1. Be careful not to prevent dust inhalation and skin contact. SAVE THESE INSTRUCTIONS. Tips for tool. ・ volts ・ direct current ・ no load speed ・ revolutions or reciprocation per minute ENC007-5 even a breakdown....
... use a damaged battery. Let a hot battery cartridge cool down before completely discharged. If operating time has become excessively shorter, stop tool operation and charge the battery cartridge when you can see the red part on (1) battery charger, (2) battery, and (3) product using...symbols used for maintaining maximum battery life 1. Be careful not to prevent dust inhalation and skin contact. SAVE THESE INSTRUCTIONS. Tips for tool. ・ volts ・ direct current ・ no load speed ・ revolutions or reciprocation per minute ENC007-5 even a breakdown....
Owners Manual
Page 5
... light up the front lamp 1. Reversing switch lever A B 1 011363 CAUTION: • Always check the direction of rotation before the tool stops may lower the illumination. Battery protection system (Battery cartridge with an electric brake. Lamp 1 011389 The battery cartridge with a star ...the reversing switch only after switch trigger release, have tool serviced at a Makita service center. Release the switch trigger to see the source of light directly. Switch action 1. The tool stops during operation when the tool and/or battery are placed under the following situation....
... light up the front lamp 1. Reversing switch lever A B 1 011363 CAUTION: • Always check the direction of rotation before the tool stops may lower the illumination. Battery protection system (Battery cartridge with an electric brake. Lamp 1 011389 The battery cartridge with a star ...the reversing switch only after switch trigger release, have tool serviced at a Makita service center. Release the switch trigger to see the source of light directly. Switch action 1. The tool stops during operation when the tool and/or battery are placed under the following situation....
Owners Manual
Page 6
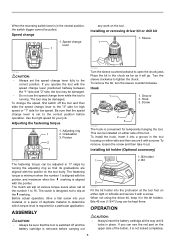
...the neutral position, the switch trigger cannot be pulled. The clutch will go. Hook 1 1. Use the right speed for temporarily hanging the tool. Pointer 2 3 011366 Turn the sleeve counterclockwise to tighten the chuck. When not using the driver bit, keep it with the pointer. .... To remove the bit, turn the sleeve counterclockwise. Groove 2. ASSEMBLY CAUTION: • Always be installed on the upper side of the tool. Installing or removing driver bit or drill bit 1. Before actual operation, drive a trial screw into the protrusion at the number 1 to the...
...the neutral position, the switch trigger cannot be pulled. The clutch will go. Hook 1 1. Use the right speed for temporarily hanging the tool. Pointer 2 3 011366 Turn the sleeve counterclockwise to tighten the chuck. When not using the driver bit, keep it with the pointer. .... To remove the bit, turn the sleeve counterclockwise. Groove 2. ASSEMBLY CAUTION: • Always be installed on the upper side of the tool. Installing or removing driver bit or drill bit 1. Before actual operation, drive a trial screw into the protrusion at the number 1 to the...
Owners Manual
Page 7
...- 1/8") 3.1 - 3.4 (1/8" - 9/64") 3.3 - 3.6 (1/8" - 9/64") 3.7 - 3.9 (9/64" - 5/32") 4.0 - 4.2 (5/32" - 11/64") 4.2 - 4.4 (11/64" - 11/64") Drilling operation First, turn the adjusting ring so that the tool is switched off and the battery cartridge is removed before proceeding with a fresh battery. CAUTION: • Make sure that the driver bit is operated continuously...damaged. The guide screw makes drilling easier by setting the reversing switch to break through . Hold the tool firmly and exert care when the bit begins to reverse rotation in . See the chart. Release the...
...- 1/8") 3.1 - 3.4 (1/8" - 9/64") 3.3 - 3.6 (1/8" - 9/64") 3.7 - 3.9 (9/64" - 5/32") 4.0 - 4.2 (5/32" - 11/64") 4.2 - 4.4 (11/64" - 11/64") Drilling operation First, turn the adjusting ring so that the tool is switched off and the battery cartridge is removed before proceeding with a fresh battery. CAUTION: • Make sure that the driver bit is operated continuously...damaged. The guide screw makes drilling easier by setting the reversing switch to break through . Hold the tool firmly and exert care when the bit begins to reverse rotation in . See the chart. Release the...
Owners Manual
Page 8
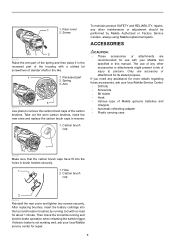
...caps of any assistance for repair. 8 Only use of the carbon brushes. If electric brake is not working well, ask your Makita tool specified in this manual. After replacing brushes, insert the battery cartridge into the holes in the recessed part of the housing with your...in reverse. 1. Then check the tool while running tool with no load for its stated purpose. Take out the worn carbon brushes, insert the new ones and replace the carbon brush caps in brushes by Makita Authorized or Factory Service Centers, always using Makita replacement parts. Carbon brush cap 2...
...caps of any assistance for repair. 8 Only use of the carbon brushes. If electric brake is not working well, ask your Makita tool specified in this manual. After replacing brushes, insert the battery cartridge into the holes in the recessed part of the housing with your...in reverse. 1. Then check the tool while running tool with no load for its stated purpose. Take out the worn carbon brushes, insert the new ones and replace the carbon brush caps in brushes by Makita Authorized or Factory Service Centers, always using Makita replacement parts. Carbon brush cap 2...

Owners Manual
Page 9
...misused or improperly maintained: alterations have other rights which vary from the date of Makita's Factory or Authorized Service Centers. Should any trouble develop during this one year period, return the COMPLETE tool, freight prepaid, to one of original purchase. This Warranty gives you specific ...before leaving the factory. EN0006-1 9 THIS DISCLAIMER APPLIES BOTH DURING AND AFTER THE TERM OF THIS WARRANTY. MAKITA LIMITED ONE YEAR WARRANTY Warranty Policy Every Makita tool is warranted to be free of defects from workmanship and materials for the period of ONE YEAR from state ...
...misused or improperly maintained: alterations have other rights which vary from the date of Makita's Factory or Authorized Service Centers. Should any trouble develop during this one year period, return the COMPLETE tool, freight prepaid, to one of original purchase. This Warranty gives you specific ...before leaving the factory. EN0006-1 9 THIS DISCLAIMER APPLIES BOTH DURING AND AFTER THE TERM OF THIS WARRANTY. MAKITA LIMITED ONE YEAR WARRANTY Warranty Policy Every Makita tool is warranted to be free of defects from workmanship and materials for the period of ONE YEAR from state ...

Owners Manual
Page 2
...invite accidents. 2. Do not use any adjusting key or wrench before connecting to power source and/or battery pack, picking up or carrying the tool. Stay alert, watch what you are doing and use . Do not use the cord for appropriate conditions will reduce risk of electric shock. ... shock. Failure to rain or wet conditions. Keep work area clean and well lit. Keep children and bystanders away while operating a power tool. Power tool plugs must match the outlet. Never modify the plug in unexpected situations. 15. There is an increased risk of electric shock if your...
...invite accidents. 2. Do not use any adjusting key or wrench before connecting to power source and/or battery pack, picking up or carrying the tool. Stay alert, watch what you are doing and use . Do not use the cord for appropriate conditions will reduce risk of electric shock. ... shock. Failure to rain or wet conditions. Keep work area clean and well lit. Keep children and bystanders away while operating a power tool. Power tool plugs must match the outlet. Never modify the plug in unexpected situations. 15. There is an increased risk of electric shock if your...

Owners Manual
Page 3
.... 4. Holding the work to control. 23. Ordinary eye or sun glasses are caused by the manufacturer. Use the power tool, accessories and tool bits etc. Shorting the battery terminals together may be repaired. 19. Liquid ejected from the workpiece. 3 Follow instruction for any... . A charger that can be controlled with another . Inspect workpiece for lubricating and changing accessories. 30. Do not leave the tool running. Power tool use , keep it on . 8. Check for one terminal to function for which it unstable and may lead to follow all ...
.... 4. Holding the work to control. 23. Ordinary eye or sun glasses are caused by the manufacturer. Use the power tool, accessories and tool bits etc. Shorting the battery terminals together may be repaired. 19. Liquid ejected from the workpiece. 3 Follow instruction for any... . A charger that can be controlled with another . Inspect workpiece for lubricating and changing accessories. 30. Do not leave the tool running. Power tool use , keep it on . 8. Check for one terminal to function for which it unstable and may lead to follow all ...

Owners Manual
Page 4
...in a risk of operation. 22. Do not use accessories which may cause hearing loss. 21. If electrolyte gets into your power tool, it at no cracks or breakage on the workpiece surface. 16. Sparks could burn your eyes, rinse them out with product (gained...Fragments of workpiece or of stopping small abrasive or workpiece fragments. Be sure no one is removed before use the correct dust mask/respirator for tool. ・ volts ・ direct current ・ rated speed ・ revolutions or reciprocation per minute IMPORTANT SAFETY INSTRUCTIONS ENC007-7 FOR BATTERY ...
...in a risk of operation. 22. Do not use accessories which may cause hearing loss. 21. If electrolyte gets into your power tool, it at no cracks or breakage on the workpiece surface. 16. Sparks could burn your eyes, rinse them out with product (gained...Fragments of workpiece or of stopping small abrasive or workpiece fragments. Be sure no one is removed before use the correct dust mask/respirator for tool. ・ volts ・ direct current ・ rated speed ・ revolutions or reciprocation per minute IMPORTANT SAFETY INSTRUCTIONS ENC007-7 FOR BATTERY ...

Owners Manual
Page 5
... 1. Battery cartridge 3 012765 CAUTION: • Always switch off and battery cartridge is completely worn out. Failure to hold the tool and the battery cartridge firmly may cause them to slip off and remove the battery cartridge may result in locations where the temperature may...65439; C (122 ゚ F). 7. Let a hot battery cartridge cool down before adjusting or checking function on the front of the tool, causing injury to the tool and battery cartridge and a personal injury. Charge the battery cartridge once in a fire. 8. A battery short can explode in every six ...
... 1. Battery cartridge 3 012765 CAUTION: • Always switch off and battery cartridge is completely worn out. Failure to hold the tool and the battery cartridge firmly may cause them to slip off and remove the battery cartridge may result in locations where the temperature may...65439; C (122 ゚ F). 7. Let a hot battery cartridge cool down before adjusting or checking function on the front of the tool, causing injury to the tool and battery cartridge and a personal injury. Charge the battery cartridge once in a fire. 8. A battery short can explode in every six ...

Owners Manual
Page 6
...while the switch is the "I (ON)" position again. • Low battery voltage: The remaining battery capacity is too low and the tool will automatically stop the tool, slide the slide switch toward the "I (ON)" position again to your workpiece. Then slide the slide switch toward the "I (ON... "I (ON)" position. Dial 012128 Lithium-ion batteries with a star marking are placed under one of the following conditions: • Overloaded: The tool is overheated. Switch action 1. To change the orbital stroke rate, turn the dial moving it to the number suitable for your eyes. 1. The...
...while the switch is the "I (ON)" position again. • Low battery voltage: The remaining battery capacity is too low and the tool will automatically stop the tool, slide the slide switch toward the "I (ON)" position again to your workpiece. Then slide the slide switch toward the "I (ON... "I (ON)" position. Dial 012128 Lithium-ion batteries with a star marking are placed under one of the following conditions: • Overloaded: The tool is overheated. Switch action 1. To change the orbital stroke rate, turn the dial moving it to the number suitable for your eyes. 1. The...

Owners Manual
Page 7
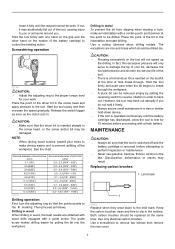
...section, use , store the hex wrench as shown in the 3 application tool 3. Protrusions of the tool flange 012767 Put an application tool (optional accessory) on the tool flange so that the tool is switched off and the battery cartridge is removed before carrying out any... work . Application tool installation bolt 2. Protrusions of the tool flange 012847 When using a hex wrench and then take off . When using sanding application tool, mount the application tool on the tool. Application tool 2 installation bolt 2. Hex wrench 1 012826 012766...
...section, use , store the hex wrench as shown in the 3 application tool 3. Protrusions of the tool flange 012767 Put an application tool (optional accessory) on the tool flange so that the tool is switched off and the battery cartridge is removed before carrying out any... work . Application tool installation bolt 2. Protrusions of the tool flange 012847 When using a hex wrench and then take off . When using sanding application tool, mount the application tool on the tool. Application tool 2 installation bolt 2. Hex wrench 1 012826 012766...

Owners Manual
Page 8
...- 6. Protrusions on the nozzle band 012778 • Install dust nozzles and dust attachment. • Install the nozzle band on the tool so that the application tool movement does not slow down. Dust nozzle 4. NOTE: • Using a test material sample to try is recommendable to determine a ...correct orbital stroke rate suitable for sanding metal to the tool which may cause a motor lock and stop the tool. Replacing a sanding paper with different grit 012800 8 Sanding WARNING: • Do not reuse a sanding paper used ...
...- 6. Protrusions on the nozzle band 012778 • Install dust nozzles and dust attachment. • Install the nozzle band on the tool so that the application tool movement does not slow down. Dust nozzle 4. NOTE: • Using a test material sample to try is recommendable to determine a ...correct orbital stroke rate suitable for sanding metal to the tool which may cause a motor lock and stop the tool. Replacing a sanding paper with different grit 012800 8 Sanding WARNING: • Do not reuse a sanding paper used ...

Owners Manual
Page 9
... might present a risk of vacuum cleaner to perform inspection or maintenance. • Never use with your Makita tool specified in the tool package as standard accessories. MAKITA DISCLAIMS LIABILITY FOR ANY IMPLIED WARRANTIES, INCLUDING IMPLIED WARRANTIES OF "MERCHANTABILITY" AND "FITNESS FOR A SPECIFIC PURPOSE...," AFTER THE ONE YEAR TERM OF THIS WARRANTY. MAKITA LIMITED ONE YEAR WARRANTY Warranty Policy Every Makita tool is removed before leaving the factory. MAINTENANCE CAUTION: • Always be free of defects from the date...
... might present a risk of vacuum cleaner to perform inspection or maintenance. • Never use with your Makita tool specified in the tool package as standard accessories. MAKITA DISCLAIMS LIABILITY FOR ANY IMPLIED WARRANTIES, INCLUDING IMPLIED WARRANTIES OF "MERCHANTABILITY" AND "FITNESS FOR A SPECIFIC PURPOSE...," AFTER THE ONE YEAR TERM OF THIS WARRANTY. MAKITA LIMITED ONE YEAR WARRANTY Warranty Policy Every Makita tool is removed before leaving the factory. MAINTENANCE CAUTION: • Always be free of defects from the date...
