Instruction Manual
Page 3
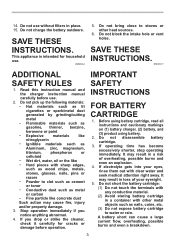
..., check it carefully for household use. Do not disassemble battery cartridge. 3. Do not use . 2. This appliance is intended for cracks or damage before use without filters in a container with other heat sources. 6. Do not block the intake hole or vent holes. Before using battery cartridge, read all instructions and cautionary markings...
..., check it carefully for household use. Do not disassemble battery cartridge. 3. Do not use . 2. This appliance is intended for cracks or damage before use without filters in a container with other heat sources. 6. Do not block the intake hole or vent holes. Before using battery cartridge, read all instructions and cautionary markings...
Instruction Manual
Page 5
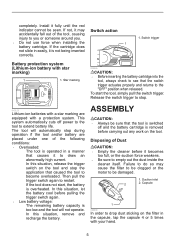
... again. • Low battery voltage: The remaining battery capacity is overheated. In this situation, let the battery cool before carrying out any work on the filter in easily, it becomes too full, or the suction force weakens. • Be sure to draw an abnormally high current. If the cartridge does not... life. Failure to do so may Switch action accidentally fall out of the tool, causing injury to be sure that causes it may cause the filter to be seen. ASSEMBLY CAUTION: • Always be damaged. 1. If not, it to empty out the dust inside the cleaner itself.
... again. • Low battery voltage: The remaining battery capacity is overheated. In this situation, let the battery cool before carrying out any work on the filter in easily, it becomes too full, or the suction force weakens. • Be sure to draw an abnormally high current. If the cartridge does not... life. Failure to do so may Switch action accidentally fall out of the tool, causing injury to be sure that causes it may cause the filter to be seen. ASSEMBLY CAUTION: • Always be damaged. 1. If not, it to empty out the dust inside the cleaner itself.
Instruction Manual
Page 6
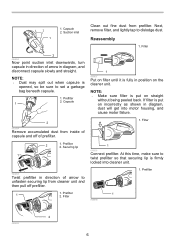
.... Securing lip 1 010005 1 Connect prefilter. At this time, make sure to set a garbage bag beneath capsule. 1. Capsule 1 009997 Put on filter until it is opened, so be sure to twist prefilter so that securing lip is put on the cleaner unit. Suction inlet 1 Clean out fine... dust from prefilter. Prefilter 1 2. NOTE: • Make sure filter is firmly locked into motor housing, and cause motor failure. 2 009994 Remove accumulated dust from cleaner unit and then pull off of arrow in direction...
.... Securing lip 1 010005 1 Connect prefilter. At this time, make sure to set a garbage bag beneath capsule. 1. Capsule 1 009997 Put on filter until it is opened, so be sure to twist prefilter so that securing lip is put on the cleaner unit. Suction inlet 1 Clean out fine... dust from prefilter. Prefilter 1 2. NOTE: • Make sure filter is firmly locked into motor housing, and cause motor failure. 2 009994 Remove accumulated dust from cleaner unit and then pull off of arrow in direction...
Instruction Manual
Page 7
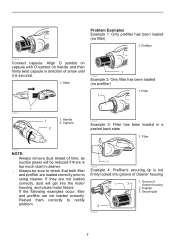
... of cleaner housing 1. Reload them correctly to using cleaner. Prefilter 3. Filter 1 1 010001 1 2 1. If the following examples occur, filter and prefilter are not loaded correctly, dust will be sure to check that both filter and prefilter are loaded correctly prior to rectify problem. 1 010005 Example ...Securing lip 2 010006 7 Prefilter 010000 Connect capsule. If they are not loaded correctly. Mark 1 010003 Example 2: Only filter has been loaded (no filter) 1. Align O symbol on capsule with O symbol on handle and then firmly twist capsule in a peeled back state 1.
... of cleaner housing 1. Reload them correctly to using cleaner. Prefilter 3. Filter 1 1 010001 1 2 1. If the following examples occur, filter and prefilter are not loaded correctly, dust will be sure to check that both filter and prefilter are loaded correctly prior to rectify problem. 1 010005 Example ...Securing lip 2 010006 7 Prefilter 010000 Connect capsule. If they are not loaded correctly. Mark 1 010003 Example 2: Only filter has been loaded (no filter) 1. Align O symbol on capsule with O symbol on handle and then firmly twist capsule in a peeled back state 1.
Instruction Manual
Page 9
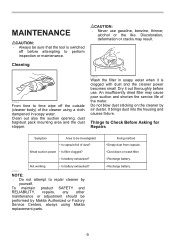
...tool is clogged with dust and the cleaner power becomes small. Recharge battery. 9 An insufficiently dried filter may result. 010008 From time to be performed by Makita Authorized or Factory Service Centers, always using a cloth dampened in soapy water when it out thoroughly ...maintenance. Discoloration, deformation or cracks may cause poor suction and shorten the service life of the cleaner using Makita replacement parts. Weak suction power Is filter clogged? Fixing method Empty dust from capsule. Things to Check Before Asking for Repairs Symptom Area to time...
...tool is clogged with dust and the cleaner power becomes small. Recharge battery. 9 An insufficiently dried filter may result. 010008 From time to be performed by Makita Authorized or Factory Service Centers, always using a cloth dampened in soapy water when it out thoroughly ...maintenance. Discoloration, deformation or cracks may cause poor suction and shorten the service life of the cleaner using Makita replacement parts. Weak suction power Is filter clogged? Fixing method Empty dust from capsule. Things to Check Before Asking for Repairs Symptom Area to time...
Instruction Manual
Page 10
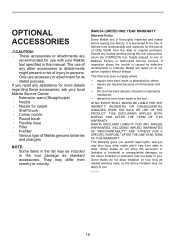
...free of defects from workmanship and materials for carpet • Shelf brush • Corner nozzle • Round brush • Flexible hose • Filter • Prefilter • Various type of injury to persons. This Warranty does not apply where: repairs have been made to the tool. THIS ...lasts, so the above limitation or exclusion may not apply to you need any assistance for more details regarding these accessories, ask your Makita tool specified in the tool package as standard accessories. EN0006-1 10 If you . If inspection shows the trouble is caused by others...
...free of defects from workmanship and materials for carpet • Shelf brush • Corner nozzle • Round brush • Flexible hose • Filter • Prefilter • Various type of injury to persons. This Warranty does not apply where: repairs have been made to the tool. THIS ...lasts, so the above limitation or exclusion may not apply to you need any assistance for more details regarding these accessories, ask your Makita tool specified in the tool package as standard accessories. EN0006-1 10 If you . If inspection shows the trouble is caused by others...
XLC02ZW Parts Breakdown
Page 2
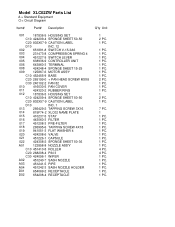
Model XLC02ZW Parts List A = Standard Equipment 〇= Circuit Diagram Item# Part# Description 001 187836-5 HOUSING SET 001 C10 424209-4 SPONGE SHEET 50-50 001 C20 802X57-9 CAUTION ... 012 C20 802X57-9 CAUTION LABEL 012 D10 INC. 1 013 266429-2 TAPPING SCREW 3X16 014 815F74-2 XLC02 NAME PLATE 015 410237-5 STAY 016 443060-3 FILTER 017 451208-3 PRE-FILTER 018 265995-6 TAPPING SCREW 4X18 019 941051-3 FLAT WASHER 4 020 424208-6 VALVE 021 451226-1 CAPSULE 022 424308-2 SPONGE SHEET 50-36 A01 122858-8 NOZZLE...
Model XLC02ZW Parts List A = Standard Equipment 〇= Circuit Diagram Item# Part# Description 001 187836-5 HOUSING SET 001 C10 424209-4 SPONGE SHEET 50-50 001 C20 802X57-9 CAUTION ... 012 C20 802X57-9 CAUTION LABEL 012 D10 INC. 1 013 266429-2 TAPPING SCREW 3X16 014 815F74-2 XLC02 NAME PLATE 015 410237-5 STAY 016 443060-3 FILTER 017 451208-3 PRE-FILTER 018 265995-6 TAPPING SCREW 4X18 019 941051-3 FLAT WASHER 4 020 424208-6 VALVE 021 451226-1 CAPSULE 022 424308-2 SPONGE SHEET 50-36 A01 122858-8 NOZZLE...