Makita XOB03Z Support and Manuals
Get Help and Manuals for this Makita item
View All Support Options Below
Free Makita XOB03Z manuals!
Problems with Makita XOB03Z?
Ask a Question
Free Makita XOB03Z manuals!
Problems with Makita XOB03Z?
Ask a Question
Popular Makita XOB03Z Manual Pages
Instruction Manual - Page 2

...outlet. Do not expose power tools to follow all warnings and instructions for carrying, pulling or unplugging the power tool. ENGLISH (Original instructions)
SPECIFICATIONS
Model:
XOB03
Pad size
92 mm x 185 mm (3-5/8″ ... to rain or wet conditions.
Save all instructions listed below may differ from heat, oil, sharp edges or moving parts.
Keep work area clean and well lit....
Instruction Manual - Page 4
...by a qualified
repair person using battery.
2. For commercial transports e.g. by Makita. Please also observe possibly more detailed national regulations. Use the batteries only with any conductive material.
(2) Avoid storing battery cartridge in the instructions for battery cartridge
1. Never service damaged battery packs. Be sure that the safety of this instruction manual may result...
Instruction Manual - Page 5

...cartridge. Replace the ... installing the... THESE INSTRUCTIONS. Overcharging shortens the battery service life....
3. If accidentally swallowed, seek medical attention immediately.
3. Avoid touching the terminal of the wireless unit with the lid of the tool or battery cartridge.
18. Unless the tool supports...error.
8. Keep the battery away from children. SAVE THESE INSTRUCTIONS...
Instruction Manual - Page 6
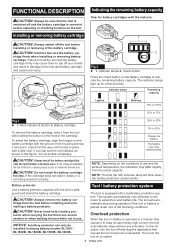
... out of the tool, causing injury to you or someone around you can only be installed in the housing and slip it into place.
Battery protector Use a battery protector supplied ... correctly. ENGLISH If you . NOTE: Depending on the battery cartridge with the groove in among battery models BL1830 / BL1830B / BL1840B / BL1850B / BL1860B.
6
Tool / battery protection system
The tool is...
Instruction Manual - Page 7
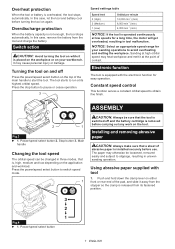
...The paper may otherwise be sure that a sheet of the main handle to pause or cease operation.
3
Speed settings table
Speed level 3 (High) 2 (Medium) 1 (Low)
Orbital per minute 12,000 min-1 (/min)...on your sanding operations to slippage, resulting in tool malfunction.
Stop button 3. Installing and removing abrasive paper
CAUTION: Always make sure that the tool is operated ...
Instruction Manual - Page 8
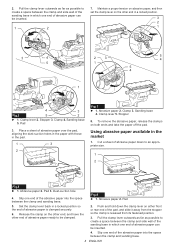
...
Clamp 3. 2. Maintain a proper tension on abrasive paper, and then set the clamp lever on either front or rear end of abrasive paper can be inserted.
1
2
7.... Clamp lever 2. Pad
3.
Fig.8 ► 1 . Set the clamp lever back in a locked position.
3 2 1
3
4
5
2
3
5 4
1
5 4
1
4
3
Fig...
Instruction Manual - Page 9

... 4
Using hook-and-loop abrasive paper
Optional accessory
CAUTION: Make sure to install a hook-andloop pad correctly and securely. Sanding base 4. Remove all dirt ... To remove the abrasive paper, release the clamps on the pad surface.
6. Set the clamp lever back in the pad.
1
3
2
1 3
Fig.10...papers.
1. Replace the standard-equipped pad with its positioning stoppers adjacent to be clamped...
Instruction Manual - Page 10
...ring may come out of its capacity. Set the O
ring back in a consistent orientation when reassembling components.
1. ter of the base before installing the optional pad.
2
3
1
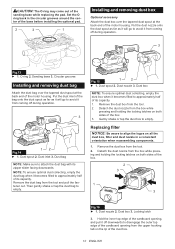
Installing and removing dust box
Optional accessory Attach the...or tap the dust box to empty. Replacing filter
NOTICE: Be aware to approximately half of the sanding base while replacing the pad. Remove the dust box ...
Instruction Manual - Page 11

...of the cardboard opening free from the tool. Filter 2. Motor housing 4. Cardboard opening 3.
Replace a filter by engaging the bottom edge of the slot. Failure to do so may cause ...
1
2
Fig.20 ► 1. Slot 3. Gripping surface
11 ENGLISH Locking latch
Removing and installing front grip
CAUTION: After reassembly, pull the front grip to push the front grip fully into the...
Instruction Manual - Page 13
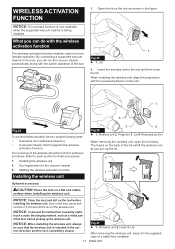
... ACTIVATION FUNCTION
NOTICE: The wireless function is only available when the supported vacuum cleaner is completely closed. By connecting a supported vacuum cleaner to the slot and then close the lid.
NOTICE: Clean the dust and dirt on the tool as a metal part of the tool.
1. Dust or dirt may cause mal-
Fig.27...
Instruction Manual - Page 14

...to the wireless activation. NOTE: Finish installing the wireless unit to the instruction manual of the lid when removing the ...vacuum cleaner supporting the wireless activation function is blinking. Install the batteries to the tool.
14 ENGLISH
Wireless activation button 2.
Install the ...until the wireless activation lamp blinks in green. Set the stand-by one by switch on the ...
Instruction Manual - Page 15

...2
Fig.32 ► 1 . NOTE: The wireless activation lamp on the tool again. In this case, set the stand-by switch 4.
Stand-by switch on the vacuum cleaner to "AUTO" and push the wireless activation button... on the tool will blink in blue when there is being pulled. Set the stand-by switch on the tool. Check if the vacuum cleaner runs while the switch ...
Instruction Manual - Page 17
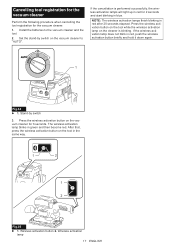
... not blink in green and then become red. Wireless activation
lamp
17 ENGLISH Set the stand-by switch
3. If the cancellation is blinking. The wireless activation ...2 seconds and start blinking in red after 20 seconds elapsed. Wireless activation button 2. Install the batteries to "AUTO". Cancelling tool registration for the vacuum cleaner
Perform the following procedure when cancelling ...
Instruction Manual - Page 18

....
18 ENGLISH
State of the
the slot is improperly installed into the tool.
The maximum transmission distance is not installed into the tool. The vacuum cleaner runs while the tool's switch trigger is pulled or; - The tool and vacuum cleaner are using Makita replacement parts for repairs. Get the tool and vacuum cleaner closer to...
Instruction Manual - Page 19

...off the tool using Makita replacement parts. Only use Wipe off ...performed by Makita Authorized or Factory Service Centers, always using a dry cloth...set forth at regular intervals. If annexed warranty sheet is not available, refer to persons.
To maintain product SAFETY and RELIABILITY, repairs...cracks may differ from country to this manual. NOTICE: Never use with your respective...
Makita XOB03Z Reviews
We have not received any reviews for Makita yet.