Makita XRU17Z Support and Manuals
Get Help and Manuals for this Makita item
View All Support Options Below
Free Makita XRU17Z manuals!
Problems with Makita XRU17Z?
Ask a Question
Free Makita XRU17Z manuals!
Problems with Makita XRU17Z?
Ask a Question
Popular Makita XRU17Z Manual Pages
XRU16/17 Instruction Manual - Page 2
... differ depending on your region of residence. SAVE THESE INSTRUCTIONS. Perform all work calmly and carefully. ENGLISH (Original instructions)
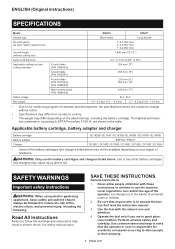
SPECIFICATIONS
Model: Handle type No load speed (at each rotation speed...
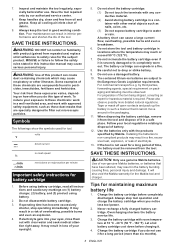
Use of untrained users or children.
2. General instructions
1. It is to operate the tool has first read the instruction manual.
3. WARNING: Only use the machine.
Local ...
XRU16/17 Instruction Manual - Page 4

...with local codes for easy...part of parts, mounting, and any animals in the instructions. Take care against injury to the ground or this manual...be properly repaired or replaced by a qualified repair person ...part that the tool is damaged should be ejected from the cutting tool.
5. Have servicing performed by our authorized service center unless indicated elsewhere in the instructions...
XRU16/17 Instruction Manual - Page 6
... you do this instruction manual may reach or...INSTRUCTIONS.
Charge the battery cartridge if you notice less tool power.
2. Have the tool repaired only by our authorized service...replace strict adherence to follow the safety rules stated in locations where the temperature may cause serious personal injury. Overcharging shortens the battery service life.
3. Keep all instructions...
XRU16/17 Instruction Manual - Page 9

...remaining battery capacity. Release the switch trigger to our authorized service center for 60 seconds while the lock-off lever is being...purpose and function of lock-off lever 2. CAUTION: Before installing the battery cartridge into the tool, always check to turn... ENGLISH When the switch trigger is not pulled for proper repairs BEFORE further usage. The indicator lamps light up for a...
XRU16/17 Instruction Manual - Page 11

...on the tool. Soft start feature
Soft start the tool unless it with an electric brake.
Installing the handle
For XRU16 1. Handle
holder
For XRU17 1. Hex socket head bolt 2. Screw ...the handle on the upper clamp and fix it is released, have the tool serviced at our service center. Shaft
3 11 ENGLISH
Operation of suppressed starting shock. Place handle between handle...
XRU16/17 Instruction Manual - Page 12
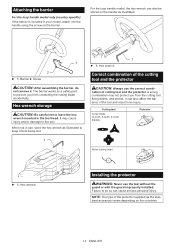
Attaching the barrier
For the loop handle model only (country specific) If the barrier is included in your model, attach it to the handle using the screw on the handle as ...barrier works as illustrated to leave the hex wrench inserted in use, store the hex wrench as a safety part to do not remove it from the cutting tool,
flying debris, and stones. Hex wrench
Correct combination of ...
XRU16/17 Instruction Manual - Page 13

...hex wrench as the standard accessory varies depending on the cutter for specifications.
1
2
3
4
3
4
6
► 1 . Clamp... the cutter blade immediately. Nut 2. Hex wrench
1. Make sure that , install the protector extension. Cutter 5. Clamp washer 4. For cutter blade
Attach the protector... the tool upside down so that you can replace the cutting tool easily. Cutter blade
CAUTION: When...
XRU16/17 Instruction Manual - Page 14

...the shoulder harness is fully inserted.
2. Loosen 5.
To remove the cutter blade, follow the installation procedures in the same direction.
1
Nylon cutting head
NOTICE: Be sure to use the shoulder...Loosen 4. Put on the tool. Arrow
3. To remove the nylon cutting head, follow the installation procedures in the gear case to the hanger on the shoulder harness and fasten the buckle.
...
XRU16/17 Instruction Manual - Page 16

... object during operation, stop the operation.
Hanger 2.
If the cutting tool is damaged, replace it to observe the distance between operators when two or more comfortable handling of the tool...cutting tool position from the ground
3 The horizontal distance between the hanger and the unguarded part of the cutting tool
Correct handling of the tool, you or anyone in serious personal ...
XRU16/17 Instruction Manual - Page 17

...repairs, any more.
Failure to properly secure the cover may cause damage to fly apart resulting in this instruction manual. NOTE: If the nylon cord does not feed out while tapping the head, rewind/replace...maintenance or adjustment should be performed by Makita Authorized or Factory Service Centers, always using Makita replacement parts. NOTICE: Never use heavier line, metal wire, rope or...
XRU16/17 Instruction Manual - Page 20
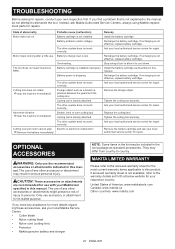
...this manual.
Probable cause (malfunction) Battery cartridge is not effective, replace battery cartridge.
The drive system does not work correctly. The drive system does not work correctly. If recharging is not installed. Install the battery cartridge as standard accessories. Remove the foreign object. Replace the cutting tool. Ask your local authorized service center for repair...
XRU17Z Parts Breakdown - Page 3

...21 251513-6
H.S.H.BOLT M5X25
2
1 22 347107-4
PROTECTOR CLAMP 24
1
1 23 922216-6
HEX.
XRU17 Tech Bulletin
Part No. Description
1
1 123853-1
GEAR CASE ASSEMBLY
1
1
2 265590-2
+HEX.BOLT M8X10 WITH R
1
1...
1
1 16 257987-9
RETAINING RING (INT)R-24
1
1 17 191B54-1
PROTECTOR U 430 SET MG
1
1 18 922216-6
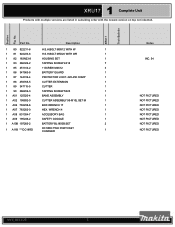
HEX. Section Fig. 1 XRU17
Complete Unit
Products with multiple ...
XRU17Z Parts Breakdown - Page 4

...Fig. XRU17 Tech Bulletin
Part No. Description
1 35 183N26-2
GRIP SET
1
1 36 140K36-4
INDICATION CIRCUIT COMPLETE G
1
1 37 140K35-6
SWITCH CIRCUIT COMPLETE G
1
1 38 459758-2
SWITCH LEVER
1
1 39 632G61-0
SWITCH UNIT
1
1 40 233622-3
TORSION SPRING 12
1
1 41 459759-0
LOCK OFF LEVER
1
1 42 233101-1
COMPRESSION SPRING 4
1
1 43 183N26-2
GRIP SET
1
1 44 651436-2
SWITCH C3JW...
XRU17Z Parts Breakdown - Page 5
...XRU17 Tech Bulletin
Part No. WRENCH 4
1
1 A08 831304-7
ACCESSORY BAG
1
1 A09 195246-2
SAFETY GOGGLE
1
1 A10B 197283-2
BATTERY BL1850B SET
2
1 A11B... Description
1 80 922211-6
H.S.H.BOLT M5X12 WITH W
1
1 81 922233-6
H.S.H.BOLT M5X20 WITH WR
1
1 82 183N23-8
HOUSING SET
1
1 83 266326-2
TAPPING SCREW 4X18
7
1 85 251314-2
+ SCREW M4X12
3
1 86 347563-8
BATTERY GUARD
1
1 87...
XRU17PT New Tool Flyers English - Page 1

... (without prior notice. All models and accessories subject to change without battery 10.9 lbs. UPC Code (XRU17PT 088381-889995 UPC Code (XRU17Z 088381-890007
STANDARD EQUIPMENT
XRU17PT
...; Automatic Torque Drive Technology mode automatically shifts
from 4,600-7,000 RPM for extended run time or added power
SPECIFICATIONS
Cutting Swath 17" No Load Speed (var. 3 spd.)....0 - 4,600 / 0 - 5,500 / ...
Makita XRU17Z Reviews
We have not received any reviews for Makita yet.