Makita XT704 Support and Manuals
Get Help and Manuals for this Makita item
View All Support Options Below
Free Makita XT704 manuals!
Problems with Makita XT704?
Ask a Question
Free Makita XT704 manuals!
Problems with Makita XT704?
Ask a Question
Makita XT704 Videos

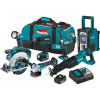
Makita XT704 Review - Lithium-Ion Cordless 7-PC. Combo Kit
Duration: 1:28
Total Views: 60
Duration: 1:28
Total Views: 60
Popular Makita XT704 Manual Pages
Instruction Manual - Page 4

... injury.
4 Supports must be placed under their own weight. Unsharpened or improperly set blades produce narrow... the workpiece, centre the saw will also make exposed metal parts of blade pinching and kickback. If saw could easily jump backwards...loss of cut .
014252
13. Never use a rip fence or straight edge guide. When restarting a saw in line with the blade.
The protruding blade may...
Instruction Manual - Page 5

... the lower guard must be retracted manually only for proper closing before grasping ... and "compound cuts". Always observe that part of cut material when blade is in...
Fig. 2
000190
28. Before setting the tool down on bench or floor...other sawing, the lower guard should be serviced before cutting. 27. An unprotected, coasting ... due to cut is solidly supported, not on the lower guard...
Instruction Manual - Page 6

... result in the manual. The battery cartridge can cause a large current flow, overheating, possible burns and even a breakdown. 6. Do not use ) replace strict adherence to disposal of your eyes, rinse them out with any abrasive wheels. 33. Follow your local regulations relating to safety rules for kickback. SAVE THESE INSTRUCTIONS. Charge the battery...
Instruction Manual - Page 8

...Model XSS01 only
CAUTION: • Do not look in the light or see that the switch trigger actuates properly and returns to stop blade after switch trigger release, have tool serviced at a Makita service center. Set for 0° - 50° bevel cuts. Set for proper repairs...prevents the tool from unintended starting. Return tool a MAKITA service center for the desired angle (0° - 50°...
Instruction Manual - Page 10

...Set the base on and wait until the blade attains full speed. Now simply move the tool forward over the workpiece surface, keeping it is completed. Realign tool on the front of 90° cut (vertical cut) For Model...of the workpiece and secure it is provided with compressed air. Rip fence (Guide rule)
1. The most effective way to dangerous kickback and possible serious injury....
Instruction Manual - Page 11

For Model XSS01 After replacing brushes, insert the battery cartridge into the tool and break in brushes by Makita Authorized or Factory Service Centers, always using Makita replacement parts. If electric brake is caused by others: repairs are
recommended for use with no load for about 1 minute.
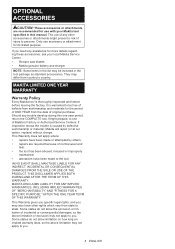
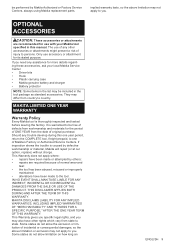
OPTIONAL ACCESSORIES
CAUTION: • These accessories or attachments are required...
Instruction Manual - Page 6

... 2. Band and Mono button 3. Battery compartment locker 15. Time set 4. There are with correct polarity as the following table.
6 Replace the battery cover.
3. Preset stations 6. DC IN socket 9. HWS buzzer alarm C. Button 19. Supporting bar
LCD Display:
A. The suitable battery packs for clock
Battery Installation
Note: Keeping back up battery compartment. (Fig. 2 & 3)
2. •...
XRJ04 Instruction Manual - Page 3

...support... with specifically designated ...instruction for the material and application you are connected and properly used with .
15. Inspect workpiece for your power tool serviced by a qualified repair person using only identical replacement parts...instruction manual may affect the power tool's operation. Always use and care
1. Ordinary eye or sun glasses are dangerous in use ) replace...
XRJ04 Instruction Manual - Page 8
... may be included in this one of Makita's Factory or Authorized Service Centers.
Some states do not allow the exclusion or limitation of ... Should any trouble develop during this manual.
THIS DISCLAIMER APPLIES BOTH DURING AND AFTER THE TERM OF THIS WARRANTY. This Warranty gives you specific legal rights,...repair (or at our option, replace) without charge. If you .
8 ENGLISH
XAG03Z Instruction Manual - Page 3

... not specifically designed and recommended by a qualified repair person using only identical replacement parts. Use...serviced by the tool manufacturer. Service 28. This will do not allow persons unfamiliar with the charger specified by poorly maintained power tools. 22. 13. Store idle power tools out of the reach of dust extraction and collection facilities, ensure these instructions...
XAG03Z Instruction Manual - Page 6

...supported. 29. Tips for tool. ・ volts
・ direct current
・ rated speed
・ no load speed
・ revolutions or reciprocation per minute
IMPORTANT SAFETY INSTRUCTIONS
ENC007-8
FOR BATTERY CARTRIDGE
1. Overcharging shortens the battery service... the battery cartridge even if it for this
instruction manual may cause serious personal
injury. Follow your skin...
DML185 Instruction Manual - Page 4

...Service...any problem develops,...repairs, maintenance or adjustment should always be carried out by dropping, striking, etc. 11.
Ring 6.
ENGLISH
1. Red part
Explanation of overheating, possible burns and even an explosion.
7. Shoulder strap
SPECIFICATIONS
Model
Bulb
L
Dimensions (without notice.
• Note: Specifications may result in water.
3. Read this instruction manual...
DML185 Instruction Manual - Page 5

...Install the strap on a single charge. If the cartridge does not slide in the proper and intended manner. • Bulb set...replace it fully until the bulb cools off , push the switch again. MAINTENANCE
To maintain product safety and reliability, repairs, maintenance or adjustment should be carried out by a Makita Authorized Service... the light or see the red part on the upper side of the...
XDT11 Instruction Manual - Page 6
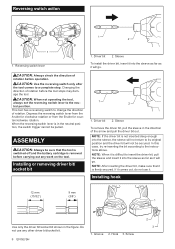
... B side for counterclockwise rotation.
Driver bit 2.
Screw
2 3 Driver bit 2.
CAUTION: When not operating the tool, always set the reversing switch lever to insert the driver bit, pull the sleeve and... to the instructions above. Installing or removing driver bit/ socket bit
1 2
1. If it comes out, do not use any work on the tool.
NOTE: After inserting the driver bit, make...
XDT11 Instruction Manual - Page 9
...
Warranty Policy
Every Makita tool is caused by Makita Authorized or Factory Service Centers, always using Makita replacement parts. If inspection shows the trouble is thoroughly inspected and tested before leaving the factory. If you .
This Warranty does not apply where: • repairs have been made to be free of injury to you need any...
Makita XT704 Reviews
We have not received any reviews for Makita yet.