
User Guide
Page 2
... REMOVE COVER (OR BACK). The lightning flash with the limits for help. However, there is encouraged to try to persons. Reorient or relocate the receiving antenna. - Cet appareil numéruque de la classe B respecte toutes les exigences du Règlement sur le matériel brouilleur du Canada. CAUTION: This Digital Video Disc Player employs a Laser System. Use...
... REMOVE COVER (OR BACK). The lightning flash with the limits for help. However, there is encouraged to try to persons. Reorient or relocate the receiving antenna. - Cet appareil numéruque de la classe B respecte toutes les exigences du Règlement sur le matériel brouilleur du Canada. CAUTION: This Digital Video Disc Player employs a Laser System. Use...
User Guide
Page 3
... product manufacturer as this product, read the owner's manual carefully, and follow all the operating and other ). REFER SERVICING TO QUALIFIED SERVICE PERSONNEL ONLY. 1. If you are provided for ventilation and to the operating instructions. 3. Do not defeat the safety purpose of time, unplug it from the wall outlet. Ventilation Slots and openings in the cabinet are not sure of the type...
... product manufacturer as this product, read the owner's manual carefully, and follow all the operating and other ). REFER SERVICING TO QUALIFIED SERVICE PERSONNEL ONLY. 1. If you are provided for ventilation and to the operating instructions. 3. Do not defeat the safety purpose of time, unplug it from the wall outlet. Ventilation Slots and openings in the cabinet are not sure of the type...
User Guide
Page 4
... the wall outlet. Any mounting of the other equipment, turn on the product. Read the owner's manual of the product should follow the instructions when making any service or repairs to this indicates a need for a longtime. It may cause sight damage. 21. Disc Do not use the headphones, keep the volume at a moderate level. b) If liquid has been spilled, or objects have the same...
... the wall outlet. Any mounting of the other equipment, turn on the product. Read the owner's manual of the product should follow the instructions when making any service or repairs to this indicates a need for a longtime. It may cause sight damage. 21. Disc Do not use the headphones, keep the volume at a moderate level. b) If liquid has been spilled, or objects have the same...
User Guide
Page 5
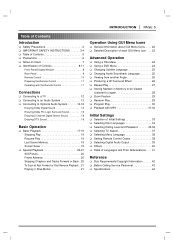
... Discs 7 ❏ Identification of Controls 8-11 Front Panel/Display Window 8 Rear Panel 9 Remote Control 10 Preparing the Remote Control 11 Operating with the Remote Control 11 Connections ❏ Connecting to a TV 12 ❏ Connecting to an Audio System 13 ❏ Connecting to Optional Audio System 14-16 Enjoying Dolby Digital Sound 14 Enjoying Dolby Pro Logic Surround Sound 15 Enjoying 2 Channel Digital Stereo Sound 16 Enjoying DTS Sound 16 Basic Operation ❏ Basic Playback 17-19 Stopping Play 19 Resume Play 19 Last Scene Memory 19 Screen...
... Discs 7 ❏ Identification of Controls 8-11 Front Panel/Display Window 8 Rear Panel 9 Remote Control 10 Preparing the Remote Control 11 Operating with the Remote Control 11 Connections ❏ Connecting to a TV 12 ❏ Connecting to an Audio System 13 ❏ Connecting to Optional Audio System 14-16 Enjoying Dolby Digital Sound 14 Enjoying Dolby Pro Logic Surround Sound 15 Enjoying 2 Channel Digital Stereo Sound 16 Enjoying DTS Sound 16 Basic Operation ❏ Basic Playback 17-19 Stopping Play 19 Resume Play 19 Last Scene Memory 19 Screen...
User Guide
Page 8
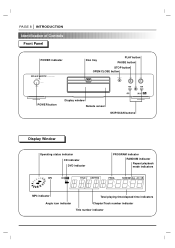
... A B MP3 indicator Total playing time/elapsed time indicators Angle icon indicator Chapter/Track number indicator Title number indicator PAGE 8 INTRODUCTION Identification of Controls Front Panel POWER indicator STANDBY DVD PLAYER DV4200 STANDBY/ON POWER Disc tray PLAY button PAUSE button STOP button OPEN/CLOSE button OPEN/CLOSE STOP PLAY PAUSE POWER button Display window Remote sensor SKIP/SCAN buttons Display Window Operating status indicator CD indicator DVD indicator PROGRAM indicator RANDOM indicator Repeat playback mode indicators MP3 CD DVD TITLE CHP/TRK PROG...
... A B MP3 indicator Total playing time/elapsed time indicators Angle icon indicator Chapter/Track number indicator Title number indicator PAGE 8 INTRODUCTION Identification of Controls Front Panel POWER indicator STANDBY DVD PLAYER DV4200 STANDBY/ON POWER Disc tray PLAY button PAUSE button STOP button OPEN/CLOSE button OPEN/CLOSE STOP PLAY PAUSE POWER button Display window Remote sensor SKIP/SCAN buttons Display Window Operating status indicator CD indicator DVD indicator PROGRAM indicator RANDOM indicator Repeat playback mode indicators MP3 CD DVD TITLE CHP/TRK PROG...
User Guide
Page 9
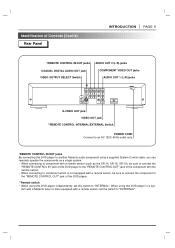
... COAXIAL DIGITAL AUDIO OUT jack VIDEO OUTPUT SELECT Switch COMPONENT VIDEO OUT jacks AUDIO OUT 1 (L/R) jacks DIGITAL REMOTE AUDIO COMPONENT AUDIO OUT CONTROL OUT2 VIDEO OUT OUT1 COAXIAL IN L CB L S-VIDEO OUT R CR R COMPONENT VIDEO OUTPUT S-VIDEO OUT Y VIDEO OUT EXTERNAL INTERNAL REMOTE CONTROL S-VIDEO OUT jack VIDEO OUT jack **REMOTE CONTROL INTERNAL/EXTERNAL Switch POWER CORD Connect to an AC 120V, 60Hz outlet only. *REMOTE CONTROL IN/OUT jacks By connecting this DVD player to another Marantz audio component using a supplied System Control cable, you can remotely operate...
... COAXIAL DIGITAL AUDIO OUT jack VIDEO OUTPUT SELECT Switch COMPONENT VIDEO OUT jacks AUDIO OUT 1 (L/R) jacks DIGITAL REMOTE AUDIO COMPONENT AUDIO OUT CONTROL OUT2 VIDEO OUT OUT1 COAXIAL IN L CB L S-VIDEO OUT R CR R COMPONENT VIDEO OUTPUT S-VIDEO OUT Y VIDEO OUT EXTERNAL INTERNAL REMOTE CONTROL S-VIDEO OUT jack VIDEO OUT jack **REMOTE CONTROL INTERNAL/EXTERNAL Switch POWER CORD Connect to an AC 120V, 60Hz outlet only. *REMOTE CONTROL IN/OUT jacks By connecting this DVD player to another Marantz audio component using a supplied System Control cable, you can remotely operate...
User Guide
Page 10
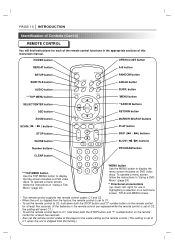
... remote control are replaced while the remote control is set to C2, the setting will find instructions for at least five seconds. • Also set the remote control codes of the player to the same setting as the remote control. (This setting is set the remote control to C2, hold down both the STOP button and "2" number button on the remote control for each of the remote control functions in "Using a Title Menu" (page 24). 7 CLEAR 8 9 PROGRAM 0 *MENU button Use the MENU button to display the menu screen included on DVD video discs...
... remote control are replaced while the remote control is set to C2, the setting will find instructions for at least five seconds. • Also set the remote control codes of the player to the same setting as the remote control. (This setting is set the remote control to C2, hold down both the STOP button and "2" number button on the remote control for each of the remote control functions in "Using a Title Menu" (page 24). 7 CLEAR 8 9 PROGRAM 0 *MENU button Use the MENU button to display the menu screen included on DVD video discs...
User Guide
Page 12
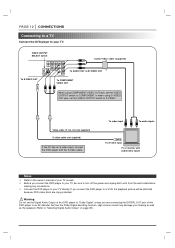
... S-video input, connect the DVD player with audio/video inputs Notes ❍ Refer to the owner's manual of this DVD player to an AV decoder that has the Dolby Digital decoding function. Warning Do not set the VIDEO OUTPUT switch to your TV, be distorted because DVD video discs are connecting the DIGITAL OUT jack of your TV as the speakers (Refer to "Selecting Digital Audio Output" on page 39). VIDEO OUTPUT SELECT switch DIGITAL REMOTE AUDIO COMPONENT AUDIO OUT CONTROL OUT2 VIDEO OUT OUT1 Audio/Video cable...
... S-video input, connect the DVD player with audio/video inputs Notes ❍ Refer to the owner's manual of this DVD player to an AV decoder that has the Dolby Digital decoding function. Warning Do not set the VIDEO OUTPUT switch to your TV, be distorted because DVD video discs are connecting the DIGITAL OUT jack of your TV as the speakers (Refer to "Selecting Digital Audio Output" on page 39). VIDEO OUTPUT SELECT switch DIGITAL REMOTE AUDIO COMPONENT AUDIO OUT CONTROL OUT2 VIDEO OUT OUT1 Audio/Video cable...
User Guide
Page 13
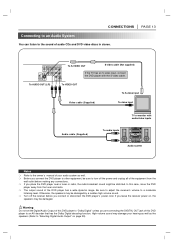
DIGITAL REMOTE AUDIO COMPONENT AUDIO OUT CONTROL OUT2 VIDEO OUT OUT1 To S-VIDEO OUT S-video cable (Not supplied) COAXIAL IN L CB L S-VIDEO OUT R CR R COMPONENT VIDEO OUTPUT S-VIDEO OUT Y VIDEO OUT If the TV has an S-video input, connect the DVD player with audio/video inputs Audio system Notes ❍ Refer to the owner's manual of your hearing as well as well. ❍ Before you connect the DVD player to other equipment, be sure to turn off the receiver before making any connections. ❍ If...
DIGITAL REMOTE AUDIO COMPONENT AUDIO OUT CONTROL OUT2 VIDEO OUT OUT1 To S-VIDEO OUT S-video cable (Not supplied) COAXIAL IN L CB L S-VIDEO OUT R CR R COMPONENT VIDEO OUTPUT S-VIDEO OUT Y VIDEO OUT If the TV has an S-video input, connect the DVD player with audio/video inputs Audio system Notes ❍ Refer to the owner's manual of your hearing as well as well. ❍ Before you connect the DVD player to other equipment, be sure to turn off the receiver before making any connections. ❍ If...
User Guide
Page 14
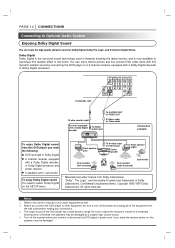
... reserved. If you need to select "Dolby Digital" on , the speakers may be damaged. To DIGITAL OUT DIGITAL REMOTE AUDIO COMPONENT AUDIO OUT CONTROL OUT2 VIDEO OUT OUT1 COAXIAL IN L CB L S-VIDEO OUT R CR R COMPONENT VIDEO OUTPUT S-VIDEO OUT Y VIDEO OUT To S-VIDEO OUT or VIDEO OUT 75 ohm coaxial cable Receiver equipped with a Dolby Digital decoder To digital audio input S-Video cable or Video cable Connection example To enjoy Dolby Digital sound from this DVD player you leave the receiver power on the SETUP menu. Confidential Unpublished works. Otherwise, the...
... reserved. If you need to select "Dolby Digital" on , the speakers may be damaged. To DIGITAL OUT DIGITAL REMOTE AUDIO COMPONENT AUDIO OUT CONTROL OUT2 VIDEO OUT OUT1 COAXIAL IN L CB L S-VIDEO OUT R CR R COMPONENT VIDEO OUTPUT S-VIDEO OUT Y VIDEO OUT To S-VIDEO OUT or VIDEO OUT 75 ohm coaxial cable Receiver equipped with a Dolby Digital decoder To digital audio input S-Video cable or Video cable Connection example To enjoy Dolby Digital sound from this DVD player you leave the receiver power on the SETUP menu. Confidential Unpublished works. Otherwise, the...
User Guide
Page 15
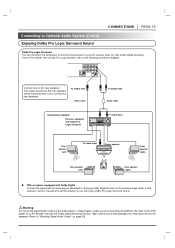
... are connecting the DIGITAL OUT jack of this DVD player to "Dolby Digital" unless you connect two rear speakers. If your hearing as well as described in "Enjoying Dolby Digital Sound" on page 39). Warning Do not set the receiver so you can still enjoy the excitement of this DVD player to an AV decoder that receiver's owner's manual and set the Digital Audio Output of Surround Sound even if your A/V receiver does not offer Dolby Digital...
... are connecting the DIGITAL OUT jack of this DVD player to "Dolby Digital" unless you connect two rear speakers. If your hearing as well as described in "Enjoying Dolby Digital Sound" on page 39). Warning Do not set the receiver so you can still enjoy the excitement of this DVD player to an AV decoder that receiver's owner's manual and set the Digital Audio Output of Surround Sound even if your A/V receiver does not offer Dolby Digital...
User Guide
Page 16
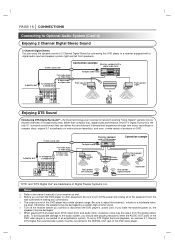
...; When playing DTS-encoded discs (DVD video discs and audio CDs), excessive noise may be damaged by a sudden high volume sound. ❍ Turn off the receiver before making any connections. ❍ The output sound of Digital Theater Systems, Inc. To avoid possible damage to the audio system, you leave the receiver power on DVD. 75 ohm coaxial cable To DIGITAL OUT To S-VIDEO OUT or VIDEO OUT To S-video Input or Video Input S-Video cable or Video cable DIGITAL REMOTE AUDIO COMPONENT AUDIO OUT CONTROL OUT2 VIDEO OUT OUT1...
...; When playing DTS-encoded discs (DVD video discs and audio CDs), excessive noise may be damaged by a sudden high volume sound. ❍ Turn off the receiver before making any connections. ❍ The output sound of Digital Theater Systems, Inc. To avoid possible damage to the audio system, you leave the receiver power on DVD. 75 ohm coaxial cable To DIGITAL OUT To S-VIDEO OUT or VIDEO OUT To S-video Input or Video Input S-Video cable or Video cable DIGITAL REMOTE AUDIO COMPONENT AUDIO OUT CONTROL OUT2 VIDEO OUT OUT1...
User Guide
Page 17
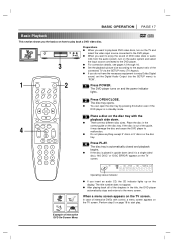
... screen. When a menu screen appears on the display. In case of the guide, it is in upside down . If the disc is automatically closed and playback begins. STANDBY DVD PLAYER DV4200 STANDBY/ON POWER Preparations q When you insert an audio CD, the CD indicator lights up on the TV screen. The disc tray opens. The DVD player turns on the TV and OPEN/CLOSE STOP PLAY select the video input source connected to "PCM". 1 POWER OPEN/CLOSE SETUP REPEAT A-B RANDOM AUDIO SUBTITLE...
... screen. When a menu screen appears on the display. In case of the guide, it is in upside down . If the disc is automatically closed and playback begins. STANDBY DVD PLAYER DV4200 STANDBY/ON POWER Preparations q When you insert an audio CD, the CD indicator lights up on the TV screen. The disc tray opens. The DVD player turns on the TV and OPEN/CLOSE STOP PLAY select the video input source connected to "PCM". 1 POWER OPEN/CLOSE SETUP REPEAT A-B RANDOM AUDIO SUBTITLE...
User Guide
Page 19
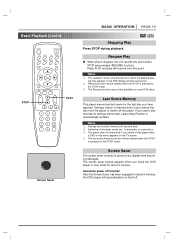
... on some DVD discs. Settings remain in memory for use any time. ❍ Switching of the audio mode, etc., is useful to prevent your display from the player or switch off function After the Screen Saver has been engaged for which the elapsed play will be available on the TV screen. ❍ The last scene memory function will resume from this point. Basic Playback (Cont'd) POWER OPEN/CLOSE SETUP REPEAT A-B RANDOM AUDIO SUBTITLE ANGLE...
... on some DVD discs. Settings remain in memory for use any time. ❍ Switching of the audio mode, etc., is useful to prevent your display from the player or switch off function After the Screen Saver has been engaged for which the elapsed play will be available on the TV screen. ❍ The last scene memory function will resume from this point. Basic Playback (Cont'd) POWER OPEN/CLOSE SETUP REPEAT A-B RANDOM AUDIO SUBTITLE ANGLE...
User Guide
Page 25
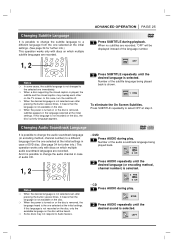
... the On Screen Subtitles. ADVANCED OPERATION PAGE 25 Changing Subtitle Language It is possible to change the subtitle language to a different language from the one selected at the initial settings. (See page 34 for further info.) This operation works only with discs on which multiple audio soundtrack languages are recorded. If this language is not recorded on the TV screen. Number of audio CD. 1, 2 SETUP REPEAT A-B RANDOM AUDIO SUBTITLE ANGLE SURR. TOP MENU MENU Notes ❍...
... the On Screen Subtitles. ADVANCED OPERATION PAGE 25 Changing Subtitle Language It is possible to change the subtitle language to a different language from the one selected at the initial settings. (See page 34 for further info.) This operation works only with discs on which multiple audio soundtrack languages are recorded. If this language is not recorded on the TV screen. Number of audio CD. 1, 2 SETUP REPEAT A-B RANDOM AUDIO SUBTITLE ANGLE SURR. TOP MENU MENU Notes ❍...
User Guide
Page 29
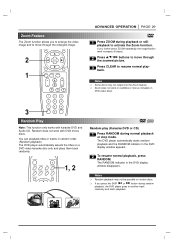
... SCAN PLAY SKIP STOP PAUSE SLOW 3 1 4 7 CLEAR 2 3 5 6 8 9 PROGRAM 0 Random Play Note: This function only works with DVD movie discs. POWER OPEN/CLOSE SETUP REPEAT A-B RANDOM AUDIO SUBTITLE ANGLE SURR. You can playback titles or tracks in random order. (Random playback) The DVD player automatically selects the titles on DVD video discs. If you further press ZOOM repeatedly, the magnification level increases (6 steps). 2 Press D/E/F/G buttons to move through the zoomed picture. 3 Press CLEAR to resume normal play (Karaoke DVD...
... SCAN PLAY SKIP STOP PAUSE SLOW 3 1 4 7 CLEAR 2 3 5 6 8 9 PROGRAM 0 Random Play Note: This function only works with DVD movie discs. POWER OPEN/CLOSE SETUP REPEAT A-B RANDOM AUDIO SUBTITLE ANGLE SURR. You can playback titles or tracks in random order. (Random playback) The DVD player automatically selects the titles on DVD video discs. If you further press ZOOM repeatedly, the magnification level increases (6 steps). 2 Press D/E/F/G buttons to move through the zoomed picture. 3 Press CLEAR to resume normal play (Karaoke DVD...
User Guide
Page 30
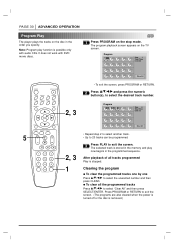
... screen. (The programs are also cleared when the power is turned off or the disc is stored in the order you specify. Program Step 1 Total Time 0:00:00 POWER OPEN/CLOSE SETUP REPEAT A-B RANDOM AUDIO SUBTITLE ANGLE SURR. TOP MENU MENU 5 SELECT /ENTER OSD RETURN ZOOM MARKER - Press PROGRAM or RETURN to exit the screen. PAGE 30 ADVANCED OPERATION Program Play The player plays the tracks on the disc in the memory and play function is stopped...
... screen. (The programs are also cleared when the power is turned off or the disc is stored in the order you specify. Program Step 1 Total Time 0:00:00 POWER OPEN/CLOSE SETUP REPEAT A-B RANDOM AUDIO SUBTITLE ANGLE SURR. TOP MENU MENU 5 SELECT /ENTER OSD RETURN ZOOM MARKER - Press PROGRAM or RETURN to exit the screen. PAGE 30 ADVANCED OPERATION Program Play The player plays the tracks on the disc in the memory and play function is stopped...
User Guide
Page 35
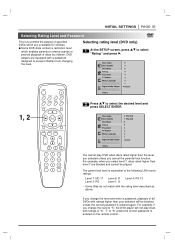
... children. POWER OPEN/CLOSE SETUP REPEAT A-B RANDOM Selecting rating level (DVD only) 1 At the SETUP screen, press D/E to select the desired level and press SELECT/ENTER. 1, 2 SELECT /ENTER OSD RETURN ZOOM MARKER - For example, when you cancel the parental lock function. For example: if you change the level to "5", the DVD player will be played. If you change the level and enter a password, playback of specified DVDs which enables parents to remove scenes...
... children. POWER OPEN/CLOSE SETUP REPEAT A-B RANDOM Selecting rating level (DVD only) 1 At the SETUP screen, press D/E to select the desired level and press SELECT/ENTER. 1, 2 SELECT /ENTER OSD RETURN ZOOM MARKER - For example, when you cancel the parental lock function. For example: if you change the level to "5", the DVD player will be played. If you change the level and enter a password, playback of specified DVDs which enables parents to remove scenes...
User Guide
Page 38
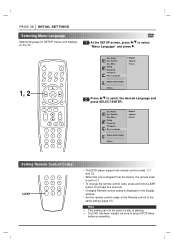
... from the factory, the remote code is set to C1. • To change the remote control cods, press and hold CLEAR button for SETUP menus and displays on the TV. 1 At the SETUP screen, press D/E to select the desired Language and press SELECT/ENTER. SEARCH SCAN PLAY SKIP STOP PAUSE SLOW 1 4 7 CLEAR 2 3 5 6 8 9 PROGRAM 0 Disc Audio Disc Subtitle Disc Menu Rating Password TV Aspect Menu Language Progressive Scan Digital Audio Output 5.1 Speaker Setup Others English Spanish French 2 Press D/E to select "Menu Language" and press G. 1, 2 POWER OPEN/CLOSE SETUP REPEAT...
... from the factory, the remote code is set to C1. • To change the remote control cods, press and hold CLEAR button for SETUP menus and displays on the TV. 1 At the SETUP screen, press D/E to select the desired Language and press SELECT/ENTER. SEARCH SCAN PLAY SKIP STOP PAUSE SLOW 1 4 7 CLEAR 2 3 5 6 8 9 PROGRAM 0 Disc Audio Disc Subtitle Disc Menu Rating Password TV Aspect Menu Language Progressive Scan Digital Audio Output 5.1 Speaker Setup Others English Spanish French 2 Press D/E to select "Menu Language" and press G. 1, 2 POWER OPEN/CLOSE SETUP REPEAT...
User Guide
Page 43
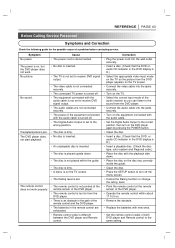
... No power. The power is set to receive DVD signal output. Cause • The power cord is poor. The playback picture is disconnected. No sound. • The video cable is not connected securely. • The connected TV power is turned off. • The equipment connected with the audio cable is turned off the menu screen. • Cancel the Rating function or change the rating level. • Point the remote control at the remote sensor of the DVD player. • The remote control...
... No power. The power is set to receive DVD signal output. Cause • The power cord is poor. The playback picture is disconnected. No sound. • The video cable is not connected securely. • The connected TV power is turned off. • The equipment connected with the audio cable is turned off the menu screen. • Cancel the Rating function or change the rating level. • Point the remote control at the remote sensor of the DVD player. • The remote control...


