
User Guide
Page 5
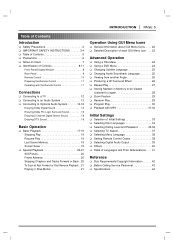
... Contents 5 ❏ Precautions 6 ❏ Notes on Discs 7 ❏ Identification of Controls 8-11 Front Panel/Display Window 8 Rear Panel 9 Remote Control 10 Preparing the Remote Control 11 Operating with the Remote Control 11 Connections ❏ Connecting to a TV 12 ❏ Connecting to an Audio System ... Selecting Rating Level and Password 35-36 ❏ Selecting TV Aspect 37 ❏ Selecting Menu Language 38 ❏ Setting Remote Control Codes 38 ❏ Selecting Digital Audio Output 39 ❏ Others 40 ❏ Table of Languages and Their Abbreviations. . ...
... Contents 5 ❏ Precautions 6 ❏ Notes on Discs 7 ❏ Identification of Controls 8-11 Front Panel/Display Window 8 Rear Panel 9 Remote Control 10 Preparing the Remote Control 11 Operating with the Remote Control 11 Connections ❏ Connecting to a TV 12 ❏ Connecting to an Audio System ... Selecting Rating Level and Password 35-36 ❏ Selecting TV Aspect 37 ❏ Selecting Menu Language 38 ❏ Setting Remote Control Codes 38 ❏ Selecting Digital Audio Output 39 ❏ Others 40 ❏ Table of Languages and Their Abbreviations. . ...
User Guide
Page 8
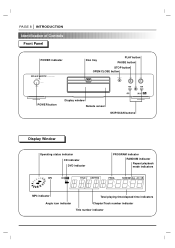
PAGE 8 INTRODUCTION Identification of Controls Front Panel POWER indicator STANDBY DVD PLAYER DV4200 STANDBY/ON POWER Disc tray PLAY button PAUSE button STOP button OPEN/CLOSE button OPEN/CLOSE STOP PLAY PAUSE POWER button Display window Remote sensor SKIP/SCAN buttons Display Window Operating status indicator CD indicator DVD indicator PROGRAM indicator RANDOM indicator...
PAGE 8 INTRODUCTION Identification of Controls Front Panel POWER indicator STANDBY DVD PLAYER DV4200 STANDBY/ON POWER Disc tray PLAY button PAUSE button STOP button OPEN/CLOSE button OPEN/CLOSE STOP PLAY PAUSE POWER button Display window Remote sensor SKIP/SCAN buttons Display Window Operating status indicator CD indicator DVD indicator PROGRAM indicator RANDOM indicator...
User Guide
Page 9
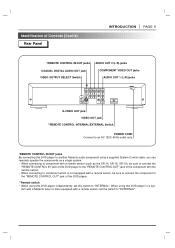
... connect the component to the "REMOTE CONTROL OUT" jack of the component with the remote sensor. • When connecting to "INTERNAL". tem with a Marantz tuner or timer equipped with a remote sensor, be sure to connect the "REMOTE CONTROL IN" jack of this DVD player to the "REMOTE CONTROL OUT" jack of this DVD player. **Remote switch • When using this...
... connect the component to the "REMOTE CONTROL OUT" jack of the component with the remote sensor. • When connecting to "INTERNAL". tem with a Marantz tuner or timer equipped with a remote sensor, be sure to connect the "REMOTE CONTROL IN" jack of this DVD player to the "REMOTE CONTROL OUT" jack of this DVD player. **Remote switch • When using this...
User Guide
Page 10
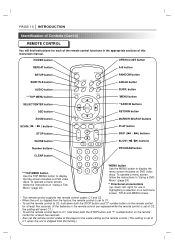
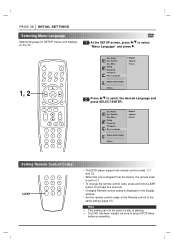
...GUI menu screen, TITLE and MENU screen. • This remote control supports two remote control codes: C1 and C2. • When the unit is shipped from the factory, the remote control is set to C1. • To set the remote control to C2, hold down both the STOP button and "1" ...the factory.) PAGE 10 INTRODUCTION Identification of Controls (Cont'd) REMOTE CONTROL You will revert C1.) • To set the remote control back to C1, hold down both the STOP button and "2" number button on the remote control for each of the remote control functions in the appropriate sections of the...
...GUI menu screen, TITLE and MENU screen. • This remote control supports two remote control codes: C1 and C2. • When the unit is shipped from the factory, the remote control is set to C1. • To set the remote control to C2, hold down both the STOP button and "1" ...the factory.) PAGE 10 INTRODUCTION Identification of Controls (Cont'd) REMOTE CONTROL You will revert C1.) • To set the remote control back to C1, hold down both the STOP button and "2" number button on the remote control for each of the remote control functions in the appropriate sections of the...
User Guide
Page 11
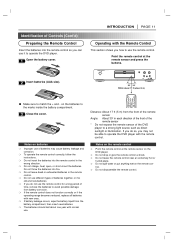
... 5 m) q Make sure to a strong light source such as direct sunlight or illumination. Notes on the remote control ❍ Point the remote control at the remote sensor and press the buttons. trol. ❍ Do not disassemble the remote control. STANDBY DVD PLAYER DV4200 STANDBY/ON POWER OPEN/CLOSE STOP PLAY PAUSE 30° 30° Within about 17 ft...
... 5 m) q Make sure to a strong light source such as direct sunlight or illumination. Notes on the remote control ❍ Point the remote control at the remote sensor and press the buttons. trol. ❍ Do not disassemble the remote control. STANDBY DVD PLAYER DV4200 STANDBY/ON POWER OPEN/CLOSE STOP PLAY PAUSE 30° 30° Within about 17 ft...
User Guide
Page 12
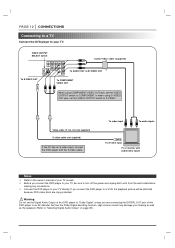
... TV directly. To video input To audio inputs To S-video input TV or monitor with the S-video cable. VIDEO OUTPUT SELECT switch DIGITAL REMOTE AUDIO COMPONENT AUDIO OUT CONTROL OUT2 VIDEO OUT OUT1 Audio/Video cable (supplied) COAXIAL IN L CB L S-VIDEO OUT R CR R COMPONENT VIDEO OUTPUT S-VIDEO OUT Y VIDEO OUT To AUDIO...
... TV directly. To video input To audio inputs To S-video input TV or monitor with the S-video cable. VIDEO OUTPUT SELECT switch DIGITAL REMOTE AUDIO COMPONENT AUDIO OUT CONTROL OUT2 VIDEO OUT OUT1 Audio/Video cable (supplied) COAXIAL IN L CB L S-VIDEO OUT R CR R COMPONENT VIDEO OUTPUT S-VIDEO OUT Y VIDEO OUT To AUDIO...
User Guide
Page 13
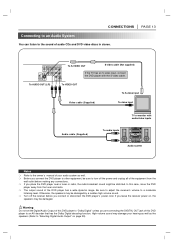
...; Before you connect the DVD player to other equipment, be sure to an AV decoder that has the Dolby Digital decoding function. DIGITAL REMOTE AUDIO COMPONENT AUDIO OUT CONTROL OUT2 VIDEO OUT OUT1 To S-VIDEO OUT S-video cable (Not supplied) COAXIAL IN L CB L S-VIDEO OUT R CR R COMPONENT VIDEO OUTPUT S-VIDEO OUT Y VIDEO...
...; Before you connect the DVD player to other equipment, be sure to an AV decoder that has the Dolby Digital decoding function. DIGITAL REMOTE AUDIO COMPONENT AUDIO OUT CONTROL OUT2 VIDEO OUT OUT1 To S-VIDEO OUT S-video cable (Not supplied) COAXIAL IN L CB L S-VIDEO OUT R CR R COMPONENT VIDEO OUTPUT S-VIDEO OUT Y VIDEO...
User Guide
Page 14
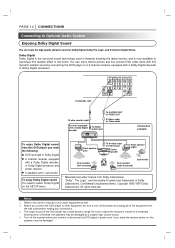
... player's power cord. Copyright 1992-1997 Dolby Laboratories. Be sure to adjust the receiver's volume to a moderate listening level. To DIGITAL OUT DIGITAL REMOTE AUDIO COMPONENT AUDIO OUT CONTROL OUT2 VIDEO OUT OUT1 COAXIAL IN L CB L S-VIDEO OUT R CR R COMPONENT VIDEO OUTPUT S-VIDEO OUT Y VIDEO OUT To S-VIDEO OUT or VIDEO OUT...
... player's power cord. Copyright 1992-1997 Dolby Laboratories. Be sure to adjust the receiver's volume to a moderate listening level. To DIGITAL OUT DIGITAL REMOTE AUDIO COMPONENT AUDIO OUT CONTROL OUT2 VIDEO OUT OUT1 COAXIAL IN L CB L S-VIDEO OUT R CR R COMPONENT VIDEO OUTPUT S-VIDEO OUT Y VIDEO OUT To S-VIDEO OUT or VIDEO OUT...
User Guide
Page 15
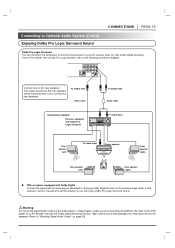
... the equipment the same way as the speakers (Refer to the following connection diagram. Refer to "Dolby Digital" unless you connect two rear speakers. DIGITAL REMOTE OUT CONTROL AUDIO OUT2 COMPONENT VIDEO OUT AUDIO OUT1 COAXIAL IN L CB L S-VIDEO OUT R CR R COMPONENT VIDEO OUTPUT S-VIDEO OUT Y VIDEO OUT Connect one or two...
... the equipment the same way as the speakers (Refer to the following connection diagram. Refer to "Dolby Digital" unless you connect two rear speakers. DIGITAL REMOTE OUT CONTROL AUDIO OUT2 COMPONENT VIDEO OUT AUDIO OUT1 COAXIAL IN L CB L S-VIDEO OUT R CR R COMPONENT VIDEO OUTPUT S-VIDEO OUT Y VIDEO OUT Connect one or two...
User Guide
Page 16
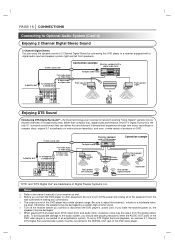
...coaxial cable To DIGITAL OUT To S-VIDEO OUT or VIDEO OUT To S-video Input or Video Input S-Video cable or Video cable DIGITAL REMOTE AUDIO COMPONENT AUDIO OUT CONTROL OUT2 VIDEO OUT OUT1 COAXIAL IN L CB L S-VIDEO OUT R CR R COMPONENT VIDEO OUTPUT S-VIDEO OUT Y VIDEO OUT Receiver ...OUT or VIDEO OUT To S-video Input or Video Input S-Video cable or Video cable To digital audio input Front speaker (left) DIGITAL REMOTE AUDIO COMPONENT AUDIO OUT CONTROL OUT2 VIDEO OUT OUT1 COAXIAL IN L CB L S-VIDEO OUT R CR R COMPONENT VIDEO OUTPUT S-VIDEO OUT Y VIDEO OUT TV ...
...coaxial cable To DIGITAL OUT To S-VIDEO OUT or VIDEO OUT To S-video Input or Video Input S-Video cable or Video cable DIGITAL REMOTE AUDIO COMPONENT AUDIO OUT CONTROL OUT2 VIDEO OUT OUT1 COAXIAL IN L CB L S-VIDEO OUT R CR R COMPONENT VIDEO OUTPUT S-VIDEO OUT Y VIDEO OUT Receiver ...OUT or VIDEO OUT To S-video Input or Video Input S-Video cable or Video cable To digital audio input Front speaker (left) DIGITAL REMOTE AUDIO COMPONENT AUDIO OUT CONTROL OUT2 VIDEO OUT OUT1 COAXIAL IN L CB L S-VIDEO OUT R CR R COMPONENT VIDEO OUTPUT S-VIDEO OUT Y VIDEO OUT TV ...
User Guide
Page 18
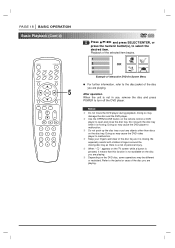
... not push the disc tray while it is closing disc tray as it is a risk of the disc you are playing. ❍ Depending on the remote control or DVD player to malfunction. ❍ Keep your fingers well clear of the disc you are playing. After operation When the unit is not available...
... not push the disc tray while it is closing disc tray as it is a risk of the disc you are playing. ❍ Depending on the remote control or DVD player to malfunction. ❍ Keep your fingers well clear of the disc you are playing. After operation When the unit is not available...
User Guide
Page 35
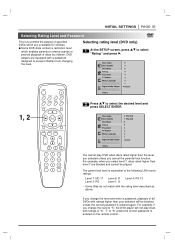
... selection will not play DVD video discs rated higher than level 7 are equipped with ratings of "6", "7" or "8" unless the correct password is entered on the remote control. INITIAL SETTINGS PAGE 35 Selecting Rating Level and Password This is to prohibit the playing of specified DVDs which enables parents to remove scenes or...
... selection will not play DVD video discs rated higher than level 7 are equipped with ratings of "6", "7" or "8" unless the correct password is entered on the remote control. INITIAL SETTINGS PAGE 35 Selecting Rating Level and Password This is to prohibit the playing of specified DVDs which enables parents to remove scenes or...
User Guide
Page 38
... ANGLE SURR. PAGE 38 INITIAL SETTINGS Selecting Menu Language Selects language for at least five seconds. • Changed Remote control codes is displayed in the Display window. • Set the remote control codes of the Remote control to select the desired Language and press SELECT/ENTER. TOP MENU MENU SELECT /ENTER OSD RETURN ZOOM MARKER - SEARCH...
... ANGLE SURR. PAGE 38 INITIAL SETTINGS Selecting Menu Language Selects language for at least five seconds. • Changed Remote control codes is displayed in the Display window. • Set the remote control codes of the Remote control to select the desired Language and press SELECT/ENTER. TOP MENU MENU SELECT /ENTER OSD RETURN ZOOM MARKER - SEARCH...
User Guide
Page 43
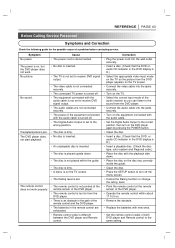
... off. • The equipment connected with the audio cable is not set to receive DVD signal output. • The audio cables are exhausted. • Remote control code is set to receive DVD signal output. Correction • Plug the power cord into the wall outlet securely. • Insert a disc. (Check that... set to the same setting. No picture. • No disc is inserted. • The TV is not pointed at the remote sensor of both DVD player and Remote control to the wrong position. The power is on the TV screen. • The Rating level is different between the DVD player and...
... off. • The equipment connected with the audio cable is not set to receive DVD signal output. • The audio cables are exhausted. • Remote control code is set to receive DVD signal output. Correction • Plug the power cord into the wall outlet securely. • Insert a disc. (Check that... set to the same setting. No picture. • No disc is inserted. • The TV is not pointed at the remote sensor of both DVD player and Remote control to the wrong position. The power is on the TV screen. • The Rating level is different between the DVD player and...
User Guide
Page 44
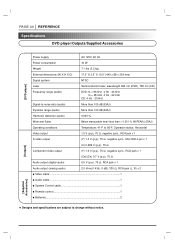
... Ω Audio output (digital audio) 0.5 V (p-p), 75 Ω, RCA jack x 1 Audio output (analog audio) 2.0 Vrms(1 KHz, 0 dB), 330 Ω, RCA jack (L, R) x 2 q Video cable 1 q Audio cable 1 q Syatem Control cable 1 q Remote control 1 q Batteries ...2 [Outputs] [Supplied Accessories] ❋ Designs and specifications are subject to change without notice.
... Ω Audio output (digital audio) 0.5 V (p-p), 75 Ω, RCA jack x 1 Audio output (analog audio) 2.0 Vrms(1 KHz, 0 dB), 330 Ω, RCA jack (L, R) x 2 q Video cable 1 q Audio cable 1 q Syatem Control cable 1 q Remote control 1 q Batteries ...2 [Outputs] [Supplied Accessories] ❋ Designs and specifications are subject to change without notice.


