
User Guide
Page 5
...; General Information about GUI Menu Icons . . . . 23 ❏ Detailed Description of each GUI Menu Icon . . . 24 Advanced Operation ❏ Using a Title Menu 25 ❏ Using a DVD Menu 25 ❏ Changing Subtitle Language 26 ❏ Changing Audio Soundtrack Language 26 ❏ Viewing from another Angle 27 ❏ Producing a 3D Surround Effect 27...
...; General Information about GUI Menu Icons . . . . 23 ❏ Detailed Description of each GUI Menu Icon . . . 24 Advanced Operation ❏ Using a Title Menu 25 ❏ Using a DVD Menu 25 ❏ Changing Subtitle Language 26 ❏ Changing Audio Soundtrack Language 26 ❏ Viewing from another Angle 27 ❏ Producing a 3D Surround Effect 27...

User Guide
Page 6
...If the optical pick-up lens inside this unit, one of the most crucial internal parts of the DVD player. Notes on Cleaning Use a soft, dry cloth for two or three hours. Drops of water ...; For stubborn dirt, soak the cloth in a weak detergent solution, wring well and wipe. Examples of the DVD player to remove the disc and turn on the optical pick-up lens and disc drive parts are dirty or ...of lenses and/or other components of the glass. In the same way, moisture may condense on the DVD player and leave it may become warm after you move the unit from an air conditioned room. ❏...
...If the optical pick-up lens inside this unit, one of the most crucial internal parts of the DVD player. Notes on Cleaning Use a soft, dry cloth for two or three hours. Drops of water ...; For stubborn dirt, soak the cloth in a weak detergent solution, wring well and wipe. Examples of the DVD player to remove the disc and turn on the optical pick-up lens and disc drive parts are dirty or ...of lenses and/or other components of the glass. In the same way, moisture may condense on the DVD player and leave it may become warm after you move the unit from an air conditioned room. ❏...

User Guide
Page 7
... not touch the playback side of solvents such as a bathroom or near heat sources. ❍ Do not store discs in this DVD player. ❍ Some DVD video discs have functions that specific DVD video disc. On Storing Discs ❍ Do not store discs in a place subject to direct sunlight or near a humidifier. ❍...
... not touch the playback side of solvents such as a bathroom or near heat sources. ❍ Do not store discs in this DVD player. ❍ Some DVD video discs have functions that specific DVD video disc. On Storing Discs ❍ Do not store discs in a place subject to direct sunlight or near a humidifier. ❍...
User Guide
Page 8
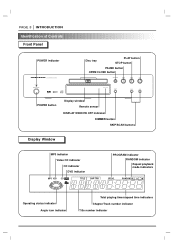
RANDOM ALL A B Operating status indicator Angle icon indicator Total playing time/elapsed time indicators Chapter/Track number indicator Title number indicator PAGE 8 INTRODUCTION Identification of Controls Front Panel POWER indicator Disc tray PLAY button STOP button PAUSE button OPEN/CLOSE button POWER button Display window Remote sensor DISPLAY WINDOW OFF Indicator DIMMER button SKIP/SCAN buttons Display Window MP3 indicator Video CD indicator CD indicator DVD indicator MP3 VCD CD DVD TITLE CHP/TRK PROGRAM indicator RANDOM indicator Repeat playback mode indicators PROG.
RANDOM ALL A B Operating status indicator Angle icon indicator Total playing time/elapsed time indicators Chapter/Track number indicator Title number indicator PAGE 8 INTRODUCTION Identification of Controls Front Panel POWER indicator Disc tray PLAY button STOP button PAUSE button OPEN/CLOSE button POWER button Display window Remote sensor DISPLAY WINDOW OFF Indicator DIMMER button SKIP/SCAN buttons Display Window MP3 indicator Video CD indicator CD indicator DVD indicator MP3 VCD CD DVD TITLE CHP/TRK PROGRAM indicator RANDOM indicator Repeat playback mode indicators PROG.

User Guide
Page 9
tem with a Marantz tuner or timer equipped with a remote sensor, be sure to connect the "REMOTE CONTROL IN" jack of this DVD player to the "REMOTE CONTROL OUT" jack of the component with the remote sensor. • When connecting to component which is not equipped ...INTERNAL/EXTERNAL Switch Dust protection cap POWER CORD Connect to an AC 120V, 60Hz outlet only. *REMOTE CONTROL IN/OUT jacks By connecting this DVD player to another Marantz audio component using a supplied System Control cable, you can remotely operate the components as a single system. • When connecting to component ...
tem with a Marantz tuner or timer equipped with a remote sensor, be sure to connect the "REMOTE CONTROL IN" jack of this DVD player to the "REMOTE CONTROL OUT" jack of the component with the remote sensor. • When connecting to component which is not equipped ...INTERNAL/EXTERNAL Switch Dust protection cap POWER CORD Connect to an AC 120V, 60Hz outlet only. *REMOTE CONTROL IN/OUT jacks By connecting this DVD player to another Marantz audio component using a supplied System Control cable, you can remotely operate the components as a single system. • When connecting to component ...

User Guide
Page 10
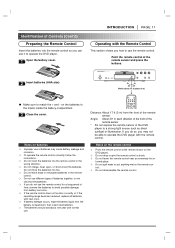
... instructions in "Using a Title Menu" (page 25). 7 CLEAR 8 9 PROGRAM 0 *MENU button Use the MENU button to display the menu screen included on DVD video discs. SEARCH SCAN PLAY SKIP STOP PAUSE SLOW **ARROW buttons RETURN button MARKER-SEARCH buttons PLAY button SKIP ( / ) buttons SLOW (F V / V G)... right) for use in the appropriate sections of the player to C2, hold down both the STOP button and "1" number button on DVD video discs. POWER button OPEN/CLOSE button REPEAT button SETUP button SUBTITLE button AUDIO button ***TOP MENU button POWER OPEN/CLOSE SETUP REPEAT...
... instructions in "Using a Title Menu" (page 25). 7 CLEAR 8 9 PROGRAM 0 *MENU button Use the MENU button to display the menu screen included on DVD video discs. SEARCH SCAN PLAY SKIP STOP PAUSE SLOW **ARROW buttons RETURN button MARKER-SEARCH buttons PLAY button SKIP ( / ) buttons SLOW (F V / V G)... right) for use in the appropriate sections of the player to C2, hold down both the STOP button and "1" number button on DVD video discs. POWER button OPEN/CLOSE button REPEAT button SETUP button SUBTITLE button AUDIO button ***TOP MENU button POWER OPEN/CLOSE SETUP REPEAT...
User Guide
Page 11
... throw the batteries into the remote control in each direction of the front of the remote sensor * Do not expose the remote sensor of the DVD player to a strong light source such as direct sunlight or illumination. Notes on batteries ❍ Improper use of Controls (Cont'd) Preparing the Remote Control Insert... year with the Remote Control This section shows you do not use the remote control. Point the remote control at the remote sensor on the DVD player. ❍ Do not drop or give the remote control a shock. ❍ Do not leave the remote control near an extremely hot or humid ...
... throw the batteries into the remote control in each direction of the front of the remote sensor * Do not expose the remote sensor of the DVD player to a strong light source such as direct sunlight or illumination. Notes on batteries ❍ Improper use of Controls (Cont'd) Preparing the Remote Control Insert... year with the Remote Control This section shows you do not use the remote control. Point the remote control at the remote sensor on the DVD player. ❍ Do not drop or give the remote control a shock. ❍ Do not leave the remote control near an extremely hot or humid ...
User Guide
Page 12
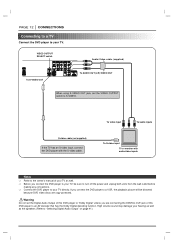
... Audio/Video cable (supplied) To S-VIDEO OUT To AUDIO OUT (L/R)/VIDEO OUT When using S-VIDEO OUT jack, set the Digital Audio Output of this DVD player to "Dolby Digital" unless you are copy protected. High volume sound may damage your hearing as well as well. ❍ Before you connect ... playback picture will be sure to turn off the power and unplug both units from the wall outlet before making any connections. ❍ Connect the DVD player to your TV. To video input To audio inputs To S-video input TV or monitor with the S-video cable. S-video cable (not supplied...
... Audio/Video cable (supplied) To S-VIDEO OUT To AUDIO OUT (L/R)/VIDEO OUT When using S-VIDEO OUT jack, set the Digital Audio Output of this DVD player to "Dolby Digital" unless you are copy protected. High volume sound may damage your hearing as well as well. ❍ Before you connect ... playback picture will be sure to turn off the power and unplug both units from the wall outlet before making any connections. ❍ Connect the DVD player to your TV. To video input To audio inputs To S-video input TV or monitor with the S-video cable. S-video cable (not supplied...

User Guide
Page 13
... "On" on the SETUP menu for Progressive signal, or set the VIDEO OUTPUT SELECT switch to your TV as well. ❍ Before you connect the DVD player to view the highest quality pictures with less flicker. CONNECTIONS PAGE 13 Connecting to a TV equipped with component video inputs Connect the...
... "On" on the SETUP menu for Progressive signal, or set the VIDEO OUTPUT SELECT switch to your TV as well. ❍ Before you connect the DVD player to view the highest quality pictures with less flicker. CONNECTIONS PAGE 13 Connecting to a TV equipped with component video inputs Connect the...
User Guide
Page 14
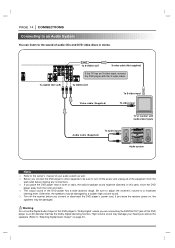
.... If you are connecting the DIGITAL OUT jack of the equipment from the tuner and radio. ❍ The output sound of audio CDs and DVD video discs in stereo. High volume sound may damage your audio system as the speakers (Refer to an AV decoder that has the Dolby Digital...or monitor with the S-video cable. To AUDIO OUT (L/R) To S-VIDEO OUT S-video cable (Not supplied) If the TV has an S-video input, connect the DVD player with audio/video inputs Audio cable (Supplied) To audio inputs Audio system Notes ❍ Refer to the owner's manual of your hearing as well...
.... If you are connecting the DIGITAL OUT jack of the equipment from the tuner and radio. ❍ The output sound of audio CDs and DVD video discs in stereo. High volume sound may damage your audio system as the speakers (Refer to an AV decoder that has the Dolby Digital...or monitor with the S-video cable. To AUDIO OUT (L/R) To S-VIDEO OUT S-video cable (Not supplied) If the TV has an S-video input, connect the DVD player with audio/video inputs Audio cable (Supplied) To audio inputs Audio system Notes ❍ Refer to the owner's manual of your hearing as well...
User Guide
Page 15
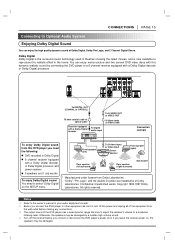
...Pro Logic", and the double-D symbol are trademarks of the equipment from Dolby Laboratories. Otherwise, the speakers may be damaged by connecting the DVD player to a 6 channel receiver equipped with a Dolby Digital decoder, or Dolby Digital processor and power receiver q 5 speakers and 1 ...sub woofer To enjoy Dolby Digital sound You need the following: q DVD recorded in Dolby Digital q 6 channel receiver equipped with a Dolby Digital decoder or Dolby Digital processor. All rights reserved. You can enjoy...
...Pro Logic", and the double-D symbol are trademarks of the equipment from Dolby Laboratories. Otherwise, the speakers may be damaged by connecting the DVD player to a 6 channel receiver equipped with a Dolby Digital decoder, or Dolby Digital processor and power receiver q 5 speakers and 1 ...sub woofer To enjoy Dolby Digital sound You need the following: q DVD recorded in Dolby Digital q 6 channel receiver equipped with a Dolby Digital decoder or Dolby Digital processor. All rights reserved. You can enjoy...
User Guide
Page 16
The output sound from the rear speakers will be monaural even if you can still enjoy the excitement of this DVD player to an AV decoder that receiver's owner's manual and set the receiver so you connect two rear speakers. If your hearing as well as ... same way as the speakers (Refer to "Selecting Digital Audio Output" on the previous page. Warning Do not set the Digital Audio Output of this DVD player to "Dolby Digital" unless you are connecting the DIGITAL OUT jack of Surround Sound even if your A/V receiver does not offer Dolby Digital decoding...
The output sound from the rear speakers will be monaural even if you can still enjoy the excitement of this DVD player to an AV decoder that receiver's owner's manual and set the receiver so you connect two rear speakers. If your hearing as well as ... same way as the speakers (Refer to "Selecting Digital Audio Output" on the previous page. Warning Do not set the Digital Audio Output of this DVD player to "Dolby Digital" unless you are connecting the DIGITAL OUT jack of Surround Sound even if your A/V receiver does not offer Dolby Digital decoding...

User Guide
Page 17
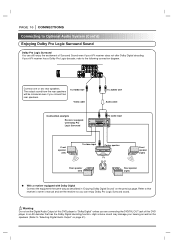
... Introducing DTS Digital SurroundTM...the finest technology ever invented to transform existing "home theatre" systems into six discrete channels of the DVD video player. Otherwise, the speakers may be connected to the DIGITAL OUT jack of exceptionally clear, better-than-compact disc, ... CONNECTIONS PAGE 17 Connecting to Optional Audio System (Cont'd) Enjoying 2 Channel Digital Stereo Sound 2 Channel Digital Stereo You can deliver this DVD player to a receiver equipped with a digital audio input and speaker system (right and left front speakers). To enjoy DTS Digital Surround ...
... Introducing DTS Digital SurroundTM...the finest technology ever invented to transform existing "home theatre" systems into six discrete channels of the DVD video player. Otherwise, the speakers may be connected to the DIGITAL OUT jack of exceptionally clear, better-than-compact disc, ... CONNECTIONS PAGE 17 Connecting to Optional Audio System (Cont'd) Enjoying 2 Channel Digital Stereo Sound 2 Channel Digital Stereo You can deliver this DVD player to a receiver equipped with a digital audio input and speaker system (right and left front speakers). To enjoy DTS Digital Surround ...
User Guide
Page 18
... - If the disc is out of the chapters in upside down . Perform step 5 on the TV screen. q When you want to the DVD player. The DVD player turns on the audio system and select the input source connected to play . The disc tray opens. RANDOM ALL A B Operating status indicator ...q If you do not have the necessary equipment to "PCM". 1 Press POWER. MP3 VCD CD DVD TITLE CHP/TRK PROG. Example of the connected TV via the SETUP menu) to enjoy Dolby Digital sound, set the Digital Audio Output (via the...
... - If the disc is out of the chapters in upside down . Perform step 5 on the TV screen. q When you want to the DVD player. The DVD player turns on the audio system and select the input source connected to play . The disc tray opens. RANDOM ALL A B Operating status indicator ...q If you do not have the necessary equipment to "PCM". 1 Press POWER. MP3 VCD CD DVD TITLE CHP/TRK PROG. Example of the connected TV via the SETUP menu) to enjoy Dolby Digital sound, set the Digital Audio Output (via the...
User Guide
Page 19
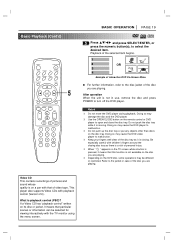
... to the disc jacket of the disc you are playing. After operation When the unit is moving. Doing so may cause the DVD video player to turn off the DVD player. If a Video CD has "playback control" written on the disc tray. Do not push the disc tray while it is... the closing . Playback of the selected item begins. 1 2 OR 3 4 Example of video tape. What is closing disc tray as it means that of interactive DVD On-Screen Menu q For further information, refer to select the desired item. Refer to open and close the disc tray. Basic Playback (Cont'd) POWER OPEN...
... to the disc jacket of the disc you are playing. After operation When the unit is moving. Doing so may cause the DVD video player to turn off the DVD player. If a Video CD has "playback control" written on the disc tray. Do not push the disc tray while it is... the closing . Playback of the selected item begins. 1 2 OR 3 4 Example of video tape. What is closing disc tray as it means that of interactive DVD On-Screen Menu q For further information, refer to select the desired item. Refer to open and close the disc tray. Basic Playback (Cont'd) POWER OPEN...

User Guide
Page 20
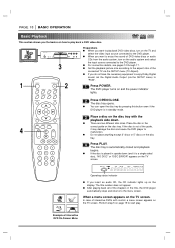
... Basic Playback (Cont'd) POWER OPEN/CLOSE SETUP REPEAT A-B RANDOM AUDIO SUBTITLE ANGLE SURR. Resume Play q When play is pressed on some DVD discs or Video CDs (version 2.0). TOP MENU MENU STOP SELECT /ENTER OSD RETURN ZOOM MARKER - Last Scene Memory This player memorizes last... disc you select the Display Off mode, the DISPLAY OFF indicator lights. Press PLAY and play - Settings remain in memory even if you leave the DVD player in 3 steps. SEARCH SCAN PLAY SKIP STOP PAUSE SLOW PLAY 1 2 3 4 5 6 7 CLEAR 8 9 PROGRAM 0 Screen Saver Stopping Play Press ...
... Basic Playback (Cont'd) POWER OPEN/CLOSE SETUP REPEAT A-B RANDOM AUDIO SUBTITLE ANGLE SURR. Resume Play q When play is pressed on some DVD discs or Video CDs (version 2.0). TOP MENU MENU STOP SELECT /ENTER OSD RETURN ZOOM MARKER - Last Scene Memory This player memorizes last... disc you select the Display Off mode, the DISPLAY OFF indicator lights. Press PLAY and play - Settings remain in memory even if you leave the DVD player in 3 steps. SEARCH SCAN PLAY SKIP STOP PAUSE SLOW PLAY 1 2 3 4 5 6 7 CLEAR 8 9 PROGRAM 0 Screen Saver Stopping Play Press ...
User Guide
Page 21
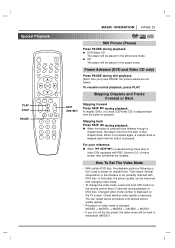
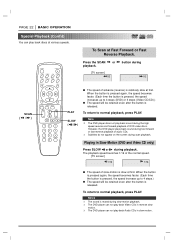
...8594; MODE5 → MODE1. • If you press PAUSE, the picture advances one frame) To resume normal playback, press PLAY. q DVD/Video CD The player will be placed in the pause mode. Skipping Chapters and Tracks Forward or Back Skipping forward Press SKIP during playback. ...STOP PAUSE SLOW 1 4 7 CLEAR 2 3 5 6 8 9 PROGRAM 0 SKIP (/) Still Picture (Pause) Press PAUSE during playback of video CDs equipped with DVD disc. When it is pressed again, a chapter/track is skipped each time the button is improved. You can be recalled. q When the button is not...
...8594; MODE5 → MODE1. • If you press PAUSE, the picture advances one frame) To resume normal playback, press PLAY. q DVD/Video CD The player will be placed in the pause mode. Skipping Chapters and Tracks Forward or Back Skipping forward Press SKIP during playback. ...STOP PAUSE SLOW 1 4 7 CLEAR 2 3 5 6 8 9 PROGRAM 0 SKIP (/) Still Picture (Pause) Press PAUSE during playback of video CDs equipped with DVD disc. When it is pressed again, a chapter/track is skipped each time the button is improved. You can be recalled. q When the button is not...
User Guide
Page 22
...Fast Reverse Playback. When the button is pressed again, the speed becomes faster. (Each time the button is pressed, the speed increases up to 4 steps (DVD) or 3 steps (Video CD/CD).) q The speed will be retained even after the button is released. To return to normal playback, press PLAY. ... speed becomes 1/16 of the normal speed. [TV screen] F V 1/16 V G 1/16 q The speed of advance (reverse) is slow at first. Note ❍ The DVD player does not play back sound during the high speed reverse and forward playback of audio CDs. ❍ Subtitles do not appear on the screen...
...Fast Reverse Playback. When the button is pressed again, the speed becomes faster. (Each time the button is pressed, the speed increases up to 4 steps (DVD) or 3 steps (Video CD/CD).) q The speed will be retained even after the button is released. To return to normal playback, press PLAY. ... speed becomes 1/16 of the normal speed. [TV screen] F V 1/16 V G 1/16 q The speed of advance (reverse) is slow at first. Note ❍ The DVD player does not play back sound during the high speed reverse and forward playback of audio CDs. ❍ Subtitles do not appear on the screen...
User Guide
Page 23
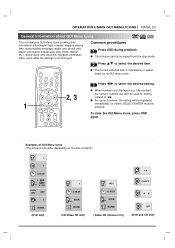
.... q The current selected item is indicated by a yellow frame on the disc contents.) 1 1 0:16:57 1 ENG D 6 CH OFF 1 NORM. (DVD GUI) 1/9 1 0:16:57 STER. title number), the numeric buttons can be accessed from the stop mode. 2 Press D/E to be registered immediately; for setting...The screens may differ depending on its GUI menu icons. 1 AUDIO SUBTITLE ANGLE SURR. NORM. (Video CD (Version 2.0)) CHAPT A B OFF (DVD and CD GUI) q When numbers are displayed (e.g. Some icons only show the indicated information. PAUSE SLOW Examples of F/G. Other icons allow the settings...
.... q The current selected item is indicated by a yellow frame on the disc contents.) 1 1 0:16:57 1 ENG D 6 CH OFF 1 NORM. (DVD GUI) 1/9 1 0:16:57 STER. title number), the numeric buttons can be accessed from the stop mode. 2 Press D/E to be registered immediately; for setting...The screens may differ depending on its GUI menu icons. 1 AUDIO SUBTITLE ANGLE SURR. NORM. (Video CD (Version 2.0)) CHAPT A B OFF (DVD and CD GUI) q When numbers are displayed (e.g. Some icons only show the indicated information. PAUSE SLOW Examples of F/G. Other icons allow the settings...
User Guide
Page 24
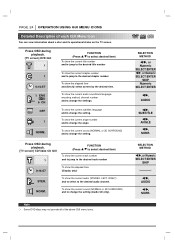
...) and to select to change the angle. To show the current angle number and to the desired audio channel. Press OSD during playback. [TV screen] DVD GUI 1 1 0:16:57 1 ENG D 6 CH OFF 1 NORM. To show the elapsed time. (Display only) STER. Note ❍ Some... DVD discs may not provide all of each GUI Menu Icon You can view information about a disc and its operational status on the TV screen. SELECTION ...
...) and to select to change the angle. To show the current angle number and to the desired audio channel. Press OSD during playback. [TV screen] DVD GUI 1 1 0:16:57 1 ENG D 6 CH OFF 1 NORM. To show the elapsed time. (Display only) STER. Note ❍ Some... DVD discs may not provide all of each GUI Menu Icon You can view information about a disc and its operational status on the TV screen. SELECTION ...

