

DV7001 User Manual
Page 5
...Video regions 9 General information 9 MP3 compatibility information 9 WMA compatibility information 9 JPEG compatibility information 9 DivX compatibility information 9 2 Connecting Up Easy setup 10 Home theater video connections 11 Home theater audio connections 12 3 Controls & Displays Front panel 13 Remote control 14 4 Getting Started Playing ... 31 Playing a DivX disc 32 Using the Setup Menu 33 6 DVD Setup Menu Using the FL menu 34 Setting up the GENERAL SETUP page 36 Setting up the AUDIO SETUP page 39 Setting up the VIDEO SETUP page 44 Setting up the PREFERENCE page 50...
...Video regions 9 General information 9 MP3 compatibility information 9 WMA compatibility information 9 JPEG compatibility information 9 DivX compatibility information 9 2 Connecting Up Easy setup 10 Home theater video connections 11 Home theater audio connections 12 3 Controls & Displays Front panel 13 Remote control 14 4 Getting Started Playing ... 31 Playing a DivX disc 32 Using the Setup Menu 33 6 DVD Setup Menu Using the FL menu 34 Setting up the GENERAL SETUP page 36 Setting up the AUDIO SETUP page 39 Setting up the VIDEO SETUP page 44 Setting up the PREFERENCE page 50...

DV7001 User Manual
Page 10
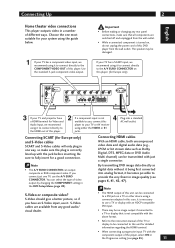
... TV, select 4:3 LETTER BOX or 4:3 PAN SCAN in a system with a Marantz receiver equipped with a remote sensor, be progressive. • Remote switch When using the supplied audio/video cables. 2 Connecting Up Easy setup This easy setup is the minimum set this DVD player from the wall outlet. Both sound and... System copy protection there are not be sure to connect the component to the REMOTE CONTROL OUT jack of this DVD player to another Marantz audio component using a pen with a sharp tip etc. • Flasher Input This is used when controlling components from different rooms with...
... TV, select 4:3 LETTER BOX or 4:3 PAN SCAN in a system with a Marantz receiver equipped with a remote sensor, be progressive. • Remote switch When using the supplied audio/video cables. 2 Connecting Up Easy setup This easy setup is the minimum set this DVD player from the wall outlet. Both sound and... System copy protection there are not be sure to connect the component to the REMOTE CONTROL OUT jack of this DVD player to another Marantz audio component using a pen with a sharp tip etc. • Flasher Input This is used when controlling components from different rooms with...
DV7001 User Manual
Page 11
... one way, so make sure that is correctly lined up with the component output of video output by changing the COMPONENT setting in the DVD Setup Menu (page 49). S-Video or composite video? S-Video cables are switched off and unplugged from the wall outlet. • While a connected component is turned on...
... one way, so make sure that is correctly lined up with the component output of video output by changing the COMPONENT setting in the DVD Setup Menu (page 49). S-Video or composite video? S-Video cables are switched off and unplugged from the wall outlet. • While a connected component is turned on...
DV7001 User Manual
Page 14
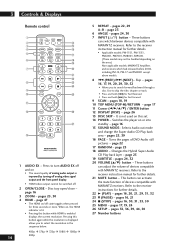
...page 25 19 SUBTITLE - pages 25, 30 4 HDMI - pages 24, 30 7 INPUT (%/fi) button - These buttons can activate the mute function of devices compatible with MARANTZ receivers. Turns the pages of analog audio output is improved by turning off analog video signal output and the front panel display. • HDMI video... control 1 2 ! 3 @ 4 # 5 $ 6 % ^ 7 & * ( 8 ) _ 9 0 + - = ¡ ™ ~ 1 AUDIO EX - Selects Audio out mode and change the Super Audio CD Play back area - Skip - pages 17, 19, 24 26 SETUP - Press to search forward/backward through a disc.
...page 25 19 SUBTITLE - pages 25, 30 4 HDMI - pages 24, 30 7 INPUT (%/fi) button - These buttons can activate the mute function of devices compatible with MARANTZ receivers. Turns the pages of analog audio output is improved by turning off analog video signal output and the front panel display. • HDMI video... control 1 2 ! 3 @ 4 # 5 $ 6 % ^ 7 & * ( 8 ) _ 9 0 + - = ¡ ™ ~ 1 AUDIO EX - Selects Audio out mode and change the Super Audio CD Play back area - Skip - pages 17, 19, 24 26 SETUP - Press to search forward/backward through a disc.

DV7001 User Manual
Page 15
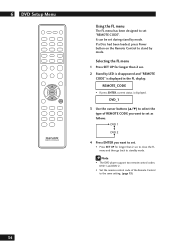
English Controls & Displays 3 Note • HDMI ON is set when the unit is shipped from the factory. • Set HDMI under the DVD Setup Menu to use HDMI functions (see pages 41, 42, 47). • This remote control supports two remote control codes: DVD1 and DVD2. • When the ...
English Controls & Displays 3 Note • HDMI ON is set when the unit is shipped from the factory. • Set HDMI under the DVD Setup Menu to use HDMI functions (see pages 41, 42, 47). • This remote control supports two remote control codes: DVD1 and DVD2. • When the ...

DV7001 User Manual
Page 29
... an MP3/DivX/JPEG/ Windows Media™ Audio disc This DVD system can ; • Press 4/¢ to playback another track/file in the Preference Setup Page to WITHOUT MENU. English Playing Discs 5 1 Insert a disc. • The disc reading time may exceed 30 seconds due to the complexity of the directory...
... an MP3/DivX/JPEG/ Windows Media™ Audio disc This DVD system can ; • Press 4/¢ to playback another track/file in the Preference Setup Page to WITHOUT MENU. English Playing Discs 5 1 Insert a disc. • The disc reading time may exceed 30 seconds due to the complexity of the directory...

DV7001 User Manual
Page 33
...the remote control to access the different features. 3 Press the ENTER button as many times as necessary to all the player's settings. To make the setup screen disappear after the power has been turned off until the settings are changed , the settings will be saved and remain the same even after... setting up, press the SETUP button again. Note • The language options shown in the on-screen display illustrations on the remote control. Note • Depending on the disc, ...
...the remote control to access the different features. 3 Press the ENTER button as many times as necessary to all the player's settings. To make the setup screen disappear after the power has been turned off until the settings are changed , the settings will be saved and remain the same even after... setting up, press the SETUP button again. Note • The language options shown in the on-screen display illustrations on the remote control. Note • Depending on the disc, ...
DV7001 User Manual
Page 34
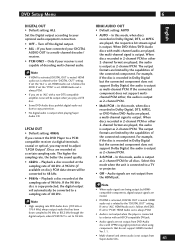
... UP for longer than 2 sec. 2 Stand by LED is disappeared and "REMOTE CODE" is displayed. DVD 1 DVD 2 4 Press ENTER you want to standby mode. 6 DVD Setup Menu Using the FL menu The FL menu has been designed to the same setting. (page 15) 34
... UP for longer than 2 sec. 2 Stand by LED is disappeared and "REMOTE CODE" is displayed. DVD 1 DVD 2 4 Press ENTER you want to standby mode. 6 DVD Setup Menu Using the FL menu The FL menu has been designed to the same setting. (page 15) 34

DV7001 User Manual
Page 35
... 36 DIVX(R) VOD CODE 37 DISC LOCK * LOCK UNLOCK 37 GENERAL DISPLAY DIM 100% 70% 40% 37 SETUP PROGRAM * INPUT MENU 37 SCREEN SAVER ON OFF 38 SLEEP 15 MINS 30 MINS 45 MINS 60 MINS OFF...SURROUND 5.1 CHANNEL DIGITAL OUT OFF ALL PCM LPCM OUT 48KHZ 96KHZ AUTO MULTI PCM 2CH PCM OFF SPEAKER SETUP PAGE FRONT L/R LARGE SMALL CENTER OFF LARGE SMALL REAR LS/RS OFF LARGE SMALL LFE(SUBWOOFER) ON ...88.2KHZ(X2) 176.4KHZ(X4) ON OFF Page 39 41 41 41 42 43 43 43 Page VIDEO SETUP TV SYSTEM PAL NTSC MULTI 44 TV ASPECT 4:3 PAN SCAN 4:3 LETTER BOX 16:9 WIDE 45 PROGRESSIVE OFF ...
... 36 DIVX(R) VOD CODE 37 DISC LOCK * LOCK UNLOCK 37 GENERAL DISPLAY DIM 100% 70% 40% 37 SETUP PROGRAM * INPUT MENU 37 SCREEN SAVER ON OFF 38 SLEEP 15 MINS 30 MINS 45 MINS 60 MINS OFF...SURROUND 5.1 CHANNEL DIGITAL OUT OFF ALL PCM LPCM OUT 48KHZ 96KHZ AUTO MULTI PCM 2CH PCM OFF SPEAKER SETUP PAGE FRONT L/R LARGE SMALL CENTER OFF LARGE SMALL REAR LS/RS OFF LARGE SMALL LFE(SUBWOOFER) ON ...88.2KHZ(X2) 176.4KHZ(X4) ON OFF Page 39 41 41 41 42 43 43 43 Page VIDEO SETUP TV SYSTEM PAL NTSC MULTI 44 TV ASPECT 4:3 PAN SCAN 4:3 LETTER BOX 16:9 WIDE 45 PROGRESSIVE OFF ...

DV7001 User Manual
Page 36
...SCREEN SAVER SLEEP AUTO STANDBY Note • Press 2 to go back to playback the bonus group. 6 DVD Setup Menu 3 Use the cursor buttons (5/∞) to exit the menu. Press SETUP to select the desired item, then press the cursor (3) or ENTER button. In this DVD system will start ...is to the DVD disc language. OSD LANGUAGE The language options are accessible by a four-digit password. Setting up the GENERAL SETUP page 1 Press the SETUP button. 2 Select GENERAL SETUP PAGE using the numeric keypad (0-9), then press ENTER. ⁄ Set will remain as you have set it, regardless of the...
...SCREEN SAVER SLEEP AUTO STANDBY Note • Press 2 to go back to playback the bonus group. 6 DVD Setup Menu 3 Use the cursor buttons (5/∞) to exit the menu. Press SETUP to select the desired item, then press the cursor (3) or ENTER button. In this DVD system will start ...is to the DVD disc language. OSD LANGUAGE The language options are accessible by a four-digit password. Setting up the GENERAL SETUP page 1 Press the SETUP button. 2 Select GENERAL SETUP PAGE using the numeric keypad (0-9), then press ENTER. ⁄ Set will remain as you have set it, regardless of the...

DV7001 User Manual
Page 37
.... Use the registration code to a locked disc requires a six-digit password. You can only be played back on this DVD system. English DVD Setup Menu 6 DivX(R) VOD CODE MARANTZ provides you with the DivX® VOD (Video On Demand) registration code that allows you can program tracks on the CD layer. •...
.... Use the registration code to a locked disc requires a six-digit password. You can only be played back on this DVD system. English DVD Setup Menu 6 DivX(R) VOD CODE MARANTZ provides you with the DivX® VOD (Video On Demand) registration code that allows you can program tracks on the CD layer. •...

DV7001 User Manual
Page 38
... automatically sets the DVD player in the Stop mode for too long. • ON - You can select from 15, 30, 45, and 60 minutes. 6 DVD Setup Menu SCREEN SAVER • Default setting: ON The screen saver prevents damage to the TV screen by avoiding exposure to confirm your selection.
... automatically sets the DVD player in the Stop mode for too long. • ON - You can select from 15, 30, 45, and 60 minutes. 6 DVD Setup Menu SCREEN SAVER • Default setting: ON The screen saver prevents damage to the TV screen by avoiding exposure to confirm your selection.

DV7001 User Manual
Page 39
... then press the ENTER button. In this to exit the menu. AUDIO SETUP PAGE AUDIO OUT DIGITAL AUDIO HDMI AUDIO OUT CD UPSAMPLING AUDIO DRC Setting up the AUDIO SETUP page 1 Press the SETUP button. 2 Select AUDIO SETUP PAGE using a multichannel audio/(video) receiver with Super Audio CD discs. Note...; Press 2 to go back to stereo, which only delivers sound from the two front speakers and a subwoofer. • VIRTUAL SURR - Press SETUP to 5.1 Channel; AUDIO OUT If you connected only the stereo outputs, set this mode, the player performs DTS decoding or Dolby Digital 5.1-channel decoding...
... then press the ENTER button. In this to exit the menu. AUDIO SETUP PAGE AUDIO OUT DIGITAL AUDIO HDMI AUDIO OUT CD UPSAMPLING AUDIO DRC Setting up the AUDIO SETUP page 1 Press the SETUP button. 2 Select AUDIO SETUP PAGE using a multichannel audio/(video) receiver with Super Audio CD discs. Note...; Press 2 to go back to stereo, which only delivers sound from the two front speakers and a subwoofer. • VIRTUAL SURR - Press SETUP to 5.1 Channel; AUDIO OUT If you connected only the stereo outputs, set this mode, the player performs DTS decoding or Dolby Digital 5.1-channel decoding...

DV7001 User Manual
Page 40
... II is allowed on DTS, DVD-Audio and Super Audio CD audio track. • LFE (Subwoofer) will be as shown in the following table. 6 DVD Setup Menu About source audio output When the source output mode has been switched among 2CH, Virtual Surround and 5.1 CH mode setting using the Audio Out...
... II is allowed on DTS, DVD-Audio and Super Audio CD audio track. • LFE (Subwoofer) will be as shown in the following table. 6 DVD Setup Menu About source audio output When the source output mode has been switched among 2CH, Virtual Surround and 5.1 CH mode setting using the Audio Out...
DV7001 User Manual
Page 41
DVD Setup Menu DIGITAL OUT • Default setting: ALL Set the Digital output according to a multi-channel decoder/ receiver. • PCM ONLY - If you set , HDMI Audio ...
DVD Setup Menu DIGITAL OUT • Default setting: ALL Set the Digital output according to a multi-channel decoder/ receiver. • PCM ONLY - If you set , HDMI Audio ...

DV7001 User Manual
Page 42
... Speaker settings are connected. • LARGE - LFE (SUBWOOFER) • ON - SPEAKER LEVEL Volume level setting for multi-channel audio output. SPEAKERS LEVEL SETUP FRONT LEFT FRONT RIGHT CENTER LFE REAR LEFT REAR RIGHT 0dB 0dB 0dB 0dB 0dB 0dB Note • When set to 0 dB, the Audio Out...relevant channel falls. These adjustments let you optimize the sound of priority in Auto mode is: Bit Stream, Multi PCM, 2ch PCM. 6 DVD Setup Menu HDMI Audio Output Auto formats Auto*1 HDMI Setting (Audio) Multi PCM*2 2 ch PCM Off Dolby Digital Dolby Digital Multi channel PCM 2...
... Speaker settings are connected. • LARGE - LFE (SUBWOOFER) • ON - SPEAKER LEVEL Volume level setting for multi-channel audio output. SPEAKERS LEVEL SETUP FRONT LEFT FRONT RIGHT CENTER LFE REAR LEFT REAR RIGHT 0dB 0dB 0dB 0dB 0dB 0dB Note • When set to 0 dB, the Audio Out...relevant channel falls. These adjustments let you optimize the sound of priority in Auto mode is: Bit Stream, Multi PCM, 2ch PCM. 6 DVD Setup Menu HDMI Audio Output Auto formats Auto*1 HDMI Setting (Audio) Multi PCM*2 2 ch PCM Off Dolby Digital Dolby Digital Multi channel PCM 2...

DV7001 User Manual
Page 43
...a higher sampling rate using sophisticated digital signal processing for individual speakers (1.0 MS to 9.0 MS). Turns off AUDIO DRC mode. English DVD Setup Menu SPEAKER DISTANCE Delay time settings in relation to the listening position/distance for better sound quality. Select this to enjoy the sound with ...Dolby Digital Audio sources. 43 Select this to convert the sampling rate of CDs to an audible level. SPEAKERS DISTANCE SETUP FRONT LEFT FRONT RIGHT CENTER LFE REAR LEFT REAR RIGHT 3.0M 3.0M 3.0M 3.0M 3.0M 3.0M Note • Use a longer ...
...a higher sampling rate using sophisticated digital signal processing for individual speakers (1.0 MS to 9.0 MS). Turns off AUDIO DRC mode. English DVD Setup Menu SPEAKER DISTANCE Delay time settings in relation to the listening position/distance for better sound quality. Select this to enjoy the sound with ...Dolby Digital Audio sources. 43 Select this to convert the sampling rate of CDs to an audible level. SPEAKERS DISTANCE SETUP FRONT LEFT FRONT RIGHT CENTER LFE REAR LEFT REAR RIGHT 3.0M 3.0M 3.0M 3.0M 3.0M 3.0M Note • Use a longer ...
DV7001 User Manual
Page 44
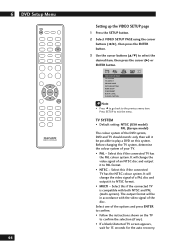
...format. • MULTI - It will it to select the desired item, then press the cursor (3) or ENTER button. VIDEO SETUP PAGE TV SYSTEM TV ASPECT PROGRESSIVE PICTURE SETTING HDMI SETUP COMPONENT BLACK LEVEL CLOSED CAPTION Note • Press 2 to go back to exit the menu. 6 DVD... Setup Menu 44 Setting up the VIDEO SETUP page 1 Press the SETUP button. 2 Select VIDEO SETUP PAGE using the cursor buttons (2/3), then press the ENTER button. 3 Use the cursor buttons (5/∞) to PAL format...
...format. • MULTI - It will it to select the desired item, then press the cursor (3) or ENTER button. VIDEO SETUP PAGE TV SYSTEM TV ASPECT PROGRESSIVE PICTURE SETTING HDMI SETUP COMPONENT BLACK LEVEL CLOSED CAPTION Note • Press 2 to go back to exit the menu. 6 DVD... Setup Menu 44 Setting up the VIDEO SETUP page 1 Press the SETUP button. 2 Select VIDEO SETUP PAGE using the cursor buttons (2/3), then press the ENTER button. 3 Use the cursor buttons (5/∞) to PAL format...

DV7001 User Manual
Page 45
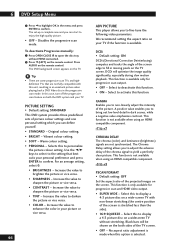
... NTSC Progressive PAL PAL Progressive PAL If progressive is "OFF", Video Output Format follow the TV SYSTEM with black bands on the disc. English DVD Setup Menu CHANGING PAL TO NTSC 1.ENSURE THAT YOUR TV SYSTEM SUPPORTS NTSC STANDARD. 2.IF THERE IS A DISTORTED PICTURE DISPLAYED ON THE TV.WAIT IS SECONDS...
... NTSC Progressive PAL PAL Progressive PAL If progressive is "OFF", Video Output Format follow the TV SYSTEM with black bands on the disc. English DVD Setup Menu CHANGING PAL TO NTSC 1.ENSURE THAT YOUR TV SYSTEM SUPPORTS NTSC STANDARD. 2.IF THERE IS A DISTORTED PICTURE DISPLAYED ON THE TV.WAIT IS SECONDS...
DV7001 User Manual
Page 46
... scan and HDMI video output. • SUPER WIDE - DCDi will be shown on a widescreen TV without HDMI connected. Ÿ Press 2 (LEFT) on the TV. 6 DVD Setup Menu ! The set-up is made when this to +3 PSCAN FORMAT • Default setting: OFF Set the aspect ratio of the screen is selected. This...
... scan and HDMI video output. • SUPER WIDE - DCDi will be shown on a widescreen TV without HDMI connected. Ÿ Press 2 (LEFT) on the TV. 6 DVD Setup Menu ! The set-up is made when this to +3 PSCAN FORMAT • Default setting: OFF Set the aspect ratio of the screen is selected. This...