
Owner s Manual In English
Page 1
Connections Playback Settings Tips Appendix AV Surround Receiver SR6011 Front panel Display Rear panel 1 Remote Owner's Manual Index Contents .
Connections Playback Settings Tips Appendix AV Surround Receiver SR6011 Front panel Display Rear panel 1 Remote Owner's Manual Index Contents .
Owner s Manual In English
Page 5
... Audyssey® Setup 204 173 Procedure for speaker settings (Audyssey® Setup) 206 174 Error messages 212 177 Retrieving Audyssey® Setup settings 214 178 Manual Setup 215 179 Amp Assign 215 180 Speaker Config. 220 183 Distances 224 185 Levels 226 185 Crossovers 227 187 Bass 228 193 Front Speaker...
... Audyssey® Setup 204 173 Procedure for speaker settings (Audyssey® Setup) 206 174 Error messages 212 177 Retrieving Audyssey® Setup settings 214 178 Manual Setup 215 179 Amp Assign 215 180 Speaker Config. 220 183 Distances 224 185 Levels 226 185 Crossovers 227 187 Bass 228 193 Front Speaker...

Owner s Manual In English
Page 7
... calibration microphone stand Remote control unit R03/AAA batteries External antennas for purchasing this Marantz product. Tips Appendix . To ensure proper operation, please read this manual, be sure to keep it for future reference. After reading this owner's manual carefully before using the product. Accessories Check that the following parts are supplied with...
... calibration microphone stand Remote control unit R03/AAA batteries External antennas for purchasing this Marantz product. Tips Appendix . To ensure proper operation, please read this manual, be sure to keep it for future reference. After reading this owner's manual carefully before using the product. Accessories Check that the following parts are supplied with...

Owner s Manual In English
Page 21
... clockwise until the antennas is in the standby mode. .. C Rotate the antenna upwards for more information about serial control of this unit. Consult the owner's manual of the home automation controller for best reception. Contents qw e r Connections Playback q A Bluetooth/wireless LAN antenna connectors Used to connect the included external antennas for...
... clockwise until the antennas is in the standby mode. .. C Rotate the antenna upwards for more information about serial control of this unit. Consult the owner's manual of the home automation controller for best reception. Contents qw e r Connections Playback q A Bluetooth/wireless LAN antenna connectors Used to connect the included external antennas for...

Owner s Manual In English
Page 98
...FM broadcast. FM: When listening to select "FM" or "AM", then press ENTER. The default setting is not good. You can also use the "Manual" mode or "Direct Tune" mode to an AM broadcast. 6 Press TUNE + or TUNE - This displays the reception band input screen. to select ... CH 1 FM 92.10MHz STEREO AUTO Now Playing Tune Preset OPTION Option G Display of "Auto" mode that automatically searches available broadcast stations and "Manual" mode that lets you cannot tune in using buttons to radio stations if the reception is "Auto". In "Auto" mode, you tune in to...
...FM broadcast. FM: When listening to select "FM" or "AM", then press ENTER. The default setting is not good. You can also use the "Manual" mode or "Direct Tune" mode to an AM broadcast. 6 Press TUNE + or TUNE - This displays the reception band input screen. to select ... CH 1 FM 92.10MHz STEREO AUTO Now Playing Tune Preset OPTION Option G Display of "Auto" mode that automatically searches available broadcast stations and "Manual" mode that lets you cannot tune in using buttons to radio stations if the reception is "Auto". In "Auto" mode, you tune in to...

Owner s Manual In English
Page 100
...you cannot tune in automatically with "Auto" mode, change the mode to "Manual" and tune in to a receivable radio station. Auto: Manual: Automatically search for tuning into FM and AM broadcasts. Settings Tips Appendix Tuning in manually. 1 Press OPTION when the input source is "Tuner". The option menu... Use ui to select "Tune Mode", then press ENTER. 3 Use o p to select "Auto Preset Memory", then press ENTER. 3 Press ENTER. Manually change the mode for and tune to stations and presetting them . 0 When presetting is completed, "Completed" is displayed for about 5 seconds and the ...
...you cannot tune in automatically with "Auto" mode, change the mode to "Manual" and tune in to a receivable radio station. Auto: Manual: Automatically search for tuning into FM and AM broadcasts. Settings Tips Appendix Tuning in manually. 1 Press OPTION when the input source is "Tuner". The option menu... Use ui to select "Tune Mode", then press ENTER. 3 Use o p to select "Auto Preset Memory", then press ENTER. 3 Press ENTER. Manually change the mode for and tune to stations and presetting them . 0 When presetting is completed, "Completed" is displayed for about 5 seconds and the ...

Owner s Manual In English
Page 110
... media stored in NAS Change settings on the PC. 2 Select "Media Sharing" in the "Library". 3 Click the "Share my media" check box, select "Marantz SR6011", and then click "Allow". 4 As you did in the drop-down list for "Media programs on this PC and remote connections...". 1 Start up Windows Media... Player 12 on the network. in the "Stream". 3 Select "Allowed" in the "Marantz SR6011" drop-down list. 4 Select "Allowed" in step 3, select the icon of your music server to access the NAS. To use as a media controller,...
... media stored in NAS Change settings on the PC. 2 Select "Media Sharing" in the "Library". 3 Click the "Share my media" check box, select "Marantz SR6011", and then click "Allow". 4 As you did in the drop-down list for "Media programs on this PC and remote connections...". 1 Start up Windows Media... Player 12 on the network. in the "Stream". 3 Select "Allowed" in the "Marantz SR6011" drop-down list. 4 Select "Allowed" in step 3, select the icon of your music server to access the NAS. To use as a media controller,...
Owner s Manual In English
Page 124
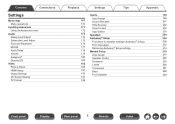
... this unit. Playing iTunes music with this unit ON. The music will stream to the same network as this unit. 0 For details, see your device's manual. 2 Play the song on your iPhone, iPod touch or iPad. ' is displayed on a Mac or Windows PC that is connected to this unit. (v p. 236) NOTE...
... this unit. Playing iTunes music with this unit ON. The music will stream to the same network as this unit. 0 For details, see your device's manual. 2 Play the song on your iPhone, iPod touch or iPad. ' is displayed on a Mac or Windows PC that is connected to this unit. (v p. 236) NOTE...

Owner s Manual In English
Page 136
... a theater room. A mode suited for most living room viewing environments. Contents Connections Playback Adjusting the picture quality for each input source. Adjusts the picture quality manually. 4 Press ENTER. 0 "Picture Mode" settings are stored for your viewing environment (Picture Mode) n Supported input sources : CBL/SAT / DVD / Blu-ray / Game / AUX1 / AUX2 / Media...
... a theater room. A mode suited for most living room viewing environments. Contents Connections Playback Adjusting the picture quality for each input source. Adjusts the picture quality manually. 4 Press ENTER. 0 "Picture Mode" settings are stored for your viewing environment (Picture Mode) n Supported input sources : CBL/SAT / DVD / Blu-ray / Game / AUX1 / AUX2 / Media...

Owner s Manual In English
Page 150
... not compatible with the HDMI control function. 0 When the HDMI ZONE2 function is used with another device via the HDMI cable connection. Check the owner's manual of this unit. NOTE 0 Some functions may not fully work. Contents Connections Playback Settings Tips Appendix HDMI control function A recent addition to the HDMI standard...
... not compatible with the HDMI control function. 0 When the HDMI ZONE2 function is used with another device via the HDMI cable connection. Check the owner's manual of this unit. NOTE 0 Some functions may not fully work. Contents Connections Playback Settings Tips Appendix HDMI control function A recent addition to the HDMI standard...
Owner s Manual In English
Page 168
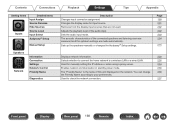
Changes the display name for manually setting the IP address or when using a proxy server. 234 Enables network communication in standby power mode. 236 The "Friendly Name" is the name of ... 236 the Friendly Name according to a wireless LAN or a wired LAN. 230 Used for input source. Sets up the speakers manually or changes the Audyssey® Setup settings. Speakers . Network Manual Setup Information Connection Settings Network Control Friendly Name Diagnostics Description Changes input connector assignment. Setting items Inputs Detailed items Input Assign...
Changes the display name for manually setting the IP address or when using a proxy server. 234 Enables network communication in standby power mode. 236 The "Friendly Name" is the name of ... 236 the Friendly Name according to a wireless LAN or a wired LAN. 230 Used for input source. Sets up the speakers manually or changes the Audyssey® Setup settings. Speakers . Network Manual Setup Information Connection Settings Network Control Friendly Name Diagnostics Description Changes input connector assignment. Setting items Inputs Detailed items Input Assign...

Owner s Manual In English
Page 169
... Setup Setup Assistant Speaker Calibration Network Setup TV Audio Connection Input Setup Description Changes the language of the separate manual "Quick Start Guide" Front panel Display Rear panel 169 Remote Index Select the conditions for audio playback with ...up the notification message display. Sets individual setting items according to one you prefer. Changes the Smart Select Name display title to Marantz. Performs basic installation/connections/settings from inadvertent changes. Configures the ECO Mode and Auto Standby energy-saving functions. Page 238 238...
... Setup Setup Assistant Speaker Calibration Network Setup TV Audio Connection Input Setup Description Changes the language of the separate manual "Quick Start Guide" Front panel Display Rear panel 169 Remote Index Select the conditions for audio playback with ...up the notification message display. Sets individual setting items according to one you prefer. Changes the Smart Select Name display title to Marantz. Performs basic installation/connections/settings from inadvertent changes. Configures the ECO Mode and Auto Standby energy-saving functions. Page 238 238...

Owner s Manual In English
Page 178
... when "Video Mode" is set to "On". Settings Tips Appendix Audio Delay Compensates for incorrect timing between the picture and sound needs to be corrected manually. 0 ms - 500 ms (Default : 0 ms) Front panel Display Rear panel 0 You can also finely adjust the delay correction value set by pressing M-DAX on the...
... when "Video Mode" is set to "On". Settings Tips Appendix Audio Delay Compensates for incorrect timing between the picture and sound needs to be corrected manually. 0 ms - 500 ms (Default : 0 ms) Front panel Display Rear panel 0 You can also finely adjust the delay correction value set by pressing M-DAX on the...

Owner s Manual In English
Page 185
...: Movie: Vivid: Streaming: ISF Day: ISF Night: Custom: Off: The standard mode suited for watching movies in a dark room at night. Adjusts the picture quality manually. Settings Tips Appendix o Picture Mode Select the desired picture mode according to "Custom". (v p. 185) 0 "Picture Adjust" settings are stored for each input source. 0 "Picture Adjust...
...: Movie: Vivid: Streaming: ISF Day: ISF Night: Custom: Off: The standard mode suited for watching movies in a dark room at night. Adjusts the picture quality manually. Settings Tips Appendix o Picture Mode Select the desired picture mode according to "Custom". (v p. 185) 0 "Picture Adjust" settings are stored for each input source. 0 "Picture Adjust...
Owner s Manual In English
Page 204
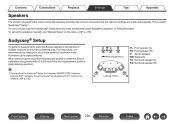
... speaker (L) SR Surround speaker (R) 0 If you have to eight positions). You do not have already performed "Speaker Calibration" in the illustration (up the speakers manually, use "Manual Setup" on the menu. (v p. 215) Audyssey® Setup To perform measurement, place the Sound calibration microphone in multiple locations all around the listening area. To...
... speaker (L) SR Surround speaker (R) 0 If you have to eight positions). You do not have already performed "Speaker Calibration" in the illustration (up the speakers manually, use "Manual Setup" on the menu. (v p. 215) Audyssey® Setup To perform measurement, place the Sound calibration microphone in multiple locations all around the listening area. To...

Owner s Manual In English
Page 214
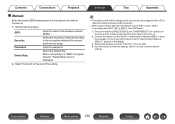
Amp Assign Channel Select Dolby Speaker Setup Check Results Restore... Contents Connections Playback Retrieving Audyssey® Setup settings If you have changed each setting manually. to "Restore", you can automatically measure the acoustics of your room then optimize your speakers using the included microphone and microphone stand. Audyssey Setup Your ...
Amp Assign Channel Select Dolby Speaker Setup Check Results Restore... Contents Connections Playback Retrieving Audyssey® Setup settings If you have changed each setting manually. to "Restore", you can automatically measure the acoustics of your room then optimize your speakers using the included microphone and microphone stand. Audyssey Setup Your ...

Owner s Manual In English
Page 215
.... o Assign Mode Select how to configure the detailed settings for MAIN ZONE. Contents Connections Playback Settings Tips Appendix Manual Setup Perform when setting the speakers manually or when changing settings made in this unit and an external power amplifier connected to PRE OUT to play back ... 0 You can be able to select Audyssey MultEQ® XT32, Audyssey Dynamic EQ® or Audyssey Dynamic Volume®. (v p. 180) 0 "Manual Setup" can connect speakers for up to 11.1channels for the speaker configuration in accordance with the selected mode. You need to use the 9-channel...
.... o Assign Mode Select how to configure the detailed settings for MAIN ZONE. Contents Connections Playback Settings Tips Appendix Manual Setup Perform when setting the speakers manually or when changing settings made in this unit and an external power amplifier connected to PRE OUT to play back ... 0 You can be able to select Audyssey MultEQ® XT32, Audyssey Dynamic EQ® or Audyssey Dynamic Volume®. (v p. 180) 0 "Manual Setup" can connect speakers for up to 11.1channels for the speaker configuration in accordance with the selected mode. You need to use the 9-channel...

Owner s Manual In English
Page 227
... will work best with the lower limit frequency of the speakers set in accordance with the widest variety of the "Speaker Config." See the speaker manual for all speakers. Selects the crossover points for each speaker. setting. (v p. 220) Front panel Display Rear panel 227 Remote Index Settings Tips Appendix o Set the...
... will work best with the lower limit frequency of the speakers set in accordance with the widest variety of the "Speaker Config." See the speaker manual for all speakers. Selects the crossover points for each speaker. setting. (v p. 220) Front panel Display Rear panel 227 Remote Index Settings Tips Appendix o Set the...

Owner s Manual In English
Page 230
...". (v p. 231) o Wi-Fi You can stop the Wi-Fi function when connecting this unit using Wired LAN. When assigning an IP address to each device manually, you must configure network settings. Friendly Name / Connection / SSID / DHCP / IP Address / MAC Address 0 MAC Address is stopped. The Wi-Fi function is required to...
...". (v p. 231) o Wi-Fi You can stop the Wi-Fi function when connecting this unit using Wired LAN. When assigning an IP address to each device manually, you must configure network settings. Friendly Name / Connection / SSID / DHCP / IP Address / MAC Address 0 MAC Address is stopped. The Wi-Fi function is required to...
Owner s Manual In English
Page 233
Contents Connections Playback o Manual Enter the name (SSID) and password of iOS 7 or later, "When connecting using Wi-Fi" (v p. ... a PC or tablet that has a firmware version of the network you wish to connect to Wi-Fi network called "Marantz SR6011"" appears in the URL. 4. Start up the browser and enter "192.168.1.16" in the display. 3. Select ...LAN connection. 0 When using . Select "Connect" at least 3 seconds when the power of the PC or tablet used to "Marantz SR6011" when the message "Connect your Wi-Fi device to . 1. Select the Default Key. Press and hold the ZONE2 SOURCE and ...
Contents Connections Playback o Manual Enter the name (SSID) and password of iOS 7 or later, "When connecting using Wi-Fi" (v p. ... a PC or tablet that has a firmware version of the network you wish to connect to Wi-Fi network called "Marantz SR6011"" appears in the URL. 4. Start up the browser and enter "192.168.1.16" in the display. 3. Select ...LAN connection. 0 When using . Select "Connect" at least 3 seconds when the power of the PC or tablet used to "Marantz SR6011" when the message "Connect your Wi-Fi device to . 1. Select the Default Key. Press and hold the ZONE2 SOURCE and ...


