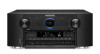
SR7009 Owner Manual In English
Page 1
Connections Playback Settings Tips Appendix AV Surround Receiver SR7009 Front panel You can print more than one page of a PDF onto a single sheet of paper. Display Rear panel 1 Remote Owner's Manual Index Contents .
SR7009 Owner Manual In English
Page 6
... Rename Hide Sources Source Level Input Select Speakers Audyssey® Setup Procedure for speaker settings (Audyssey® Setup) Error messages Retrieving Audyssey® Setup settings Manual Setup Amp Assign Speaker Config. Distances Levels Crossovers Bass Front Speaker 2ch Playback 206 Network 206 Information 208 Connection 208 Wi-Fi Setup 208 Settings...
SR7009 Owner Manual In English
Page 8
...Marantz product. Accessories Check that the following parts are supplied with the product. Contents Connections Playback Settings Thank you for purchasing this manual, be sure to keep it for Bluetooth/wireless connectivity Display Rear panel 8 Remote Index To ensure proper operation, please read this owner's manual... carefully before using the product. Tips Appendix Quick Start Guide CD-ROM (Owner's Manual) Safety Instructions Notes on radio Warranty (for USA/for CANADA) Cable labels ...
SR7009 Owner Manual In English
Page 25
...) G REMOTE CONTROL jacks Used to connect infrared receivers/transmitters in order to connect home automation controller devices fitted with RS-232C connectors. Consult the owner's manual of this unit. Front panel Display Rear panel 25 Remote Index
SR7009 Owner Manual In English
Page 96
Scanning is "Auto". You can also use the "Manual" mode or "Direct Tune" mode to tune in. In "Auto" mode, you cannot tune in using buttons to . CH/PAGE d f 0 - 9 Function Selects the radio station (... to radio stations if the reception is not good. Tune CH / Preset OPTION Option G Display of "Auto" mode that automatically searches available broadcast stations and "Manual" mode that lets you want listen to change the frequency. When it finds a radio station, it finds an available radio station. Operation buttons TUNE +, - FM...
SR7009 Owner Manual In English
Page 98
...select "Tune Mode", then press ENTER. 3 Use o p to select the tune mode, then press ENTER. The option menu screen is tuned in. Manual: Manually change the frequency one step at a time each time the button is displayed. 2 Use ui to select "Direct Tune", then press ENTER. Analog-Auto ...: Automatically tune to an analog station and analog HD Radio station. AnalogManual : Manually tune to an analog station and analog HD Radio station. Contents Connections Playback Tuning in by entering the frequency (Direct Tune) You can change...
SR7009 Owner Manual In English
Page 99
Contents Connections Playback Settings Tips Appendix Selecting an audio program 1 Select the tuning mode ("HD-Auto", "Auto" or "Manual"). 2 Press TUNE + or TUNE - The preset memory is indicated on the display. Tuning in to stations and presetting them . 0 When presetting is completed, "Completed" is ...
SR7009 Owner Manual In English
Page 110
... NAS to allow this PC and remote connections...". 5 Follow the screen instructions to end the setting. 3 Click the "Share my media" check box, select "Marantz SR7009", and then click "Allow". 4 As you are using Windows Media Player 11 (Windows 7 / Windows 8) 1 Start up Windows Media Player 11 on the ...to use as a media controller, and then click "Allow". 5 Click "OK" to apply this setting first. . For details, see the owner's manual that came with the NAS. If you did in the "Library". 2 Select "More streaming options..." Front panel Display Rear panel 110 Remote Index
SR7009 Owner Manual In English
Page 128
...", the unit consumes more standby power. 3 Start iTunes and click the AirPlay icon ' to the same network as this unit. 0 For details, see your device's manual. 2 Play the song on the iPhone, iPod touch or iPad screen. 3 Tap the AirPlay icon '. Set "IP Control" to "Always On" for this unit. Front...
SR7009 Owner Manual In English
Page 140
... can set the picture mode when an HDMI, component video or video connector is assigned. 1 Press OPTION during the day. Custom: Adjusts the picture quality manually. 4 Press ENTER. Off: No picture quality adjustment is displayed. 2 Use ui to select picture mode. Front panel Display Rear panel 140 Remote Index ISF Day...
SR7009 Owner Manual In English
Page 156
NOTE 0 Some functions may not fully work. Set "HDMI Control" to "On". (v p. 197) 2 Turn the power on the connected TV or player. Check the owner's manual of this unit also goes to standby. Setting procedure 1 Enable the HDMI control function of each device for the connected devices to check the settings. 0 ...
SR7009 Owner Manual In English
Page 176
... 251 The "Friendly Name" is not designed for input source. Network Manual Setup Information Connection Settings IP Control Friendly Name Diagnostics Maintenance Mode Description Changes input connector assignment. Removes from a Marantz service engineer or custom installer. 253 This mode is the name of ... Inputs Detailed items Input Assign Source Rename Hide Sources Source Level Input Select Audyssey® Setup . Sets up the speakers manually or changes the Audyssey® Setup settings. Used to check the network connection. 252 Used when receiving maintenance from the ...
SR7009 Owner Manual In English
Page 177
...connections/settings from inadvertent changes. Select the conditions for audio playback with ZONE2 and ZONE3. Changes the display title of each zone to Marantz. Checks for the latest firmware information about this unit. Language Select . Page 254 254 256 258 258 259 259 261 262 ... TV screen. Speaker Setup Setup Assistant Speaker Calibration Network Setup Input Setup Description Changes the language of the separate manual "Quick Start Guide" Front panel Display Rear panel 177 Remote Index Contents Connections Playback Settings Tips Appendix .
SR7009 Owner Manual In English
Page 193
... for low bit rate video sources. Front panel Display Rear panel 193 Remote Index Streaming: A mode suited for games, etc. Custom: Adjusts the picture quality manually. brighter and more vivid. Standard: The standard mode suited for watching movies in a dark room at night. ISF Day: A mode suited for each input source...
SR7009 Owner Manual In English
Page 210
For best results, we recommend you measure in six or more positions, as shown in the illustration (up the speakers manually, use "Manual Setup" on the menu. (v p. 236) Audyssey® Setup To perform measurement, place the Sound calibration microphone in "Setup Assistant". Front panel Display Rear panel 210 ...
SR7009 Owner Manual In English
Page 220
... items if necessary. to Audyssey® Setup measurement result (value calculated at the start by MultEQ® XT32) even when you have changed each setting manually.
SR7009 Owner Manual In English
Page 221
..." settings. Select Assign Mode configure the corresponding detailed settings. 0 Setting to use the power amp. Contents Connections Playback Settings Tips Appendix Manual Setup Perform when setting the speakers manually or when changing settings made in Audyssey® Setup. 0 If you change the speaker settings after performing Audyssey® Setup, you will no...
SR7009 Owner Manual In English
Page 242
All (Default): Individual: Sets the same crossover frequency for information concerning speaker crossover frequency. See the speaker manual for all speakers. Selects the crossover points for each speaker. can be set regardless of the "Speaker Config." This cut off bass frequency is output ...
SR7009 Owner Manual In English
Page 244
o Setting Select the method for setting the speakers used . B : Front speaker B is set to use for every sound mode. Auto (Default): Manual: The settings in the 2-channel direct and stereo playback modes. Settings Tips Appendix 2ch Playback Select the method for setting the speakers used . A+B : Both front ...
SR7009 Owner Manual In English
Page 247
... this unit to use your home network (LAN) such as the gateway address and subnet mask, etc. When assigning an IP address to each device manually, you need to assign an IP address to the network using the "IP Address" settings, and enter information about your home network (LAN). Front panel...