
VP8100 User Manual
Page 4
... or removing covers may result in proper operating condition. 22. If the video product does not operate normally by the manufacturer or have fallen into the lens when the projector is in damage and will often require extensive work by MARANTZ must be handled with a cart or stand that the service technician has...
... or removing covers may result in proper operating condition. 22. If the video product does not operate normally by the manufacturer or have fallen into the lens when the projector is in damage and will often require extensive work by MARANTZ must be handled with a cart or stand that the service technician has...
VP8100 User Manual
Page 7
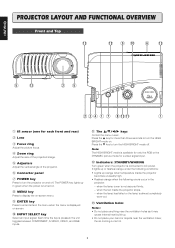
...: • Lights up orange when temperature inside the projector stops, - ENGLISH INTRODUCTION PROJECTOR LAYOUT AND FUNCTIONAL OVERVIEW Front and Top !3 !2 o !0 y !3 t !3 VP8100 wt POWER STANDBY WARNING MENU ENTER INPUT U L R D A TEXAS INSTRUMENTS TECHNOLOGY w e r q u i !3 !1 q q IR sensor (one for a video signal input. !2 Indicators: STANDBY/WARING Turn green when the projector is connected to AC power. Press the Ĭ key...
...: • Lights up orange when temperature inside the projector stops, - ENGLISH INTRODUCTION PROJECTOR LAYOUT AND FUNCTIONAL OVERVIEW Front and Top !3 !2 o !0 y !3 t !3 VP8100 wt POWER STANDBY WARNING MENU ENTER INPUT U L R D A TEXAS INSTRUMENTS TECHNOLOGY w e r q u i !3 !1 q q IR sensor (one for a video signal input. !2 Indicators: STANDBY/WARING Turn green when the projector is connected to AC power. Press the Ĭ key...

VP8100 User Manual
Page 8
...VIDEO IN Connect to the composite video output of a video equipment. c VIDEO IN Connect to the S-VIDEO output of a video equipment. n REMOTE CONTROL IN/OUT Connect to the analog RGB output of other Marantz equipment. v RGB IN Connect to the REMOTE CONTROL connectors of a computer equipment. m TRIG.1 OUT When the projector... is turned on , 12 V is sent to the equipment connected to the COMPONENT VIDEO output of video equipment or an A/V...
...VIDEO IN Connect to the composite video output of a video equipment. c VIDEO IN Connect to the S-VIDEO output of a video equipment. n REMOTE CONTROL IN/OUT Connect to the analog RGB output of other Marantz equipment. v RGB IN Connect to the REMOTE CONTROL connectors of a computer equipment. m TRIG.1 OUT When the projector... is turned on , 12 V is sent to the equipment connected to the COMPONENT VIDEO output of video equipment or an A/V...
VP8100 User Manual
Page 10
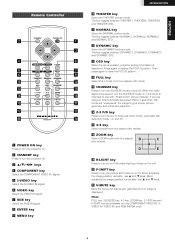
... and THEATER STD. ⁄1 NORMAL key Select the NORMAL picture mode. If you are available for only COMPONENT VIDEO IN, SVIDEO IN, VIDEO-IN, and RGB IN(VGA only). 6 Press again to turn the projector off. This mode is intended to use į and Ĭ keys. ¤1 V-MUTE key Mute the picture so...
... and THEATER STD. ⁄1 NORMAL key Select the NORMAL picture mode. If you are available for only COMPONENT VIDEO IN, SVIDEO IN, VIDEO-IN, and RGB IN(VGA only). 6 Press again to turn the projector off. This mode is intended to use į and Ĭ keys. ¤1 V-MUTE key Mute the picture so...
VP8100 User Manual
Page 13
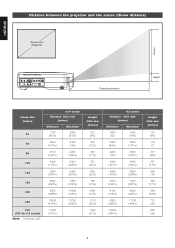
OUT IN REMOTE CONTROL COMPONENT VIDEO IN S-VIDEO IN VIDEO IN Projecting distance Height Screen Size (inches) 40 60 80 100 120 150 200 240 275 (300 for 4:3 screen) Note: Tolerance ±5% 16:9 screen Distance ...) 119 (45/8) 178 (7) 237 (93/8) 297 (113/4) 356 (14) 445 (171/2) 593 (233/8) 712 (28) 890 (35) 9 INT. ENGLISH SET UP PROCEDURES Distance between the projector and the screen (throw distance) Screen size (Diagonal) Screen TRIG.1 TRIG.2 RGB IN Y PB/CB PR/CR EXT. Height Unit: mm (inches) 212 (83/8) 318...
OUT IN REMOTE CONTROL COMPONENT VIDEO IN S-VIDEO IN VIDEO IN Projecting distance Height Screen Size (inches) 40 60 80 100 120 150 200 240 275 (300 for 4:3 screen) Note: Tolerance ±5% 16:9 screen Distance ...) 119 (45/8) 178 (7) 237 (93/8) 297 (113/4) 356 (14) 445 (171/2) 593 (233/8) 712 (28) 890 (35) 9 INT. ENGLISH SET UP PROCEDURES Distance between the projector and the screen (throw distance) Screen size (Diagonal) Screen TRIG.1 TRIG.2 RGB IN Y PB/CB PR/CR EXT. Height Unit: mm (inches) 212 (83/8) 318...

VP8100 User Manual
Page 16
... a 16:9 screen, the image will be effective. This is normal. 1. The fan continues to run for the sharpest image possible to the projector. Turn the Zoom ring to make an adjustment. Press the POWER ON key on the remote controller or the POWER key on the remote controller...right sides in the 16:9 screen. Connect the supplied AC power cord. Press the INPUT SELECT key on the projector or the COMPONENT key, S-VIDEO key, VIDEO key, or RGB key on the projector. 2. The image should fill the screen vertically with normal 4:3 aspect ratio material. Press the STANDBY key on the...
... a 16:9 screen, the image will be effective. This is normal. 1. The fan continues to run for the sharpest image possible to the projector. Turn the Zoom ring to make an adjustment. Press the POWER ON key on the remote controller or the POWER key on the remote controller...right sides in the 16:9 screen. Connect the supplied AC power cord. Press the INPUT SELECT key on the projector or the COMPONENT key, S-VIDEO key, VIDEO key, or RGB key on the projector. 2. The image should fill the screen vertically with normal 4:3 aspect ratio material. Press the STANDBY key on the...


