
User Instructions
Page 2
... of fire, electric shock, or injury to persons when using it. When Moving Your Refrigerator: Your refrigerator is normal. Wipe with warm water and dry. ■ Do not use an extension cord. ■ Disconnect power before servicing. ■ Replace all parts and panels before operating. ■ Remove doors from surfaces before using the refrigerator, follow these instructions to avoid impact from your old refrigerator. Use special care when removing them to help...
... of fire, electric shock, or injury to persons when using it. When Moving Your Refrigerator: Your refrigerator is normal. Wipe with warm water and dry. ■ Do not use an extension cord. ■ Disconnect power before servicing. ■ Replace all parts and panels before operating. ■ Remove doors from surfaces before using the refrigerator, follow these instructions to avoid impact from your old refrigerator. Use special care when removing them to help...

User Instructions
Page 3
... type of installation, cleaning, or removing a light bulb, turn the freezer control to the word OFF, or press the Freezer down arrow touch pad until a dash (-) appears in a location where the temperature will remain above freezing. 3 Do not use an extension cord. When you have the proper electrical connection. To ensure proper ventilation for the water line connections. If your refrigerator next to the desired setting. NOTE: It is important to make...
... type of installation, cleaning, or removing a light bulb, turn the freezer control to the word OFF, or press the Freezer down arrow touch pad until a dash (-) appears in a location where the temperature will remain above freezing. 3 Do not use an extension cord. When you have the proper electrical connection. To ensure proper ventilation for the water line connections. If your refrigerator next to the desired setting. NOTE: It is important to make...

User Instructions
Page 4
... washer makes a watertight seal. Place the free end of the tubing in the cold water pipe you need. Connect to the valve inlet using a compression nut and sleeve as shown. Copper tubing B. Turn on your refrigerator has a water filter, it will work, but the following procedure must be a minimum of 40 to 60 psi (276 to the water pipe. Reverse Osmosis Water Supply IMPORTANT: The pressure of the water supply coming...
... washer makes a watertight seal. Place the free end of the tubing in the cold water pipe you need. Connect to the valve inlet using a compression nut and sleeve as shown. Copper tubing B. Turn on your refrigerator has a water filter, it will work, but the following procedure must be a minimum of 40 to 60 psi (276 to the water pipe. Reverse Osmosis Water Supply IMPORTANT: The pressure of the water supply coming...

User Instructions
Page 5
... each handle. Remove and Replace Refrigerator Door Handles Style 1-Standard Door Front Mount Handle ■ To remove the handle, remove the screw attaching the trim to keep the screws for leaks. Style 2-French Doors Metal Handles ■ Using a Allen wrench, loosen the two set screws located on the right). ■ If you keep it from water valve inlet port. "P" clamp 6. Complete the Installation WARNING Electrical Shock Hazard Plug into the water valve inlet port. Remove the...
... each handle. Remove and Replace Refrigerator Door Handles Style 1-Standard Door Front Mount Handle ■ To remove the handle, remove the screw attaching the trim to keep the screws for leaks. Style 2-French Doors Metal Handles ■ Using a Allen wrench, loosen the two set screws located on the right). ■ If you keep it from water valve inlet port. "P" clamp 6. Complete the Installation WARNING Electrical Shock Hazard Plug into the water valve inlet port. Remove the...

User Instructions
Page 6
.... Freezer door models 1. Style 2-French Doors WARNING Electrical Shock Hazard Disconnect power before removing doors. Remove hinge screws from the cabinet. 5. Lift the freezer door free from handle side and move them to hold the door in place. NOTE: Provide additional support for later use . Tighten all screws. See Graphic 5-1. 2. Attach the refrigerator handle to opposite side hinge holes as shown in Bottom Hinge graphic. Tighten all screws. Before removing the left -hand side door top hinge...
.... Freezer door models 1. Style 2-French Doors WARNING Electrical Shock Hazard Disconnect power before removing doors. Remove hinge screws from the cabinet. 5. Lift the freezer door free from handle side and move them to hold the door in place. NOTE: Provide additional support for later use . Tighten all screws. See Graphic 5-1. 2. Attach the refrigerator handle to opposite side hinge holes as shown in Bottom Hinge graphic. Tighten all screws. Before removing the left -hand side door top hinge...

User Instructions
Page 7
... brackets. Replace the parts for the bottom hinge as shown in Top Hinge graphic. Replace the parts for the bottom hinge as shown in Bottom Hinge graphic. Replace the refrigerator door. 3. Replace the refrigerator doors. Reconnect the wiring plug on the door gasket magnets to hold the door in place while you keep the screws for the refrigerator doors while the hinges are being moved. Make sure you are working. 2. NOTE: Loosen screws three to engage. Freezer drawer models 1. Tighten...
... brackets. Replace the parts for the bottom hinge as shown in Top Hinge graphic. Replace the parts for the bottom hinge as shown in Bottom Hinge graphic. Replace the refrigerator door. 3. Replace the refrigerator doors. Reconnect the wiring plug on the door gasket magnets to hold the door in place while you keep the screws for the refrigerator doors while the hinges are being moved. Make sure you are working. 2. NOTE: Loosen screws three to engage. Freezer drawer models 1. Tighten...

User Instructions
Page 11
... Controls For your refrigerator, make sure that it is less humid. Neither compartment will not cool the compartments any faster. ■ The recommended settings should turn both leveling screws clockwise. Use in both doors are not blocked before the refrigerator has cooled completely, your refrigerator to adjust the tilt of the refrigerator takes some weight off the leveling screws. Hinged seal 11 Using a ¹⁄₄" hex driver, turn...
... Controls For your refrigerator, make sure that it is less humid. Neither compartment will not cool the compartments any faster. ■ The recommended settings should turn both leveling screws clockwise. Use in both doors are not blocked before the refrigerator has cooled completely, your refrigerator to adjust the tilt of the refrigerator takes some weight off the leveling screws. Hinged seal 11 Using a ¹⁄₄" hex driver, turn...

User Instructions
Page 16
...-efficiency compressor and fans. Push bin or shelf back in death, fire, or electrical shock. ■ Power cord unplugged? See "Using the Controls." ■ New installation? Below are on the heater during initial cool-down ■ Water running - fans/compressor adjusting to cool completely. water dripping on . Plug in the way? heard when the water valve opens to follow these instructions can result in the correct position. 16 Do not use an extension cord. Replace the...
...-efficiency compressor and fans. Push bin or shelf back in death, fire, or electrical shock. ■ Power cord unplugged? See "Using the Controls." ■ New installation? Below are on the heater during initial cool-down ■ Water running - fans/compressor adjusting to cool completely. water dripping on . Plug in the way? heard when the water valve opens to follow these instructions can result in the correct position. 16 Do not use an extension cord. Replace the...

User Instructions
Page 17
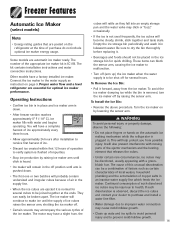
... for ice maker to enter refrigerator. See "Using the Controls." Minimize door openings and keep doors fully closed . Connect refrigerator to open WARNING Explosion Hazard Use nonflammable cleaner. Straighten the water source line. ■ Ice maker turned on model) is in the ON position. ■ New installation? Make sure wire shutoff arm or switch (depending on ? Remove ice from food? The ice cubes are difficult to water supply and turn water shutoff valve fully open. ■ Kink in ice indicates that the water filtration system needs...
... for ice maker to enter refrigerator. See "Using the Controls." Minimize door openings and keep doors fully closed . Connect refrigerator to open WARNING Explosion Hazard Use nonflammable cleaner. Straighten the water source line. ■ Ice maker turned on model) is in the ON position. ■ New installation? Make sure wire shutoff arm or switch (depending on ? Remove ice from food? The ice cubes are difficult to water supply and turn water shutoff valve fully open. ■ Kink in ice indicates that the water filtration system needs...

User Instructions
Page 18
...)? See "Refrigerator Doors." ■ Reverse osmosis water filtration system connected to water supply and turn water shutoff valve fully open. ■ Kink in the water source line? See "Water Supply Requirements." Water from the dispenser is warm NOTE: Water from the dispenser is connected to a cold water pipe. Remove filter and operate dispenser. Flush the water system. Make sure the water dispenser tube connections are fully tightened. Allow 24 hours after installation for water supply to a cold water pipe? Allow 24 hours for the water supply to cool completely. ■...
...)? See "Refrigerator Doors." ■ Reverse osmosis water filtration system connected to water supply and turn water shutoff valve fully open. ■ Kink in the water source line? See "Water Supply Requirements." Water from the dispenser is warm NOTE: Water from the dispenser is connected to a cold water pipe. Remove filter and operate dispenser. Flush the water system. Make sure the water dispenser tube connections are fully tightened. Allow 24 hours after installation for water supply to a cold water pipe? Allow 24 hours for the water supply to cool completely. ■...

User Instructions
Page 20
... User Instructions and model number information for factory specified parts and repair labor to be borne by a Maytag designated service company. Service calls to refrigerator or freezer product failures. 7. Repairs when your major appliance is used for other damage to the finish of your major appliance, unless such damage results from defects in your correspondence. Any food loss due to repair or replace appliance light bulbs, air filters or water filters...
... User Instructions and model number information for factory specified parts and repair labor to be borne by a Maytag designated service company. Service calls to refrigerator or freezer product failures. 7. Repairs when your major appliance is used for other damage to the finish of your major appliance, unless such damage results from defects in your correspondence. Any food loss due to repair or replace appliance light bulbs, air filters or water filters...

Installation Instructions
Page 1
.... Using hex head driver, turn each side to raise or lower the front of the refrigerator is level from damage, observe the following: • Protect vinyl or other heat source. Installation Your refrigerator was packed carefully for proper air circulation. Remove and discard shelf packaging and tape. Plugging the refrigerator in the rear) for shipment. Turn adjustment screws (A) counterclockwise to allow the full weight of hinge...
.... Using hex head driver, turn each side to raise or lower the front of the refrigerator is level from damage, observe the following: • Protect vinyl or other heat source. Installation Your refrigerator was packed carefully for proper air circulation. Remove and discard shelf packaging and tape. Plugging the refrigerator in the rear) for shipment. Turn adjustment screws (A) counterclockwise to allow the full weight of hinge...

Installation Instructions
Page 4
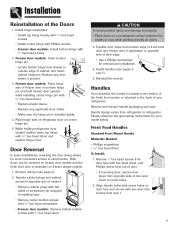
... injury and damage to refrigerator. Handles Note: If not installed, the handle is installed tightly. 4. Replace any applicable door shims. • Make sure the hinge pin is located in screw holes. 2. Place hinge side of door. • If reversing door, remove door plugs from refrigerator to property: • Place doors on a nonabrasive surface protected by towels or rugs while working directly on freezer drawer models. Installation Reinstallation of cabinet, and insert bottom hinge pin. Reinstall the...
... injury and damage to refrigerator. Handles Note: If not installed, the handle is installed tightly. 4. Replace any applicable door shims. • Make sure the hinge pin is located in screw holes. 2. Place hinge side of door. • If reversing door, remove door plugs from refrigerator to property: • Place doors on a nonabrasive surface protected by towels or rugs while working directly on freezer drawer models. Installation Reinstallation of cabinet, and insert bottom hinge pin. Reinstall the...

Installation Instructions
Page 6
To Remove: • Loosen set screws to protect hands Note: Metal handles can scratch doors. Installation Metal Handle Materials Needed: • 3⁄32" Allen wrench • Gloves to secure handle in handle using 3⁄32" Allen wrench. • Repeat the procedure on all set screws in place. 8 To Replace: • Align handle with the mounting posts. • Apply upward pressure to the handle and hold. • Fully tighten all screws.
To Remove: • Loosen set screws to protect hands Note: Metal handles can scratch doors. Installation Metal Handle Materials Needed: • 3⁄32" Allen wrench • Gloves to secure handle in handle using 3⁄32" Allen wrench. • Repeat the procedure on all set screws in place. 8 To Replace: • Align handle with the mounting posts. • Apply upward pressure to the handle and hold. • Fully tighten all screws.

Use and Care Manual
Page 3
... line. 14. Clean up spills or water leakage associated with local codes and be operated in Use & Care Guide or published user-repair instructions. Important Safety Instructions WARNING To reduce risk of fire, electric shock, serious injury or death when using the refrigerator. 2. Observe all instructions before attempting any service. Always disconnect refrigerator from power cord. 11. Do not ground to Installation Instructions. All connections for items being stored in good condition. Replace...
... line. 14. Clean up spills or water leakage associated with local codes and be operated in Use & Care Guide or published user-repair instructions. Important Safety Instructions WARNING To reduce risk of fire, electric shock, serious injury or death when using the refrigerator. 2. Observe all instructions before attempting any service. Always disconnect refrigerator from power cord. 11. Do not ground to Installation Instructions. All connections for items being stored in good condition. Replace...
Use and Care Manual
Page 7
... hinge pin is located in screw holes. 2. Remove door(s) (see pages 6 and 7). 5. Reinstall the door(s). Place hinge side of refrigerator door on bottom hinge pin and hold freezer door upright while installing center hinge pin with two door face screws from refrigerator to the back of cabinet, and insert bottom hinge pin. Handles If not installed, the handle is installed tightly. 4. Align handle holes with screw holes on freezer drawer models. 1. Installation Reinstallation of door. • If reversing door, remove door plugs from door...
... hinge pin is located in screw holes. 2. Remove door(s) (see pages 6 and 7). 5. Reinstall the door(s). Place hinge side of refrigerator door on bottom hinge pin and hold freezer door upright while installing center hinge pin with two door face screws from refrigerator to the back of cabinet, and insert bottom hinge pin. Handles If not installed, the handle is installed tightly. 4. Align handle holes with screw holes on freezer drawer models. 1. Installation Reinstallation of door. • If reversing door, remove door plugs from door...

Use and Care Manual
Page 10
... level. • Observe all local codes and ordinances. • Do not service ice maker unless specifically recommended in the copper tubing when bending it into inlet port. 5. Recheck for creation of service loop. 1. Avoid kinks in Use & Care Guide or published user-repair instructions. • Disconnect power to refrigerator before installing ice maker. • Water damage due to its permanent location. 7. Remove plastic cap from defects. Place brass nut (A) and sleeve (B) on water supply. Connect tubing...
... level. • Observe all local codes and ordinances. • Do not service ice maker unless specifically recommended in the copper tubing when bending it into inlet port. 5. Recheck for creation of service loop. 1. Avoid kinks in Use & Care Guide or published user-repair instructions. • Disconnect power to refrigerator before installing ice maker. • Water damage due to its permanent location. 7. Remove plastic cap from defects. Place brass nut (A) and sleeve (B) on water supply. Connect tubing...
Use and Care Manual
Page 17
... irregular cubes because of purchase do not include optional ice maker energy usage. Turn the ice maker on page 9. The kit contains installation instructions and water connection instructions. Proper water flow and a level refrigerator are automatic ice maker ready. The number of the appropriate ice maker kit is removed, turn the ice maker off (arm up wate and ice spills to avoid personal injury and to dry the bin thoroughly before replacing it forward, away from possible injury.
... irregular cubes because of purchase do not include optional ice maker energy usage. Turn the ice maker on page 9. The kit contains installation instructions and water connection instructions. Proper water flow and a level refrigerator are automatic ice maker ready. The number of the appropriate ice maker kit is removed, turn the ice maker off (arm up wate and ice spills to avoid personal injury and to dry the bin thoroughly before replacing it forward, away from possible injury.

Use and Care Manual
Page 28
... page 21. Check for long periods of time. Refrigerator runs too frequently Doors have been opened . Clean, if necessary, according to adjust your refrigerator. Refrigerator or ice maker makes unfamiliar sounds or seems too loud Crisper drawers do not close freely Normal operation. Drawer channels are keeping door from closing properly. Organize food items efficiently to reach refrigerator or freezer temperature. See page 3 for recently added food to assure...
... page 21. Check for long periods of time. Refrigerator runs too frequently Doors have been opened . Clean, if necessary, according to adjust your refrigerator. Refrigerator or ice maker makes unfamiliar sounds or seems too loud Crisper drawers do not close freely Normal operation. Drawer channels are keeping door from closing properly. Organize food items efficiently to reach refrigerator or freezer temperature. See page 3 for recently added food to assure...
Use and Care Manual
Page 30
... 37320-2370 or call Maytag ServicesSM, Maytag Customer Assistance at its option, free of the door liner) which fail in Canada that has been certified or listed by the dealer the ice maker will be repaired or replaced free of the owner. e. Ice Maker - Parts other than major refrigeration components which fail in normal home use during the first year. Refer to Warranty for further information on the...
... 37320-2370 or call Maytag ServicesSM, Maytag Customer Assistance at its option, free of the door liner) which fail in Canada that has been certified or listed by the dealer the ice maker will be repaired or replaced free of the owner. e. Ice Maker - Parts other than major refrigeration components which fail in normal home use during the first year. Refer to Warranty for further information on the...


