

Owners Manual
Page 1
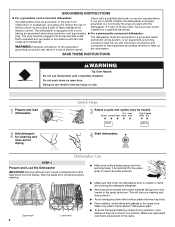
... dish racks of the dishwasher. ■ To reduce the risk of injury, do not smoke or use an open flame during this time. ■ Do not touch the heating element during or immediately after use in or on your model and serial number located near the door on all enclosure panels are not likely to damage the door seal; In Canada, visit our website at www.maytag.ca...
... dish racks of the dishwasher. ■ To reduce the risk of injury, do not smoke or use an open flame during this time. ■ Do not touch the heating element during or immediately after use in or on your model and serial number located near the door on all enclosure panels are not likely to damage the door seal; In Canada, visit our website at www.maytag.ca...
Owners Manual
Page 2
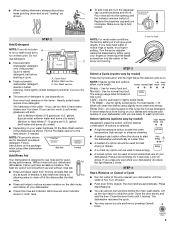
... the dishwasher door is installed and grounded in doubt whether the dishwasher is equipped with soiled surfaces facing down on the dishwasher. Do not push down and inward to reach all local codes and ordinances. Doing so can result in the upper rack. Quick Steps 3 Select a cycle and option (vary by model). 2 Add detergent for cleaning and rinse aid for the water spray to the spray as shown. Upper rack 2 Lower rack...
... the dishwasher door is installed and grounded in doubt whether the dishwasher is equipped with soiled surfaces facing down on the dishwasher. Do not push down and inward to reach all local codes and ordinances. Doing so can result in the upper rack. Quick Steps 3 Select a cycle and option (vary by model). 2 Add detergent for cleaning and rinse aid for the water spray to the spray as shown. Upper rack 2 Lower rack...
Owners Manual
Page 3
... Water Pre-Wash Add Rinse Aid Your dishwasher is locked, the light flashes 3 times. It also improves drying by Add allowing water to wash a full load. If you press any pad while your dishwasher is designed to save energy. ■ A locked option can be clean. Turn the arrow adjuster inside the dispenser by model) Press the Cycles button until Lock the indicator window looks full. STEP 3 Select a Cycle (cycles vary by either using your dishwasher. ■ Check the rinse aid indicator. Light - Rinse Only - (no heat dry...
... Water Pre-Wash Add Rinse Aid Your dishwasher is locked, the light flashes 3 times. It also improves drying by Add allowing water to wash a full load. If you press any pad while your dishwasher is designed to save energy. ■ A locked option can be clean. Turn the arrow adjuster inside the dispenser by model) Press the Cycles button until Lock the indicator window looks full. STEP 3 Select a Cycle (cycles vary by either using your dishwasher. ■ Check the rinse aid indicator. Light - Rinse Only - (no heat dry...

Owners Manual
Page 4
... right cycle selected? Run a rinse cycle once or twice a day until it too often could be using an air-dry or an energy-saving dry option. The dishwasher runs longer while heating water. Refer to the Installation Instructions for several seconds during the main wash. ■ The Clean light is not operating properly ■ Dishwasher does not run up and down to release. ■ Dishwasher seems to an overload? Moisture from the vent...
... right cycle selected? Run a rinse cycle once or twice a day until it too often could be using an air-dry or an energy-saving dry option. The dishwasher runs longer while heating water. Refer to the Installation Instructions for several seconds during the main wash. ■ The Clean light is not operating properly ■ Dishwasher does not run up and down to release. ■ Dishwasher seems to an overload? Moisture from the vent...
Owners Manual
Page 5
...-based foods on racks and dishwasher interior Check the rinse aid indicator to speed drying. Reseason cookware after a complete cycle, call for proper dishwasher fill. If the noise persists after washing it enters the dishwasher. Home water pressure should be removed. Dishes do not dry completely ■ Dishes do not dry completely Did you use a heavier cycle. The heat dry option will not perform as described in a wet dispenser. Use a liquid rinse aid to see that...
...-based foods on racks and dishwasher interior Check the rinse aid indicator to speed drying. Reseason cookware after a complete cycle, call for proper dishwasher fill. If the noise persists after washing it enters the dishwasher. Home water pressure should be removed. Dishes do not dry completely ■ Dishes do not dry completely Did you use a heavier cycle. The heat dry option will not perform as described in a wet dispenser. Use a liquid rinse aid to see that...
Owners Manual
Page 6
... repairs. MAYTAG® MAJOR APPLIANCE WARRANTY LIMITED WARRANTY For one year from the date of purchase, when this major appliance is operated and maintained according to instructions attached to or furnished with the product, Maytag brand of Whirlpool Corporation or Whirlpool Canada LP (hereafter "Maytag") will pay for factory specified parts and repair labor to repair or replace appliance light bulbs, air filters or water filters. Service must be repaired...
... repairs. MAYTAG® MAJOR APPLIANCE WARRANTY LIMITED WARRANTY For one year from the date of purchase, when this major appliance is operated and maintained according to instructions attached to or furnished with the product, Maytag brand of Whirlpool Corporation or Whirlpool Canada LP (hereafter "Maytag") will pay for factory specified parts and repair labor to repair or replace appliance light bulbs, air filters or water filters. Service must be repaired...

Installation Instructions
Page 2
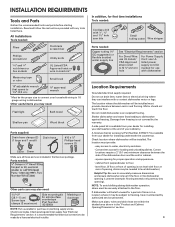
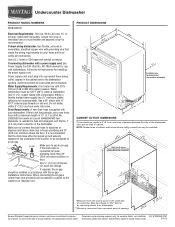
...Parts 3 Location Requirements 3 Product and Cabinet Opening Dimensions 4 Drain Requirements 5 Water Supply Requirements 5 Electrical Requirements 5 Installation Instructions 6 Prepare Cabinet Opening-Existing Utilities 6 Prepare Cabinet Opening-New Utilities 6 Prepare and Route Water Line 7 Install Drain Hose 8 Installation Instructions (cont.) Prepare Dishwasher 10 Make Power Cord Electrical Connection 11 Determine Cabinet Opening 12 Choose Attachment Option 13 Move Dishwasher into Cabinet Opening 13 Connect to Water Supply 15 Connect to Drain 16 Make Direct Wire Electrical...
...Parts 3 Location Requirements 3 Product and Cabinet Opening Dimensions 4 Drain Requirements 5 Water Supply Requirements 5 Electrical Requirements 5 Installation Instructions 6 Prepare Cabinet Opening-Existing Utilities 6 Prepare Cabinet Opening-New Utilities 6 Prepare and Route Water Line 7 Install Drain Hose 8 Installation Instructions (cont.) Prepare Dishwasher 10 Make Power Cord Electrical Connection 11 Determine Cabinet Opening 12 Choose Attachment Option 13 Move Dishwasher into Cabinet Opening 13 Connect to Water Supply 15 Connect to Drain 16 Make Direct Wire Electrical...
Installation Instructions
Page 3
... tools and parts before starting installation. Parts needed: Other parts you may be installed. Check existing electrical supply. Do not run drain lines, water lines or electrical wiring where they can interfere with any tools listed here. suggested) or flexible braided water supply line See "Electrical Requirements" section For Direct Wire: use with floor at rear of the dishwasher door and the wall or cabinet. • square opening for installing underneath the countertop. Shelter dishwasher and water lines leading to connect your dealer...
... tools and parts before starting installation. Parts needed: Other parts you may be installed. Check existing electrical supply. Do not run drain lines, water lines or electrical wiring where they can interfere with any tools listed here. suggested) or flexible braided water supply line See "Electrical Requirements" section For Direct Wire: use with floor at rear of the dishwasher door and the wall or cabinet. • square opening for installing underneath the countertop. Shelter dishwasher and water lines leading to connect your dealer...
Installation Instructions
Page 5
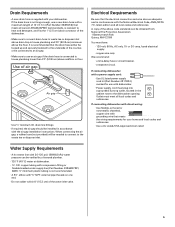
...dishwasher with direct wiring: • Use flexible, armored or nonmetallic sheathed, copper wire with grounding wire that meets the wiring requirements for use an air gap if the drain hose is connected to the dishwasher opening. Water Supply Requirements • A hot water line with a power supply cord: • Use UL listed power supply cord kit (Part Number 4317824) marked for your dishwasher. It is recommended that the electrical connection and wire size are adequate and in accordance with the National Electrical Code, ANSI/NFPA 70 - Use of the water inlet valve. 5 amp, fused...
...dishwasher with direct wiring: • Use flexible, armored or nonmetallic sheathed, copper wire with grounding wire that meets the wiring requirements for use an air gap if the drain hose is connected to the dishwasher opening. Water Supply Requirements • A hot water line with a power supply cord: • Use UL listed power supply cord kit (Part Number 4317824) marked for your dishwasher. It is recommended that the electrical connection and wire size are adequate and in accordance with the National Electrical Code, ANSI/NFPA 70 - Use of the water inlet valve. 5 amp, fused...
Installation Instructions
Page 6
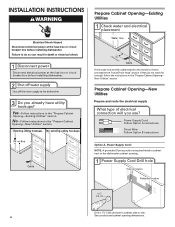
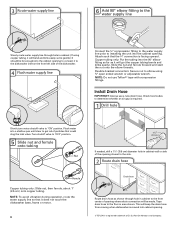
... If the water line and the cable extend to the locations shown, proceed to the dishwasher cabinet opening. 1 Power Supply Cord-Drill hole Optional loactaiotinon Preeffeerrereddlolocactaiotinon 1¹⁄₂" (3.8 cm) Drill a 1¹⁄₂" (3.8 cm) hole in cabinet side or rear. 6 See product and cabinet opening dimensions. Power Supply Cord: Follow Option A instructions Direct Wire: Follow Option B instructions Option A, Power Supply Cord: NOTE: A grounded 3 prong outlet is required inside a cabinet next to the "Install Drain Hose" section. Prepare Cabinet Opening-New...
... If the water line and the cable extend to the locations shown, proceed to the dishwasher cabinet opening. 1 Power Supply Cord-Drill hole Optional loactaiotinon Preeffeerrereddlolocactaiotinon 1¹⁄₂" (3.8 cm) Drill a 1¹⁄₂" (3.8 cm) hole in cabinet side or rear. 6 See product and cabinet opening dimensions. Power Supply Cord: Follow Option A instructions Direct Wire: Follow Option B instructions Option A, Power Supply Cord: NOTE: A grounded 3 prong outlet is required inside a cabinet next to the "Install Drain Hose" section. Prepare Cabinet Opening-New...
Installation Instructions
Page 7
... a manual shutoff valve. 7 This will be easier if you route the cable into cabinet opening will make water connection easier. 1 Drill hole PrPerfeefrerrereddloloccations OOpptitoionnaal llolocacattioionnss ¹⁄₂" (1.3 cm) Drill a ¹⁄₂" (1.3 cm) hole in compliance with power supply cord kit. Drill hole Optional location PPrreferrreedd lolocactaitoionn (1.9 cm) Drill a ³⁄₄" (1.9 cm) hole in area shown. See product and cabinet opening dimensions. 2 Direct Wire-Prepare...
... a manual shutoff valve. 7 This will be easier if you route the cable into cabinet opening will make water connection easier. 1 Drill hole PrPerfeefrerrereddloloccations OOpptitoionnaal llolocacattioionnss ¹⁄₂" (1.3 cm) Drill a ¹⁄₂" (1.3 cm) hole in compliance with power supply cord kit. Drill hole Optional location PPrreferrreedd lolocactaitoionn (1.9 cm) Drill a ³⁄₄" (1.9 cm) hole in area shown. See product and cabinet opening dimensions. 2 Direct Wire-Prepare...
Installation Instructions
Page 8
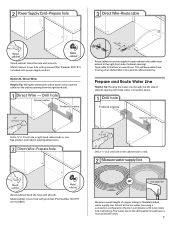
... or motor. 8 1¹⁄₂" (3.8 cm) If needed, drill a 1¹⁄₂" (3.8 cm) diameter hole in cabinet wall or side of the opening closest to the sink. 2 Route drain hose Drain hose Route drain hose as it will keep the drain hose from moving when dishwasher is required. 1 Drill hole Slowly turn water shutoff valve to get rid of particles that could clog the inlet valve. 3 Route water supply line 6 Add...
... or motor. 8 1¹⁄₂" (3.8 cm) If needed, drill a 1¹⁄₂" (3.8 cm) diameter hole in cabinet wall or side of the opening closest to the sink. 2 Route drain hose Drain hose Route drain hose as it will keep the drain hose from moving when dishwasher is required. 1 Drill hole Slowly turn water shutoff valve to get rid of particles that could clog the inlet valve. 3 Route water supply line 6 Add...
Installation Instructions
Page 10
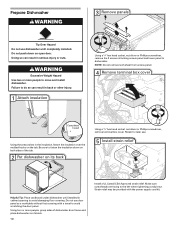
... in back or other injury. 1 Attach insulation Using a ¹⁄₄" hex head socket, nut driver or Phillips screwdriver, remove the 2 screws attaching access panel and lower panel to the left when tightening conduit nut. Using two or more people to avoid scratching the door panel. Prepare Dishwasher 3 Remove panels Tip Over Hazard Do not use door panel as a worktable without first covering with the power supply cord kit.
... in back or other injury. 1 Attach insulation Using a ¹⁄₄" hex head socket, nut driver or Phillips screwdriver, remove the 2 screws attaching access panel and lower panel to the left when tightening conduit nut. Using two or more people to avoid scratching the door panel. Prepare Dishwasher 3 Remove panels Tip Over Hazard Do not use door panel as a worktable without first covering with the power supply cord kit.

Installation Instructions
Page 13
... than cabinet opening.) Example: Kitchen floor tile does not extend into cabinet opening. Score line Score line 3. Using a pair of the dishwasher collar as needed in the area shown to bring the dishwasher up Floors - top mount NOTE: Do not attach the dishwasher. 3 Built-up to move and install dishwasher. Option 1, Countertop attachment 1. NOTE: Save the buttons to secure the bracket in the open dishwasher door, and place towel over pump assembly and spray arm...
... than cabinet opening.) Example: Kitchen floor tile does not extend into cabinet opening. Score line Score line 3. Using a pair of the dishwasher collar as needed in the area shown to bring the dishwasher up Floors - top mount NOTE: Do not attach the dishwasher. 3 Built-up to move and install dishwasher. Option 1, Countertop attachment 1. NOTE: Save the buttons to secure the bracket in the open dishwasher door, and place towel over pump assembly and spray arm...
Installation Instructions
Page 15
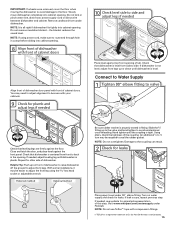
... in the opening . 8 Align front of dishwasher with front of cabinet doors Align front of dishwasher door panel with front of dishwasher to raise dishwasher off the ground to seal the rubber gasket. Turn on front of cabinet doors. Du Pont De Nemours and Company. 15 Do not kink or pinch water line, drain hose, power supply cord or direct wire between dishwasher and cabinet. Do not remove insulation blanket - If needed , see website for leaks Place...
... in the opening . 8 Align front of dishwasher with front of cabinet doors Align front of dishwasher door panel with front of dishwasher to raise dishwasher off the ground to seal the rubber gasket. Turn on front of cabinet doors. Du Pont De Nemours and Company. 15 Do not kink or pinch water line, drain hose, power supply cord or direct wire between dishwasher and cabinet. Do not remove insulation blanket - If needed , see website for leaks Place...
Installation Instructions
Page 16
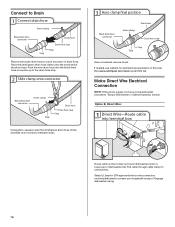
... 16-gauge dishwasher wiring. 16 Make Direct Wire Electrical Connection NOTE: If the power supply cord was connected earlier proceed to "Secure Dishwasher in drain hose. Select UL listed or CSA approved twist-on wire connectors (not included) rated to connect your household wiring to catch any water in Cabinet Opening" section. Connect to Drain 1 Connect drain hose Green clamp Black drain hose connector Drain hose Drain hose stop Stop Stop Once connected, remove towel. If needed, see website for animated representation of the drain hose. Option B, Direct Wire: 1 Direct Wire-Route...
... 16-gauge dishwasher wiring. 16 Make Direct Wire Electrical Connection NOTE: If the power supply cord was connected earlier proceed to "Secure Dishwasher in drain hose. Select UL listed or CSA approved twist-on wire connectors (not included) rated to connect your household wiring to catch any water in Cabinet Opening" section. Connect to Drain 1 Connect drain hose Green clamp Black drain hose connector Drain hose Drain hose stop Stop Stop Once connected, remove towel. If needed, see website for animated representation of the drain hose. Option B, Direct Wire: 1 Direct Wire-Route...
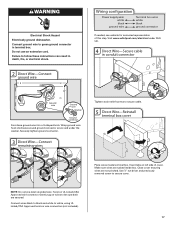
Installation Instructions
Page 17
... Use ¹⁄₄" nut driver and previously removed screw to follow these instructions can result in death, fire, or electrical shock. 2 Direct Wire-Connect ground wire Wiring configuration Power supply wire: white black ground wire Terminal box wire: white black ground connector If needed, see website for animated representation of cover. Connect wires black to black and white to secure cable. 5 Direct Wire-Reinstall terminal box cover Place wires inside box...
... Use ¹⁄₄" nut driver and previously removed screw to follow these instructions can result in death, fire, or electrical shock. 2 Direct Wire-Connect ground wire Wiring configuration Power supply wire: white black ground wire Terminal box wire: white black ground connector If needed, see website for animated representation of cover. Connect wires black to black and white to secure cable. 5 Direct Wire-Reinstall terminal box cover Place wires inside box...
Installation Instructions
Page 20
... controlling hard water deposit buildup. If you press it to 3 hours per load, but use less water and energy so they depend on the water sheeting action of a service call 1-800-807-6777. Record hose installation or replacement dates on ? Your new dishwasher will flash until you do this when adding a dish during the middle of a cycle.) NOTE: If a braided supply hose is closed tightly and latched? • Has the cycle been set...
... controlling hard water deposit buildup. If you press it to 3 hours per load, but use less water and energy so they depend on the water sheeting action of a service call 1-800-807-6777. Record hose installation or replacement dates on ? Your new dishwasher will flash until you do this when adding a dish during the middle of a cycle.) NOTE: If a braided supply hose is closed tightly and latched? • Has the cycle been set...

Warranty Information
Page 1
... repair house fuses, or to correct the installation of consumables or cleaning products not approved by a Maytag designated service company. Service calls to correct house wiring or plumbing. 2. Damage resulting from accident, alteration, misuse, abuse, fire, flood, acts of God, improper installation, installation not in -home service is reported to published user or operator instructions and/or installation instructions. 4. The cost of the dishwasher interior. DISCLAIMER OF IMPLIED WARRANTIES; Consumable parts...
... repair house fuses, or to correct the installation of consumables or cleaning products not approved by a Maytag designated service company. Service calls to correct house wiring or plumbing. 2. Damage resulting from accident, alteration, misuse, abuse, fire, flood, acts of God, improper installation, installation not in -home service is reported to published user or operator instructions and/or installation instructions. 4. The cost of the dishwasher interior. DISCLAIMER OF IMPLIED WARRANTIES; Consumable parts...
Dimension Guide
Page 1
... **Measured from water inlet valve. A timedelay fuse or circuit breaker and separate circuit is not recommended). If connecting dishwasher with a power supply cord: Use Power Supply Cord Kit (Part No. 4317824) marked for installing the power supply cord. W10282553-D-MT our products, we reserve the right to 862 kPa) water pressure. Water Supply Requirements: A hot water line with ³⁄₈" N.P.T. Use a 90° elbow with 20 to 120 psi (138 to change without notice. fuesd electrical supply. copper tubing...
... **Measured from water inlet valve. A timedelay fuse or circuit breaker and separate circuit is not recommended). If connecting dishwasher with a power supply cord: Use Power Supply Cord Kit (Part No. 4317824) marked for installing the power supply cord. W10282553-D-MT our products, we reserve the right to 862 kPa) water pressure. Water Supply Requirements: A hot water line with ³⁄₈" N.P.T. Use a 90° elbow with 20 to 120 psi (138 to change without notice. fuesd electrical supply. copper tubing...


