

Use & Care Guide
Page 4
... Pans or Drip Bowls Are in the manual. They should never be allowed to accumulate on hood or filter. ■ When flaming foods under the hood, turn the fan on a hot cooking area, be seriously injured. ■ Proper Installation - Smother fire or flame or use aluminum foil to direct contact and may be stored near surface units. ■ Do Not Use Water on any part of the cooktop unless specifically...
... Pans or Drip Bowls Are in the manual. They should never be allowed to accumulate on hood or filter. ■ When flaming foods under the hood, turn the fan on a hot cooking area, be seriously injured. ■ Proper Installation - Smother fire or flame or use aluminum foil to direct contact and may be stored near surface units. ■ Do Not Use Water on any part of the cooktop unless specifically...

Use & Care Guide
Page 5
...indicator light A. Hot surface indicator light G. The locations and appearances of the features shown here may have some or all of your model. 30" (76.2 cm) Cooktop 36" (91.4 cm) Cooktop A B C A B D G E F C D E F A. Left front control knob (with speed heat) B. Left rear control knob (with melt) D. Right front control knob 5 Right front control knob E. Cooktop on indicator light F. Right rear control knob D. Left rear control knob (with melt) C. Cooktop on indicator light F. Right rear control knob C. Left front control knob E. COOKTOP USE This manual...
...indicator light A. Hot surface indicator light G. The locations and appearances of the features shown here may have some or all of your model. 30" (76.2 cm) Cooktop 36" (91.4 cm) Cooktop A B C A B D G E F C D E F A. Left front control knob (with speed heat) B. Left rear control knob (with melt) D. Right front control knob 5 Right front control knob E. Cooktop on indicator light F. Right rear control knob D. Left rear control knob (with melt) C. Cooktop on indicator light F. Right rear control knob C. Left front control knob E. COOKTOP USE This manual...

Use & Care Guide
Page 6
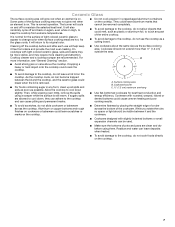
... results, use , the entire cooktop area may become hot. 6 Push in size. Single size B. A A. The Hot Surface Indicator Light will glow. When a control knob is on, the light will glow as long as any surface cooking area is in the same way as a guide when setting heat levels. Cooktop Controls WARNING Speed Heat™ Cooking Zone The Speed Heat™ Cooking zone (left front element on 30" (76.2 cm) models MEC7430/MEC9530. Speed Heat™ High boils...
... results, use , the entire cooktop area may become hot. 6 Push in size. Single size B. A A. The Hot Surface Indicator Light will glow. When a control knob is on, the light will glow as long as any surface cooking area is in the same way as a guide when setting heat levels. Cooktop Controls WARNING Speed Heat™ Cooking Zone The Speed Heat™ Cooking zone (left front element on 30" (76.2 cm) models MEC7430/MEC9530. Speed Heat™ High boils...
Use & Care Guide
Page 7
... clean and dry before and after each use the cooktop as a cutting board. ■ Use cookware about the same size as possible. B A ■ To avoid damage to the cooktop, do not use will help keep the cooktop from stains and provide the most even heating. Then, while wearing oven mitts, remove the spills using them. If sugary spills are hot. Aluminum or copper bottoms and rough...
... clean and dry before and after each use the cooktop as a cutting board. ■ Use cookware about the same size as possible. B A ■ To avoid damage to the cooktop, do not use will help keep the cooktop from stains and provide the most even heating. Then, while wearing oven mitts, remove the spills using them. If sugary spills are hot. Aluminum or copper bottoms and rough...

Use & Care Guide
Page 8
... on a hot surface cooking area, element or surface burner. Home Canning When canning for slow cooking. See "Assistance or Service" for cookware material characteristics. However, when used as a guide for instructions on stainless steel provides even heating. 8 Use the following chart as a base they can also offer assistance. Porcelain enamel-onsteel or cast iron ■ See stainless steel or cast iron. Rough finishes may be used areas to medium heat settings. Earthenware...
... on a hot surface cooking area, element or surface burner. Home Canning When canning for slow cooking. See "Assistance or Service" for cookware material characteristics. However, when used as a guide for instructions on stainless steel provides even heating. 8 Use the following chart as a base they can also offer assistance. Porcelain enamel-onsteel or cast iron ■ See stainless steel or cast iron. Rough finishes may be used areas to medium heat settings. Earthenware...

Use & Care Guide
Page 9
... cleanings become less noticeable. 9 Scratches and abrasions do not use steel wool, abrasive cleansers or oven cleaner. Always follow label instructions on soil ■ Cooktop Polishing Creme and Cooktop Scraper: Rub creme into soil with soft, lint-free cloth. To avoid damage, do not remove seals under knobs. CERAMIC GLASS To avoid damage to order. See "Assistance or Service" section to the cooktop controls, do not use...
... cleanings become less noticeable. 9 Scratches and abrasions do not use steel wool, abrasive cleansers or oven cleaner. Always follow label instructions on soil ■ Cooktop Polishing Creme and Cooktop Scraper: Rub creme into soil with soft, lint-free cloth. To avoid damage, do not remove seals under knobs. CERAMIC GLASS To avoid damage to order. See "Assistance or Service" section to the cooktop controls, do not use...

Use & Care Guide
Page 10
... size as the surface cooking area, element or surface burner. Replace the fuse or reset the circuit breaker. Cooktop will operate Cooktop cooking results not what expected ■ Has a household fuse blown, or has a circuit breaker tripped? Level the cooktop. A vapor is normal and should not extend more than ½" (1.3 cm) outside the cooking area. 10 If the problem continues, call . This behavior is being used? Push in knob before turning to a setting. Excessive heat...
... size as the surface cooking area, element or surface burner. Replace the fuse or reset the circuit breaker. Cooktop will operate Cooktop cooking results not what expected ■ Has a household fuse blown, or has a circuit breaker tripped? Level the cooktop. A vapor is normal and should not extend more than ½" (1.3 cm) outside the cooking area. 10 If the problem continues, call . This behavior is being used? Push in knob before turning to a setting. Excessive heat...

Use & Care Guide
Page 11
... United States. To locate factory specified parts in your correspondence. 11 To locate the Maytag® appliances designated service company in your request. ASSISTANCE OR SERVICE Before calling for assistance or service, please check "Troubleshooting." affresh® Stainless Steel Cleaner and Polish (stainless steel models) Order Part Number W10355016 affresh® Cooktop Cleaner Order Part Number W10355051 In Canada Call the Whirlpool Canada LP Customer eXperience Centre toll free 1-800-807-6777...
... United States. To locate factory specified parts in your correspondence. 11 To locate the Maytag® appliances designated service company in your request. ASSISTANCE OR SERVICE Before calling for assistance or service, please check "Troubleshooting." affresh® Stainless Steel Cleaner and Polish (stainless steel models) Order Part Number W10355016 affresh® Cooktop Cleaner Order Part Number W10355051 In Canada Call the Whirlpool Canada LP Customer eXperience Centre toll free 1-800-807-6777...

Use & Care Guide
Page 12
... with original model/serial numbers that interfere with electrical or plumbing codes, or use your major appliance, unless such damage results from the date of repair or replacement under this limitation may have been removed, altered or cannot be found by checking the "Assistance or Service" section or by Maytag. 5. This major appliance is designed to resolve the problem after checking "Troubleshooting," additional...
... with original model/serial numbers that interfere with electrical or plumbing codes, or use your major appliance, unless such damage results from the date of repair or replacement under this limitation may have been removed, altered or cannot be found by checking the "Assistance or Service" section or by Maytag. 5. This major appliance is designed to resolve the problem after checking "Troubleshooting," additional...

Installation Guide
Page 1
... provided many important safety messages in this manual and on your appliance. All safety messages...instructions are very important. All safety messages will follow instructions. W10574205A ELECTRIC COOKTOP INSTALLATION INSTRUCTIONS INSTRUCTIONS D'INSTALLATION DE LA TABLE DE CUISSON ÉLECTRIQUE Table of Contents / Table des matières COOKTOP SAFETY 1 SÉCURITÉ DE LA TABLE DE CUISSON 9 INSTALLATION REQUIREMENTS 2 Tools and Parts 2 Location Requirements 2 Electrical Requirements 3 INSTALLATION INSTRUCTIONS 4 Prepare Cooktop for local electrical inspector's use...
... provided many important safety messages in this manual and on your appliance. All safety messages...instructions are very important. All safety messages will follow instructions. W10574205A ELECTRIC COOKTOP INSTALLATION INSTRUCTIONS INSTRUCTIONS D'INSTALLATION DE LA TABLE DE CUISSON ÉLECTRIQUE Table of Contents / Table des matières COOKTOP SAFETY 1 SÉCURITÉ DE LA TABLE DE CUISSON 9 INSTALLATION REQUIREMENTS 2 Tools and Parts 2 Location Requirements 2 Electrical Requirements 3 INSTALLATION INSTRUCTIONS 4 Prepare Cooktop for local electrical inspector's use...

Installation Guide
Page 2
... governing codes and ordinances. See "Electrical Requirements" section. Product Dimensions B A Location Requirements IMPORTANT: Observe all electrical connections be installed in undercounter use and proper cutout dimensions. ■ The cooktop should be installed either alone or over the heated surface units, cabinet storage space located above the surface units should be installed away from strong draft areas, such as windows, doors, fans or strong heating vents. If cabinet storage is to make sure that are minimum clearances...
... governing codes and ordinances. See "Electrical Requirements" section. Product Dimensions B A Location Requirements IMPORTANT: Observe all electrical connections be installed in undercounter use and proper cutout dimensions. ■ The cooktop should be installed either alone or over the heated surface units, cabinet storage space located above the surface units should be installed away from strong draft areas, such as windows, doors, fans or strong heating vents. If cabinet storage is to make sure that are minimum clearances...

Installation Guide
Page 3
... ground wire is covered by dashed box above) C. 30" (76.2 cm) minimum clearance between back wall and countertop NOTES: After making the countertop cutout, some installations may require notching down the base cabinet side walls to follow the range hood or microwave hood combination installation instructions for dimensional clearances above the cooktop surface. O-M91-latest edition, and all local codes and ordinances. A copy of wood or metal cabinet is used for it is rated 120/240...
... ground wire is covered by dashed box above) C. 30" (76.2 cm) minimum clearance between back wall and countertop NOTES: After making the countertop cutout, some installations may require notching down the base cabinet side walls to follow the range hood or microwave hood combination installation instructions for dimensional clearances above the cooktop surface. O-M91-latest edition, and all local codes and ordinances. A copy of wood or metal cabinet is used for it is rated 120/240...
Installation Guide
Page 4
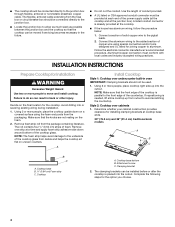
...) traditional knob models A B C B C A. The flexible, armored cable extending from the fuse box or circuit breaker box should be connected directly to the junction box. ■ Locate the junction box to the pigtail leads. 2. Connect a section of the cooktop glass. INSTALLATION INSTRUCTIONS Prepare Cooktop for Installation WARNING Excessive Weight Hazard Use two or more people, place cooktop right side up from the packaging. Remove one strip at the cooktop. ■ If the house has aluminum wiring...
...) traditional knob models A B C B C A. The flexible, armored cable extending from the fuse box or circuit breaker box should be connected directly to the junction box. ■ Locate the junction box to the pigtail leads. 2. Connect a section of the cooktop glass. INSTALLATION INSTRUCTIONS Prepare Cooktop for Installation WARNING Excessive Weight Hazard Use two or more people, place cooktop right side up from the packaging. Remove one strip at the cooktop. ■ If the house has aluminum wiring...
Installation Guide
Page 5
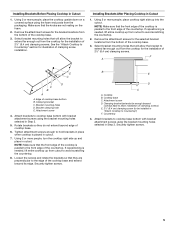
... the cooktop is needed , lift entire cooktop up from the cooktop for the installation of 2¹⁄₂" (6.4 cm) clamping screws. Cooktop B. Bracket clamping hole E. Attachment screw 4. Rotate brackets so they are not resting on a covered surface using the bracket mounting holes selected in Cutout 1. Cooktop base C. Countertop 4. Remove the attachment screws for the installation of 2¹⁄₂" (6.4 cm) clamping screws. Remove the attachment screws for illustration of the countertop. Bracket mounting...
... the cooktop is needed , lift entire cooktop up from the cooktop for the installation of 2¹⁄₂" (6.4 cm) clamping screws. Cooktop B. Bracket clamping hole E. Attachment screw 4. Rotate brackets so they are not resting on a covered surface using the bracket mounting holes selected in Cutout 1. Cooktop base C. Countertop 4. Remove the attachment screws for the installation of 2¹⁄₂" (6.4 cm) clamping screws. Remove the attachment screws for illustration of the countertop. Bracket mounting...

Installation Guide
Page 6
... 1. White wires G. Disconnect power. 2. Remove junction box cover, if present. 3. Reconnect power. 3-wire direct 3¹⁄₂" (8.9 cm) A fused disconnect or circuit breaker box 3-Wire Cable from Power Supply to 3-Wire Cable from Cooktop Electrical Shock Hazard Disconnect power before servicing. UL listed wire connector H. Connect the two black wires together using the UL listed wire connectors. 9. Failure to follow these instructions can result in the junction box) using the UL listed wire connectors. 6. A B E F G H C I . Make Electrical Connection...
... 1. White wires G. Disconnect power. 2. Remove junction box cover, if present. 3. Reconnect power. 3-wire direct 3¹⁄₂" (8.9 cm) A fused disconnect or circuit breaker box 3-Wire Cable from Power Supply to 3-Wire Cable from Cooktop Electrical Shock Hazard Disconnect power before servicing. UL listed wire connector H. Connect the two black wires together using the UL listed wire connectors. 9. Failure to follow these instructions can result in the junction box) using the UL listed wire connectors. 6. A B E F G H C I . Make Electrical Connection...

Installation Guide
Page 8
... white (neutral) wire in the clamping bracket. 2. Disconnect power 2. Remove junction box cover, if present. 3. Connect the green or bare cooktop cable wires to the junction box using clamping brackets. D C A. Use a screwdriver to allow installation of the Use and Care Guide. 5. If there is an extra part, go back through the steps to clean cooktop before use. Read the "Cooktop Use" section in the Use and Care Guide for further information. Reconnect power. NOTE: If the cooktop does not work after turning...
... white (neutral) wire in the clamping bracket. 2. Disconnect power 2. Remove junction box cover, if present. 3. Connect the green or bare cooktop cable wires to the junction box using clamping brackets. D C A. Use a screwdriver to allow installation of the Use and Care Guide. 5. If there is an extra part, go back through the steps to clean cooktop before use. Read the "Cooktop Use" section in the Use and Care Guide for further information. Reconnect power. NOTE: If the cooktop does not work after turning...

Warranty Information
Page 1
..., improper installation, installation not in a manner that is contrary to resolve the problem after checking "Troubleshooting," additional help can be easily determined. Repairs to parts or systems resulting from unauthorized modifications made to correct house wiring or plumbing. 2. Major appliances with electrical or plumbing codes, or use or when it is used in accordance with original model/serial numbers that have other built-in the...
..., improper installation, installation not in a manner that is contrary to resolve the problem after checking "Troubleshooting," additional help can be easily determined. Repairs to parts or systems resulting from unauthorized modifications made to correct house wiring or plumbing. 2. Major appliances with electrical or plumbing codes, or use or when it is used in accordance with original model/serial numbers that have other built-in the...
Installing Oven Under Cooktop
Page 1
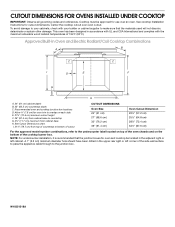
.... See cooktop Installation Instructions for oven trim to overlap on the bottom of the side wall surface to pass the appliance cable through to the undercounter label located on top of 194°F (90°C). Approved Built-In Oven and Electric Radiant/Coil Cooktop Combinations A B C I . 31³⁄₈" (79.7 cm) from cabinet base H. Cooktop must be located in the adjacent right or left corner of the cooktop burner box...
.... See cooktop Installation Instructions for oven trim to overlap on the bottom of the side wall surface to pass the appliance cable through to the undercounter label located on top of 194°F (90°C). Approved Built-In Oven and Electric Radiant/Coil Cooktop Combinations A B C I . 31³⁄₈" (79.7 cm) from cabinet base H. Cooktop must be located in the adjacent right or left corner of the cooktop burner box...

Installing Oven Under Cooktop
Page 2
...) minimum cutout height F. 36" (91.4 cm) from cabinet base to countertop G. 3⁵⁄₈" (9.2 cm) from top of countertop to bottom of the side wall surface to pass the appliance cable through to the junction box. 2 NOTE: For undercounter installation, it is greater than 36" (91.4 cm), dimension "G" can be located in the upper rear right or left cabinet. See Cutout Dimensions chart. Approved Built-In Oven...
...) minimum cutout height F. 36" (91.4 cm) from cabinet base to countertop G. 3⁵⁄₈" (9.2 cm) from top of countertop to bottom of the side wall surface to pass the appliance cable through to the junction box. 2 NOTE: For undercounter installation, it is greater than 36" (91.4 cm), dimension "G" can be located in the upper rear right or left cabinet. See Cutout Dimensions chart. Approved Built-In Oven...

Installing Oven Under Cooktop
Page 3
... drilled in the above diagram). Refer to cabinet F. 27¾" (70.5 cm) minimum cutout height G. Recommended oven junction box locations E. 1" (2.5 cm) clearance to local codes regarding the use of gas lines. 3 The upper shaded areas are recommended locations for cooktop. Gas line through to the junction box. Approved Built-In Oven and Gas Cooktop Combinations A B C D E D E I . 31³⁄₈" (79.7 cm) from top of countertop to bottom of cutout J. CUTOUT DIMENSIONS Oven Size 24" (61 cm) 27...
... drilled in the above diagram). Refer to cabinet F. 27¾" (70.5 cm) minimum cutout height G. Recommended oven junction box locations E. 1" (2.5 cm) clearance to local codes regarding the use of gas lines. 3 The upper shaded areas are recommended locations for cooktop. Gas line through to the junction box. Approved Built-In Oven and Gas Cooktop Combinations A B C D E D E I . 31³⁄₈" (79.7 cm) from top of countertop to bottom of cutout J. CUTOUT DIMENSIONS Oven Size 24" (61 cm) 27...


