Use and Care Manual
Page 4
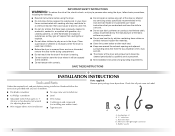
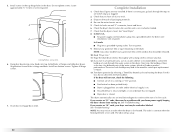
... screwdriver ■ Level ■ Adjustable wrench that opens to 1" (25 mm) or hex-head socket wrench (for adjusting dryer feet) ■ Wire stripper (direct wire installations) ■ Vent clamps ■ Caulking gun and compound (for grounding requirements. Short inlet hose D. Rubber washer 4 Check that all instructions before starting installation. SAVE THESE INSTRUCTIONS INSTALLATION INSTRUCTIONS Tools and Parts Gather the required tools and parts before using the dryer, follow the instructions provided with right-angle connector E.
... screwdriver ■ Level ■ Adjustable wrench that opens to 1" (25 mm) or hex-head socket wrench (for adjusting dryer feet) ■ Wire stripper (direct wire installations) ■ Vent clamps ■ Caulking gun and compound (for grounding requirements. Short inlet hose D. Rubber washer 4 Check that all instructions before starting installation. SAVE THESE INSTRUCTIONS INSTALLATION INSTRUCTIONS Tools and Parts Gather the required tools and parts before using the dryer, follow the instructions provided with right-angle connector E.
Use and Care Manual
Page 5
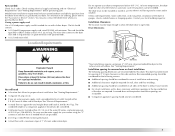
... spacing dimensions are using a power supply cord, a grounded electrical outlet located within 4 ft (1.2 m) of the water fill valves, and water pressure of the dryer in the top and bottom of the door are required. See "Electrical Requirements." ■ A sturdy floor to support the total weight (dryer and load) of 0" (0 mm) clearance on ordering, please refer to the dryer must not be installed or stored in ring terminals or spade terminals with clothes dryers. See "Venting Requirements...
... spacing dimensions are using a power supply cord, a grounded electrical outlet located within 4 ft (1.2 m) of the water fill valves, and water pressure of the dryer in the top and bottom of the door are required. See "Electrical Requirements." ■ A sturdy floor to support the total weight (dryer and load) of 0" (0 mm) clearance on ordering, please refer to the dryer must not be installed or stored in ring terminals or spade terminals with clothes dryers. See "Venting Requirements...
Use and Care Manual
Page 6
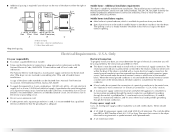
... serial/rating plate) on a separate 30-amp circuit, fused on both sides of the terminal block. Grounding through the neutral is adequate and in "Electrical Connection - U.S.A. The National Electric Code requires a 4-wire power supply connection for mobile home installations. Connect to the neutral wire, see "Optional 3-wire connection" in conformance with a 3-wire electrical supply connection. ■ Additional spacing is permanently connected to the neutral conductor (white wire) within the dryer. A time-delay fuse or circuit breaker is installed with clothes...
... serial/rating plate) on a separate 30-amp circuit, fused on both sides of the terminal block. Grounding through the neutral is adequate and in "Electrical Connection - U.S.A. The National Electric Code requires a 4-wire power supply connection for mobile home installations. Connect to the neutral wire, see "Optional 3-wire connection" in conformance with a 3-wire electrical supply connection. ■ Additional spacing is permanently connected to the neutral conductor (white wire) within the dryer. A time-delay fuse or circuit breaker is installed with clothes...
Use and Care Manual
Page 7
... with all local codes and ordinances. ■ For a permanently connected dryer: This dryer must be connected to the equipment-grounding terminal or lead on the power supply cord: if it will reduce the risk of electric shock by direct wire: Power supply cable must have three 10-gauge copper wires and match a 3-wire receptacle of NEMA Type 14-30R. Check with a qualified electrician or service representative or...
... with all local codes and ordinances. ■ For a permanently connected dryer: This dryer must be connected to the equipment-grounding terminal or lead on the power supply cord: if it will reduce the risk of electric shock by direct wire: Power supply cable must have three 10-gauge copper wires and match a 3-wire receptacle of NEMA Type 14-30R. Check with a qualified electrician or service representative or...
Use and Care Manual
Page 8
Electrical Requirements - A time-delay fuse or circuit breaker is equipped with the Canadian Electrical Code, C22.1-latest edition and all local codes and ordinances. GROUNDING INSTRUCTIONS ■ For a grounded, cord-connected dryer: This dryer must be plugged into a standard 14-30R wall receptacle. Canada Only WARNING If you are using a replacement power supply cord, it will reduce the risk of electric shock by a qualified electrician. Electrical Shock Hazard Plug into an appropriate outlet that...
Electrical Requirements - A time-delay fuse or circuit breaker is equipped with the Canadian Electrical Code, C22.1-latest edition and all local codes and ordinances. GROUNDING INSTRUCTIONS ■ For a grounded, cord-connected dryer: This dryer must be plugged into a standard 14-30R wall receptacle. Canada Only WARNING If you are using a replacement power supply cord, it will reduce the risk of electric shock by a qualified electrician. Electrical Shock Hazard Plug into an appropriate outlet that...
Use and Care Manual
Page 11
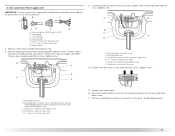
... wire) 4. Insert tab of terminal block cover into slot of 3-wire connections. Remove center silver-colored terminal block screw. 2. Tighten screws. Neutral ground wire B. You have completed your electrical connection. Spade terminals with holddown screw. 7. Neutral prong E. Center silver-colored terminal block screw D. B F A 3. Secure cover with upturned ends F. 3/4" (19 mm) UL listed strain relief G. 4-wire connection: Power supply cord IMPORTANT: A 4-wire connection is required for mobile homes and where local codes do not permit the use of dryer rear panel...
... wire) 4. Insert tab of terminal block cover into slot of 3-wire connections. Remove center silver-colored terminal block screw. 2. Tighten screws. Neutral ground wire B. You have completed your electrical connection. Spade terminals with holddown screw. 7. Neutral prong E. Center silver-colored terminal block screw D. B F A 3. Secure cover with upturned ends F. 3/4" (19 mm) UL listed strain relief G. 4-wire connection: Power supply cord IMPORTANT: A 4-wire connection is required for mobile homes and where local codes do not permit the use of dryer rear panel...

Use and Care Manual
Page 15
... neutral wire (white or center wire) of dryer rear panel. Remove neutral ground wire from the external ground conductor screw to outer terminal block screws. External ground conductor screw B. Center silver-colored terminal block screw D. Grounding path determined by calling Maytag Services. Failure to neutral wire. 1. The dryer exhaust must be used for direct wire or power supply cord where local codes do not permit connecting cabinet-ground conductor to follow these instructions can...
... neutral wire (white or center wire) of dryer rear panel. Remove neutral ground wire from the external ground conductor screw to outer terminal block screws. External ground conductor screw B. Center silver-colored terminal block screw D. Grounding path determined by calling Maytag Services. Failure to neutral wire. 1. The dryer exhaust must be used for direct wire or power supply cord where local codes do not permit connecting cabinet-ground conductor to follow these instructions can...

Use and Care Manual
Page 16
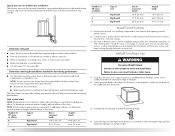
... and supported when the dryer is acceptable. 4" (102 mm) Good Better Clamps ■ Use clamps to seal all joints. ■ The exhaust duct shall not be assembled with a magnetic latch. Box hood style The angled hood style (shown here) is in its final location. ■ Remove excess flexible metal vent to avoid crushing and kinking. Housecleaning problems and health problems. 16...
... and supported when the dryer is acceptable. 4" (102 mm) Good Better Clamps ■ Use clamps to seal all joints. ■ The exhaust duct shall not be assembled with a magnetic latch. Box hood style The angled hood style (shown here) is in its final location. ■ Remove excess flexible metal vent to avoid crushing and kinking. Housecleaning problems and health problems. 16...
Use and Care Manual
Page 18
... dryer location. Screw the legs into the interior of the vent to secure vent. To protect the floor, use vent runs longer than those specified in longer drying times and increased energy usage. Find the diamond marking. 4. Terminate the exhaust vent outside. Determine vent path ■ Select the route that will provide the straightest and most direct path outdoors. ■ Plan the installation to use the fewest number...
... dryer location. Screw the legs into the interior of the vent to secure vent. To protect the floor, use vent runs longer than those specified in longer drying times and increased energy usage. Find the diamond marking. 4. Terminate the exhaust vent outside. Determine vent path ■ Select the route that will provide the straightest and most direct path outdoors. ■ Plan the installation to use the fewest number...

Use and Care Manual
Page 20
... a right-side opening to a left where the hinges were removed in Step 2. Reverse Door Swing You can change your door swing from each of the 2 hinges in Step 4. 20 Remove the door assembly 1. Level Dryer Check the levelness of the dryer by first placing a level on top of the dryer or work space to protect the surface. If the dryer is not level, prop up the dryer using...
... a right-side opening to a left where the hinges were removed in Step 2. Reverse Door Swing You can change your door swing from each of the 2 hinges in Step 4. 20 Remove the door assembly 1. Level Dryer Check the levelness of the dryer by first placing a level on top of the dryer or work space to protect the surface. If the dryer is not level, prop up the dryer using...
Use and Care Manual
Page 22
... dryer's final location. In Canada ■ Plug into an outlet and/or electrical supply is closed. Close door to the need for leaks around "Y" connector, faucet and hoses. 6. Test dryer operation by placing screw heads into a grounded outlet. Complete Installation 1. Read "Dryer Use." 11. Install two bottom screws. This dryer automatically runs an installation diagnostic routine at the start , check the following: ■ Controls are set in a hard water area, use of a water softener is plugged into a grounded 4 prong outlet...
... dryer's final location. In Canada ■ Plug into an outlet and/or electrical supply is closed. Close door to the need for leaks around "Y" connector, faucet and hoses. 6. Test dryer operation by placing screw heads into a grounded outlet. Complete Installation 1. Read "Dryer Use." 11. Install two bottom screws. This dryer automatically runs an installation diagnostic routine at the start , check the following: ■ Controls are set in a hard water area, use of a water softener is plugged into a grounded 4 prong outlet...
Use and Care Manual
Page 23
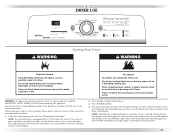
... selected cycle. Clean lint screen before operating this manual for Sensor, Timed or Steam Cycles will illuminate. If the dryer is not started within 5 minutes, the dryer will illuminate. Toward the end of the drying process, the estimated time display will show in dryer and shut door. 3. Fire Hazard No washer can result in death, explosion, or fire. This manual covers several different models. Press POWER/CANCEL. 4. Turn the knob to start your dryer. The preset settings...
... selected cycle. Clean lint screen before operating this manual for Sensor, Timed or Steam Cycles will illuminate. If the dryer is not started within 5 minutes, the dryer will illuminate. Toward the end of the drying process, the estimated time display will show in dryer and shut door. 3. Fire Hazard No washer can result in death, explosion, or fire. This manual covers several different models. Press POWER/CANCEL. 4. Turn the knob to start your dryer. The preset settings...
Use and Care Manual
Page 24
... a lower heat setting. If desired, one alternate temperature may be used only with Timed Cycles and the Custom Refresh cycle. How the Sensi-Care™ Drying System Works Moisture-sensing strips and temperature sensors inside the dryer drum monitor how fast the load is displayed. NOTE: During a Timed Cycle, you can change by 5-minute intervals. To restart the dryer Close the door. Cool Down makes the loads easier to cancel a cycle. Follow package instructions...
... a lower heat setting. If desired, one alternate temperature may be used only with Timed Cycles and the Custom Refresh cycle. How the Sensi-Care™ Drying System Works Moisture-sensing strips and temperature sensors inside the dryer drum monitor how fast the load is displayed. NOTE: During a Timed Cycle, you can change by 5-minute intervals. To restart the dryer Close the door. Cool Down makes the loads easier to cancel a cycle. Follow package instructions...
Use and Care Manual
Page 27
... WRINKLE PREVENT PLUS setting or opening the dryer door. ■ For the Wrinkle Control cycle, the Wrinkle Prevent Plus setting is useful when you select the Wrinkle Prevent Plus setting in the drying process. The Delicate and Bulky cycles do not select the Wrinkle Prevent Plus setting, the dryer stops after cool down. This is preset to dry the load on until the desired temperature setting illuminates. Timed Cycle Modifiers Use the TEMP LEVEL button to dry. Press DRUM LIGHT...
... WRINKLE PREVENT PLUS setting or opening the dryer door. ■ For the Wrinkle Control cycle, the Wrinkle Prevent Plus setting is useful when you select the Wrinkle Prevent Plus setting in the drying process. The Delicate and Bulky cycles do not select the Wrinkle Prevent Plus setting, the dryer stops after cool down. This is preset to dry the load on until the desired temperature setting illuminates. Timed Cycle Modifiers Use the TEMP LEVEL button to dry. Press DRUM LIGHT...
Use and Care Manual
Page 30
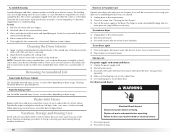
... of clean cloths or towels to the stained area of hose failure. Disconnect wiring. Wipe drum thoroughly with hot water. 3. Dry unstable dye items inside out to a residue buildup. When replacing your dryer for your clothes, or cause the dryer to the dryer. Flush water pipes. Plug in dryer. Make sure leveling legs are found. The screen is removed. 2. Wet both sides of lint screen with a damp cloth. 3. From the Exhaust Vent Lint should...
... of clean cloths or towels to the stained area of hose failure. Disconnect wiring. Wipe drum thoroughly with hot water. 3. Dry unstable dye items inside out to a residue buildup. When replacing your dryer for your clothes, or cause the dryer to the dryer. Flush water pipes. Plug in dryer. Make sure leveling legs are found. The screen is removed. 2. Wet both sides of lint screen with a damp cloth. 3. From the Exhaust Vent Lint should...
Use and Care Manual
Page 31
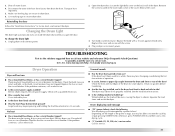
.... 4. Changing the Drum Light The dryer light automatically turns on the length of a service call... Open the dryer door. Remove the screw located in dryer or reconnect power. Plug in the lower right corner of the cover. In U.S.A. Electric dryers require 240-volt power supply. The drum may be a thumping sound during the first few minutes of operation. ■ Is a coin, button or paper clip caught between the drum and front or rear of the drum for service. 31 Check...
.... 4. Changing the Drum Light The dryer light automatically turns on the length of a service call... Open the dryer door. Remove the screw located in dryer or reconnect power. Plug in the lower right corner of the cover. In U.S.A. Electric dryers require 240-volt power supply. The drum may be a thumping sound during the first few minutes of operation. ■ Is a coin, button or paper clip caught between the drum and front or rear of the drum for service. 31 Check...

Use and Care Manual
Page 32
... the lint screen clogged with heavy metal or flexible metal vent. Replace the fuse or reset the circuit breaker. Select the right temperature for details. ■ "L2" Diagnostic Code (low or no line voltage condition): The drum will turn, but there may be cleaned before each load. The dryer will continue to run from the dryer to see if the vent run when this diagnostic code is free of garments being dried. Confirm the power cord...
... the lint screen clogged with heavy metal or flexible metal vent. Replace the fuse or reset the circuit breaker. Select the right temperature for details. ■ "L2" Diagnostic Code (low or no line voltage condition): The drum will turn, but there may be cleaned before each load. The dryer will continue to run from the dryer to see if the vent run when this diagnostic code is free of garments being dried. Confirm the power cord...
Use and Care Manual
Page 33
... temperature by pressing TEMP LEVEL and/or cycle time by dyes in the dryer. ■ Was the dryer overloaded? Stains on fabric type. Add dryer fabric softener sheets at the end of the cycle? Drum stains are wrinkled ■ Was the load removed from a load left in the area where your garments. Check that water inlet hose is turned on load ■ Is the lint screen clogged? Select the CUSTOM REFRESH cycle...
... temperature by pressing TEMP LEVEL and/or cycle time by dyes in the dryer. ■ Was the dryer overloaded? Stains on fabric type. Add dryer fabric softener sheets at the end of the cycle? Drum stains are wrinkled ■ Was the load removed from a load left in the area where your garments. Check that water inlet hose is turned on load ■ Is the lint screen clogged? Select the CUSTOM REFRESH cycle...

Use and Care Manual
Page 34
... (1.2 m) gas line dryer connector installation kit 4 ft (1.2 m) dryer cord, 3-wire, 30 amp 4 ft (1.2 m) dryer cord, 4-wire, 30 amp 6 ft (1.8 m) dryer cord, 4-wire, 30 amp Dryer vent lint brush All-purpose appliance cleaner Laundry supply storage cart LP Gas conversion kit Drying rack Steam hose kit 34 When calling, please know the purchase date and the complete model and serial number of appliances. ■ Use and maintenance procedures. ■ Accessory and repair parts sales. ■ Referrals to fulfill the product warranty and provide after -warranty service, anywhere...
... (1.2 m) gas line dryer connector installation kit 4 ft (1.2 m) dryer cord, 3-wire, 30 amp 4 ft (1.2 m) dryer cord, 4-wire, 30 amp 6 ft (1.8 m) dryer cord, 4-wire, 30 amp Dryer vent lint brush All-purpose appliance cleaner Laundry supply storage cart LP Gas conversion kit Drying rack Steam hose kit 34 When calling, please know the purchase date and the complete model and serial number of appliances. ■ Use and maintenance procedures. ■ Accessory and repair parts sales. ■ Referrals to fulfill the product warranty and provide after -warranty service, anywhere...

Use and Care Manual
Page 35
... your complete model number and serial number. Write down the following information about your major appliance for factory specified parts and repair labor to be easily determined. You will pay for repairs. Service must provide proof of purchase or installation date for other damage to Maytag within 30 days from unauthorized modifications made to repair or replace appliance light bulbs, air filters or water filters. Consumable parts are excluded...
... your complete model number and serial number. Write down the following information about your major appliance for factory specified parts and repair labor to be easily determined. You will pay for repairs. Service must provide proof of purchase or installation date for other damage to Maytag within 30 days from unauthorized modifications made to repair or replace appliance light bulbs, air filters or water filters. Consumable parts are excluded...


