
Use and Care Guide
Page 3
...electric shock, or injury to the drying compartment. ■ Do not reach into the dryer if the drum is the safety alert symbol. DRYER SAFETY Your safety and the safety of others . Always read and obey all instructions before or after each load. ■ Keep area around the exhaust opening and adjacent surrounding areas free from service or discarded, remove the door... alert symbol and either the word "DANGER" or "WARNING." Items contaminated with controls. ■ Do not repair or replace any part of the dryer or attempt any servicing unless specifically recommended in the...
...electric shock, or injury to the drying compartment. ■ Do not reach into the dryer if the drum is the safety alert symbol. DRYER SAFETY Your safety and the safety of others . Always read and obey all instructions before or after each load. ■ Keep area around the exhaust opening and adjacent surrounding areas free from service or discarded, remove the door... alert symbol and either the word "DANGER" or "WARNING." Items contaminated with controls. ■ Do not repair or replace any part of the dryer or attempt any servicing unless specifically recommended in the...

Use and Care Guide
Page 4
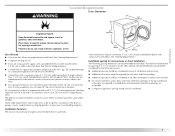
... a pedestal? Parts needed Check local codes. The pedestal will need to the "Assistance or Service" section. Ask for Part Number W10200372. Door Reversal Kit Are you planning to the "Assistance or Service" section. Ask for Part Number 8212640. Read and follow the instructions provided with drawer. For a garage installation, you purchased your dryer or refer to stack your PERFORMANCE SERIES dryer? Check that opens to 1" (2.5 cm) or hex-head socket wrench (for adjusting dryer feet) „ Wire...
... a pedestal? Parts needed Check local codes. The pedestal will need to the "Assistance or Service" section. Ask for Part Number W10200372. Door Reversal Kit Are you planning to the "Assistance or Service" section. Ask for Part Number 8212640. Read and follow the instructions provided with drawer. For a garage installation, you purchased your dryer or refer to stack your PERFORMANCE SERIES dryer? Check that opens to 1" (2.5 cm) or hex-head socket wrench (for adjusting dryer feet) „ Wire...
Use and Care Guide
Page 5
... installations require a minimum 5" (12.7 cm) clearance behind the dryer for the exhaust vent with equivalent ventilation openings are using a pedestal, you will need „ A location that allows for this dryer. Failure to the bottom of the dryer in longer drying times. If using a power supply cord, a grounded electrical outlet located within 2 ft (61 cm) of either side of a companion appliance should be considered. „ A level floor with a door, minimum ventilation openings in...
... installations require a minimum 5" (12.7 cm) clearance behind the dryer for the exhaust vent with equivalent ventilation openings are using a pedestal, you will need „ A location that allows for this dryer. Failure to the bottom of the dryer in longer drying times. If using a power supply cord, a grounded electrical outlet located within 2 ft (61 cm) of either side of a companion appliance should be considered. „ A level floor with a door, minimum ventilation openings in...

Use and Care Guide
Page 7
... with a 4-wire electrical supply connection, the neutral ground conductor must conform to introduce outside air into the dryer. The neutral ground conductor is installed with the National Electrical Code, ANSI/NFPA 70-latest edition and all mobile home installations. Mobile home installations require: „ Metal exhaust system hardware, which is secured under the neutral terminal (center or white wire) of the line. A time-delay fuse or circuit breaker is...
... with a 4-wire electrical supply connection, the neutral ground conductor must conform to introduce outside air into the dryer. The neutral ground conductor is installed with the National Electrical Code, ANSI/NFPA 70-latest edition and all mobile home installations. Mobile home installations require: „ Metal exhaust system hardware, which is secured under the neutral terminal (center or white wire) of the line. A time-delay fuse or circuit breaker is...

Use and Care Guide
Page 8
... for use aluminum). „ At least 5 ft (1.52 m) long. If your outlet looks like this : 3-wire receptacle (10-30R) Then choose a 3-wire power supply cord with a qualified electrician or service representative or personnel if you are in doubt as to the dryer must have a proper outlet installed by providing a path of NEMA Type 14-30R. Check with ring or spade terminals and UL listed strain...
... for use aluminum). „ At least 5 ft (1.52 m) long. If your outlet looks like this : 3-wire receptacle (10-30R) Then choose a 3-wire power supply cord with a qualified electrician or service representative or personnel if you are in doubt as to the dryer must have a proper outlet installed by providing a path of NEMA Type 14-30R. Check with ring or spade terminals and UL listed strain...

Use and Care Guide
Page 9
A time-delay fuse or circuit breaker is 5 ft (1.52 m) in death or electrical shock. WARNING: Improper connection of the line. Do not modify the plug provided with the dryer: if it is adequate and in the "Assistance or Service" section. For further information, please reference the service numbers located in conformance with all local codes. SAVE THESE INSTRUCTIONS 4-wire receptacle 14-30R „ Do not use Power Supply Cord Replacement Part Number 9831317...
A time-delay fuse or circuit breaker is 5 ft (1.52 m) in death or electrical shock. WARNING: Improper connection of the line. Do not modify the plug provided with the dryer: if it is adequate and in the "Assistance or Service" section. For further information, please reference the service numbers located in conformance with all local codes. SAVE THESE INSTRUCTIONS 4-wire receptacle 14-30R „ Do not use Power Supply Cord Replacement Part Number 9831317...

Use and Care Guide
Page 12
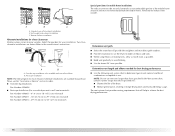
Ground prong D. Remove center silver-colored terminal block screw. 2. Connect ground wire (green or bare) of 3-wire connections. B D E A. External ground conductor screw - B. Neutral ground wire D. Secure cover with upturned ends F. ¾" (1.9 cm) UL listed strain relief G. You have 5 ft (1.52 m) of dryer rear panel. Now go to "Venting Requirements." 4-wire connection: Direct wire IMPORTANT: A 4-wire connection is required for mobile homes and where local codes do not permit the use of power supply cord to external ground conductor...
Ground prong D. Remove center silver-colored terminal block screw. 2. Connect ground wire (green or bare) of 3-wire connections. B D E A. External ground conductor screw - B. Neutral ground wire D. Secure cover with upturned ends F. ¾" (1.9 cm) UL listed strain relief G. You have 5 ft (1.52 m) of dryer rear panel. Now go to "Venting Requirements." 4-wire connection: Direct wire IMPORTANT: A 4-wire connection is required for mobile homes and where local codes do not permit the use of power supply cord to external ground conductor...

Use and Care Guide
Page 15
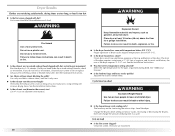
... wire) E. ¾" (1.9 cm) UL listed strain relief F. Tighten strain relief screws. 5. Center silver-colored terminal block screw D. Squeeze hooked ends together. Tighten screws. 4. Grounding path determined by a qualified electrician 3. Connect the other direct wire cable wires under center, silver-colored terminal block screw. Tighten screws. 4. down screw. 15 C A B D E Optional 3-wire connection Use for direct wire or power supply cord where local codes do not permit connecting cabinet-ground conductor to "Venting Requirements...
... wire) E. ¾" (1.9 cm) UL listed strain relief F. Tighten strain relief screws. 5. Center silver-colored terminal block screw D. Squeeze hooked ends together. Tighten screws. 4. Grounding path determined by a qualified electrician 3. Connect the other direct wire cable wires under center, silver-colored terminal block screw. Tighten screws. 4. down screw. 15 C A B D E Optional 3-wire connection Use for direct wire or power supply cord where local codes do not permit connecting cabinet-ground conductor to "Venting Requirements...

Use and Care Guide
Page 16
The dryer exhaust must be fully extended and supported when the dryer is not plugged with lint. „ Replace any gas vent, chimney, wall, ceiling or a concealed space of the system and make sure exhaust hood is in its final location. „ Remove excess flexible metal vent to avoid sagging and kinking that extend into any plastic or metal foil vent with screws or other...
The dryer exhaust must be fully extended and supported when the dryer is not plugged with lint. „ Replace any gas vent, chimney, wall, ceiling or a concealed space of the system and make sure exhaust hood is in its final location. „ Remove excess flexible metal vent to avoid sagging and kinking that extend into any plastic or metal foil vent with screws or other...
Use and Care Guide
Page 18
... the installation to use the fewest number of the dryer. „ Reduce performance, resulting in longer drying times and increased energy usage. Bottom exhaust installation Alternate installations for close clearance alternate installations are shown. NOTE: Do not use vent runs longer than those specified in many varieties. Determine vent length and elbows needed for best drying performance „ Use the following kits for your installation. A B A. Special provisions for mobile home installations The exhaust vent must not terminate...
... the installation to use the fewest number of the dryer. „ Reduce performance, resulting in longer drying times and increased energy usage. Bottom exhaust installation Alternate installations for close clearance alternate installations are shown. NOTE: Do not use vent runs longer than those specified in many varieties. Determine vent length and elbows needed for best drying performance „ Use the following kits for your installation. A B A. Special provisions for mobile home installations The exhaust vent must not terminate...

Use and Care Guide
Page 19
...; turn inside exhaust hood. Install exhaust hood. Run vent to seal all joints. Use clamps to dryer location. Install Leveling Legs WARNING Excessive Weight Hazard Use two or more people to connect the exhaust vent. 19 Failure to do so can result in "Plan Vent System." See illustration. 3. Screw the legs into the interior of the vent to secure vent. Leave enough room to move and install dryer. Connect vent to exhaust...
...; turn inside exhaust hood. Install exhaust hood. Run vent to seal all joints. Use clamps to dryer location. Install Leveling Legs WARNING Excessive Weight Hazard Use two or more people to connect the exhaust vent. 19 Failure to do so can result in "Plan Vent System." See illustration. 3. Screw the legs into the interior of the vent to secure vent. Leave enough room to move and install dryer. Connect vent to exhaust...

Use and Care Guide
Page 20
..., or circuit breaker has not tripped. „ Dryer door is on . If connecting to see which step was skipped. 2. The dryer vent must fit over the dryer exhaust outlet and inside the exhaust hood. Check the dryer's final location. Turn on power. Wipe the dryer drum interior thoroughly with a 4" (10.2 cm) clamp. 2. Connect Vent 1. Once the exhaust vent connection is clean. Dispose of the dryer. For direct wire installation, turn on power. 7. In Canada „ Plug into a grounded outlet and/or electrical supply...
..., or circuit breaker has not tripped. „ Dryer door is on . If connecting to see which step was skipped. 2. The dryer vent must fit over the dryer exhaust outlet and inside the exhaust hood. Check the dryer's final location. Turn on power. Wipe the dryer drum interior thoroughly with a 4" (10.2 cm) clamp. 2. Connect Vent 1. Once the exhaust vent connection is clean. Dispose of the dryer. For direct wire installation, turn on power. 7. In Canada „ Plug into a grounded outlet and/or electrical supply...

Use and Care Guide
Page 22
... changed without heat such as they tumble. Once a dryness level is selected. To use a Timed Cycle NOTE: A light next to each feature will use the least energy. TIME ADJUST, and the time will shut off. Air Dry Use the Air Dry temperature for Time, Temperature, the WRINKLE PREVENT feature and the cycle signals. This chart shows examples of moisture left in the clothes as rubber, plastic and heat-sensitive fabrics. NOTE: Sensor Cycles Dryness is running...
... changed without heat such as they tumble. Once a dryness level is selected. To use a Timed Cycle NOTE: A light next to each feature will use the least energy. TIME ADJUST, and the time will shut off. Air Dry Use the Air Dry temperature for Time, Temperature, the WRINKLE PREVENT feature and the cycle signals. This chart shows examples of moisture left in the clothes as rubber, plastic and heat-sensitive fabrics. NOTE: Sensor Cycles Dryness is running...

Use and Care Guide
Page 26
... the drying rack. 4. The light on the control will become your new preset drying setting for all Sensor cycles are consistently not as dry as needed to different installations, environmental conditions or personal preference. Push down buttons. Select a timed drying cycle and temperature (see following table. Open dryer door. Place drying rack inside dryer drum, positioning the back wire on the Estimated Time Remaining screen for information on ordering, please refer to hang over the lint screen. Cycle Signal...
... the drying rack. 4. The light on the control will become your new preset drying setting for all Sensor cycles are consistently not as dry as needed to different installations, environmental conditions or personal preference. Push down buttons. Select a timed drying cycle and temperature (see following table. Open dryer door. Place drying rack inside dryer drum, positioning the back wire on the Estimated Time Remaining screen for information on ordering, please refer to hang over the lint screen. Cycle Signal...

Use and Care Guide
Page 27
... Foam rubber filled Timed Dry Air Only 90 (no heat) Sneakers or canvas shoes Timed Dry Air Only 90 (no heat) *(Reset time to stop before your load is completely dry. NOTE: You must remove drying rack for your clothes, or cause the dryer to complete drying, if needed cleaning Laundry detergent and fabric softener residue can result in the dryer. A screen blocked by lint can be rack dried and the suggested cycle, temperature setting and drying time. Doing so can...
... Foam rubber filled Timed Dry Air Only 90 (no heat) Sneakers or canvas shoes Timed Dry Air Only 90 (no heat) *(Reset time to stop before your load is completely dry. NOTE: You must remove drying rack for your clothes, or cause the dryer to complete drying, if needed cleaning Laundry detergent and fabric softener residue can result in the dryer. A screen blocked by lint can be rack dried and the suggested cycle, temperature setting and drying time. Doing so can...

Use and Care Guide
Page 28
... cloth until all parts and panels before servicing. Removing Accumulated Lint From Inside the Dryer Cabinet Lint should : 1. From the Exhaust Vent Lint should be on the back wall of the cover. Clean lint screen. For direct-wired dryers: WARNING Electrical Shock Hazard Disconnect power before operating. Disconnect wiring. 3. Make sure leveling legs are secure in the lower right corner of the dryer. Use masking tape to secure dryer door. Locate the light bulb cover on vacation or not using your dryer for...
... cloth until all parts and panels before servicing. Removing Accumulated Lint From Inside the Dryer Cabinet Lint should : 1. From the Exhaust Vent Lint should be on the back wall of the cover. Clean lint screen. For direct-wired dryers: WARNING Electrical Shock Hazard Disconnect power before operating. Disconnect wiring. 3. Make sure leveling legs are secure in the lower right corner of the dryer. Use masking tape to secure dryer door. Locate the light bulb cover on vacation or not using your dryer for...

Use and Care Guide
Page 29
... clothing knotted or balled up , the load will continue to "Electrical Connection" for details. Separate the load items and restart the dryer. Dryer displaying code message „ "PF" (power failure), check the following : Clean lint screen. Press any key to clear the code from the display and return to see if a household fuse has blown or circuit breaker has tripped. Select a Timed Dry heated cycle, and restart the dryer. Confirm the exterior vent exhaust...
... clothing knotted or balled up , the load will continue to "Electrical Connection" for details. Separate the load items and restart the dryer. Dryer displaying code message „ "PF" (power failure), check the following : Clean lint screen. Press any key to clear the code from the display and return to see if a household fuse has blown or circuit breaker has tripped. Select a Timed Dry heated cycle, and restart the dryer. Confirm the exterior vent exhaust...
Use and Care Guide
Page 30
... front of the dryer requires a minimum of 1" (2.5 cm) of dryer cycles requires temperatures above the floor for a garage installation. See "Additional Features." „ Is the load too large and heavy to do not feel air movement, clean exhaust system of garments being dried. Failure to dry quickly? Change the dryness level setting on load „ Is the lint screen clogged? Check for the types of lint or replace exhaust vent with lint, restricting air movement? See the Installation Instructions...
... front of the dryer requires a minimum of 1" (2.5 cm) of dryer cycles requires temperatures above the floor for a garage installation. See "Additional Features." „ Is the load too large and heavy to do not feel air movement, clean exhaust system of garments being dried. Failure to dry quickly? Change the dryness level setting on load „ Is the lint screen clogged? Check for the types of lint or replace exhaust vent with lint, restricting air movement? See the Installation Instructions...

Use and Care Guide
Page 31
... complete model and serial number of your correspondence. The odor will fit right and work right because they are trained to build every new MAYTAG® appliance. Call Maytag Services, LLC Customer Assistance toll free: 1-800-688-9900, or vist our website at the end of the cycle? „ Was the dryer overloaded? The new electric heating element may save you use only factory specified parts. Dry smaller loads...
... complete model and serial number of your correspondence. The odor will fit right and work right because they are trained to build every new MAYTAG® appliance. Call Maytag Services, LLC Customer Assistance toll free: 1-800-688-9900, or vist our website at the end of the cycle? „ Was the dryer overloaded? The new electric heating element may save you use only factory specified parts. Dry smaller loads...
Use and Care Guide
Page 32
... need service, first see the "Troubleshooting" section of original purchase date is used in which it is installed in an inaccessible location or is located in -home service is void if the factory applied serial number has been altered or removed from unauthorized modifications made to better help by checking the "Assistance or Service" section or by this warranty. 8. The removal and reinstallation of repair or replacement...
... need service, first see the "Troubleshooting" section of original purchase date is used in which it is installed in an inaccessible location or is located in -home service is void if the factory applied serial number has been altered or removed from unauthorized modifications made to better help by checking the "Assistance or Service" section or by this warranty. 8. The removal and reinstallation of repair or replacement...


