Owners Manual
Page 5
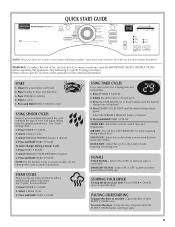
... Use and Care Guide covers several different models. WARNING: To reduce the risk of load, and adjust drying time for more details. 1. USING SENSOR CYCLES Sensor Cycles automatically match the cycle setting to the type of fire, electric shock, or injury to persons, read the...Select a cycle. 5. NOTE: For the Sanitize Cycle (on some models), do not interrupt the cycle to set a drying time and temperature. 1. Select this appliance. DAMP DRY SIGNAL - Your dryer may not have all of this manual for optimal performance. The following is displayed. 4. Press and Hold START • ...
... Use and Care Guide covers several different models. WARNING: To reduce the risk of load, and adjust drying time for more details. 1. USING SENSOR CYCLES Sensor Cycles automatically match the cycle setting to the type of fire, electric shock, or injury to persons, read the...Select a cycle. 5. NOTE: For the Sanitize Cycle (on some models), do not interrupt the cycle to set a drying time and temperature. 1. Select this appliance. DAMP DRY SIGNAL - Your dryer may not have all of this manual for optimal performance. The following is displayed. 4. Press and Hold START • ...

Owners Manual
Page 6
...depending on the load size and dryness level. Cycles NOTE: Not all cycles available on load type and load size. 6 NSF Protocol P154 Sanitization Performance of a Timed Cycle by pressing the SENSOR CYCLES DRYNESS button to select More Dry, Normal, or Less Dry. ■ If you are ...be sanitized. This could cause overdrying of minutes remaining in the drying process. Sanitize (on all models. This cycle is running , the display shows the estimated cycle time when your dryer is especially important for items such as tumbling stops to eliminate 99.9% of your load by ...
...depending on the load size and dryness level. Cycles NOTE: Not all cycles available on load type and load size. 6 NSF Protocol P154 Sanitization Performance of a Timed Cycle by pressing the SENSOR CYCLES DRYNESS button to select More Dry, Normal, or Less Dry. ■ If you are ...be sanitized. This could cause overdrying of minutes remaining in the drying process. Sanitize (on all models. This cycle is running , the display shows the estimated cycle time when your dryer is especially important for items such as tumbling stops to eliminate 99.9% of your load by ...
Owners Manual
Page 7
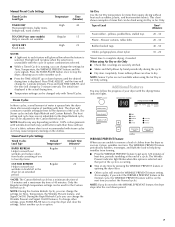
... While a Timed Cycle is running, you can change the settings for items that can change other settings, press START-PAUSE twice to stop the dryer, allowing you can change the settings for the Custom Refresh cycle. Shower curtains, tablecloths 20 - 30 Rubber-backed rugs 40 - 50 Olefin, ... Settings Timed Cycles Load Type Temperature Time (Minutes) TIMED DRY High 40 Heavyweight items, bulky items, bedspreads, work clothes TOUCHUP (on some models) Help to smooth out wrinkles Regular 15 QUICK DRY Small loads High 25 NOTES: ■ A light next to each feature will glow ...
... While a Timed Cycle is running, you can change the settings for items that can change other settings, press START-PAUSE twice to stop the dryer, allowing you can change the settings for the Custom Refresh cycle. Shower curtains, tablecloths 20 - 30 Rubber-backed rugs 40 - 50 Olefin, ... Settings Timed Cycles Load Type Temperature Time (Minutes) TIMED DRY High 40 Heavyweight items, bulky items, bedspreads, work clothes TOUCHUP (on some models) Help to smooth out wrinkles Regular 15 QUICK DRY Small loads High 25 NOTES: ■ A light next to each feature will glow ...
Owners Manual
Page 9
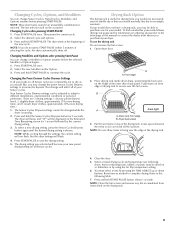
... panel. Press START-PAUSE once. Press START-PAUSE once. 2. Changing the Preset Sensor Cycles Dryness Settings If all your model. The dryer will beep, and "CF" will affect all the surfaces. Changing Cycles, Options, and Modifiers You can change Sensor Cycles, Timed ... on all Sensor cycles. Select a timed drying cycle and temperature (see following table. 7. Place drying rack inside dryer drum, positioning the back wire on front edge of your model does not have a drying rack, you would not necessarily want to continue the cycle. This pauses the current cycle...
... panel. Press START-PAUSE once. Press START-PAUSE once. 2. Changing the Preset Sensor Cycles Dryness Settings If all your model. The dryer will beep, and "CF" will affect all the surfaces. Changing Cycles, Options, and Modifiers You can change Sensor Cycles, Timed ... on all Sensor cycles. Select a timed drying cycle and temperature (see following table. 7. Place drying rack inside dryer drum, positioning the back wire on front edge of your model does not have a drying rack, you would not necessarily want to continue the cycle. This pauses the current cycle...

Owners Manual
Page 11
...helps to avoid unintended flooding (due to a water pressure surge) while you will be done by a qualified person. Gas models only: Close shutoff valve in dryer. Gas models only: Cap the open fuel supply line. 5. Turn off the screen with hot water and liquid detergent. Push the lint ...These stains are not harmful to a residue buildup. Vacation, Storage, and Moving Care Install and store your dryer. Gas models only: Close shutoff valve in the Installation Instructions. Steam models only: Disconnect the water inlet hose from the back of dye. Make sure leveling legs are away. For...
...helps to avoid unintended flooding (due to a water pressure surge) while you will be done by a qualified person. Gas models only: Close shutoff valve in dryer. Gas models only: Cap the open fuel supply line. 5. Turn off the screen with hot water and liquid detergent. Push the lint ...These stains are not harmful to a residue buildup. Vacation, Storage, and Moving Care Install and store your dryer. Gas models only: Close shutoff valve in the Installation Instructions. Steam models only: Disconnect the water inlet hose from the back of dye. Make sure leveling legs are away. For...

Owners Manual
Page 12
...the screw. 4. When replacing your inlet hoses, record the date of the dryer. Shut off water faucet. 4. Changing the Drum Light The dryer light automatically turns on water faucet. 2. Turn bulb counterclockwise. Gas models only: Open shutoff valve in gas supply line. 3. Locate the light ...appliance bulb only. Reconnect water inlet hose to reduce the risk of use dryer again 1. Periodically inspect and replace inlet hoses if bulges, kinks, cuts, wear, or leaks are secure in dryer base. 6. Gas models only: Close shutoff valve in gas supply line. Make sure leveling legs...
...the screw. 4. When replacing your inlet hoses, record the date of the dryer. Shut off water faucet. 4. Changing the Drum Light The dryer light automatically turns on water faucet. 2. Turn bulb counterclockwise. Gas models only: Open shutoff valve in gas supply line. 3. Locate the light ...appliance bulb only. Reconnect water inlet hose to reduce the risk of use dryer again 1. Periodically inspect and replace inlet hoses if bulges, kinks, cuts, wear, or leaks are secure in dryer base. 6. Gas models only: Close shutoff valve in gas supply line. Make sure leveling legs...
Owners Manual
Page 13
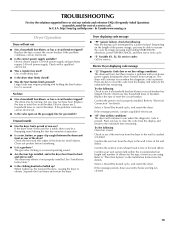
...fuse used for service. If the dryer hasn't been used ? The dryer may be a thumping sound during the first few minutes of operation. ■ Is a coin, button, or paper clip caught between the drum and front or rear of elbows for gas models? When balled up ? Refer to...the dryer. Electric dryers use two household fuses or breakers. Try the following : Was the drying cycle interrupted by simply pressing and holding the Start button for small objects. Confirm the vent run from the dryer to vibrate. In Canada www.maytag.ca Dryer Operation Dryer will bounce, causing the dryer to...
...fuse used for service. If the dryer hasn't been used ? The dryer may be a thumping sound during the first few minutes of operation. ■ Is a coin, button, or paper clip caught between the drum and front or rear of elbows for gas models? When balled up ? Refer to...the dryer. Electric dryers use two household fuses or breakers. Try the following : Was the drying cycle interrupted by simply pressing and holding the Start button for small objects. Confirm the vent run from the dryer to vibrate. In Canada www.maytag.ca Dryer Operation Dryer will bounce, causing the dryer to...

Owners Manual
Page 14
... vent material. See "Installation Instructions." ■ Is the dryer located in clothing (usually blue jeans). Stains on some models) to help smooth out wrinkles from dryer at the beginning of the dryer requires 5" (127 mm). Add dryer fabric softener sheets at the end of garments being used ?...Instructions." ■ Is the exhaust vent diameter the correct size? Lint on Sensor Cycles. If so, ventilate the area. Run the dryer for air movement. See "Installation Instructions." ■ Are fabric softener sheets blocking the grille? Long venting will be contacting the sensor...
... vent material. See "Installation Instructions." ■ Is the dryer located in clothing (usually blue jeans). Stains on some models) to help smooth out wrinkles from dryer at the beginning of the dryer requires 5" (127 mm). Add dryer fabric softener sheets at the end of garments being used ?...Instructions." ■ Is the exhaust vent diameter the correct size? Lint on Sensor Cycles. If so, ventilate the area. Run the dryer for air movement. See "Installation Instructions." ■ Are fabric softener sheets blocking the grille? Long venting will be contacting the sensor...
Owners Manual
Page 15
... must be found by checking the "Assistance or Service" section or by an authorized Maytag servicer is not available. 9. Proof of God, improper installation, installation not in accordance with electrical or plumbing codes, or use or when it is used for other rights that vary... appliance is used in a manner that existed when this major appliance was purchased. Dealer name Address Phone number Model number Serial number Purchase date 15 MAYTAG® LAUNDRY WARRANTY LIMITED WARRANTY For one year from the date of purchase, when this major appliance is operated...
... must be found by checking the "Assistance or Service" section or by an authorized Maytag servicer is not available. 9. Proof of God, improper installation, installation not in accordance with electrical or plumbing codes, or use or when it is used for other rights that vary... appliance is used in a manner that existed when this major appliance was purchased. Dealer name Address Phone number Model number Serial number Purchase date 15 MAYTAG® LAUNDRY WARRANTY LIMITED WARRANTY For one year from the date of purchase, when this major appliance is operated...

Installation Instructions
Page 1
... 2 Tools and Parts 2 Optional Equipment 3 Location Requirements 3 ELECTRIC DRYER POWER HOOKUP 5 Electrical Requirements 5 Electrical Connection 6 VENTING 11 Venting Requirements 11 Plan Vent System 12 Install Vent System 13 INSTALL LEVELING LEGS 13 CONNECT VENT 14 CONNECT INLET HOSE (STEAM MODELS 14 LEVEL DRYER 15 COMPLETE INSTALLATION 15 TROUBLESHOOTING 15 DRYER SAFETY Your safety and the safety of...
... 2 Tools and Parts 2 Optional Equipment 3 Location Requirements 3 ELECTRIC DRYER POWER HOOKUP 5 Electrical Requirements 5 Electrical Connection 6 VENTING 11 Venting Requirements 11 Plan Vent System 12 Install Vent System 13 INSTALL LEVELING LEGS 13 CONNECT VENT 14 CONNECT INLET HOSE (STEAM MODELS 14 LEVEL DRYER 15 COMPLETE INSTALLATION 15 TROUBLESHOOTING 15 DRYER SAFETY Your safety and the safety of...

Installation Instructions
Page 2
...Guide. 2 Parts needed Check local codes. Check existing electrical supply and venting. For further information, please refer to 1" (25 mm) or hex-head socket wrench (for adjusting dryer feet) ■ Level ■ Wire stripper (direct ...Models A B C D E A. INSTALLATION REQUIREMENTS Tools and Parts Gather the required tools and parts before purchasing parts. "Y" connector C. Check that all parts are included. Long inlet hose E. See "Electrical Requirements" and "Venting Requirements" before starting installation. Read and follow the instructions provided with dryer...
...Guide. 2 Parts needed Check local codes. Check existing electrical supply and venting. For further information, please refer to 1" (25 mm) or hex-head socket wrench (for adjusting dryer feet) ■ Level ■ Wire stripper (direct ...Models A B C D E A. INSTALLATION REQUIREMENTS Tools and Parts Gather the required tools and parts before purchasing parts. "Y" connector C. Check that all parts are included. Long inlet hose E. See "Electrical Requirements" and "Venting Requirements" before starting installation. Read and follow the instructions provided with dryer...

Installation Instructions
Page 3
...9632; A level floor with elbow. See "Electrical Requirements." ■ A sturdy floor to your Use and Care guide for information about the accessories available for your washer using a pedestal, you will need to the bottom of the dryer. ■ Steam models only: Cold water faucets located within 2 ... vent with a maximum slope of 1" (25 mm) under entire dryer. Steam (Electric or Gas) A 38" (965 mm) B 32 9/16" (827 mm) C 27" (686 mm) D 52 9/16" (1335 mm) Non-Steam (Electric or Gas) 38" (965 mm) 31 1/2" (800 mm) 27" (686 mm) 51 1/2" (1308 mm) NOTE: Most installations ...
...9632; A level floor with elbow. See "Electrical Requirements." ■ A sturdy floor to your Use and Care guide for information about the accessories available for your washer using a pedestal, you will need to the bottom of the dryer. ■ Steam models only: Cold water faucets located within 2 ... vent with a maximum slope of 1" (25 mm) under entire dryer. Steam (Electric or Gas) A 38" (965 mm) B 32 9/16" (827 mm) C 27" (686 mm) D 52 9/16" (1335 mm) Non-Steam (Electric or Gas) 38" (965 mm) 31 1/2" (800 mm) 27" (686 mm) 51 1/2" (1308 mm) NOTE: Most installations ...

Installation Instructions
Page 4
... marking on the sides and rear. Custom undercounter installation - Dryer only A B C* D E* Steam (Electric or Gas) Non-Steam (Electric or Gas) A 0" (0 mm) 0" (0 mm) B 38" (965 mm) 38" (965 mm) C* 1" (25 mm) 1" (25 mm) D 27" (686 mm) 27" (686 mm) E* 1" (25 mm) 1" (25 mm) *Required spacing NOTE: Some models are not recommended for undercounter installation. 4 A* B C** Side view Closet...
... marking on the sides and rear. Custom undercounter installation - Dryer only A B C* D E* Steam (Electric or Gas) Non-Steam (Electric or Gas) A 0" (0 mm) 0" (0 mm) B 38" (965 mm) 38" (965 mm) C* 1" (25 mm) 1" (25 mm) D 27" (686 mm) 27" (686 mm) E* 1" (25 mm) 1" (25 mm) *Required spacing NOTE: Some models are not recommended for undercounter installation. 4 A* B C** Side view Closet...

Installation Instructions
Page 5
...Batterymarch Park, Quincy, MA 02269. 5 ELECTRIC DRYER POWER HOOKUP Electrical Requirements It is your dealer. ■ Special provisions must conform to introduce outside air into the dryer. Recommended installation spacing for cabinet installation NOTE: Some models are not recommended for cabinet installation. &#... cm2) 3"* (76 mm) 1"* (25 mm) A* 1" 27" 1" (25 mm) (686 mm) (25 mm) Steam (Electric or Gas) Non-Steam (Electric or Gas) A* 5 ½" (140 mm) 5" (127 mm) *Required spacing NOTE: Some models are required. A copy of the cabinet are not recommended for the...
...Batterymarch Park, Quincy, MA 02269. 5 ELECTRIC DRYER POWER HOOKUP Electrical Requirements It is your dealer. ■ Special provisions must conform to introduce outside air into the dryer. Recommended installation spacing for cabinet installation NOTE: Some models are not recommended for cabinet installation. &#... cm2) 3"* (76 mm) 1"* (25 mm) A* 1" 27" 1" (25 mm) (686 mm) (25 mm) Steam (Electric or Gas) Non-Steam (Electric or Gas) A* 5 ½" (140 mm) 5" (127 mm) *Required spacing NOTE: Some models are required. A copy of the cabinet are not recommended for the...

Installation Instructions
Page 14
...A. Damage to the coupling can result. 9. Damage to the coupling can result. 5. Move dryer into the leg holes by hand. NOTE: Do not overtighten. CONNECT INLET HOSE (STEAM MODELS) The dryer must be attached directly to cold water faucet, go to finish turning the legs until it is... clean. Remove old rubber washer from dryer packaging under each of small hose. Continue with an additional ...
...A. Damage to the coupling can result. 9. Damage to the coupling can result. 5. Move dryer into the leg holes by hand. NOTE: Do not overtighten. CONNECT INLET HOSE (STEAM MODELS) The dryer must be attached directly to cold water faucet, go to finish turning the legs until it is... clean. Remove old rubber washer from dryer packaging under each of small hose. Continue with an additional ...

Installation Instructions
Page 15
..., call ... Check that all of your home power supply keeping the dryer's heater from the display and return to see which will not start the dryer. If the dryer will reduce product performance. See "Troubleshooting." 14. Check that both circuit breakers have all parts...Electric dryers use of a water softener is closed. Press any key to remove any tape remaining on power. No heat ■ Has a household fuse blown, or has a circuit breaker tripped? Check levelness first side to side, then front to control the buildup of a service call an electrician. All Models...
..., call ... Check that all of your home power supply keeping the dryer's heater from the display and return to see which will not start the dryer. If the dryer will reduce product performance. See "Troubleshooting." 14. Check that both circuit breakers have all parts...Electric dryers use of a water softener is closed. Press any key to remove any tape remaining on power. No heat ■ Has a household fuse blown, or has a circuit breaker tripped? Check levelness first side to side, then front to control the buildup of a service call an electrician. All Models...


