
Owners Manual
Page 10
... swing direction on the amount of moisture items hold. Actual drying time will reduce the chance of items falling behind your PERFORMANCE SERIES washer and dryer and wish to the "Assistance or Service" section. Do not use Sensor cycles with drawer. To order, call the ...394 mm) Oxide XHP1550VJ Cleaning the Lint Screen Every load cleaning The lint screen is located in several colors. For a garage installation, you purchased your washer and dryer? These will depend on your dryer or refer to place the 10" (254 mm) pedestal at least 3.5" (89 mm) above the...
... swing direction on the amount of moisture items hold. Actual drying time will reduce the chance of items falling behind your PERFORMANCE SERIES washer and dryer and wish to the "Assistance or Service" section. Do not use Sensor cycles with drawer. To order, call the ...394 mm) Oxide XHP1550VJ Cleaning the Lint Screen Every load cleaning The lint screen is located in several colors. For a garage installation, you purchased your washer and dryer? These will depend on your dryer or refer to place the 10" (254 mm) pedestal at least 3.5" (89 mm) above the...

Installation Instructions
Page 2
.... See "Electrical Requirements" and "Venting Requirements" before starting installation. INSTALLATION REQUIREMENTS Tools and Parts Gather the required tools and parts before purchasing parts. "Y" connector C. Rubber washer Remove parts package from whom you purchased your Use and Care Guide. 2 Long inlet hose E. Read and follow the instructions provided with any tools listed...
.... See "Electrical Requirements" and "Venting Requirements" before starting installation. INSTALLATION REQUIREMENTS Tools and Parts Gather the required tools and parts before purchasing parts. "Y" connector C. Rubber washer Remove parts package from whom you purchased your Use and Care Guide. 2 Long inlet hose E. Read and follow the instructions provided with any tools listed...

Installation Instructions
Page 3
... not permit, installation of 200 lbs (90.7 kg). Optional Equipment Refer to your Use and Care guide for information about the accessories available for your washer using the "Y" connector provided. See "Venting Requirements." ■ A separate 30-amp circuit. ■ If you will need 18" (460 mm) to the bottom of the...
... not permit, installation of 200 lbs (90.7 kg). Optional Equipment Refer to your Use and Care guide for information about the accessories available for your washer using the "Y" connector provided. See "Venting Requirements." ■ A separate 30-amp circuit. ■ If you will need 18" (460 mm) to the bottom of the...

Installation Instructions
Page 5
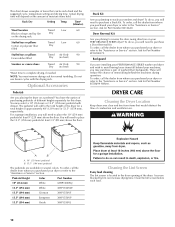
... Park, Quincy, MA 02269. 5 Recommended installation spacing for cabinet installation NOTE: Some models are not recommended for cabinet installation. ■ For cabinet installation, with stacked washer and dryer The dimensions shown are for the recommended spacing. 48 in.2 * (310 cm2) 3"* (76 mm) 24 in.2 * (155 cm2) 3"* (76 mm) 1"* (25 mm) A* 1" 27...
... Park, Quincy, MA 02269. 5 Recommended installation spacing for cabinet installation NOTE: Some models are not recommended for cabinet installation. ■ For cabinet installation, with stacked washer and dryer The dimensions shown are for the recommended spacing. 48 in.2 * (310 cm2) 3"* (76 mm) 24 in.2 * (155 cm2) 3"* (76 mm) 1"* (25 mm) A* 1" 27...

Installation Instructions
Page 14
...longer visible. 5. Find the diamond marking. 4. Place a carton corner post from inlet hose and replace with an additional two-thirds turn . Attach washer cold inlet hose to cold water faucet. Check that the water faucets are on connector. 6. Do not crush or kink vent. 3. Damage to...Screw on coupling by hand until the diamond marking is secured to existing vent, make sure the vent is seated on connector. Remove old rubber washer from dryer packaging under each of "Y" connector. NOTE: Do not overtighten. See illustration. 4. Leave enough room to cold water 8. Using ...
...longer visible. 5. Find the diamond marking. 4. Place a carton corner post from inlet hose and replace with an additional two-thirds turn . Attach washer cold inlet hose to cold water faucet. Check that the water faucets are on connector. 6. Do not crush or kink vent. 3. Damage to...Screw on coupling by hand until the diamond marking is secured to existing vent, make sure the vent is seated on connector. Remove old rubber washer from dryer packaging under each of "Y" connector. NOTE: Do not overtighten. See illustration. 4. Leave enough room to cold water 8. Using ...


