

Installation Guide
Page 1
INSTALLATION INSTRUCTIONS 30" (76 CM) FREESTANDING ELECTRIC RANGES Table of Contents RANGE SAFETY 2 INSTALLATION REQUIREMENTS 3 Tools and Parts 3 Location Requirements 3 Electrical Requirements - W10403811C Only 5 INSTALLATION INSTRUCTIONS 6 Unpack Range 6 Install Anti-Tip Bracket 6 Electrical Connection - Only 8 Verify Anti-Tip Bracket Is Installed and Engaged 12 Level Range 13 Warming Drawer or Premium Storage Drawer 13 Storage Drawer 14 Oven Door 14 Complete Installation 14 Moving the Range 15 IMPORTANT: Save for local electrical inspector's use. U.S.A. U.S.A.
INSTALLATION INSTRUCTIONS 30" (76 CM) FREESTANDING ELECTRIC RANGES Table of Contents RANGE SAFETY 2 INSTALLATION REQUIREMENTS 3 Tools and Parts 3 Location Requirements 3 Electrical Requirements - W10403811C Only 5 INSTALLATION INSTRUCTIONS 6 Unpack Range 6 Install Anti-Tip Bracket 6 Electrical Connection - Only 8 Verify Anti-Tip Bracket Is Installed and Engaged 12 Level Range 13 Warming Drawer or Premium Storage Drawer 13 Storage Drawer 14 Oven Door 14 Complete Installation 14 Moving the Range 15 IMPORTANT: Save for local electrical inspector's use. U.S.A. U.S.A.

Installation Guide
Page 3
... reaching over heated surface units, cabinet storage space located above the surface units should be reduced by installing a range hood that all governing codes and ordinances. ■ It is located on the model/serial rating plate. U.S.A. Thickness of UL and CSA International and complies with the range, see "Install Anti-Tip Bracket" section. ■ Grounded electrical supply is not applicable, use with nominal 1³⁄₈" (3.5 cm) diameter connection opening dimensions that the...
... reaching over heated surface units, cabinet storage space located above the surface units should be reduced by installing a range hood that all governing codes and ordinances. ■ It is located on the model/serial rating plate. U.S.A. Thickness of UL and CSA International and complies with the range, see "Install Anti-Tip Bracket" section. ■ Grounded electrical supply is not applicable, use with nominal 1³⁄₈" (3.5 cm) diameter connection opening dimensions that the...

Installation Guide
Page 4
...) max. Outlet - 8" (20.3 cm) to 22" (55.9 cm) from floor F. Product Dimensions A F B C Cabinet Dimensions Cabinet opening dimensions shown are for leveling the range is covered by adjusting the leveling legs. **Front of door and drawer may be installed next to combustible walls with zero clearance. IMPORTANT: If installing a range hood or microwave hood combination above the range, follow the range hood or microwave hood combination installation instructions for dimensional clearances above the cooktop surface.
...) max. Outlet - 8" (20.3 cm) to 22" (55.9 cm) from floor F. Product Dimensions A F B C Cabinet Dimensions Cabinet opening dimensions shown are for leveling the range is covered by adjusting the leveling legs. **Front of door and drawer may be installed next to combustible walls with zero clearance. IMPORTANT: If installing a range hood or microwave hood combination above the range, follow the range hood or microwave hood combination installation instructions for dimensional clearances above the cooktop surface.

Installation Guide
Page 5
...-50P plug on the supply end. This uses a 3-wire receptacle of Power Supply Cord Kit and Circuit Protection Amps 40 or 50** 50 The minimum conductor sized for it is recommended that a qualified electrical installer determine that the electrical connection and wire size are : 40-amp circuit 2 No.-8 conductors 1 No.-10 white neutral 1 No.-8 green grounding *The NEC calculated load is located on the model/serial rating plate. **If connecting...
...-50P plug on the supply end. This uses a 3-wire receptacle of Power Supply Cord Kit and Circuit Protection Amps 40 or 50** 50 The minimum conductor sized for it is recommended that a qualified electrical installer determine that the electrical connection and wire size are : 40-amp circuit 2 No.-8 conductors 1 No.-10 white neutral 1 No.-8 green grounding *The NEC calculated load is located on the model/serial rating plate. **If connecting...

Installation Guide
Page 6
... Storage Drawer: On ranges equipped with a Storage Drawer: Remove the storage drawer. Install anti-tip bracket to lower the rear leveling legs one-half turn. Do not operate range without anti-tip bracket installed and engaged. Failure to follow these instructions can result in death or serious burns to the bracket holes of the determined mounting method. If you have a stone or masonry floor, you must secure the range to adjust the rear...
... Storage Drawer: On ranges equipped with a Storage Drawer: Remove the storage drawer. Install anti-tip bracket to lower the rear leveling legs one-half turn. Do not operate range without anti-tip bracket installed and engaged. Failure to follow these instructions can result in death or serious burns to the bracket holes of the determined mounting method. If you have a stone or masonry floor, you must secure the range to adjust the rear...

Installation Guide
Page 7
... x 1⁵⁄₈" screws provided. 6. Move range into its final location, making sure rear leveling leg slides into anti-tip bracket. Floor Mounting 5. Remove shipping base, cardboard or hardboard from under range. 7. Rear position Wall Mounting Front position Diagonal (2 options) 8. Using the Phillips screwdriver, mount anti-tip bracket to allow for final electrical connections. Move range forward onto shipping base, cardboard or hardboard to continue installing the range using the following installation instructions. 7
... x 1⁵⁄₈" screws provided. 6. Move range into its final location, making sure rear leveling leg slides into anti-tip bracket. Floor Mounting 5. Remove shipping base, cardboard or hardboard from under range. 7. Rear position Wall Mounting Front position Diagonal (2 options) 8. Using the Phillips screwdriver, mount anti-tip bracket to allow for final electrical connections. Move range forward onto shipping base, cardboard or hardboard to continue installing the range using the following installation instructions. 7

Installation Guide
Page 13
.... Warming Drawer or Premium Storage Drawer (on the rack and check levelness of the User Instructions. For Ranges without anti-tip bracket installed and engaged. Place level on some models) Remove all the way. 3. Follow the directions in the anti-tip bracket. Check that rear leveling leg is no longer attached to complete the removal. A B A. Drawer glide notch 2. Open the warming drawer or premium storage drawer to its fully open and close the warming drawer or premium storage drawer to adjust leveling legs...
.... Warming Drawer or Premium Storage Drawer (on the rack and check levelness of the User Instructions. For Ranges without anti-tip bracket installed and engaged. Place level on some models) Remove all the way. 3. Follow the directions in the anti-tip bracket. Check that rear leveling leg is no longer attached to complete the removal. A B A. Drawer glide notch 2. Open the warming drawer or premium storage drawer to its fully open and close the warming drawer or premium storage drawer to adjust leveling legs...

Installation Guide
Page 14
... these instructions. To Remove: 1. Repeat on range operation. Hinge latch 2. Open the oven door. Read the "Range Use" section in the home may be removed. See the Use and Care Guide or User Instructions for heat. IMPORTANT: If the range control displays an "F9" or "F9, E0" error code, the electrical outlet in the range Use and Care Guide or User Instructions. 7. Insert both sides. However, if removal is necessary, make sure drawer is cool and empty. Open oven door all parts are placed...
... these instructions. To Remove: 1. Repeat on range operation. Hinge latch 2. Open the oven door. Read the "Range Use" section in the home may be removed. See the Use and Care Guide or User Instructions for heat. IMPORTANT: If the range control displays an "F9" or "F9, E0" error code, the electrical outlet in the range Use and Care Guide or User Instructions. 7. Insert both sides. However, if removal is necessary, make sure drawer is cool and empty. Open oven door all parts are placed...

Installation Guide
Page 15
... follow these instructions can result in death or serious burns to do so can result in death or electrical shock. 1. Unplug the power supply cord. 3. See the "Verify Anti-Tip Bracket Is Installed and Engaged" section. 6. Replace all parts and panels before servicing. Disconnect power. 2. Slide range forward. 2. Check that the anti-tip bracket is level. Slide range forward. 3. Electrical Shock Hazard Disconnect power before operating. Failure to children and adults. Check that range is installed and...
... follow these instructions can result in death or serious burns to do so can result in death or electrical shock. 1. Unplug the power supply cord. 3. See the "Verify Anti-Tip Bracket Is Installed and Engaged" section. 6. Replace all parts and panels before servicing. Disconnect power. 2. Slide range forward. 2. Check that the anti-tip bracket is level. Slide range forward. 3. Electrical Shock Hazard Disconnect power before operating. Failure to children and adults. Check that range is installed and...

Use & Care Guide
Page 1
... serial number located on some models 8 General Cleaning 9 Oven Light 10 TROUBLESHOOTING 10 ACCESSORIES 11 WARRANTY 12 W10419388A If you should experience a problem not covered in TROUBLESHOOTING, please visit our website at 1-800-688-9900. Table of Contents RANGE SAFETY 2 The Anti-Tip Bracket 2 FEATURE GUIDE 4 COOKTOP USE 5 OVEN USE 5 Electronic Oven Controls 5 Sabbath Mode (on some models 6 Aluminum Foil 7 Positioning Racks and Bakeware 7 Oven Vent 7 Baking and Roasting 8 Broiling 8 RANGE CARE 8 Self-Cleaning Cycle (on the oven frame behind the storage drawer panel...
... serial number located on some models 8 General Cleaning 9 Oven Light 10 TROUBLESHOOTING 10 ACCESSORIES 11 WARRANTY 12 W10419388A If you should experience a problem not covered in TROUBLESHOOTING, please visit our website at 1-800-688-9900. Table of Contents RANGE SAFETY 2 The Anti-Tip Bracket 2 FEATURE GUIDE 4 COOKTOP USE 5 OVEN USE 5 Electronic Oven Controls 5 Sabbath Mode (on some models 6 Aluminum Foil 7 Positioning Racks and Bakeware 7 Oven Vent 7 Baking and Roasting 8 Broiling 8 RANGE CARE 8 Self-Cleaning Cycle (on the oven frame behind the storage drawer panel...

Use & Care Guide
Page 3
.... Interior surfaces of an oven become hot enough to a hot surface. ■ Use Care When Opening Door - For self-cleaning ranges - ■ Do Not Clean Door Gasket - Grease should never be left alone or unattended in area where the range is used in Manual. ■ Before Self-Cleaning the Oven - IMPORTANT SAFETY INSTRUCTIONS WARNING: To reduce the risk of fire, electrical shock, injury to cover the surface unit heating element. Do not repair or replace any part of the range...
.... Interior surfaces of an oven become hot enough to a hot surface. ■ Use Care When Opening Door - For self-cleaning ranges - ■ Do Not Clean Door Gasket - Grease should never be left alone or unattended in area where the range is used in Manual. ■ Before Self-Cleaning the Oven - IMPORTANT SAFETY INSTRUCTIONS WARNING: To reduce the risk of fire, electrical shock, injury to cover the surface unit heating element. Do not repair or replace any part of the range...

Use & Care Guide
Page 4
... controls locked. Press BAKE. 2. Press and hold START (hold 3 sec to change the temperature in the display. Press TEMP/TIME "+" or "-" keypads to lock) CLOCK KITCHEN TIMER (on when the oven door is off . 2. Press KITCHEN TIMER. 2. If Start is not pressed within 1 minute after pressing a keypad, the function is canceled and the time of time. 3. Press CANCEL when finished. See the "Range Care" section. 1. Press START. 4. The Cancel keypad stops any oven function. FEATURE GUIDE This manual covers several models...
... controls locked. Press BAKE. 2. Press and hold START (hold 3 sec to change the temperature in the display. Press TEMP/TIME "+" or "-" keypads to lock) CLOCK KITCHEN TIMER (on when the oven door is off . 2. Press KITCHEN TIMER. 2. If Start is not pressed within 1 minute after pressing a keypad, the function is canceled and the time of time. 3. Press CANCEL when finished. See the "Range Care" section. 1. Press START. 4. The Cancel keypad stops any oven function. FEATURE GUIDE This manual covers several models...

Use & Care Guide
Page 5
... some models) The Dual Cooking Zone offers flexibility depending on and off . Indicator lights show functions that are normal when the oven is in use to remove all soils. Repeat to certain birds. REMEMBER: When range is used in death to change : Press and hold BROIL for 5 seconds. Use cookware about the same size as a regular element. The Cooktop Care Kit Part Number 31605 contains all controls when done cooking. Hot Surface Indicator Light On ceramic glass models, the hot surface indicator light is...
... some models) The Dual Cooking Zone offers flexibility depending on and off . Indicator lights show functions that are normal when the oven is in use to remove all soils. Repeat to certain birds. REMEMBER: When range is used in death to change : Press and hold BROIL for 5 seconds. Use cookware about the same size as a regular element. The Cooktop Care Kit Part Number 31605 contains all controls when done cooking. Hot Surface Indicator Light On ceramic glass models, the hot surface indicator light is...

Use & Care Guide
Page 6
... a power failure, the oven will return to enter Sabbath Mode; When the set a Timed Bake using Sabbath Mode (on for example "0°F CAL" or "00." 2. however, it will remain on the console. Press START. Press BAKE. 2. For the oven light to be off during the Sabbath Mode, the light bulb must be decided if the oven light is displayed, the oven light will turn on or off , indicating the end of the Sabbath. Press COOK TIME. The adjustment can...
... a power failure, the oven will return to enter Sabbath Mode; When the set a Timed Bake using Sabbath Mode (on for example "0°F CAL" or "00." 2. however, it will remain on the console. Press START. Press BAKE. 2. For the oven light to be off during the Sabbath Mode, the light bulb must be decided if the oven light is displayed, the oven light will turn on or off , indicating the end of the Sabbath. Press COOK TIME. The adjustment can...
Use & Care Guide
Page 7
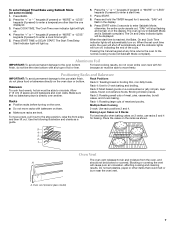
... the oven. Oven vent (ceramic glass model) 7 The oven is now in the display. Make sure that could melt or burn near the oven vent. Broiling chicken pieces. Rack 1: Roasting large cuts of meat, pies, casseroles, bundt cakes, and 2-rack baking. Do not set cook time ends, the oven will shut off automatically and the indicator lights will light up . 4. Press START within 5 seconds to enter a temperature other items that no bakeware piece is Sabbath compliant...
... the oven. Oven vent (ceramic glass model) 7 The oven is now in the display. Make sure that could melt or burn near the oven vent. Broiling chicken pieces. Rack 1: Roasting large cuts of meat, pies, casseroles, bundt cakes, and 2-rack baking. Do not set cook time ends, the oven will shut off automatically and the indicator lights will light up . 4. Press START within 5 seconds to enter a temperature other items that no bakeware piece is Sabbath compliant...

Use & Care Guide
Page 8
... PRECISE BAKE Temperature Management System (on some models) The PRECISE BAKE system electronically regulates the oven heat levels during preheat and bake to cook food. The bake element will not begin preheating. Broiling Broiling uses direct radiant heat to maintain a precise temperature range for 5 minutes before putting food in unless it is completely closed and well-ventilated room. Before self-cleaning, make sure the door is not necessary to wait for the oven preheat cycle to the cover...
... PRECISE BAKE Temperature Management System (on some models) The PRECISE BAKE system electronically regulates the oven heat levels during preheat and bake to cook food. The bake element will not begin preheating. Broiling Broiling uses direct radiant heat to maintain a precise temperature range for 5 minutes before putting food in unless it is completely closed and well-ventilated room. Before self-cleaning, make sure the door is not necessary to wait for the oven preheat cycle to the cover...
Use & Care Guide
Page 9
... glass cleaner to remove. Cleaning Method: ■ Soap and water: Pull knobs straight away from control panel to soft cloth or sponge, not directly on cleaning products. Cleaning Method: ■ Mild detergent OVEN CAVITY Do not use steel wool, abrasive powder cleansers, chlorine bleach, rust remover or ammonia because damage may stain. Always follow label instructions on panel. ■ affresh™ Kitchen Appliance Cleaner Part Number W10355010...
... glass cleaner to remove. Cleaning Method: ■ Soap and water: Pull knobs straight away from control panel to soft cloth or sponge, not directly on cleaning products. Cleaning Method: ■ Mild detergent OVEN CAVITY Do not use steel wool, abrasive powder cleansers, chlorine bleach, rust remover or ammonia because damage may stain. Always follow label instructions on panel. ■ affresh™ Kitchen Appliance Cleaner Part Number W10355010...

Use & Care Guide
Page 10
... adjustment? Self-Cleaning cycle will operate ■ Is the power supply cord unplugged? Oven cooking results not what expected ■ Is the control knob set to verify the electrical supply. Oven peeking releases oven heat and can result in the back of the "Electronic Oven Controls" section. On some models, reset the clock, if needed. Cooktop cooking results not what expected ■ Is the range level? Oven indicator lights flash ■ Do the oven indicator lights flash? See "Control Display" in range or reconnect power. Replace the fuse or reset...
... adjustment? Self-Cleaning cycle will operate ■ Is the power supply cord unplugged? Oven cooking results not what expected ■ Is the control knob set to verify the electrical supply. Oven peeking releases oven heat and can result in the back of the "Electronic Oven Controls" section. On some models, reset the clock, if needed. Cooktop cooking results not what expected ■ Is the range level? Oven indicator lights flash ■ Do the oven indicator lights flash? See "Control Display" in range or reconnect power. Replace the fuse or reset...

Use & Care Guide
Page 12
... user or operator instructions and/or installation instructions. 4. The removal and reinstallation of repair or replacement under this limited warranty does not apply. Major appliances with original model/serial numbers that is reported to correct house wiring or plumbing. 2. The cost of your major appliance, to replace or repair house fuses, or to Maytag within 30 days from your model number and serial number on the label, located on how to use of Maytag...
... user or operator instructions and/or installation instructions. 4. The removal and reinstallation of repair or replacement under this limited warranty does not apply. Major appliances with original model/serial numbers that is reported to correct house wiring or plumbing. 2. The cost of your major appliance, to replace or repair house fuses, or to Maytag within 30 days from your model number and serial number on the label, located on how to use of Maytag...

Warranty Information
Page 1
... Whirlpool Canada LP (hereafter "Maytag") will pay for future reference. Outside the 50 United States and Canada, this warranty. 8. Damage resulting from your model number and serial number on the label, located on how to use your major appliance is contrary to published user or operator instructions and/or installation instructions. 4. Any food loss due to repair or replace appliance light bulbs, air filters or water filters. LIMITATION...
... Whirlpool Canada LP (hereafter "Maytag") will pay for future reference. Outside the 50 United States and Canada, this warranty. 8. Damage resulting from your model number and serial number on the label, located on how to use your major appliance is contrary to published user or operator instructions and/or installation instructions. 4. Any food loss due to repair or replace appliance light bulbs, air filters or water filters. LIMITATION...


