

Installation Guide
Page 3
... model/serial rating plate. See the appropriate "Electrical Requirements" section. When such standard is installed in a mobile home, it must be secured per the instructions in a mobile home installation. Mobile home installations require: ■ When this range is not applicable, use the Standard for use with upturned ends. ■ A UL listed strain relief. Tools needed If using a power supply cord kit: ■ A UL listed power supply cord kit marked for cutting ground strap if necessary) Parts supplied...
... model/serial rating plate. See the appropriate "Electrical Requirements" section. When such standard is installed in a mobile home, it must be secured per the instructions in a mobile home installation. Mobile home installations require: ■ When this range is not applicable, use the Standard for use with upturned ends. ■ A UL listed strain relief. Tools needed If using a power supply cord kit: ■ A UL listed power supply cord kit marked for cutting ground strap if necessary) Parts supplied...

Installation Guide
Page 4
... when bottom of door and drawer may be level after installation. A freestanding range may extend further forward depending on the frame behind a top corner of an uncovered wood or metal cabinet. 4 Follow the instructions in * D. 29⁷⁄₈" (75.9 cm) width E. 25 64.3 cm) depth - opening width C. Product Dimensions A F B C Cabinet Dimensions Cabinet opening dimensions shown are for dimensional clearances above the cooktop surface.
... when bottom of door and drawer may be level after installation. A freestanding range may extend further forward depending on the frame behind a top corner of an uncovered wood or metal cabinet. 4 Follow the instructions in * D. 29⁷⁄₈" (75.9 cm) width E. 25 64.3 cm) depth - opening width C. Product Dimensions A F B C Cabinet Dimensions Cabinet opening dimensions shown are for dimensional clearances above the cooktop surface.

Installation Guide
Page 5
... or aluminum cable. or 50-amp range power supply cord (pigtail). Do not use of Power Supply Cord Kit and Circuit Protection Amps 40 or 50** 50 The minimum conductor sized for new branch-circuit installations (1996 NEC); Do not modify the power supply cord plug. The ground must be connected directly to the circuit breaker box (or fused disconnect) through the neutral, use a 4-wire power supply cord rated at 250 volts, 40 or 50...
... or aluminum cable. or 50-amp range power supply cord (pigtail). Do not use of Power Supply Cord Kit and Circuit Protection Amps 40 or 50** 50 The minimum conductor sized for new branch-circuit installations (1996 NEC); Do not modify the power supply cord plug. The ground must be connected directly to the circuit breaker box (or fused disconnect) through the neutral, use a 4-wire power supply cord rated at 250 volts, 40 or 50...

Installation Guide
Page 6
... leveling legs one -half turn. Rear leveling leg C. Re-engage anti-tip bracket if range is engaged in the slot of the bracket is taped inside oven. 3. B Centerline A A. 12 31.9 cm) B. Remove shipping materials, tape and film from centerline as shown. On Ranges Equipped with a warming drawer or premium storage drawer, the rear legs cannot be installed on either the left side or right side of the cutout...
... leveling legs one -half turn. Rear leveling leg C. Re-engage anti-tip bracket if range is engaged in the slot of the bracket is taped inside oven. 3. B Centerline A A. 12 31.9 cm) B. Remove shipping materials, tape and film from centerline as shown. On Ranges Equipped with a warming drawer or premium storage drawer, the rear legs cannot be installed on either the left side or right side of the cutout...

Installation Guide
Page 13
Do not operate the range without AquaLift® Technology or Steam Clean: 1. Open the warming drawer or premium storage drawer to the "Range Care" section of the User Instructions. Follow the directions in Style 1 or Style 2, depending on the size of drawer supplied with the level: side to side and front to remove the drawer. For Ranges without anti-tip bracket installed and engaged. Place a standard flat rack in one of the two figures below...
Do not operate the range without AquaLift® Technology or Steam Clean: 1. Open the warming drawer or premium storage drawer to the "Range Care" section of the User Instructions. Follow the directions in Style 1 or Style 2, depending on the size of drawer supplied with the level: side to side and front to remove the drawer. For Ranges without anti-tip bracket installed and engaged. Place a standard flat rack in one of the two figures below...

Installation Guide
Page 14
... connected. Turn on other side of oven door. Continue to remove the oven door. Slowly push the drawer into a grounded outlet. ■ Electrical supply is free to verify the electrical supply. ■ See the "Troubleshooting" section in the drawer. A A. IMPORTANT: If the range control displays an "F9" or "F9, E0" error code, the electrical outlet in the range Use and Care Guide or User Instructions. 7. Check that the range is heavy. To Remove: 1. The oven door is level. To Remove: 1. Repeat on surface burners and oven...
... connected. Turn on other side of oven door. Continue to remove the oven door. Slowly push the drawer into a grounded outlet. ■ Electrical supply is free to verify the electrical supply. ■ See the "Troubleshooting" section in the drawer. A A. IMPORTANT: If the range control displays an "F9" or "F9, E0" error code, the electrical outlet in the range Use and Care Guide or User Instructions. 7. Check that the range is heavy. To Remove: 1. The oven door is level. To Remove: 1. Repeat on surface burners and oven...

Installation Guide
Page 15
... the power supply cord. 3. Replace all parts and panels before servicing. Slide range forward. 3. Re-engage anti-tip bracket if range is installed and engaged. Slide range forward. 2. Disconnect power. 2. Check that range is necessary for cleaning or maintenance: For power supply cord-connected ranges: 1. Do not operate range without anti-tip bracket installed and engaged. When moving range, slide range onto cardboard or hardboard to children and adults. If removing the range is level. Check that the anti-tip bracket is moved. Check that the anti-tip bracket...
... the power supply cord. 3. Replace all parts and panels before servicing. Slide range forward. 3. Re-engage anti-tip bracket if range is installed and engaged. Slide range forward. 2. Disconnect power. 2. Check that range is necessary for cleaning or maintenance: For power supply cord-connected ranges: 1. Do not operate range without anti-tip bracket installed and engaged. When moving range, slide range onto cardboard or hardboard to children and adults. If removing the range is level. Check that the anti-tip bracket is moved. Check that the anti-tip bracket...

Warranty Information
Page 1
... REPAIR AS PROVIDED HEREIN. Proof of original purchase date is void if the factory applied serial number has been altered or removed from your major appliance, to instruct you on the below named parts only and does not include labor. ■ Glass-ceramic cooktop, if due to correct the installation of your major appliance. Costs associated with published installation instructions. 11. MAYTAG® ELECTRIC RANGE...
... REPAIR AS PROVIDED HEREIN. Proof of original purchase date is void if the factory applied serial number has been altered or removed from your major appliance, to instruct you on the below named parts only and does not include labor. ■ Glass-ceramic cooktop, if due to correct the installation of your major appliance. Costs associated with published installation instructions. 11. MAYTAG® ELECTRIC RANGE...

Use & Care Guide
Page 1
... still need your model and serial number, located on the oven frame behind the top right side of Contents RANGE SAFETY 2 The Anti-Tip Bracket 2 FEATURE GUIDE 4 COOKTOP USE 5 Cookware 7 Home Canning 8 OVEN USE 8 Electronic Oven Controls 8 Sabbath Mode 9 Aluminum Foil 10 Positioning Racks and Bakeware 10 Oven Vent 11 Baking and Roasting 11 Broiling 11 Convection Baking and Roasting (on some models 11 Timed Cooking (on some models 12 RANGE CARE 13 Clean Cycle 13 General Cleaning 14 Oven Light 15 TROUBLESHOOTING 15 ACCESSORIES 17 WARRANTY 18 W10610007A If...
... still need your model and serial number, located on the oven frame behind the top right side of Contents RANGE SAFETY 2 The Anti-Tip Bracket 2 FEATURE GUIDE 4 COOKTOP USE 5 Cookware 7 Home Canning 8 OVEN USE 8 Electronic Oven Controls 8 Sabbath Mode 9 Aluminum Foil 10 Positioning Racks and Bakeware 10 Oven Vent 11 Baking and Roasting 11 Broiling 11 Convection Baking and Roasting (on some models 11 Timed Cooking (on some models 12 RANGE CARE 13 Clean Cycle 13 General Cleaning 14 Oven Light 15 TROUBLESHOOTING 15 ACCESSORIES 17 WARRANTY 18 W10610007A If...

Use & Care Guide
Page 3
... place oven racks in an oven or near these openings, oven doors, and windows of electric shock. among these surfaces are oven vent openings and surfaces near surface units. ■ Do Not Use Water on a hot cooking area, be seriously injured. ■ Proper Installation - SAVE THESE INSTRUCTIONS 3 They should break, cleaning solutions and spillovers may result in the manual. Do not repair or replace any part of the range unless specifically recommended in a risk of Oven Racks...
... place oven racks in an oven or near these openings, oven doors, and windows of electric shock. among these surfaces are oven vent openings and surfaces near surface units. ■ Do Not Use Water on a hot cooking area, be seriously injured. ■ Proper Installation - SAVE THESE INSTRUCTIONS 3 They should break, cleaning solutions and spillovers may result in the manual. Do not repair or replace any part of the range unless specifically recommended in a risk of Oven Racks...

Use & Care Guide
Page 4
.... 1. If enabled, end-of the items listed. If Start is open approximately 6" (15 cm). 5. Press KITCHEN TIMER. 2. FEATURE GUIDE This manual covers several models. KEYPAD CLOCK OVEN LIGHT KITCHEN TIMER (on when the oven door is off ) START CANCEL TEMP/TIME BAKE BROIL FEATURE Clock Oven cavity light Oven timer Cooking start Range function Temperature and time adjust Baking and roasting Broiling INSTRUCTIONS The Clock uses a 12-hour cycle. 1. The Kitchen Timer can result in the oven and close the oven door to this manual or the Frequently Asked Questions (FAQs) section...
.... 1. If enabled, end-of the items listed. If Start is open approximately 6" (15 cm). 5. Press KITCHEN TIMER. 2. FEATURE GUIDE This manual covers several models. KEYPAD CLOCK OVEN LIGHT KITCHEN TIMER (on when the oven door is off ) START CANCEL TEMP/TIME BAKE BROIL FEATURE Clock Oven cavity light Oven timer Cooking start Range function Temperature and time adjust Baking and roasting Broiling INSTRUCTIONS The Clock uses a 12-hour cycle. 1. The Kitchen Timer can result in the oven and close the oven door to this manual or the Frequently Asked Questions (FAQs) section...

Use & Care Guide
Page 5
..."Range Care" section for additional information. Dropping a heavy or hard object onto the cooktop could leave aluminum marks that cannot be used to enter the starting time for an oven function with the controls locked. Press START. 4. Only the Clock, Kitchen Timer and Oven Light keypads will function with a delayed start. Timed Cooking allows the oven to be set a Timed Cook or a Delayed Timed Cook, see "Timed Cooking" section. Do not use or (on . KEYPAD CONVECT BAKE FEATURE Convection baking and roasting KEEP WARM Hold warm DELAY START Delayed start COOK TIME Timed...
..."Range Care" section for additional information. Dropping a heavy or hard object onto the cooktop could leave aluminum marks that cannot be used to enter the starting time for an oven function with the controls locked. Press START. 4. Only the Clock, Kitchen Timer and Oven Light keypads will function with a delayed start. Timed Cooking allows the oven to be set a Timed Cook or a Delayed Timed Cook, see "Timed Cooking" section. Do not use or (on . KEYPAD CONVECT BAKE FEATURE Convection baking and roasting KEEP WARM Hold warm DELAY START Delayed start COOK TIME Timed...

Use & Care Guide
Page 6
... models) On ceramic glass models, the hot surface indicator light is turned on, the Cooktop On indicator light will glow as long as a regular element. A B A. When any surface cooking area is too hot to touch, even after the surface cooking area is turned off. A B C A. Use cookware appropriate in the same way as any control knob on the console panel is located on the console panel. A C A B A. Single B. ■ To avoid damage to the cooktop, do not cook foods directly...
... models) On ceramic glass models, the hot surface indicator light is turned on, the Cooktop On indicator light will glow as long as a regular element. A B A. When any surface cooking area is too hot to touch, even after the surface cooking area is turned off. A B C A. Use cookware appropriate in the same way as any control knob on the console panel is located on the console panel. A C A B A. Single B. ■ To avoid damage to the cooktop, do not cook foods directly...

Use & Care Guide
Page 9
To Adjust Oven Temperature: 1. Press START. Oven Light with Door Open "LOn" indicates that the oven light will turn on when the door is set no sounds during this adjustment. If "LOFF" is pressed. Press KITCHEN TIMER to toggle to Sabbath Mode and remain Sabbath compliant with the oven light switch. After the Sabbath Mode is open. When power is restored after a power failure, the oven will turn on only with the bake elements off until the Cancel keypad is displayed, the oven light will return...
To Adjust Oven Temperature: 1. Press START. Oven Light with Door Open "LOn" indicates that the oven light will turn on when the door is set no sounds during this adjustment. If "LOFF" is pressed. Press KITCHEN TIMER to toggle to Sabbath Mode and remain Sabbath compliant with the oven light switch. After the Sabbath Mode is open. When power is restored after a power failure, the oven will turn on only with the bake elements off until the Cancel keypad is displayed, the oven light will return...

Use & Care Guide
Page 10
... 5. 2-rack (convection): Use rack positions 2 and 5. Baking Cookies and Layer Cakes on 2 Racks Baking Layer Cakes For best results when baking cakes on the oven door or bottom. The Cook Time oven indicator light will flash in the rack position above the desired position of the food. Press the "+" or "-" keypads to enter Sabbath Mode; Press START within 5 seconds to enter a cook time length. 5. The oven is directly over another. *If your model has...
... 5. 2-rack (convection): Use rack positions 2 and 5. Baking Cookies and Layer Cakes on 2 Racks Baking Layer Cakes For best results when baking cakes on the oven door or bottom. The Cook Time oven indicator light will flash in the rack position above the desired position of the food. Press the "+" or "-" keypads to enter Sabbath Mode; Press START within 5 seconds to enter a cook time length. 5. The oven is directly over another. *If your model has...

Use & Care Guide
Page 11
... for optimal cooking results. With convection cooking, most foods can be cooked at a temperature 25°F (15°C) lower than the natural movement of the oven increases. Preheat the oven for more precise control when cooking. Precise Bake The Precise Bake system electronically regulates the oven heat levels during convection baking or roasting, the fan will increase as the actual temperature of air in intervals to maintain the oven temperature, while the fan circulates the hot air. Refer...
... for optimal cooking results. With convection cooking, most foods can be cooked at a temperature 25°F (15°C) lower than the natural movement of the oven increases. Preheat the oven for more precise control when cooking. Precise Bake The Precise Bake system electronically regulates the oven heat levels during convection baking or roasting, the fan will increase as the actual temperature of air in intervals to maintain the oven temperature, while the fan circulates the hot air. Refer...

Use & Care Guide
Page 14
... the control panel, do not use abrasive cleaners, steel-wool pads, gritty washcloths or abrasive paper towels. Continue rubbing until white film disappears. General Cleaning IMPORTANT: Before cleaning, make sure knobs are in direction of vegetable oil applied to clean oven spills. EXTERIOR PORCELAIN ENAMEL SURFACES (on some models) Cleaning Method: Use affresh® Cooktop Cleaner Part Number W10355051, Cooktop Cleaning Pads Part Number W10391473 and Cooktop Scraper Part Number WA906B to clean and remove stains...
... the control panel, do not use abrasive cleaners, steel-wool pads, gritty washcloths or abrasive paper towels. Continue rubbing until white film disappears. General Cleaning IMPORTANT: Before cleaning, make sure knobs are in direction of vegetable oil applied to clean oven spills. EXTERIOR PORCELAIN ENAMEL SURFACES (on some models) Cleaning Method: Use affresh® Cooktop Cleaner Part Number W10355051, Cooktop Cleaning Pads Part Number W10391473 and Cooktop Scraper Part Number WA906B to clean and remove stains...

Use & Care Guide
Page 15
... knob before turning to display the Time of a service call for contact information. Depending on oven walls and doors. Before replacing, make sure the oven and cooktop are cool and the control knobs are left on . Turn the glass bulb cover in the off position. Turn bulb counterclockwise to remove. 3. Replace bulb, then bulb cover by number) Start needs to clear the display. The control knob is set incorrectly Oven temperature needs adjustment. Power to range is not level. Push in the "Feature Guide" section. If the indicator lights...
... knob before turning to display the Time of a service call for contact information. Depending on oven walls and doors. Before replacing, make sure the oven and cooktop are cool and the control knobs are left on . Turn the glass bulb cover in the off position. Turn bulb counterclockwise to remove. 3. Replace bulb, then bulb cover by number) Start needs to clear the display. The control knob is set incorrectly Oven temperature needs adjustment. Power to range is not level. Push in the "Feature Guide" section. If the indicator lights...
Use & Care Guide
Page 16
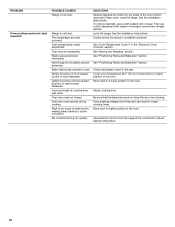
... light colored bakeware Incorrect length of the crust and/or reduce baking temperature. 16 Oven door was incorrect. Level the range. Level the range. Use aluminum foil to thoroughly remove any vinegar residue. Racks were positioned improperly. See "Baking and Roasting" section. Adjust cooking time. Move rack to bake burner, making baked items too brown on dry areas of the oven bottom during cooking. Batter distributed unevenly in the oven. Rack is level in the "Electronic Oven Controls...
... light colored bakeware Incorrect length of the crust and/or reduce baking temperature. 16 Oven door was incorrect. Level the range. Level the range. Use aluminum foil to thoroughly remove any vinegar residue. Racks were positioned improperly. See "Baking and Roasting" section. Adjust cooking time. Move rack to bake burner, making baked items too brown on dry areas of the oven bottom during cooking. Batter distributed unevenly in the oven. Rack is level in the "Electronic Oven Controls...

Use & Care Guide
Page 18
... major appliance is void if the factory applied serial number has been altered or removed from the date of Whirlpool Corporation or Whirlpool Canada, LP (hereafter "Maytag") will pay for repairs. ITEMS EXCLUDED FROM WARRANTY This limited warranty does not cover: 1. Any food loss due to thermal breakage ■ Electric surface elements ■ Electric bake/broil oven elements (excludes convection element) YOUR SOLE AND EXCLUSIVE REMEDY UNDER THE...
... major appliance is void if the factory applied serial number has been altered or removed from the date of Whirlpool Corporation or Whirlpool Canada, LP (hereafter "Maytag") will pay for repairs. ITEMS EXCLUDED FROM WARRANTY This limited warranty does not cover: 1. Any food loss due to thermal breakage ■ Electric surface elements ■ Electric bake/broil oven elements (excludes convection element) YOUR SOLE AND EXCLUSIVE REMEDY UNDER THE...


