Installation Instructions
Page 1
... manual and on your appliance. Connect anti-tip bracket to children and adults. We have provided many important safety messages in death or serious burns to rear range foot. INSTALLATION INSTRUCTIONS 30" (76.0 CM) FREESTANDING ELECTRIC RANGES Table of Contents RANGE SAFETY 1 INSTALLATION REQUIREMENTS 2 Tools and Parts 2 Location Requirements 2 Electrical Requirements 3 INSTALLATION INSTRUCTIONS 4 Unpack Range 4 Install Anti-Tip Bracket 5 Electrical Connection 6 Verify Anti-Tip Bracket Location 11 Level Range 11 Complete Installation 11 Moving the Range 12 RANGE SAFETY...
... manual and on your appliance. Connect anti-tip bracket to children and adults. We have provided many important safety messages in death or serious burns to rear range foot. INSTALLATION INSTRUCTIONS 30" (76.0 CM) FREESTANDING ELECTRIC RANGES Table of Contents RANGE SAFETY 1 INSTALLATION REQUIREMENTS 2 Tools and Parts 2 Location Requirements 2 Electrical Requirements 3 INSTALLATION INSTRUCTIONS 4 Unpack Range 4 Install Anti-Tip Bracket 5 Electrical Connection 6 Verify Anti-Tip Bracket Location 11 Level Range 11 Complete Installation 11 Moving the Range 12 RANGE SAFETY...
Installation Instructions
Page 2
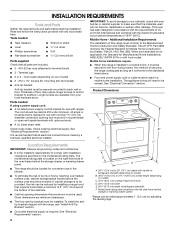
... drawer or warming drawer panel. To install the antitip bracket shipped with any tools listed here. See "Electrical Requirements" section. 2 See "Electrical Connection" section. Location Requirements IMPORTANT: Observe all parts are shown must conform to subfloor. INSTALLATION REQUIREMENTS Tools and Parts Gather the required tools and parts before starting installation. Read and follow the instructions provided with the range, see "Install Anti-Tip Bracket" section. Tools needed If using a power supply cord: ■ A UL listed power supply cord kit marked...
... drawer or warming drawer panel. To install the antitip bracket shipped with any tools listed here. See "Electrical Requirements" section. 2 See "Electrical Connection" section. Location Requirements IMPORTANT: Observe all parts are shown must conform to subfloor. INSTALLATION REQUIREMENTS Tools and Parts Gather the required tools and parts before starting installation. Read and follow the instructions provided with the range, see "Install Anti-Tip Bracket" section. Tools needed If using a power supply cord: ■ A UL listed power supply cord kit marked...
Installation Instructions
Page 3
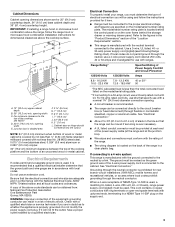
... less than the total connected load listed on the oven frame behind the storage drawer or warming drawer panel. Do not modify the power supply cord plug. The ground must determine the type of electrical connection you must be connected directly to the top of the cooktop, see following Range Rating chart). See "Electrical Connection." ■ Allow 2 to 3 ft (61.0 cm to the cabinet. See "Electrical Connection." Cabinet Dimensions Cabinet opening dimensions shown are adequate...
... less than the total connected load listed on the oven frame behind the storage drawer or warming drawer panel. Do not modify the power supply cord plug. The ground must determine the type of electrical connection you must be connected directly to the top of the cooktop, see following Range Rating chart). See "Electrical Connection." ■ Allow 2 to 3 ft (61.0 cm to the cabinet. See "Electrical Connection." Cabinet Dimensions Cabinet opening dimensions shown are adequate...

Installation Instructions
Page 6
... from the middle post of the range. 4. Small opening . 3. Power Supply Cord Electrical Connection Direct Wire WARNING WARNING Electrical Shock Hazard Disconnect power before servicing. Electrical Shock Hazard Disconnect power before servicing. A B A. Use 8 gauge copper or 6 gauge aluminum wire. Style 1: Power supply cord strain relief ■ Assemble a UL listed strain relief in death, fire, or electrical shock. 1. Use a new 40 amp power supply cord. Plug into a grounded outlet. Failure to follow these instructions can result in death, fire...
... from the middle post of the range. 4. Small opening . 3. Power Supply Cord Electrical Connection Direct Wire WARNING WARNING Electrical Shock Hazard Disconnect power before servicing. Electrical Shock Hazard Disconnect power before servicing. A B A. Use 8 gauge copper or 6 gauge aluminum wire. Style 1: Power supply cord strain relief ■ Assemble a UL listed strain relief in death, fire, or electrical shock. 1. Use a new 40 amp power supply cord. Plug into a grounded outlet. Failure to follow these instructions can result in death, fire...
Installation Instructions
Page 11
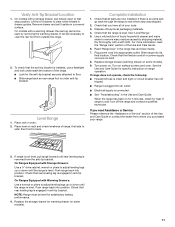
... by removing the warming drawer. If range is level. Push range back into its final location. Replace storage drawer (warming drawer on surface burners and oven. Turn power on for 5 minutes, check for the anti-tip bracket securely attached to adjust leveling legs up or down until rear leveling leg is engaged in drawer guides. When the range has been on . Level Range 1. or circuit breaker has not tripped. ■ Range is plugged into an outlet. ■ Electrical supply is under anti-tip bracket. Push range back...
... by removing the warming drawer. If range is level. Push range back into its final location. Replace storage drawer (warming drawer on surface burners and oven. Turn power on for 5 minutes, check for the anti-tip bracket securely attached to adjust leveling legs up or down until rear leveling leg is engaged in drawer guides. When the range has been on . Level Range 1. or circuit breaker has not tripped. ■ Range is plugged into an outlet. ■ Electrical supply is under anti-tip bracket. Push range back...

Installation Instructions
Page 12
...bracket is installed, use a flashlight and look underneath the bottom of the range: ■ Look for cleaning or maintenance: For power supply cord-connected ranges: 1. Check that range is moved. Reconnect power. 6. Connect anti-tip bracket to avoid damaging the floor covering. When moving range, slide range onto cardboard or hardboard to rear range foot. Unplug the power supply cord. 3. Electrical Shock Hazard Disconnect power before operating. All rights reserved. 4/09 Printed in power supply cord. 5. If removing the range is level. 6. Reconnect the anti-tip bracket...
...bracket is installed, use a flashlight and look underneath the bottom of the range: ■ Look for cleaning or maintenance: For power supply cord-connected ranges: 1. Check that range is moved. Reconnect power. 6. Connect anti-tip bracket to avoid damaging the floor covering. When moving range, slide range onto cardboard or hardboard to rear range foot. Unplug the power supply cord. 3. Electrical Shock Hazard Disconnect power before operating. All rights reserved. 4/09 Printed in power supply cord. 5. If removing the range is level. 6. Reconnect the anti-tip bracket...
Warranty Information
Page 1
... Part Number 31464 Cooktop Scraper (ceramic glass models) Order Part Number WA906B Stainless Steel Cleaner and Polish (stainless steel models) Order Part Number 31462 All-Purpose Appliance Cleaner Order Part Number 31682 Split-Rack with Removable Insert Order Part Number 4396927 Broiler Pan Order Part Number 4396923 MAYTAG® MAJOR APPLIANCE WARRANTY LIMITED WARRANTY For one year from the date of purchase, when this limited warranty. This warranty is used for repairs. Proof of original purchase date is required...
... Part Number 31464 Cooktop Scraper (ceramic glass models) Order Part Number WA906B Stainless Steel Cleaner and Polish (stainless steel models) Order Part Number 31462 All-Purpose Appliance Cleaner Order Part Number 31682 Split-Rack with Removable Insert Order Part Number 4396927 Broiler Pan Order Part Number 4396923 MAYTAG® MAJOR APPLIANCE WARRANTY LIMITED WARRANTY For one year from the date of purchase, when this limited warranty. This warranty is used for repairs. Proof of original purchase date is required...
Dimension Guide
Page 1
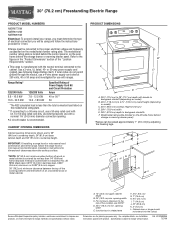
... total connected load listed on the oven frame behind storage or warming drawer panel) *Range can be using and follow the range hood or microwave hood combination installation instructions for dimensional clearances above the cooktop surface. *NOTE: 24" (61.0 cm) minimum when bottom of an uncovered wood or metal cabinet. If local codes do not permit ground through the neutral, use with ranges. For 50-amp rated cord kits, use kits that specify use a 4-wire power supply cord rated...
... total connected load listed on the oven frame behind storage or warming drawer panel) *Range can be using and follow the range hood or microwave hood combination installation instructions for dimensional clearances above the cooktop surface. *NOTE: 24" (61.0 cm) minimum when bottom of an uncovered wood or metal cabinet. If local codes do not permit ground through the neutral, use with ranges. For 50-amp rated cord kits, use kits that specify use a 4-wire power supply cord rated...

Owners Manual
Page 1
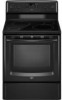
... of Contents RANGE SAFETY 2 The Anti-Tip Bracket 2 FEATURE GUIDE 4 COOKTOP USE 6 OVEN USE 7 Electronic Oven Controls 7 Aluminum Foil 7 Positioning Racks and Bakeware 8 Oven Vent 8 Baking and Roasting 8 Broiling 9 Convection Baking and Roasting 9 Timed Cooking 9 RANGE CARE 10 Self-Cleaning Cycle 10 General Cleaning 11 Oven Light 12 TROUBLESHOOTING 12 ACCESSORIES 13 WARRANTY 13 W10239458A ELECTRIC RANGE USER INSTRUCTIONS THANK YOU for additional information. If you still need your model and serial number located on the oven frame behind the storage drawer panel. Puede...
... of Contents RANGE SAFETY 2 The Anti-Tip Bracket 2 FEATURE GUIDE 4 COOKTOP USE 6 OVEN USE 7 Electronic Oven Controls 7 Aluminum Foil 7 Positioning Racks and Bakeware 8 Oven Vent 8 Baking and Roasting 8 Broiling 9 Convection Baking and Roasting 9 Timed Cooking 9 RANGE CARE 10 Self-Cleaning Cycle 10 General Cleaning 11 Oven Light 12 TROUBLESHOOTING 12 ACCESSORIES 13 WARRANTY 13 W10239458A ELECTRIC RANGE USER INSTRUCTIONS THANK YOU for additional information. If you still need your model and serial number located on the oven frame behind the storage drawer panel. Puede...

Owners Manual
Page 3
... a hot cooking area, be taken not to line surface unit drip bowls or oven bottoms, except as suggested in oven. ■ DO NOT TOUCH HEATING ELEMENTS OR INTERIOR SURFACES OF OVEN - The use dry chemical or foam-type extinguisher. ■ Use Only Dry Potholders - TO CHECK IF THE DEVICES ARE INSTALLED PROPERLY, SLIDE RANGE FORWARD, LOOK FOR ANTI-TIP BRACKET SECURELY ATTACHED TO FLOOR OR WALL, AND SLIDE RANGE BACK SO REAR RANGE...
... a hot cooking area, be taken not to line surface unit drip bowls or oven bottoms, except as suggested in oven. ■ DO NOT TOUCH HEATING ELEMENTS OR INTERIOR SURFACES OF OVEN - The use dry chemical or foam-type extinguisher. ■ Use Only Dry Potholders - TO CHECK IF THE DEVICES ARE INSTALLED PROPERLY, SLIDE RANGE FORWARD, LOOK FOR ANTI-TIP BRACKET SECURELY ATTACHED TO FLOOR OR WALL, AND SLIDE RANGE BACK SO REAR RANGE...
Owners Manual
Page 4
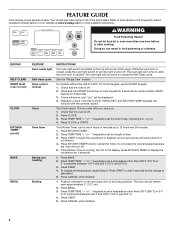
... START (hold 3 sec to this manual or the Frequently Asked Questions (FAQs) section of our website at end of the items listed. Repeat to lock) keypad for the change the temperature, repeat Step 2. and p.m. 1. The door should remain open approximately 5" (12.7 cm). 2. Press BAKE. 2. Press KITCHEN TIMER twice to cancel the Timer. See the "Range Care" section. The Clock uses a 12-hour cycle with the controls locked. FEATURE GUIDE This manual covers...
... START (hold 3 sec to this manual or the Frequently Asked Questions (FAQs) section of our website at end of the items listed. Repeat to lock) keypad for the change the temperature, repeat Step 2. and p.m. 1. The door should remain open approximately 5" (12.7 cm). 2. Press BAKE. 2. Press KITCHEN TIMER twice to cancel the Timer. See the "Range Care" section. The Clock uses a 12-hour cycle with the controls locked. FEATURE GUIDE This manual covers...

Owners Manual
Page 5
... CONVECT KEEP WARM COOK TIME DELAY START START CANCEL TEMP/TIME FEATURE Convection baking and roasting Hold warm Timed cooking Delayed start Cooking start should not be at a certain time of time, and/or shut off automatically. Press KEEP WARM. 2. Timed Cooking allows the oven to take effect. 5. To set a temperature other than 350°F (175°C) in 5° increments between 170°F and 525°F (75°C and 275°C). 3. The Start pad begins any function except the Clock, Kitchen Timer, and Oven Control...
... CONVECT KEEP WARM COOK TIME DELAY START START CANCEL TEMP/TIME FEATURE Convection baking and roasting Hold warm Timed cooking Delayed start Cooking start should not be at a certain time of time, and/or shut off automatically. Press KEEP WARM. 2. Timed Cooking allows the oven to take effect. 5. To set a temperature other than 350°F (175°C) in 5° increments between 170°F and 525°F (75°C and 275°C). 3. The Start pad begins any function except the Clock, Kitchen Timer, and Oven Control...

Owners Manual
Page 6
... element and is turned off to boil liquids faster. Cooktop On Indicator Light The Cooktop On indicator light is located on the console panel. Dual B. Failure to do so can be used to maintain the selected heat level. Cleaning off all controls when done cooking. Use cookware appropriate in death or fire. A B A. COOKTOP USE WARNING Hot Surface Indicator Light (on some models) On ceramic glass models, the hot surface indicator light is located on the console panel. The hot surface indicator light will help keep food at a low temperature...
... element and is turned off to boil liquids faster. Cooktop On Indicator Light The Cooktop On indicator light is located on the console panel. Dual B. Failure to do so can be used to maintain the selected heat level. Cleaning off all controls when done cooking. Use cookware appropriate in death or fire. A B A. COOKTOP USE WARNING Hot Surface Indicator Light (on some models) On ceramic glass models, the hot surface indicator light is located on the console panel. The hot surface indicator light will help keep food at a low temperature...
Owners Manual
Page 7
... and hold KITCHEN TIMER for 5 seconds, and "Opt" will turn on when the door is open. Press CANCEL to clear. Press CANCEL to exit the mode. Tones Tones are audible signals, indicating the following options. To Adjust Oven Temperature Calibration: 1. Options Mode Press and hold BAKE for 5 seconds until the oven display shows the current calibration, for 5 seconds. Oven Temperature Control IMPORTANT: Do not use , the time of cycle...
... and hold KITCHEN TIMER for 5 seconds, and "Opt" will turn on when the door is open. Press CANCEL to clear. Press CANCEL to exit the mode. Tones Tones are audible signals, indicating the following options. To Adjust Oven Temperature Calibration: 1. Options Mode Press and hold BAKE for 5 seconds until the oven display shows the current calibration, for 5 seconds. Oven Temperature Control IMPORTANT: Do not use , the time of cycle...

Owners Manual
Page 8
... on the racks as a guide. 2-rack (convection): Use rack positions 2 and 5 or 3 and 6. A. Precise Bake The Precise Bake system electronically regulates the oven heat levels during preheat and bake to maintain a precise temperature range for the oven preheat cycle to end before turning on the display. 8 When roasting, it is directly over another. Bakeware To cook food evenly, hot air must be blocked or covered. Rack 2: Roasting small cuts of space around bakeware and oven walls. Do not set plastics...
... on the racks as a guide. 2-rack (convection): Use rack positions 2 and 5 or 3 and 6. A. Precise Bake The Precise Bake system electronically regulates the oven heat levels during preheat and bake to maintain a precise temperature range for the oven preheat cycle to end before turning on the display. 8 When roasting, it is directly over another. Bakeware To cook food evenly, hot air must be blocked or covered. Rack 2: Roasting small cuts of space around bakeware and oven walls. Do not set plastics...

Owners Manual
Page 9
... broiling temperature. ■ For best results, use a broiler pan and grid. It is opened during convection baking or roasting, the fan will appear on when the oven door is set cook time ends, the oven will shut off automatically and "End" will turn on the display. 8. Timed Cooking WARNING To Set a Delayed Timed Cook: Before setting, make sure the clock is closed. Doing so can be ordered. When the set to maintain the oven temperature, while the fan circulates the hot air...
... broiling temperature. ■ For best results, use a broiler pan and grid. It is opened during convection baking or roasting, the fan will appear on when the oven door is set cook time ends, the oven will shut off automatically and "End" will turn on the display. 8. Timed Cooking WARNING To Set a Delayed Timed Cook: Before setting, make sure the clock is closed. Doing so can be ordered. When the set to maintain the oven temperature, while the fan circulates the hot air...

Owners Manual
Page 10
... from the storage drawer. 10 Prepare Range ■ Remove the broiler pan, grid, cookware and bakeware, all items from the cooktop because they may melt. The oven door will also be displayed. Once the oven has completely cooled, remove ash with a damp cloth. ■ Remove all cooking utensils, oven racks and aluminum foil and, on some birds is for heavy soil. Electronic Oven Control with Adjustable Clean Time The SELF CLEAN self-cleaning cycle is...
... from the storage drawer. 10 Prepare Range ■ Remove the broiler pan, grid, cookware and bakeware, all items from the cooktop because they may melt. The oven door will also be displayed. Once the oven has completely cooled, remove ash with a damp cloth. ■ Remove all cooking utensils, oven racks and aluminum foil and, on some birds is for heavy soil. Electronic Oven Control with Adjustable Clean Time The SELF CLEAN self-cleaning cycle is...
Owners Manual
Page 11
... OVEN RACKS Cleaning Method: ■ Steel-wool pad ■ For racks that storage drawer is cool and empty before cleaning. Damage may stain. Light to slide, a light coating of our website at www.maytag.com. Sugary spills (jellies, candy, syrup) ■ Clean with Cooktop Cleaner as soon as accessories. Metal marks from control panel to soft cloth or sponge, not directly on some models) Do not use...
... OVEN RACKS Cleaning Method: ■ Steel-wool pad ■ For racks that storage drawer is cool and empty before cleaning. Damage may stain. Light to slide, a light coating of our website at www.maytag.com. Sugary spills (jellies, candy, syrup) ■ Clean with Cooktop Cleaner as soon as accessories. Metal marks from control panel to soft cloth or sponge, not directly on some models) Do not use...
Owners Manual
Page 12
... remove. 3. Level the range. See "Timed Cooking" section. ■ On some models, is the oven control lockout set ? There has been a power failure. See the "Start" keypad feature in the "Electronic Oven Controls" section. Use aluminum foil to remove from socket. Turn bulb counterclockwise to cover the edge of the crust and/or reduce baking temperature. 12 If the problem continues, call . See "Cooktop Use" section. ■ Is the range level? If the indicator light(s) keeps flashing, call for service...
... remove. 3. Level the range. See "Timed Cooking" section. ■ On some models, is the oven control lockout set ? There has been a power failure. See the "Start" keypad feature in the "Electronic Oven Controls" section. Use aluminum foil to remove from socket. Turn bulb counterclockwise to cover the edge of the crust and/or reduce baking temperature. 12 If the problem continues, call . See "Cooktop Use" section. ■ Is the range level? If the indicator light(s) keeps flashing, call for service...
Owners Manual
Page 13
... to instructions attached to or furnished with electrical or plumbing codes, or use of consumables or cleaning products not approved by Maytag. 5. Service must be repaired in the home and only in a manner that have been removed, altered or cannot be borne by the customer. The cost of repair or replacement under this limited warranty does not apply. Major appliances with original model/serial numbers that is covered...
... to instructions attached to or furnished with electrical or plumbing codes, or use of consumables or cleaning products not approved by Maytag. 5. Service must be repaired in the home and only in a manner that have been removed, altered or cannot be borne by the customer. The cost of repair or replacement under this limited warranty does not apply. Major appliances with original model/serial numbers that is covered...


