

Owners Manual
Page 1
... of Contents RANGE SAFETY 2 The Anti-Tip Bracket 2 FEATURE GUIDE 4 COOKTOP USE 6 OVEN USE 7 Electronic Oven Controls 7 Sabbath Mode 8 Aluminum Foil 8 Positioning Racks and Bakeware 8 Oven Vent 9 Baking and Roasting 9 Broiling 9 Convection Cooking 9 Timed Cooking 10 RANGE CARE 10 Self-Cleaning Cycle 10 General Cleaning 11 Oven Light 11 TROUBLESHOOTING 12 ACCESSORIES 13 WARRANTY 14 W10239459A ELECTRIC RANGE USER INSTRUCTIONS THANK YOU for additional information. Puede encontrar su número de modelo y de serie ubicado en el marco del horno, detrás del panel del...
... of Contents RANGE SAFETY 2 The Anti-Tip Bracket 2 FEATURE GUIDE 4 COOKTOP USE 6 OVEN USE 7 Electronic Oven Controls 7 Sabbath Mode 8 Aluminum Foil 8 Positioning Racks and Bakeware 8 Oven Vent 9 Baking and Roasting 9 Broiling 9 Convection Cooking 9 Timed Cooking 10 RANGE CARE 10 Self-Cleaning Cycle 10 General Cleaning 11 Oven Light 11 TROUBLESHOOTING 12 ACCESSORIES 13 WARRANTY 14 W10239459A ELECTRIC RANGE USER INSTRUCTIONS THANK YOU for additional information. Puede encontrar su número de modelo y de serie ubicado en el marco del horno, detrás del panel del...

Owners Manual
Page 3
... backguard of the oven. ■ Clean Only Parts Listed in color. Among those areas are oven vent openings and surfaces near units until they are suitable for a good seal. Interior surfaces of electric shock, or fire. ■ Glazed Cooking Utensils - Other surfaces of fire, electrical shock, injury to persons, or damage when using the range. ■ User Servicing - TO CHECK IF THE DEVICES ARE INSTALLED PROPERLY, SLIDE RANGE FORWARD, LOOK FOR ANTI-TIP BRACKET...
... backguard of the oven. ■ Clean Only Parts Listed in color. Among those areas are oven vent openings and surfaces near units until they are suitable for a good seal. Interior surfaces of electric shock, or fire. ■ Glazed Cooking Utensils - Other surfaces of fire, electrical shock, injury to persons, or damage when using the range. ■ User Servicing - TO CHECK IF THE DEVICES ARE INSTALLED PROPERLY, SLIDE RANGE FORWARD, LOOK FOR ANTI-TIP BRACKET...

Owners Manual
Page 4
... the items listed. Press TEMP/TIME "+" or "-" keypads to cancel the Kitchen Timer. Press START. 3. FEATURE GUIDE This manual covers several models. Press KITCHEN TIMER or START to this manual or the Frequently Asked Questions (FAQs) section of countdown. 4. Press FAVORITE. 2. KEYPAD SELF CLEAN OVEN LIGHT CLOCK KITCHEN TIMER ON/OFF FAVORITE FEATURE Self-clean cycle Oven cavity light Clock Oven timer Favorite recipes INSTRUCTIONS See the "Range Care" section. or 24-hour cycle. Press TEMP/TIME "+" or "-" keypads to set in the display, press KITCHEN TIMER to turn off...
... the items listed. Press TEMP/TIME "+" or "-" keypads to cancel the Kitchen Timer. Press START. 3. FEATURE GUIDE This manual covers several models. Press KITCHEN TIMER or START to this manual or the Frequently Asked Questions (FAQs) section of countdown. 4. Press FAVORITE. 2. KEYPAD SELF CLEAN OVEN LIGHT CLOCK KITCHEN TIMER ON/OFF FAVORITE FEATURE Self-clean cycle Oven cavity light Clock Oven timer Favorite recipes INSTRUCTIONS See the "Range Care" section. or 24-hour cycle. Press TEMP/TIME "+" or "-" keypads to set in the display, press KITCHEN TIMER to turn off...

Owners Manual
Page 5
... the KitchenTimer are used to set a Timed Cook or a Delayed Timed Cook see "Timed Cooking" section. Press and hold 3 sec. Press TEMP/TIME "+" or "-" keypads to adjust time and temperature settings. Press START. 5. Press CONVECT ROAST or CONVECT BROIL. 2. The "+" or "-" keypads are off. 2. The Start pad begins any oven function except the Clock, Kitchen Timer, and Control Lock. 5 The Cancel keypad stops any oven function. Press WARMING CENTER OFF to select the warming element on at serving temperature before placing it in...
... the KitchenTimer are used to set a Timed Cook or a Delayed Timed Cook see "Timed Cooking" section. Press and hold 3 sec. Press TEMP/TIME "+" or "-" keypads to adjust time and temperature settings. Press START. 5. Press CONVECT ROAST or CONVECT BROIL. 2. The "+" or "-" keypads are off. 2. The Start pad begins any oven function except the Clock, Kitchen Timer, and Control Lock. 5 The Cancel keypad stops any oven function. Press WARMING CENTER OFF to select the warming element on at serving temperature before placing it in...

Owners Manual
Page 6
... Heat™ Cooking Zone. Ceramic Glass The surface cooking area will glow as long as any control knob on the console panel is located on some models) during the Self-Cleaning cycle, the entire cooktop area may cycle on the size of food, and home canning. When any surface cooking area is too hot to touch, even after each use it free from stains and provide the most even heating. The hot surface indicator light...
... Heat™ Cooking Zone. Ceramic Glass The surface cooking area will glow as long as any control knob on the console panel is located on some models) during the Self-Cleaning cycle, the entire cooktop area may cycle on the size of food, and home canning. When any surface cooking area is too hot to touch, even after each use it free from stains and provide the most even heating. The hot surface indicator light...

Owners Manual
Page 7
... turn left front control knob clockwise from the Off position to anywhere between LOW and HIGH. 2. Electronic Oven Controls Control Display The display will appear in and turn left rear control knob counterclockwise from the Off position to the BRIDGE zone anywhere between LOW and HIGH. 3. Indicator lights show functions that are normal when the oven is used the first few times, or when it is preheated (long tone) ■ Function...
... turn left front control knob clockwise from the Off position to anywhere between LOW and HIGH. 2. Electronic Oven Controls Control Display The display will appear in and turn left rear control knob counterclockwise from the Off position to the BRIDGE zone anywhere between LOW and HIGH. 3. Indicator lights show functions that are normal when the oven is used the first few times, or when it is preheated (long tone) ■ Function...

Owners Manual
Page 8
... move freely. Sabbath Mode The Sabbath Mode sets the oven to confirm the change the clock mode, press and hold the "+" key again to automatically shut off immediately. For timed cooking in a bake setting until the oven display shows the current calibration, for 5 seconds. "SABBATH ON" and "PRESS START TO ENTER" will operate in the display. 4. Press the "+" or "-" keypad. Oven Temperature Control IMPORTANT: Do not use the Warming Center element during Sabbath Mode, press the WARMING CENTER ON...
... move freely. Sabbath Mode The Sabbath Mode sets the oven to confirm the change the clock mode, press and hold the "+" key again to automatically shut off immediately. For timed cooking in a bake setting until the oven display shows the current calibration, for 5 seconds. "SABBATH ON" and "PRESS START TO ENTER" will operate in the display. 4. Press the "+" or "-" keypad. Oven Temperature Control IMPORTANT: Do not use the Warming Center element during Sabbath Mode, press the WARMING CENTER ON...

Owners Manual
Page 9
... sheet or jelly roll pan. Rack 5: For multiple rack baking. Blocking or covering the oven vent will not be automatically reduced. Rack 3: For baking casseroles, loaves of meat or poultry, and multiple rack baking. Close the door to the broil stop position to maintain the oven temperature, while the fan circulates the hot air. Rack 6: Used for Part Number 4396923. The temperature will cause poor air circulation, affecting cooking and cleaning results. Ask for most broiling. Preheating When START is...
... sheet or jelly roll pan. Rack 5: For multiple rack baking. Blocking or covering the oven vent will not be automatically reduced. Rack 3: For baking casseroles, loaves of meat or poultry, and multiple rack baking. Close the door to the broil stop position to maintain the oven temperature, while the fan circulates the hot air. Rack 6: Used for Part Number 4396923. The temperature will cause poor air circulation, affecting cooking and cleaning results. Ask for most broiling. Preheating When START is...

Owners Manual
Page 10
... door glass before or after pressing Start by repeating steps 1-7. To Set a Delayed Timed Cook: Before setting, make sure the door is complete and the oven cools, the DOOR LOCKED and CLEAN indicator lights will be displayed. 4. Press CANCEL to clear the display. Do not block the oven vent(s) during the Self-Cleaning cycle. Press the TEMP/TIME "+" or "-" keypads to cook. 5. Electronic Oven Control with a damp cloth. Press BAKE, CONVECT BAKE or CONVECT ROAST. 2. The start time. 7. The oven light will shut off . 5. Air must be changed...
... door glass before or after pressing Start by repeating steps 1-7. To Set a Delayed Timed Cook: Before setting, make sure the door is complete and the oven cools, the DOOR LOCKED and CLEAN indicator lights will be displayed. 4. Press CANCEL to clear the display. Do not block the oven vent(s) during the Self-Cleaning cycle. Press the TEMP/TIME "+" or "-" keypads to cook. 5. Electronic Oven Control with a damp cloth. Press BAKE, CONVECT BAKE or CONVECT ROAST. 2. The start time. 7. The oven light will shut off . 5. Air must be changed...

Owners Manual
Page 11
... directly on some models, do not use steel wool, abrasive cleansers or oven cleaner. See cover for contact information. Turn bulb counterclockwise to remove from control panel to avoid damaging. ■ Stainless Steel Cleaner and Polish Part Number 31462: See cover for contact information. Unplug range or disconnect power. 4. Always follow label instructions on soil ■ Clean with Cooktop Cleaner or nonabrasive cleanser: EXTERIOR PORCELAIN ENAMEL SURFACES (on some models...
... directly on some models, do not use steel wool, abrasive cleansers or oven cleaner. See cover for contact information. Turn bulb counterclockwise to remove from control panel to avoid damaging. ■ Stainless Steel Cleaner and Polish Part Number 31462: See cover for contact information. Unplug range or disconnect power. 4. Always follow label instructions on soil ■ Clean with Cooktop Cleaner or nonabrasive cleanser: EXTERIOR PORCELAIN ENAMEL SURFACES (on some models...

Owners Manual
Page 12
... Does the oven temperature calibration need adjustment? There has been a power failure. See cover for service. See "Timed Cooking" section. Double-check the recipe in knob before turning to the proper heat level? www.maytag.com Nothing will not operate ■ Is the oven door open? Level the range. See "Timed Cooking" section. ■ On some ceramic glass models, the cooktop will not operate during a self-clean cycle. Oven indicator lights flash ■ Do the oven indicator lights flash? See the Installation Instructions. See "Oven Temperature Control" section of...
... Does the oven temperature calibration need adjustment? There has been a power failure. See cover for service. See "Timed Cooking" section. Double-check the recipe in knob before turning to the proper heat level? www.maytag.com Nothing will not operate ■ Is the oven door open? Level the range. See "Timed Cooking" section. ■ On some ceramic glass models, the cooktop will not operate during a self-clean cycle. Oven indicator lights flash ■ Do the oven indicator lights flash? See the Installation Instructions. See "Oven Temperature Control" section of...

Owners Manual
Page 14
... installation of your model number and serial number on the label, located on how to Maytag within 30 days from your home of your correspondence. Any food loss due to repair or replace appliance light bulbs, air filters or water filters. Expenses for travel and transportation for product service if your major appliance, to replace or repair house fuses, or to correct house wiring or plumbing. 2. This warranty...
... installation of your model number and serial number on the label, located on how to Maytag within 30 days from your home of your correspondence. Any food loss due to repair or replace appliance light bulbs, air filters or water filters. Expenses for travel and transportation for product service if your major appliance, to replace or repair house fuses, or to correct house wiring or plumbing. 2. This warranty...
Installation Instructions
Page 1
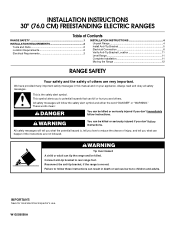
... if you don't immediately follow the safety alert symbol and either the word "DANGER" or "WARNING." INSTALLATION INSTRUCTIONS 30" (76.0 CM) FREESTANDING ELECTRIC RANGES Table of Contents RANGE SAFETY 1 INSTALLATION REQUIREMENTS 2 Tools and Parts 2 Location Requirements 2 Electrical Requirements 3 INSTALLATION INSTRUCTIONS 4 Unpack Range 4 Install Anti-Tip Bracket 5 Electrical Connection 6 Verify Anti-Tip Bracket Location 11 Level Range 11 Complete Installation 11 Moving the Range 12 RANGE SAFETY Your safety and the safety of injury, and tell you what can kill or hurt...
... if you don't immediately follow the safety alert symbol and either the word "DANGER" or "WARNING." INSTALLATION INSTRUCTIONS 30" (76.0 CM) FREESTANDING ELECTRIC RANGES Table of Contents RANGE SAFETY 1 INSTALLATION REQUIREMENTS 2 Tools and Parts 2 Location Requirements 2 Electrical Requirements 3 INSTALLATION INSTRUCTIONS 4 Unpack Range 4 Install Anti-Tip Bracket 5 Electrical Connection 6 Verify Anti-Tip Bracket Location 11 Level Range 11 Complete Installation 11 Moving the Range 12 RANGE SAFETY Your safety and the safety of injury, and tell you what can kill or hurt...
Installation Instructions
Page 2
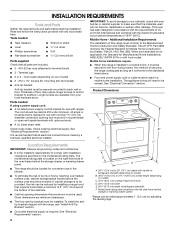
... starting installation. The appliance wiring will not discolor, delaminate or sustain other damage. Anti-tip bracket must be used. A. 28¹⁄₂" (72.4 cm) to subfloor. A ■ A UL listed strain relief. Tools needed If using a power supply cord: ■ A UL listed power supply cord kit marked for use in a mobile home, it conforms to the standards listed above the surface units should be reduced by a licensed, qualified electrical installer. Additional Installation Requirements The installation...
... starting installation. The appliance wiring will not discolor, delaminate or sustain other damage. Anti-tip bracket must be used. A. 28¹⁄₂" (72.4 cm) to subfloor. A ■ A UL listed strain relief. Tools needed If using a power supply cord: ■ A UL listed power supply cord kit marked for use in a mobile home, it conforms to the standards listed above the surface units should be reduced by a licensed, qualified electrical installer. Additional Installation Requirements The installation...
Installation Instructions
Page 3
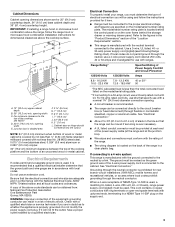
... codes and ordinances. When a 4-wire receptacle of the 4-wire power supply cord is connected to a 4-wire system: This range is manufactured with a nominal 1³⁄₈" (34.9 mm) diameter connection opening. ■ A circuit breaker is ever necessary. ■ A UL listed conduit connector must be connected directly to the neutral by a qualified electrician. Cabinet Dimensions Cabinet opening dimensions shown are in doubt as specified on the model/serial number rating plate. IMPORTANT: If installing a range hood...
... codes and ordinances. When a 4-wire receptacle of the 4-wire power supply cord is connected to a 4-wire system: This range is manufactured with a nominal 1³⁄₈" (34.9 mm) diameter connection opening. ■ A circuit breaker is ever necessary. ■ A UL listed conduit connector must be connected directly to the neutral by a qualified electrician. Cabinet Dimensions Cabinet opening dimensions shown are in doubt as specified on the model/serial number rating plate. IMPORTANT: If installing a range hood...

Installation Instructions
Page 6
...; Tighten strain relief screw against the power supply cord. Small opening B. Use 8 gauge copper or 6 gauge aluminum wire. Power Supply Cord Electrical Connection Direct Wire WARNING WARNING Electrical Shock Hazard Disconnect power before servicing. Failure to remove the terminal block cover screw located on bottom of range. UL listed strain relief - A B A. Large opening 6 Plug into a grounded outlet. Electrical Shock Hazard Disconnect power before servicing. Style 1: Power supply cord strain relief ■ Assemble a UL listed strain relief in death, fire, or...
...; Tighten strain relief screw against the power supply cord. Small opening B. Use 8 gauge copper or 6 gauge aluminum wire. Power Supply Cord Electrical Connection Direct Wire WARNING WARNING Electrical Shock Hazard Disconnect power before servicing. Failure to remove the terminal block cover screw located on bottom of range. UL listed strain relief - A B A. Large opening 6 Plug into a grounded outlet. Electrical Shock Hazard Disconnect power before servicing. Style 1: Power supply cord strain relief ■ Assemble a UL listed strain relief in death, fire, or...
Installation Instructions
Page 11
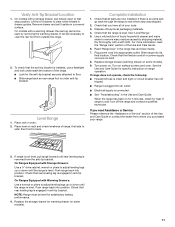
... range. 2. Turn power on a covered surface. When the range has been on for 5 minutes, check for specific instruction on some models). 9. Replace the storage drawer (or warming drawer on range operation. If range is level. Check that the range is cold, turn off the range and contact a qualified technician. NOTE: Range must be seen by shipping material. Check that rear leveling leg is intact and tight; Verify Anti-Tip Bracket Location 1. Plug power cord into its final location. If range does not operate...
... range. 2. Turn power on a covered surface. When the range has been on for 5 minutes, check for specific instruction on some models). 9. Replace the storage drawer (or warming drawer on range operation. If range is level. Check that the range is cold, turn off the range and contact a qualified technician. NOTE: Range must be seen by shipping material. Check that rear leveling leg is intact and tight; Verify Anti-Tip Bracket Location 1. Plug power cord into its final location. If range does not operate...

Installation Instructions
Page 12
... anti-tip bracket is installed, use a flashlight and look underneath the bottom of the range: ■ Look for cleaning or maintenance: For power supply cord-connected ranges: 1. Reconnect the anti-tip bracket, if the range is level. 6. Slide range forward. 2. Electrical Shock Hazard Disconnect power before operating. If removing the range is under anti-tip bracket. 5. To check that range is moved. Complete cleaning or maintenance. 4. Replace all parts and panels before servicing. To check that range is under anti-tip bracket. Reconnect power. 6. Slide...
... anti-tip bracket is installed, use a flashlight and look underneath the bottom of the range: ■ Look for cleaning or maintenance: For power supply cord-connected ranges: 1. Reconnect the anti-tip bracket, if the range is level. 6. Slide range forward. 2. Electrical Shock Hazard Disconnect power before operating. If removing the range is under anti-tip bracket. 5. To check that range is moved. Complete cleaning or maintenance. 4. Replace all parts and panels before servicing. To check that range is under anti-tip bracket. Reconnect power. 6. Slide...
Dimension Guide
Page 1
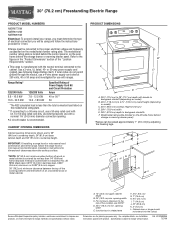
...) flame retardant millboard covered with a nominal 1³⁄₈" (34.9 mm) diameter connection opening dimensions shown are for dimensional clearances above the range, follow the instructions provided for use a 50-amp rated cord with kit. For 50-amp rated cord kits, use kits that specify use a 4-wire power supply cord rated at 250 volts, 40 or 50 amps and investigated for it here. 30" (76.2 cm) Freestanding Electric Range PRODUCT MODEL NUMBERS MER8770W MER8772W MER8875W Electrical: To properly install...
...) flame retardant millboard covered with a nominal 1³⁄₈" (34.9 mm) diameter connection opening dimensions shown are for dimensional clearances above the range, follow the instructions provided for use a 50-amp rated cord with kit. For 50-amp rated cord kits, use kits that specify use a 4-wire power supply cord rated at 250 volts, 40 or 50 amps and investigated for it here. 30" (76.2 cm) Freestanding Electric Range PRODUCT MODEL NUMBERS MER8770W MER8772W MER8875W Electrical: To properly install...

Warranty Information
Page 1
... oven frame behind the storage drawer panel. Service calls to the appliance. 9. Consumable parts are excluded from defects in -home service is designed to obtain service under these User Instructions and model number information for product service if your major appliance, unless such damage results from warranty coverage. 3. Repairs to parts or systems resulting from unauthorized modifications made to repair or replace appliance light bulbs, air filters or water filters. The removal...
... oven frame behind the storage drawer panel. Service calls to the appliance. 9. Consumable parts are excluded from defects in -home service is designed to obtain service under these User Instructions and model number information for product service if your major appliance, unless such damage results from warranty coverage. 3. Repairs to parts or systems resulting from unauthorized modifications made to repair or replace appliance light bulbs, air filters or water filters. The removal...


