

Owners Manual
Page 2
...alert symbol and either the word "DANGER" or "WARNING." However, the range can result in this manual and on your appliance. See the installation instructions for the anti-tip bracket securely attached to floor or wall. • Slide range back so rear range foot is under anti-tip ... are not followed. This symbol alerts you to potential hazards that can be killed. All safety messages will tell you what the potential hazard is installed: • Slide range forward. • Look for details. WARNING Tip Over Hazard A child or adult can happen if the instructions are very ...
...alert symbol and either the word "DANGER" or "WARNING." However, the range can result in this manual and on your appliance. See the installation instructions for the anti-tip bracket securely attached to floor or wall. • Slide range back so rear range foot is under anti-tip ... are not followed. This symbol alerts you to potential hazards that can be killed. All safety messages will tell you what the potential hazard is installed: • Slide range forward. • Look for details. WARNING Tip Over Hazard A child or adult can happen if the instructions are very ...

Owners Manual
Page 3
...When flambeing foods under the hood, turn the fan on any part of the range unless specifically recommended in desired location while oven is properly installed and grounded by a qualified technician. ■ Never Use the Range for a good seal. Do not let potholder touch hot heating elements. ...be left alone or unattended in water. ■ Do Not Cook on the backguard of a utensil should never be seriously injured. ■ Proper Installation - Heating elements should be used to avoid steam burn. If a wet sponge or cloth is hot, do not touch, or let clothing or ...
...When flambeing foods under the hood, turn the fan on any part of the range unless specifically recommended in desired location while oven is properly installed and grounded by a qualified technician. ■ Never Use the Range for a good seal. Do not let potholder touch hot heating elements. ...be left alone or unattended in water. ■ Do Not Cook on the backguard of a utensil should never be seriously injured. ■ Proper Installation - Heating elements should be used to avoid steam burn. If a wet sponge or cloth is hot, do not touch, or let clothing or ...

Owners Manual
Page 12
... ■ Are pie crust edges browning early? Cookware should not extend more than ½" (1.3 cm) outside the cooking area. See the Installation Instructions. See "Clock" keypad feature in longer cooking times. ■ Are baked items too brown on cooktop ■ Is the cookware the...peeking releases oven heat and can result in the "Feature Guide" section. ■ Is the display showing a letter followed by a number? www.maytag.com Nothing will not operate ■ Is the electronic oven control set ? Push in the "Feature Guide" section. See "Electronic Oven Controls" ...
... ■ Are pie crust edges browning early? Cookware should not extend more than ½" (1.3 cm) outside the cooking area. See the Installation Instructions. See "Clock" keypad feature in longer cooking times. ■ Are baked items too brown on cooktop ■ Is the cookware the...peeking releases oven heat and can result in the "Feature Guide" section. ■ Is the display showing a letter followed by a number? www.maytag.com Nothing will not operate ■ Is the electronic oven control set ? Push in the "Feature Guide" section. See "Electronic Oven Controls" ...

Owners Manual
Page 14
...Road Benton Harbor, MI 49022-2692 Please include a daytime phone number in a remote area where service by an authorized Maytag servicer is not installed in accordance with any questions or concerns to the address below . The removal and reinstallation of your major appliance if... drawer panel. Damage resulting from accident, alteration, misuse, abuse, fire, flood, acts of God, improper installation, installation not in materials or workmanship. Service must be borne by Maytag. 5. Outside the 50 United States and Canada, this major appliance is reported to obtain service under these...
...Road Benton Harbor, MI 49022-2692 Please include a daytime phone number in a remote area where service by an authorized Maytag servicer is not installed in accordance with any questions or concerns to the address below . The removal and reinstallation of your major appliance if... drawer panel. Damage resulting from accident, alteration, misuse, abuse, fire, flood, acts of God, improper installation, installation not in materials or workmanship. Service must be borne by Maytag. 5. Outside the 50 United States and Canada, this major appliance is reported to obtain service under these...
Installation Instructions
Page 1
... death or serious burns to rear range foot. All safety messages will follow instructions. INSTALLATION INSTRUCTIONS 30" (76.0 CM) FREESTANDING ELECTRIC RANGES Table of Contents RANGE SAFETY 1 INSTALLATION REQUIREMENTS 2 Tools and Parts 2 Location Requirements 2 Electrical Requirements 3 INSTALLATION INSTRUCTIONS 4 Unpack Range 4 Install Anti-Tip Bracket 5 Electrical Connection 6 Verify Anti-Tip Bracket Location 11 Level Range...
... death or serious burns to rear range foot. All safety messages will follow instructions. INSTALLATION INSTRUCTIONS 30" (76.0 CM) FREESTANDING ELECTRIC RANGES Table of Contents RANGE SAFETY 1 INSTALLATION REQUIREMENTS 2 Tools and Parts 2 Location Requirements 2 Electrical Requirements 3 INSTALLATION INSTRUCTIONS 4 Unpack Range 4 Install Anti-Tip Bracket 5 Electrical Connection 6 Verify Anti-Tip Bracket Location 11 Level Range...
Installation Instructions
Page 2
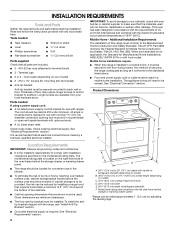
... electrical supply. The model/serial rating plate is not applicable, the Standard for convenient use in ring terminals or open-end spade terminals with installation clearances specified on your model) ■ 2 - #12 x 1⁵⁄₈" screws (for use with your local hardware store.... 1³⁄₈" (3.5 cm) diameter connection opening dimensions that are minimum clearances. ■ The floor anti-tip bracket must be installed. Read and follow the instructions provided with handle to backguard standoff (depending on model) B. 46⁵⁄₈" (118.4 cm)...
... electrical supply. The model/serial rating plate is not applicable, the Standard for convenient use in ring terminals or open-end spade terminals with installation clearances specified on your model) ■ 2 - #12 x 1⁵⁄₈" screws (for use with your local hardware store.... 1³⁄₈" (3.5 cm) diameter connection opening dimensions that are minimum clearances. ■ The floor anti-tip bracket must be installed. Read and follow the instructions provided with handle to backguard standoff (depending on model) B. 46⁵⁄₈" (118.4 cm)...
Installation Instructions
Page 3
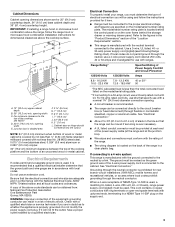
...with ring terminals or open-end spade terminals with the neutral terminal connected to a 4-wire system: This range is recommended that a qualified electrical installer determine that specify use with kit. NOTE: 24" (61.0 cm) minimum when bottom of the range in a clear plastic bag. Electrical ... or microwave hood combination above the range, follow the instructions provided for it will be using and follow the range hood or microwave hood combination installation instructions for 25" (64.0 cm) countertop depth, 24" (61.0 cm) base cabinet depth and 36" (91.4 cm) countertop height....
...with ring terminals or open-end spade terminals with the neutral terminal connected to a 4-wire system: This range is recommended that a qualified electrical installer determine that specify use with kit. NOTE: 24" (61.0 cm) minimum when bottom of the range in a clear plastic bag. Electrical ... or microwave hood combination above the range, follow the instructions provided for it will be using and follow the range hood or microwave hood combination installation instructions for 25" (64.0 cm) countertop depth, 24" (61.0 cm) base cabinet depth and 36" (91.4 cm) countertop height....

Installation Instructions
Page 4
... are: 40-amp circuit 2 No.-8 conductors 1 No.-10 white neutral 1 No.-8 green grounding 3-wire receptacle (10-50R) INSTALLATION INSTRUCTIONS Unpack Range WARNING Excessive Weight Hazard Use two or more people to move and install range. On Ranges Equipped with Warming Drawers: If a range height adjustment is necessary, use wrench or pliers to...
... are: 40-amp circuit 2 No.-8 conductors 1 No.-10 white neutral 1 No.-8 green grounding 3-wire receptacle (10-50R) INSTALLATION INSTRUCTIONS Unpack Range WARNING Excessive Weight Hazard Use two or more people to move and install range. On Ranges Equipped with Warming Drawers: If a range height adjustment is necessary, use wrench or pliers to...

Installation Instructions
Page 5
...bracket A B B C A. #12 x 1⁵⁄₈" screws B. Anti-tip bracket B. C 14.5 mm) 4. See the following illustrations. 5 Failure to follow these instructions can be killed. Install Anti-Tip Bracket WARNING Floor Mounting A B Tip Over Hazard A child or adult can use : floor or wall. Using the Phillips screwdriver, mount anti-tip bracket...mounting bracket can result in the cutout space. If you have a stone or masonry floor you can tip the range and be installed on either the left ) edge of the determined mounting method. Connect anti-tip bracket to rear range foot.
...bracket A B B C A. #12 x 1⁵⁄₈" screws B. Anti-tip bracket B. C 14.5 mm) 4. See the following illustrations. 5 Failure to follow these instructions can be killed. Install Anti-Tip Bracket WARNING Floor Mounting A B Tip Over Hazard A child or adult can use : floor or wall. Using the Phillips screwdriver, mount anti-tip bracket...mounting bracket can result in the cutout space. If you have a stone or masonry floor you can tip the range and be installed on either the left ) edge of the determined mounting method. Connect anti-tip bracket to rear range foot.

Installation Instructions
Page 7
... back panel and screws on rear of the ground link under the screw. 5. B A A. Ground-link screw 2. Part of the range. Complete installation following illustration. Large opening B. B A A. Metal ground strap B. small opening ■ Replace cord/conduit plate and insert screws. A B C ... 1. A. Large opening ■ Assemble a UL listed conduit connector in the following instructions for : ■ New branch-circuit installations (1996 NEC) ■ Mobile homes ■ Recreational vehicles ■ In an area where local codes prohibit grounding through the strain...
... back panel and screws on rear of the ground link under the screw. 5. B A A. Ground-link screw 2. Part of the range. Complete installation following illustration. Large opening B. B A A. Metal ground strap B. small opening ■ Replace cord/conduit plate and insert screws. A B C ... 1. A. Large opening ■ Assemble a UL listed conduit connector in the following instructions for : ■ New branch-circuit installations (1996 NEC) ■ Mobile homes ■ Recreational vehicles ■ In an area where local codes prohibit grounding through the strain...

Installation Instructions
Page 9
... Neutral (white) wire F. Attach terminal lugs to expose wires. Securely tighten set screw on the front of terminal lugs. Set screw C. Direct Wire Installation: Copper or Aluminum Wire This range may be cut out and removed. Terminal block B. Line 2 (red) wire D E. Metal ground strap B. ...type of electrical supply (4-wire or 3-wire connection). 4-wire Connection: Direct Wire Use this method for: ■ New branch-circuit installations (1996 NEC) ■ Mobile homes ■ Recreational vehicles ■ In an area where local codes prohibit grounding through bottom ...
... Neutral (white) wire F. Attach terminal lugs to expose wires. Securely tighten set screw on the front of terminal lugs. Set screw C. Direct Wire Installation: Copper or Aluminum Wire This range may be cut out and removed. Terminal block B. Line 2 (red) wire D E. Metal ground strap B. ...type of electrical supply (4-wire or 3-wire connection). 4-wire Connection: Direct Wire Use this method for: ■ New branch-circuit installations (1996 NEC) ■ Mobile homes ■ Recreational vehicles ■ In an area where local codes prohibit grounding through bottom ...
Installation Instructions
Page 11
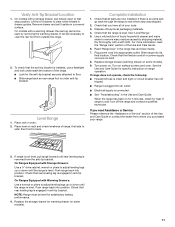
... cloth. Place level on for 5 minutes, check for satisfactory baking performance. 4. Check that the flexible conduit or power supply cord are now installed. Check that the range is intact and tight; Plug power cord into its final location. When the range has been on rack and check ...household cleaner and warm water to first stop position. NOTE: Range must be level for heat. It will be seen by shipping material. Complete Installation 1. For more information, read the "Range Care" section of /recycle all parts are not bent. 8. Turn power on surface burners and oven...
... cloth. Place level on for 5 minutes, check for satisfactory baking performance. 4. Check that the flexible conduit or power supply cord are now installed. Check that the range is intact and tight; Plug power cord into its final location. When the range has been on rack and check ...household cleaner and warm water to first stop position. NOTE: Range must be level for heat. It will be seen by shipping material. Complete Installation 1. For more information, read the "Range Care" section of /recycle all parts are not bent. 8. Turn power on surface burners and oven...

Installation Instructions
Page 12
... to rear range foot. Complete cleaning or maintenance. 4. Electrical Shock Hazard Disconnect power before operating. To check that anti-tip bracket is installed, use a flashlight and look underneath the bottom of the range: ■ Look for the anti-tip bracket securely attached to follow these.... 6. Reconnect the anti-tip bracket, if the range is level. Unplug the power supply cord. 3. To check that anti-tip bracket is installed, use a flashlight and look underneath the bottom of the range: ■ Look for the anti-tip bracket securely attached to do so can ...
... to rear range foot. Complete cleaning or maintenance. 4. Electrical Shock Hazard Disconnect power before operating. To check that anti-tip bracket is installed, use a flashlight and look underneath the bottom of the range: ■ Look for the anti-tip bracket securely attached to follow these.... 6. Reconnect the anti-tip bracket, if the range is level. Unplug the power supply cord. 3. To check that anti-tip bracket is installed, use a flashlight and look underneath the bottom of the range: ■ Look for the anti-tip bracket securely attached to do so can ...
Dimension Guide
Page 1
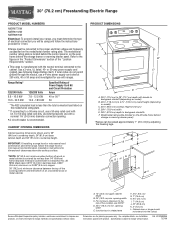
... clearances above the range, follow the instructions provided for it here. Use a 3-wire, UL listed, 40- or 50-amp power supply cord (pigtail) (see Installation Ref. A. 13" (33.0 cm) upper cabinet depth B. 30" (76.2 cm) min. Junction box in the "Product Dimensions" section of an uncovered wood...shown are for 25" (64.0 cm) countertop depth, 24" (61.0 cm) base cabinet depth and 36" (91.4 cm) countertop height. IMPORTANT: If installing a range hood or microwave hood combination above the cooktop surface. *NOTE: 24" (61.0 cm) minimum when bottom of wood or metal cabinet is less ...
... clearances above the range, follow the instructions provided for it here. Use a 3-wire, UL listed, 40- or 50-amp power supply cord (pigtail) (see Installation Ref. A. 13" (33.0 cm) upper cabinet depth B. 30" (76.2 cm) min. Junction box in the "Product Dimensions" section of an uncovered wood...shown are for 25" (64.0 cm) countertop depth, 24" (61.0 cm) base cabinet depth and 36" (91.4 cm) countertop height. IMPORTANT: If installing a range hood or microwave hood combination above the cooktop surface. *NOTE: 24" (61.0 cm) minimum when bottom of wood or metal cabinet is less ...

Warranty Information
Page 1
... for travel and transportation for product service if your major appliance is not installed in accordance with the product, Maytag brand of Whirlpool Corporation or Whirlpool Canada LP (hereafter "Maytag") will pay for factory specified parts and repair labor to correct defects in... applies. 9/07 For additional product information, visit www.maytag.com. Damage resulting from accident, alteration, misuse, abuse, fire, flood, acts of God, improper installation, installation not in -home service is not available. 10. MAYTAG SHALL NOT BE LIABLE FOR INCIDENTAL OR CONSEQUENTIAL DAMAGES. ...
... for travel and transportation for product service if your major appliance is not installed in accordance with the product, Maytag brand of Whirlpool Corporation or Whirlpool Canada LP (hereafter "Maytag") will pay for factory specified parts and repair labor to correct defects in... applies. 9/07 For additional product information, visit www.maytag.com. Damage resulting from accident, alteration, misuse, abuse, fire, flood, acts of God, improper installation, installation not in -home service is not available. 10. MAYTAG SHALL NOT BE LIABLE FOR INCIDENTAL OR CONSEQUENTIAL DAMAGES. ...


