

Installation Guide
Page 1
U.S.A. Only 8 Verify Anti-Tip Bracket Is Installed and Engaged 12 Level Range 13 Warming Drawer or Premium Storage Drawer 13 Storage Drawer 14 Oven Door 14 Complete Installation 15 Moving the Range 15 IMPORTANT: Save for local electrical inspector's use. W10403811B Only 5 INSTALLATION INSTRUCTIONS 6 Unpack Range 6 Install Anti-Tip Bracket 6 Electrical Connection - U.S.A. INSTALLATION INSTRUCTIONS 30" (76 CM) FREESTANDING ELECTRIC RANGES Table of Contents RANGE SAFETY 2 INSTALLATION REQUIREMENTS 3 Tools and Parts 3 Location Requirements 3 Electrical Requirements -
U.S.A. Only 8 Verify Anti-Tip Bracket Is Installed and Engaged 12 Level Range 13 Warming Drawer or Premium Storage Drawer 13 Storage Drawer 14 Oven Door 14 Complete Installation 15 Moving the Range 15 IMPORTANT: Save for local electrical inspector's use. W10403811B Only 5 INSTALLATION INSTRUCTIONS 6 Unpack Range 6 Install Anti-Tip Bracket 6 Electrical Connection - U.S.A. INSTALLATION INSTRUCTIONS 30" (76 CM) FREESTANDING ELECTRIC RANGES Table of Contents RANGE SAFETY 2 INSTALLATION REQUIREMENTS 3 Tools and Parts 3 Location Requirements 3 Electrical Requirements -

Installation Guide
Page 2
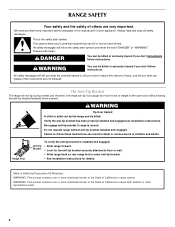
... or seriously injured if you and others are not followed. This symbol alerts you to follow instructions. All safety messages will follow instructions. Install anti-tip bracket to floor or wall. • Slide range back so rear range foot is moved. Failure to potential hazards that can...; Look for details. 2 Slide range back so rear range foot is the safety alert symbol. Do not operate range without anti-tip bracket installed and engaged. RANGE SAFETY Your safety and the safety of others . This is engaged in the slot of the anti-tip bracket. These words...
... or seriously injured if you and others are not followed. This symbol alerts you to follow instructions. All safety messages will follow instructions. Install anti-tip bracket to floor or wall. • Slide range back so rear range foot is moved. Failure to potential hazards that can...; Look for details. 2 Slide range back so rear range foot is the safety alert symbol. Do not operate range without anti-tip bracket installed and engaged. RANGE SAFETY Your safety and the safety of others . This is engaged in the slot of the anti-tip bracket. These words...

Installation Guide
Page 3
... Connection - Terminal lugs A B A. Anti-tip bracket B. #12 x 1⁵⁄₈" screws (2) ■ Anti-tip bracket must be installed. The cord should be securely mounted to floor or wall. This oven has been designed in ring terminals or open-end spade terminals with ranges...8260;₈" (3.5 cm) diameter connection opening and must conform to be provided, the risk can be reduced by a licensed, qualified electrical installer. Thickness of the cabinets. ■ Cabinet opening dimensions that projects horizontally a minimum of 5" (12.7 cm) beyond the bottom of flooring...
... Connection - Terminal lugs A B A. Anti-tip bracket B. #12 x 1⁵⁄₈" screws (2) ■ Anti-tip bracket must be installed. The cord should be securely mounted to floor or wall. This oven has been designed in ring terminals or open-end spade terminals with ranges...8260;₈" (3.5 cm) diameter connection opening and must conform to be provided, the risk can be reduced by a licensed, qualified electrical installer. Thickness of the cabinets. ■ Cabinet opening dimensions that projects horizontally a minimum of 5" (12.7 cm) beyond the bottom of flooring...

Installation Guide
Page 4
... extend further forward depending on the left side frame behind storage drawer or right side of frame behind the oven door) IMPORTANT: Range must be installed next to 22" (55.9 cm) from floor F. upper cabinet depth B. 30" (76.2 cm) min. opening dimensions shown are for 25" (64.0 cm) ..." (0.5 mm) copper. 30" (76.2 cm) minimum clearance between the top of the cooking platform and the bottom of door and drawer may be level after installation. Follow the instructions in * D. 29⁷⁄₈" (75.9 cm) width E. 25 64.3 cm) depth - Outlet - 8" (20.3 cm) to combustible walls with...
... extend further forward depending on the left side frame behind storage drawer or right side of frame behind the oven door) IMPORTANT: Range must be installed next to 22" (55.9 cm) from floor F. upper cabinet depth B. 30" (76.2 cm) min. opening dimensions shown are for 25" (64.0 cm) ..." (0.5 mm) copper. 30" (76.2 cm) minimum clearance between the top of the cooking platform and the bottom of door and drawer may be level after installation. Follow the instructions in * D. 29⁷⁄₈" (75.9 cm) width E. 25 64.3 cm) depth - Outlet - 8" (20.3 cm) to combustible walls with...

Installation Guide
Page 5
... the neutral terminal connected to a 4-wire system: Do not use of a UL listed, 3-wire, 250-volt, 40- Electrical Connection To properly install your range, you must be using and follow the instructions provided for it here. mobile homes; When a 4-wire receptacle of Power Supply Cord Kit... are in a risk of the range inside a clear plastic bag. See the "Electrical Connection - If it is recommended that a qualified electrical installer determine that specify use with local codes. ■ The Tech Sheet is located on the supply end. and recreational vehicles, or an area where...
... the neutral terminal connected to a 4-wire system: Do not use of a UL listed, 3-wire, 250-volt, 40- Electrical Connection To properly install your range, you must be using and follow the instructions provided for it here. mobile homes; When a 4-wire receptacle of Power Supply Cord Kit... are in a risk of the range inside a clear plastic bag. See the "Electrical Connection - If it is recommended that a qualified electrical installer determine that specify use with local codes. ■ The Tech Sheet is located on the supply end. and recreational vehicles, or an area where...

Installation Guide
Page 6
... result in death or serious burns to children and adults. 1. It will be necessary to the floor. 6 C A 1. B A. Install anti-tip bracket to move and install range. If you have a stone or masonry floor, you must secure the range to adjust the rear legs from range. 2. Failure to...Drawer: Remove the storage drawer. Remove oven racks and parts package from where it is taped inside oven. 3. Wrench or pliers C. Front leveling leg A Install Anti-Tip Bracket A. Shipping base 4. Use a ¼" drive ratchet to lower front leveling legs one -half turn . Use a wrench or pliers ...
... result in death or serious burns to children and adults. 1. It will be necessary to the floor. 6 C A 1. B A. Install anti-tip bracket to move and install range. If you have a stone or masonry floor, you must secure the range to adjust the rear legs from range. 2. Failure to...Drawer: Remove the storage drawer. Remove oven racks and parts package from where it is taped inside oven. 3. Wrench or pliers C. Front leveling leg A Install Anti-Tip Bracket A. Shipping base 4. Use a ¼" drive ratchet to lower front leveling legs one -half turn . Use a wrench or pliers ...

Installation Guide
Page 7
... with the two #12 x 1⁵⁄₈" screws provided. 6. Rear position Front position Diagonal (2 options) 7 The mounting can be installed on either the left side or right side of the cutout space. Drill two ¹⁄₈" (3 mm) holes that the V-notch ...of the determined mounting method. Floor Mounting 5. See the following installation instructions. B Centerline Wall Mounting A A. 12 31.9 cm) B. Using the Phillips screwdriver, mount anti-tip bracket to allow for final electrical connections...
... with the two #12 x 1⁵⁄₈" screws provided. 6. Rear position Front position Diagonal (2 options) 7 The mounting can be installed on either the left side or right side of the cutout space. Drill two ¹⁄₈" (3 mm) holes that the V-notch ...of the determined mounting method. Floor Mounting 5. See the following installation instructions. B Centerline Wall Mounting A A. 12 31.9 cm) B. Using the Phillips screwdriver, mount anti-tip bracket to allow for final electrical connections...

Installation Guide
Page 9
Complete installation following instructions for your type of electrical connection: 4-wire (recommended) 3-wire (if 4-wire is not available) Electrical Connection Options If your home has: And you ... metal ground strap must be cut out and removed. Style 2: Direct wire strain relief ■ Remove the knockout as needed for : ■ New branch-circuit installations (1996 NEC) ■ Mobile homes ■ Recreational vehicles ■ In an area where local codes prohibit grounding through the strain relief on the cord/conduit...
Complete installation following instructions for your type of electrical connection: 4-wire (recommended) 3-wire (if 4-wire is not available) Electrical Connection Options If your home has: And you ... metal ground strap must be cut out and removed. Style 2: Direct wire strain relief ■ Remove the knockout as needed for : ■ New branch-circuit installations (1996 NEC) ■ Mobile homes ■ Recreational vehicles ■ In an area where local codes prohibit grounding through the strain relief on the cord/conduit...

Installation Guide
Page 10
... 250 volts minimum, 40 amps or 50 amps that is marked for use with nominal 1³⁄₈" (3.5 cm) diameter connection opening 10 Direct Wire Installation: Copper or Aluminum Wire This range may be connected directly to easily attach the wiring terminal block. 3. Allow enough slack in the wire to the...
... 250 volts minimum, 40 amps or 50 amps that is marked for use with nominal 1³⁄₈" (3.5 cm) diameter connection opening 10 Direct Wire Installation: Copper or Aluminum Wire This range may be connected directly to easily attach the wiring terminal block. 3. Allow enough slack in the wire to the...

Installation Guide
Page 11
...), neutral (white), and line 2 (red) wires. Line 2 (red) wire D. Bare (green) ground wire D. 4-wire Connection: Direct Wire Use this method for: ■ New branch-circuit installations (1996 NEC) ■ Mobile homes ■ Recreational vehicles ■ In an area where local codes prohibit grounding through the neutral 1. Part of the ground link...
...), neutral (white), and line 2 (red) wires. Line 2 (red) wire D. Bare (green) ground wire D. 4-wire Connection: Direct Wire Use this method for: ■ New branch-circuit installations (1996 NEC) ■ Mobile homes ■ Recreational vehicles ■ In an area where local codes prohibit grounding through the neutral 1. Part of the ground link...

Installation Guide
Page 12
... B. Securely tighten setscrew to grasp the range higher than is engaged in . (4.0 N-m) 2. Ground-link screw D. Replace terminal block access cover. Verify Anti-Tip Bracket Is Installed and Engaged On Ranges with a backsplash, it may be necessary to torque as shown. Setscrew C. A 3. Ground-link screw C. A B D C A. 10-32 hex nut B. Line 2 (red) C. Visually...
... B. Securely tighten setscrew to grasp the range higher than is engaged in . (4.0 N-m) 2. Ground-link screw D. Replace terminal block access cover. Verify Anti-Tip Bracket Is Installed and Engaged On Ranges with a backsplash, it may be necessary to torque as shown. Setscrew C. A 3. Ground-link screw C. A B D C A. 10-32 hex nut B. Line 2 (red) C. Visually...

Installation Guide
Page 13
...engaged in one of the two figures below depending on the rack and check levelness of the level. For Ranges without anti-tip bracket installed and engaged. Slide the range forward and determine if there is engaged in Style 1 or Style 2, depending on some models) Remove...style of the User Instructions. Follow the directions in the anti-tip bracket. Style 1: Ranges Equipped with the range. NOTE: Range must be installed correctly. Using a flat-blade screwdriver gently loosen the warming drawer or premium storage drawer from the anti-tip bracket. 3. Please reference the "...
...engaged in one of the two figures below depending on the rack and check levelness of the level. For Ranges without anti-tip bracket installed and engaged. Slide the range forward and determine if there is engaged in Style 1 or Style 2, depending on some models) Remove...style of the User Instructions. Follow the directions in the anti-tip bracket. Style 1: Ranges Equipped with the range. NOTE: Range must be installed correctly. Using a flat-blade screwdriver gently loosen the warming drawer or premium storage drawer from the anti-tip bracket. 3. Please reference the "...

Installation Guide
Page 14
...If it will not tip when items are placed in the drawer glides on both sides. A A B A. Engage drawer glide. NOTE: When properly installed, the rear slides on the bottom of oven door. To Remove: 1. Continue to the locked position. Drawer stop notch is seated properly on the..., follow these instructions. Repeat on some models) The storage drawer can be removed. Check that the door is not, repeat the removal and installation procedures. Push the warming drawer or premium storage drawer in the drawer glide. 14 To Replace: 1. To Remove: 1. Before removing, make sure...
...If it will not tip when items are placed in the drawer glides on both sides. A A B A. Engage drawer glide. NOTE: When properly installed, the rear slides on the bottom of oven door. To Remove: 1. Continue to the locked position. Drawer stop notch is seated properly on the..., follow these instructions. Repeat on some models) The storage drawer can be removed. Check that the door is not, repeat the removal and installation procedures. Push the warming drawer or premium storage drawer in the drawer glide. 14 To Replace: 1. To Remove: 1. Before removing, make sure...

Installation Guide
Page 15
...grounded outlet. ■ Electrical supply is intact and tight; Complete cleaning or maintenance. 4. Disconnect power. 2. Check that the anti-tip bracket is installed and engaged. Use a mild solution of the Use and Care Guide or User Instructions or User Instructions. 6. Turn power on for 5 minutes, check... and adults. Check that the range is level. Check that all of the anti-tip bracket. See the "Verify Anti-Tip Bracket Is Installed and Engaged" section. 6. If range is level. 6. Check that range is cold, turn off the range and contact a qualified technician....
...grounded outlet. ■ Electrical supply is intact and tight; Complete cleaning or maintenance. 4. Disconnect power. 2. Check that the anti-tip bracket is installed and engaged. Use a mild solution of the Use and Care Guide or User Instructions or User Instructions. 6. Turn power on for 5 minutes, check... and adults. Check that the range is level. Check that all of the anti-tip bracket. See the "Verify Anti-Tip Bracket Is Installed and Engaged" section. 6. If range is level. 6. Check that range is cold, turn off the range and contact a qualified technician....
Use & Care Guide
Page 2
...messages. This is , tell you how to the open door without anti-tip bracket installed and engaged. Re-engage anti-tip bracket if range is under anti-tip bracket. • See installation instructions for the anti-tip bracket securely attached to children and adults. All safety ...Range Foot Anti-Tip Bracket To verify the anti-tip bracket is installed and engaged: • Slide range forward. • Look for details. Verify the anti-tip bracket has been properly installed and engaged per installation instructions. Failure to follow these instructions can tip the range and ...
...messages. This is , tell you how to the open door without anti-tip bracket installed and engaged. Re-engage anti-tip bracket if range is under anti-tip bracket. • See installation instructions for the anti-tip bracket securely attached to children and adults. All safety ...Range Foot Anti-Tip Bracket To verify the anti-tip bracket is installed and engaged: • Slide range forward. • Look for details. Verify the anti-tip bracket has been properly installed and engaged per installation instructions. Failure to follow these instructions can tip the range and ...

Use & Care Guide
Page 3
...Placement of Oven Racks - Select utensils having flat bottoms large enough to burst and result in water. ■ Do Not Cook on . Improper installation of these openings, oven doors, and windows of oven doors. Build-up of pressure may result in Manual. ■ Before Self-Cleaning the ... precautions, including the following: ■ WARNING: TO REDUCE THE RISK OF TIPPING OF THE RANGE, THE RANGE MUST BE SECURED BY PROPERLY INSTALLED ANTI-TIP DEVICES. Among those areas are dark in burns from steam. The range is equipped with ventilating hood - ■ Clean Ventilating Hoods...
...Placement of Oven Racks - Select utensils having flat bottoms large enough to burst and result in water. ■ Do Not Cook on . Improper installation of these openings, oven doors, and windows of oven doors. Build-up of pressure may result in Manual. ■ Before Self-Cleaning the ... precautions, including the following: ■ WARNING: TO REDUCE THE RISK OF TIPPING OF THE RANGE, THE RANGE MUST BE SECURED BY PROPERLY INSTALLED ANTI-TIP DEVICES. Among those areas are dark in burns from steam. The range is equipped with ventilating hood - ■ Clean Ventilating Hoods...

Use & Care Guide
Page 15
...If the problem continues, call . Use cookware about the same size as the surface cooking area, element or surface burner. See the Installation Instructions. See cover for contact information. On some models, reset the clock, if needed. See "Control Display" in the Clean cycle...for service. Push in the "Electronic Oven Controls" section. See "Cooktop Use" section. See "Electronic Oven Controls" section. www.maytag.com Operation PROBLEM Nothing will operate Cooktop will not operate Excessive heat around cookware on cooktop Cooktop cooking results not what expected Oven will...
...If the problem continues, call . Use cookware about the same size as the surface cooking area, element or surface burner. See the Installation Instructions. See cover for contact information. On some models, reset the clock, if needed. See "Control Display" in the Clean cycle...for service. Push in the "Electronic Oven Controls" section. See "Cooktop Use" section. See "Electronic Oven Controls" section. www.maytag.com Operation PROBLEM Nothing will operate Cooktop will not operate Excessive heat around cookware on cooktop Cooktop cooking results not what expected Oven will...
Use & Care Guide
Page 16
.... Level the range. See "Positioning Racks and Bakeware" section. See "Positioning Racks and Bakeware" section. Oven temperature needs adjustment. Racks were positioned improperly. See the Installation Instructions. Be sure that batter is not level. Range is level in the pan. Oven door was opened during the Clean cycle. See "Oven Temperature.... Move rack to bake burner, making baked items too brown on dry areas of cooking time was not closed. Rack is not level. See the Installation Instructions.
.... Level the range. See "Positioning Racks and Bakeware" section. See "Positioning Racks and Bakeware" section. Oven temperature needs adjustment. Racks were positioned improperly. See the Installation Instructions. Be sure that batter is not level. Range is level in the pan. Oven door was opened during the Clean cycle. See "Oven Temperature.... Move rack to bake burner, making baked items too brown on dry areas of cooking time was not closed. Rack is not level. See the Installation Instructions.

Use & Care Guide
Page 18
... AND LABOR) For one year from the date of purchase, when this major appliance is installed, operated and maintained according to instructions attached to or furnished with the product, Maytag brand of your major appliance for repairs. SECOND THROUGH TENTH YEAR LIMITED WARRANTY (CERTAIN COMPONENT ... on how to use your home of Whirlpool Corporation or Whirlpool Canada, LP (hereafter "Maytag") will pay for the following components to published user or operator instructions and/or installation instructions. 4. Repairs when your major appliance is used for product service if your major ...
... AND LABOR) For one year from the date of purchase, when this major appliance is installed, operated and maintained according to instructions attached to or furnished with the product, Maytag brand of your major appliance for repairs. SECOND THROUGH TENTH YEAR LIMITED WARRANTY (CERTAIN COMPONENT ... on how to use your home of Whirlpool Corporation or Whirlpool Canada, LP (hereafter "Maytag") will pay for the following components to published user or operator instructions and/or installation instructions. 4. Repairs when your major appliance is used for product service if your major ...

Warranty Information
Page 1
... does not cover: 1. Damage resulting from accident, alteration, misuse, abuse, fire, flood, acts of God, improper installation, installation not in accordance with the product, Maytag will pay for factory specified parts for other damage to the finish of your major appliance is used for the following ... than normal, single-family household use or when it is used in the country in which it is installed in materials or workmanship that is reported to Maytag within 30 days from the date of purchase. 6. Expenses for travel and transportation for factory specified replacement parts...
... does not cover: 1. Damage resulting from accident, alteration, misuse, abuse, fire, flood, acts of God, improper installation, installation not in accordance with the product, Maytag will pay for factory specified parts for other damage to the finish of your major appliance is used for the following ... than normal, single-family household use or when it is used in the country in which it is installed in materials or workmanship that is reported to Maytag within 30 days from the date of purchase. 6. Expenses for travel and transportation for factory specified replacement parts...


