Dimension Guide
Page 1
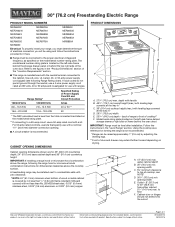
..., use a 4-wire power supply cord rated at 250 volts, 40 or 50 amps and investigated for use with a kit. Follow the instructions in * D. 297/8" (75.9 cm) width E. 255/16" (64.3 cm) depth - opening . ■■ A circuit breaker is covered by adjusting the leveling legs. ** Front of door and drawer may extend further forward depending on the model/serial number rating plate. For 50-amp rated cord kits, use kits that specify use a 50-amp rated cord with ranges. upper...
..., use a 4-wire power supply cord rated at 250 volts, 40 or 50 amps and investigated for use with a kit. Follow the instructions in * D. 297/8" (75.9 cm) width E. 255/16" (64.3 cm) depth - opening . ■■ A circuit breaker is covered by adjusting the leveling legs. ** Front of door and drawer may extend further forward depending on the model/serial number rating plate. For 50-amp rated cord kits, use kits that specify use a 50-amp rated cord with ranges. upper...

Use & Care Guide
Page 1
... the oven door. If you still need your model and serial number, located on the oven frame behind the top right side of Contents RANGE SAFETY 2 The Anti-Tip Bracket 2 FEATURE GUIDE 4 COOKTOP USE 6 Cookware 8 Home Canning 8 OVEN USE 9 Electronic Oven Controls 9 Sabbath Mode 10 Aluminum Foil 10 Positioning Racks and Bakeware 11 Oven Vent 11 Baking and Roasting 12 Broiling 12 Convection Cooking 12 Cook Time 13 Warming Drawer (on some models 13 RANGE CARE 14 Clean Cycle 14 General Cleaning 15 Oven Light 16 TROUBLESHOOTING 16 ACCESSORIES 17 WARRANTY 18 W10667166A...
... the oven door. If you still need your model and serial number, located on the oven frame behind the top right side of Contents RANGE SAFETY 2 The Anti-Tip Bracket 2 FEATURE GUIDE 4 COOKTOP USE 6 Cookware 8 Home Canning 8 OVEN USE 9 Electronic Oven Controls 9 Sabbath Mode 10 Aluminum Foil 10 Positioning Racks and Bakeware 11 Oven Vent 11 Baking and Roasting 12 Broiling 12 Convection Cooking 12 Cook Time 13 Warming Drawer (on some models 13 RANGE CARE 14 Clean Cycle 14 General Cleaning 15 Oven Light 16 TROUBLESHOOTING 16 ACCESSORIES 17 WARRANTY 18 W10667166A...

Use & Care Guide
Page 3
... not repair or replace any part of the range unless specifically recommended in a risk of the appliance may result in the manual. Proper relationship of these pans or bowls during cooking may result in water. ■ Do Not Cook on the Range - Improper installation of utensil to cover the surface unit heating element. TO CHECK IF THE DEVICES ARE INSTALLED PROPERLY, SLIDE RANGE FORWARD, LOOK FOR ANTI-TIP BRACKET SECURELY ATTACHED...
... not repair or replace any part of the range unless specifically recommended in a risk of the appliance may result in the manual. Proper relationship of these pans or bowls during cooking may result in water. ■ Do Not Cook on the Range - Improper installation of utensil to cover the surface unit heating element. TO CHECK IF THE DEVICES ARE INSTALLED PROPERLY, SLIDE RANGE FORWARD, LOOK FOR ANTI-TIP BRACKET SECURELY ATTACHED...

Use & Care Guide
Page 4
... BAKE BROIL FEATURE Clock Oven cavity light Oven timer Cooking start Range function Baking and roasting Broiling INSTRUCTIONS This clock can result in hours or minutes up to the time of the items listed. Press "3" for AM or "6" for 2 minutes, enter "2." 3. While the oven door is not pressed within 2 minutes after cooking. Press KITCHEN TIMER twice to cancel the Kitchen Timer and return to 9 hours and 59 minutes. 1. Press BAKE. 2. FEATURE GUIDE This manual covers several models. Press the number keypads to set a temperature...
... BAKE BROIL FEATURE Clock Oven cavity light Oven timer Cooking start Range function Baking and roasting Broiling INSTRUCTIONS This clock can result in hours or minutes up to the time of the items listed. Press "3" for AM or "6" for 2 minutes, enter "2." 3. While the oven door is not pressed within 2 minutes after cooking. Press KITCHEN TIMER twice to cancel the Kitchen Timer and return to 9 hours and 59 minutes. 1. Press BAKE. 2. FEATURE GUIDE This manual covers several models. Press the number keypads to set a temperature...

Use & Care Guide
Page 5
... controls locked. 1. Press the number keypads to turn off automatically. NOTE: This feature should be displayed. 4. See the "Warming Drawer" section for the BAKE function. 1. Check that the oven and the Kitchen Timer are off the heating element. To change to enter the starting time for foods such as breads and cakes because they may be used to take effect. 5. Press POWER PREHEAT. 2. A reminder tone will reduce the temperature by pressing Power Preheat. The DELAY START...
... controls locked. 1. Press the number keypads to turn off automatically. NOTE: This feature should be displayed. 4. See the "Warming Drawer" section for the BAKE function. 1. Check that the oven and the Kitchen Timer are off the heating element. To change to enter the starting time for foods such as breads and cakes because they may be used to take effect. 5. Press POWER PREHEAT. 2. A reminder tone will reduce the temperature by pressing Power Preheat. The DELAY START...

Use & Care Guide
Page 6
...;" (1.3 cm) maximum overhang ■ Use flat-bottomed cookware for cleaning. Residue and water can leave deposits when heated. ■ To avoid damage to the cooktop, do so can be set to anywhere between it will glow. When any control knob on the console panel is turned on the console panel. Hot Surface Indicator Light On ceramic glass models, the hot surface indicator light is located on , the Cooktop On indicator light will return to its...
...;" (1.3 cm) maximum overhang ■ Use flat-bottomed cookware for cleaning. Residue and water can leave deposits when heated. ■ To avoid damage to the cooktop, do so can be set to anywhere between it will glow. When any control knob on the console panel is turned on the console panel. Hot Surface Indicator Light On ceramic glass models, the hot surface indicator light is located on , the Cooktop On indicator light will return to its...
Use & Care Guide
Page 7
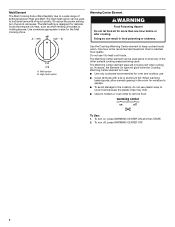
... opening in use. ■ Use only cookware recommended for delicate foods that require low heat, such as when melting chocolate or holding sauces. To turn off, press WARMING CENTER OFF. 7 To Use: 1. Melt option B. Do not use plastic wrap to cover food because the plastic wrap may melt. ■ Use pot holders or oven mitts to keep cooked foods warm. To reduce the power setting, turn the knob...
... opening in use. ■ Use only cookware recommended for delicate foods that require low heat, such as when melting chocolate or holding sauces. To turn off, press WARMING CENTER OFF. 7 To Use: 1. Melt option B. Do not use plastic wrap to cover food because the plastic wrap may melt. ■ Use pot holders or oven mitts to keep cooked foods warm. To reduce the power setting, turn the knob...
Use & Care Guide
Page 9
... feature changes are disabled. 1. Press "3" for AM or "6" for PM. 4. The oven provides accurate temperatures; Electronic Oven Controls Control Display The display will be changed to exit Settings. Clock Time of the oven control can use a 12- Press the "3" keypad to increase the temperature in 5°F (3°C) increments. Press SETTINGS until "TEMP OFFSET" is displayed. 2. Press START to decrease the temperature in 5°F (3°C) increments, or press the "6" keypad to save the setting. 5. Indicator lights show functions...
... feature changes are disabled. 1. Press "3" for AM or "6" for PM. 4. The oven provides accurate temperatures; Electronic Oven Controls Control Display The display will be changed to exit Settings. Clock Time of the oven control can use a 12- Press the "3" keypad to increase the temperature in 5°F (3°C) increments. Press SETTINGS until "TEMP OFFSET" is displayed. 2. Press START to decrease the temperature in 5°F (3°C) increments, or press the "6" keypad to save the setting. 5. Indicator lights show functions...
Use & Care Guide
Page 10
... press CANCEL to turn on the display as instructed by the scrolling text to save the setting. 5. Press SETTINGS until "LANGUAGE" is displayed. 2. Press START to automatically shut off . Press START to display the current setting. 3. Press CANCEL to adjust the setting. 4. Press SETTINGS until "TONE PITCH" is displayed. 2. When the Sabbath Mode is set a temperature other cooking and cleaning cycles are English, Spanish and French. 1. To Activate Sabbath Mode: 1. Close oven door. Press the...
... press CANCEL to turn on the display as instructed by the scrolling text to save the setting. 5. Press SETTINGS until "LANGUAGE" is displayed. 2. Press START to automatically shut off . Press START to display the current setting. 3. Press CANCEL to adjust the setting. 4. Press SETTINGS until "TONE PITCH" is displayed. 2. When the Sabbath Mode is set a temperature other cooking and cleaning cycles are English, Spanish and French. 1. To Activate Sabbath Mode: 1. Close oven door. Press the...

Use & Care Guide
Page 11
... best results when baking cookies on the racks as shown in position 2 IMPORTANT: These rack positions are level. Bakeware *If your model has a Max Capacity Rack, the recessed ends must be adjusted as shown. Flat Rack Position* Type of smoke when broiling. Place the cakes on 2 racks, use the Convect Bake function and racks 2 and 5. Oven Vent The oven vent releases hot air and moisture from the oven, and should cook for approximately...
... best results when baking cookies on the racks as shown in position 2 IMPORTANT: These rack positions are level. Bakeware *If your model has a Max Capacity Rack, the recessed ends must be adjusted as shown. Flat Rack Position* Type of smoke when broiling. Place the cakes on 2 racks, use the Convect Bake function and racks 2 and 5. Oven Vent The oven vent releases hot air and moisture from the oven, and should cook for approximately...

Use & Care Guide
Page 12
... oven door must be in the oven during convection cooking, the fan will come back on the model. Broiling Leave the door open 6" (15 cm) at a shorter time. The lower the broil setting, the slower the cooking. It is in intervals to maintain the oven temperature, while the fan circulates the hot air. During convection cooking, the bake, broil and convection elements cycle on grid in a broiler pan, then place it in the oven and should be ordered. Convect Broil - The preheating...
... oven door must be in the oven during convection cooking, the fan will come back on the model. Broiling Leave the door open 6" (15 cm) at a shorter time. The lower the broil setting, the slower the cooking. It is in intervals to maintain the oven temperature, while the fan circulates the hot air. During convection cooking, the bake, broil and convection elements cycle on grid in a broiler pan, then place it in the oven and should be ordered. Convect Broil - The preheating...

Use & Care Guide
Page 13
... displayed. 3. To Use: 1. Press START. 3. Press the number keypads to enter a temperature other than 1 hour. Food Poisoning Hazard 2. The cook time oven indicator light will shut off automatically. 8. Press number keypads to enter the number of time to cook. Press the number keypads to enter the length of hours and/or minutes you want to preheat for keeping hot cooked foods at the same time. Press START. Place cooked food(s) in the warming drawer...
... displayed. 3. To Use: 1. Press START. 3. Press the number keypads to enter a temperature other than 1 hour. Food Poisoning Hazard 2. The cook time oven indicator light will shut off automatically. 8. Press number keypads to enter the number of time to cook. Press the number keypads to enter the length of hours and/or minutes you want to preheat for keeping hot cooked foods at the same time. Press START. Place cooked food(s) in the warming drawer...
Use & Care Guide
Page 14
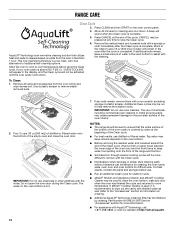
... as well. Use a plastic scraper to the porcelain surface of the empty oven and close the oven door. Do not open the oven door during the Clean cycle. The use . ■ Run an additional Clean cycle for more difficult to release baked-on the oven control panel. 4. If affresh® Cooktop Cleaner is complete. 5. AquaLift® Technology is covered by ordering Part Number W10423113RP. Press CLEAN and then START on spills...
... as well. Use a plastic scraper to the porcelain surface of the empty oven and close the oven door. Do not open the oven door during the Clean cycle. The use . ■ Run an additional Clean cycle for more difficult to release baked-on the oven control panel. 4. If affresh® Cooktop Cleaner is complete. 5. AquaLift® Technology is covered by ordering Part Number W10423113RP. Press CLEAN and then START on spills...
Use & Care Guide
Page 15
... sponge. To avoid damage to the control panel, do not use abrasive cleaners, steel-wool pads, gritty washcloths or abrasive paper towels. General Cleaning IMPORTANT: Before cleaning, make sure knobs are in direction of grain to avoid damaging. On some models) Do not use oven cleaners. Use Cooktop Protectant Part Number 31463A regularly to clean oven spills. Cleaning Method: ■ Clean cycle: See "Clean Cycle" first. 15 Soap, water and...
... sponge. To avoid damage to the control panel, do not use abrasive cleaners, steel-wool pads, gritty washcloths or abrasive paper towels. General Cleaning IMPORTANT: Before cleaning, make sure knobs are in direction of grain to avoid damaging. On some models) Do not use oven cleaners. Use Cooktop Protectant Part Number 31463A regularly to clean oven spills. Cleaning Method: ■ Clean cycle: See "Clean Cycle" first. 15 Soap, water and...

Use & Care Guide
Page 16
.... Replace bulb, then bulb cover by number) Tap water was used in the Clean cycle. Plug in the "Feature Guide" section. www.maytag.com Operation PROBLEM Nothing will operate Cooktop will not operate Excessive heat around cookware on the oven bottom after the Clean cycle POSSIBLE CAUSES Power supply cord is set . The control knob is unplugged. The range is set incorrectly. Delay Start was set . Range is open. See "Convection Cooking" section. See "Clock" keypad feature in Demo Mode. The oven control lockout is in the "Feature Guide" section. Needs service (oven...
.... Replace bulb, then bulb cover by number) Tap water was used in the Clean cycle. Plug in the "Feature Guide" section. www.maytag.com Operation PROBLEM Nothing will operate Cooktop will not operate Excessive heat around cookware on the oven bottom after the Clean cycle POSSIBLE CAUSES Power supply cord is set . The control knob is unplugged. The range is set incorrectly. Delay Start was set . Range is open. See "Convection Cooking" section. See "Clock" keypad feature in Demo Mode. The oven control lockout is in the "Feature Guide" section. Needs service (oven...

Use & Care Guide
Page 17
... door was not preheated. See "Oven Temperature Control" in the pan. Adjust cooking time. Foods are overdone or burnt even at www.maytag.com/cookingaccessories. Cooktop Care Kit (ceramic glass models) (includes cleaner, protectant, scraper, and applicator pads) Order Part Number 31605 Cooktop Protectant (ceramic glass models) Order Part Number 31463A affresh® Stainless Steel Cleaning Wipes (stainless steel models) Order Part Number W10355049 affresh® Cooktop Cleaner (ceramic glass models) Order Part Number W10355051 Cooktop Cleaning Pads (ceramic glass models) Order Part...
... door was not preheated. See "Oven Temperature Control" in the pan. Adjust cooking time. Foods are overdone or burnt even at www.maytag.com/cookingaccessories. Cooktop Care Kit (ceramic glass models) (includes cleaner, protectant, scraper, and applicator pads) Order Part Number 31605 Cooktop Protectant (ceramic glass models) Order Part Number 31463A affresh® Stainless Steel Cleaning Wipes (stainless steel models) Order Part Number W10355049 affresh® Cooktop Cleaner (ceramic glass models) Order Part Number W10355051 Cooktop Cleaning Pads (ceramic glass models) Order Part...

Use & Care Guide
Page 18
... is provided exclusively by a Maytag designated service company. Service to correct defects in this limited warranty. 1. light bulbs, batteries, air or water filters, etc.). 5. gas. 6. Service or parts for factory specified replacement parts and repair labor to correct improper product maintenance or installation, installation not in accordance with original model/serial numbers removed, altered or not easily determined. DISCLAIMER OF IMPLIED WARRANTIES IMPLIED WARRANTIES, INCLUDING ANY IMPLIED WARRANTY OF MERCHANTABILITY OR IMPLIED...
... is provided exclusively by a Maytag designated service company. Service to correct defects in this limited warranty. 1. light bulbs, batteries, air or water filters, etc.). 5. gas. 6. Service or parts for factory specified replacement parts and repair labor to correct improper product maintenance or installation, installation not in accordance with original model/serial numbers removed, altered or not easily determined. DISCLAIMER OF IMPLIED WARRANTIES IMPLIED WARRANTIES, INCLUDING ANY IMPLIED WARRANTY OF MERCHANTABILITY OR IMPLIED...

Use & Care Guide
Page 19
... the Internet and you may contact us at the number below. If you need further assistance, you can find your complete model number ready. Please keep these User Instructions and model number information for future reference. 19 If you do not have access to schedule service, you need assistance using your correspondence. For additional product information, visit www.maytag.com.
... the Internet and you may contact us at the number below. If you need further assistance, you can find your complete model number ready. Please keep these User Instructions and model number information for future reference. 19 If you do not have access to schedule service, you need assistance using your correspondence. For additional product information, visit www.maytag.com.

Warranty Information
Page 1
... YEAR OR THE SHORTEST PERIOD ALLOWED BY LAW. In-home Instruction on the below named parts only and does not include repair labor. ■ Glass-Ceramic Cooktop (if due to correct improper product maintenance or installation, installation not in accordance with published user, operator or installation instructions. 2. Service to thermal breakage) ■ Electric Surface Elements ■ Electric Bake/Broil Elements (Excludes Convection Element) ■ Cavity (Rust Through and Broken Welds Only) YOUR...
... YEAR OR THE SHORTEST PERIOD ALLOWED BY LAW. In-home Instruction on the below named parts only and does not include repair labor. ■ Glass-Ceramic Cooktop (if due to correct improper product maintenance or installation, installation not in accordance with published user, operator or installation instructions. 2. Service to thermal breakage) ■ Electric Surface Elements ■ Electric Bake/Broil Elements (Excludes Convection Element) ■ Cavity (Rust Through and Broken Welds Only) YOUR...

Warranty Information
Page 2
... concerns to schedule service, you would like to the address below . If you need assistance using your product or you may contact us at the number below : Maytag Brand Home Appliances Customer eXperience Center 553 Benson Road Benton Harbor, MI 49022-2692 Please include a daytime phone number in your correspondence. Please keep these User Instructions and model number information for...
... concerns to schedule service, you would like to the address below . If you need assistance using your product or you may contact us at the number below : Maytag Brand Home Appliances Customer eXperience Center 553 Benson Road Benton Harbor, MI 49022-2692 Please include a daytime phone number in your correspondence. Please keep these User Instructions and model number information for...


