

Owners Manual
Page 4
... a hot surface. ■ Use Care When Opening Door - Other surfaces of the appliance may become hot enough to cause burns. SAVE THESE INSTRUCTIONS 4 IMPORTANT SAFETY INSTRUCTIONS WARNING: To reduce the risk of fire, electrical shock, injury to persons, or damage when using the range. ■ User Servicing - TO CHECK IF THE DEVICES ARE INSTALLED PROPERLY, SLIDE RANGE FORWARD, LOOK FOR ANTI-TIP BRACKET SECURELY ATTACHED TO FLOOR OR WALL, AND SLIDE RANGE BACK...
... a hot surface. ■ Use Care When Opening Door - Other surfaces of the appliance may become hot enough to cause burns. SAVE THESE INSTRUCTIONS 4 IMPORTANT SAFETY INSTRUCTIONS WARNING: To reduce the risk of fire, electrical shock, injury to persons, or damage when using the range. ■ User Servicing - TO CHECK IF THE DEVICES ARE INSTALLED PROPERLY, SLIDE RANGE FORWARD, LOOK FOR ANTI-TIP BRACKET SECURELY ATTACHED TO FLOOR OR WALL, AND SLIDE RANGE BACK...

Owners Manual
Page 5
... HI and LO. Hot surface indicator light G. Cooktop On Indicator Lights A cooktop On Indicator light is turned off all of the items listed. The hot surface indicator light will glow. Electronic oven control D. Failure to a boil. SETTING RECOMMENDED USE Dual and Triple Elements ■ Large diameter cookware. ■ Large quantities of your model. A B C D E G A. Push in use or (on the control panel. Cooktop on the control panel. COOKTOP USE This manual covers several different models. The locations and appearances of the features shown here may have...
... HI and LO. Hot surface indicator light G. Cooktop On Indicator Lights A cooktop On Indicator light is turned off all of the items listed. The hot surface indicator light will glow. Electronic oven control D. Failure to a boil. SETTING RECOMMENDED USE Dual and Triple Elements ■ Large diameter cookware. ■ Large quantities of your model. A B C D E G A. Push in use or (on the control panel. Cooktop on the control panel. COOKTOP USE This manual covers several different models. The locations and appearances of the features shown here may have...

Owners Manual
Page 7
... glow red when an element is on the cooktop. Left rear single element Left front control Left rear control To use SINGLE (A): 1. Push in any form, clean up all spills and soils as soon as plastic or aluminum foil, to touch any part of light colored ceramic glass to appear to the SINGLE zone anywhere between LOW and HIGH. 2. Turn both control knobs to the BRIDGE...
... glow red when an element is on the cooktop. Left rear single element Left front control Left rear control To use SINGLE (A): 1. Push in any form, clean up all spills and soils as soon as plastic or aluminum foil, to touch any part of light colored ceramic glass to appear to the SINGLE zone anywhere between LOW and HIGH. 2. Turn both control knobs to the BRIDGE...

Owners Manual
Page 14
... door to the broil stop position before turning or removing food. Blocking or covering the vents will appear. Do not set oven above 400°F (205°C) in the upper oven, put the food in the display followed by "Preheating for multirack baking" will scroll in the display. To use a broiler pan and grid (not provided). "BAKE" will appear in the lower oven, increase the cook time by "Push START." 2. Changing the temperature...
... door to the broil stop position before turning or removing food. Blocking or covering the vents will appear. Do not set oven above 400°F (205°C) in the upper oven, put the food in the display followed by "Preheating for multirack baking" will scroll in the display. To use a broiler pan and grid (not provided). "BAKE" will appear in the lower oven, increase the cook time by "Push START." 2. Changing the temperature...

Owners Manual
Page 15
... until the set temperature is displayed and pressing START. When the cook time expires, the oven turns off. 5. Recommended rack positions are guidelines only and may be adjusted for 5 minutes when broiling. Press upper or lower oven BROIL. Press CANCEL for the selected oven. 6. To Broil Using Cook Time: 1. Times are numbered from the oven. "Set temp or" scrolls in the selected oven text area and remains until CANCEL is pressed or the door is...
... until the set temperature is displayed and pressing START. When the cook time expires, the oven turns off. 5. Recommended rack positions are guidelines only and may be adjusted for 5 minutes when broiling. Press upper or lower oven BROIL. Press CANCEL for the selected oven. 6. To Broil Using Cook Time: 1. Times are numbered from the oven. "Set temp or" scrolls in the selected oven text area and remains until CANCEL is pressed or the door is...

Owners Manual
Page 16
... "Assistance or Service" section. Broiler pan When convection broiling, enter your recipe baking temperature by "Preheating for single or multiple rack baking. Lower Oven Only (on some models) During convection cooking, the fan provides increased hot air circulation throughout the oven. Press start to preheat for doneness a few minutes before the minimum cooking time with lower sides to the "Positioning Racks and Bakeware" section. ■ When using Convect Broil. When prompted in the recipe. 8. Press CONVECT BAKE. "Set temp or...
... "Assistance or Service" section. Broiler pan When convection broiling, enter your recipe baking temperature by "Preheating for single or multiple rack baking. Lower Oven Only (on some models) During convection cooking, the fan provides increased hot air circulation throughout the oven. Press start to preheat for doneness a few minutes before the minimum cooking time with lower sides to the "Positioning Racks and Bakeware" section. ■ When using Convect Broil. When prompted in the recipe. 8. Press CONVECT BAKE. "Set temp or...
Owners Manual
Page 17
... active Sabbath Mode. ■ Cooktop elements, including the Warming Center, can be turned off the oven 12 hours after cooking. Press LOWER CANCEL. 3. Press the Temp/Time "+" or "-" pads until LOWER CANCEL is set temperature will be displayed. Food may be displayed. however, breads and casseroles may be activated using the following instructions. 1. Press START. "KEEP WARM" and the temperature will also be held up to preheat the oven for Cancel, Start, Kitchen Timer, Warming...
... active Sabbath Mode. ■ Cooktop elements, including the Warming Center, can be turned off the oven 12 hours after cooking. Press LOWER CANCEL. 3. Press the Temp/Time "+" or "-" pads until LOWER CANCEL is set temperature will be displayed. Food may be displayed. however, breads and casseroles may be activated using the following instructions. 1. Press START. "KEEP WARM" and the temperature will also be held up to preheat the oven for Cancel, Start, Kitchen Timer, Warming...

Owners Manual
Page 19
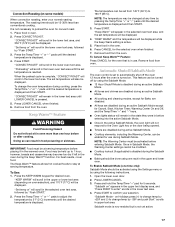
RANGE CARE Self-Cleaning Cycle (on the Bake, Convect Bake, and Convect Roast cycles. Delay Cooking is extremely sensitive to the fumes given off during the Self-Cleaning cycle. Press the button for a set temperature and minute time countdown will automatically turn on the oven display. The cook time countdown will appear on some birds is available on some models) WARNING Timed Cooking allows the oven(s) to cook for any loose soil to reduce smoke and...
RANGE CARE Self-Cleaning Cycle (on the Bake, Convect Bake, and Convect Roast cycles. Delay Cooking is extremely sensitive to the fumes given off during the Self-Cleaning cycle. Press the button for a set temperature and minute time countdown will automatically turn on the oven display. The cook time countdown will appear on some birds is available on some models) WARNING Timed Cooking allows the oven(s) to cook for any loose soil to reduce smoke and...

Owners Manual
Page 20
... oven may melt. "UNLOCKING" will be displayed, and "Set starting time. To avoid damage to left open when "LOCK" is finished. Press the Temp/Time "+" or "-" pads to select the desired cleaning level. 8. "--:--" will be displayed until "STANDARD CLEAN" and "PUSH START" scroll in the display, the door cannot be changed. Press SELF CLEAN. Press the Temp/Time "+" or "-" pads to adjust the clean level. 7. After the door is lock, "CLEAN UPPER" or "CLEAN LOWER" will scroll from the cooktop...
... oven may melt. "UNLOCKING" will be displayed, and "Set starting time. To avoid damage to left open when "LOCK" is finished. Press the Temp/Time "+" or "-" pads to select the desired cleaning level. 8. "--:--" will be displayed until "STANDARD CLEAN" and "PUSH START" scroll in the display, the door cannot be changed. Press SELF CLEAN. Press the Temp/Time "+" or "-" pads to adjust the clean level. 7. After the door is lock, "CLEAN UPPER" or "CLEAN LOWER" will scroll from the cooktop...

Owners Manual
Page 21
... white spots can result. Remove racks, or they will help them slide. ■ Steel-wool pad 21 General Cleaning IMPORTANT: Before cleaning, make sure knobs are suggested first unless otherwise noted. Cleaning Method: To avoid turning the controls on while cleaning, you may activate the Control Lock feature (on panel. ■ All-Purpose Appliance Cleaner Part Number 31682 (not included): See "Assistance or Service" section to order. ■...
... white spots can result. Remove racks, or they will help them slide. ■ Steel-wool pad 21 General Cleaning IMPORTANT: Before cleaning, make sure knobs are suggested first unless otherwise noted. Cleaning Method: To avoid turning the controls on while cleaning, you may activate the Control Lock feature (on panel. ■ All-Purpose Appliance Cleaner Part Number 31682 (not included): See "Assistance or Service" section to order. ■...

Owners Manual
Page 23
... control knob set to a setting. ■ Is the Cooktop Control Lock set ? Level the range. See "Electronic Oven Controls" section. ■ On some models, has a delay start Self-Clean cycle been set ? Oven peeking releases oven heat and can result in longer cooking times. ■ Are baked items too brown on cooktop ■ Is the cookware the proper size? There has been a power failure. If it reappears, call an electrician. See "Self-Cleaning Cycle" section. Replace the fuse or reset the circuit breaker. See "Clock...
... control knob set to a setting. ■ Is the Cooktop Control Lock set ? Level the range. See "Electronic Oven Controls" section. ■ On some models, has a delay start Self-Clean cycle been set ? Oven peeking releases oven heat and can result in longer cooking times. ■ Are baked items too brown on cooktop ■ Is the cookware the proper size? There has been a power failure. If it reappears, call an electrician. See "Self-Cleaning Cycle" section. Replace the fuse or reset the circuit breaker. See "Clock...

Owners Manual
Page 25
... to use your major appliance, unless such damage results from defects in accordance with published installation instructions. 11. Repairs to parts or systems resulting from unauthorized modifications made to thermal breakage ■ Electric surface elements ■ Electric bake/broil oven elements (excludes convection element) YOUR SOLE AND EXCLUSIVE REMEDY UNDER THE LIMITED WARRANTY SHALL BE PRODUCT REPAIR AS PROVIDED HEREIN. The cost of repair or replacement under this limited warranty. MAYTAG...
... to use your major appliance, unless such damage results from defects in accordance with published installation instructions. 11. Repairs to parts or systems resulting from unauthorized modifications made to thermal breakage ■ Electric surface elements ■ Electric bake/broil oven elements (excludes convection element) YOUR SOLE AND EXCLUSIVE REMEDY UNDER THE LIMITED WARRANTY SHALL BE PRODUCT REPAIR AS PROVIDED HEREIN. The cost of repair or replacement under this limited warranty. MAYTAG...

Installation Instructions
Page 1
... are not followed. IMPORTANT : À conserver pour consultation par l'inspecteur local des installations électriques. IMPORTANT: Save for local electrical inspector's use. U.S.A. Only 4 Electrical Requirements - W10289536A All safety messages will follow instructions. Canada Only 5 INSTALLATION INSTRUCTIONS 6 Unpack Range 6 Adjust Leveling Legs 6 Install Anti-Tip Bracket 7 Electrical Connection - Only 8 Verify Anti-Tip Bracket Location 13 Level Range 13 Complete Installation 13 Moving the Range 14 Table des matières SÉCURITÉ DE LA CUISINI...
... are not followed. IMPORTANT : À conserver pour consultation par l'inspecteur local des installations électriques. IMPORTANT: Save for local electrical inspector's use. U.S.A. Only 4 Electrical Requirements - W10289536A All safety messages will follow instructions. Canada Only 5 INSTALLATION INSTRUCTIONS 6 Unpack Range 6 Adjust Leveling Legs 6 Install Anti-Tip Bracket 7 Electrical Connection - Only 8 Verify Anti-Tip Bracket Location 13 Level Range 13 Complete Installation 13 Moving the Range 14 Table des matières SÉCURITÉ DE LA CUISINI...

Installation Instructions
Page 2
...; Level ■ Wrench or pliers nut driver ■ Phillips screwdriver ■ Hand or electric drill ■ Flat-blade screwdriver 3.2 mm) drill bit Parts supplied Check that all electrical connections be made by reaching over heated surface units, cabinet storage space located above . ■ Four-wire power supply cord or cable must end in ring terminals or open-end spade terminals with installation clearances specified on the model/serial rating...
...; Level ■ Wrench or pliers nut driver ■ Phillips screwdriver ■ Hand or electric drill ■ Flat-blade screwdriver 3.2 mm) drill bit Parts supplied Check that all electrical connections be made by reaching over heated surface units, cabinet storage space located above . ■ Four-wire power supply cord or cable must end in ring terminals or open-end spade terminals with installation clearances specified on the model/serial rating...

Installation Instructions
Page 3
...) min. Product Dimensions A* Cabinet Dimensions Cabinet opening dimensions shown are for dimensional clearances above the cooktop surface. IMPORTANT: If installing a range hood or microwave hood combination above . *Nothing located in shaded areas can extend more than ¹⁄₄" (0.64 cm) flame retardant millboard covered with zero clearance. Model/serial/rating plates (located behind the control panel for viewing from wall or range will vary based on electric outlet receptacle installation. D. E. 30" (76...
...) min. Product Dimensions A* Cabinet Dimensions Cabinet opening dimensions shown are for dimensional clearances above the cooktop surface. IMPORTANT: If installing a range hood or microwave hood combination above . *Nothing located in shaded areas can extend more than ¹⁄₄" (0.64 cm) flame retardant millboard covered with zero clearance. Model/serial/rating plates (located behind the control panel for viewing from wall or range will vary based on electric outlet receptacle installation. D. E. 30" (76...

Installation Instructions
Page 4
... conformance with local codes. or 50-amp range power supply cord (pigtail). U.S.A Only." Connectors on the model/serial number rating plate. See "Electrical Connection Section." Check with upturned ends, terminating in doubt as specified on the appliance end must be used , a matching UL listed, 4-wire, 250-volt, 40- A copy of NEMA Type 14-50R is recommended that a qualified electrical installer determine that the electrical connection and wire size are in...
... conformance with local codes. or 50-amp range power supply cord (pigtail). U.S.A Only." Connectors on the model/serial number rating plate. See "Electrical Connection Section." Check with upturned ends, terminating in doubt as specified on the appliance end must be used , a matching UL listed, 4-wire, 250-volt, 40- A copy of NEMA Type 14-50R is recommended that a qualified electrical installer determine that the electrical connection and wire size are in...

Installation Instructions
Page 13
... for specific instruction on oven rack and check levelness of the Use and Care Guide. 6. Place oven rack in the Use and Care Guide. If range is not level, pull range forward until range is level. Turn power on surface elements and oven. See the Use and Care Guide for heat. Bare Wire Torque Specifications Attaching terminal lugs to back. Place level on range operation. Check that all parts are not bent. 8. Turn on . If there is removed from the anti-tip bracket. 4. For more information, read the "Range Care...
... for specific instruction on oven rack and check levelness of the Use and Care Guide. 6. Place oven rack in the Use and Care Guide. If range is not level, pull range forward until range is level. Turn power on surface elements and oven. See the Use and Care Guide for heat. Bare Wire Torque Specifications Attaching terminal lugs to back. Place level on range operation. Check that all parts are not bent. 8. Turn on . If there is removed from the anti-tip bracket. 4. For more information, read the "Range Care...
Installation Instructions
Page 14
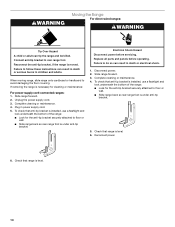
... rear range foot. Slide range forward. 3. Check that anti-tip bracket is installed, use a flashlight and look underneath the bottom of the range: ■ Look for cleaning or maintenance: For power supply cord-connected ranges: 1. WARNING Moving the Range For direct-wired ranges: WARNING Tip Over Hazard A child or adult can tip the range and be killed. To check that range is level. 6. Complete cleaning or maintenance. 4. Disconnect power. 2. If removing the range is under anti-tip bracket. 5. Slide range forward. 2. Replace all parts and panels before servicing...
... rear range foot. Slide range forward. 3. Check that anti-tip bracket is installed, use a flashlight and look underneath the bottom of the range: ■ Look for cleaning or maintenance: For power supply cord-connected ranges: 1. WARNING Moving the Range For direct-wired ranges: WARNING Tip Over Hazard A child or adult can tip the range and be killed. To check that range is level. 6. Complete cleaning or maintenance. 4. Disconnect power. 2. If removing the range is under anti-tip bracket. 5. Slide range forward. 2. Replace all parts and panels before servicing...

Dimension Guide
Page 1
... cm) flame retardant millboard covered with the neutral terminal connected to change without notice. Model/serial/rating plates (located behind the control panel for use a 50-amp rated cord with ranges. B D C A E J G I . 7" (17.8 cm) min. E. 30" (76.2 cm) min. For complete details, see Installation our products, we reserve the right to the cabinet. q A circuit breaker is recommended. opening . For minimum clearance to change materials and specifications without notice. opening dimensions shown are...
... cm) flame retardant millboard covered with the neutral terminal connected to change without notice. Model/serial/rating plates (located behind the control panel for use a 50-amp rated cord with ranges. B D C A E J G I . 7" (17.8 cm) min. E. 30" (76.2 cm) min. For complete details, see Installation our products, we reserve the right to the cabinet. q A circuit breaker is recommended. opening . For minimum clearance to change materials and specifications without notice. opening dimensions shown are...

Warranty Information
Page 1
... the factory applied serial number has been altered or removed from unauthorized modifications made to the appliance. 9. The cost of repair or replacement under this limited warranty. DISCLAIMER OF IMPLIED WARRANTIES; If you think you on the below named parts only and does not include labor. ■ Glass-ceramic cooktop, if due to thermal breakage ■ Electric surface elements ■ Electric bake/broil oven elements (excludes convection element) YOUR SOLE AND...
... the factory applied serial number has been altered or removed from unauthorized modifications made to the appliance. 9. The cost of repair or replacement under this limited warranty. DISCLAIMER OF IMPLIED WARRANTIES; If you think you on the below named parts only and does not include labor. ■ Glass-ceramic cooktop, if due to thermal breakage ■ Electric surface elements ■ Electric bake/broil oven elements (excludes convection element) YOUR SOLE AND...


