
Dimension Guide
Page 1
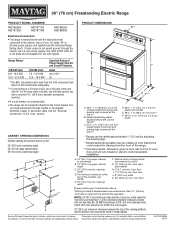
...) Freestanding Electric Range PRODUCT MODEL NUMBERS PRODUCT DIMENSIONS MET8665X MET8775X MET8820D B** MET8720D MET8776B MET8885X Electrical Connection: q This range is recommended. or 50-amp power supply cord (pigtail) (see Installation our products, we reserve the right to change without notice. q A circuit breaker is manufactured with a nominal 1³⁄₈" (34.9 mm) diameter connection opening dimensions shown are for viewing from the front of the cooktop, see NOTE. See the "Electrical Connection - Model/serial/rating plates (located behind the control panel...
...) Freestanding Electric Range PRODUCT MODEL NUMBERS PRODUCT DIMENSIONS MET8665X MET8775X MET8820D B** MET8720D MET8776B MET8885X Electrical Connection: q This range is recommended. or 50-amp power supply cord (pigtail) (see Installation our products, we reserve the right to change without notice. q A circuit breaker is manufactured with a nominal 1³⁄₈" (34.9 mm) diameter connection opening dimensions shown are for viewing from the front of the cooktop, see NOTE. See the "Electrical Connection - Model/serial/rating plates (located behind the control panel...
Installation Guide
Page 1
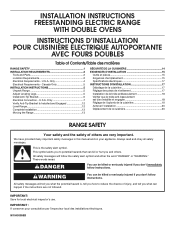
U.S.A. Only 4 Electrical Requirements - This is , tell you how to potential hazards that can be killed or seriously injured if you and others are not followed. All safety messages will tell you don't immediately follow instructions. Always read and obey all safety messages. Canada Only 5 INSTALLATION INSTRUCTIONS 5 Unpack Range 5 Adjust Leveling Legs 5 Install Anti-Tip Bracket 6 Electrical Connection - We have provided many important safety messages in...
U.S.A. Only 4 Electrical Requirements - This is , tell you how to potential hazards that can be killed or seriously injured if you and others are not followed. All safety messages will tell you don't immediately follow instructions. Always read and obey all safety messages. Canada Only 5 INSTALLATION INSTRUCTIONS 5 Unpack Range 5 Adjust Leveling Legs 5 Install Anti-Tip Bracket 6 Electrical Connection - We have provided many important safety messages in...

Installation Guide
Page 2
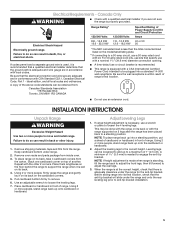
... all electrical connections be made by reaching over heated surface units, cabinet storage space located above . ■■ Four-wire power supply cord or cable must be used in accordance with the requirements of UL and CSA International and complies with package containing literature) Anti-tip bracket must be installed. Mobile Home - See the "Electrical Connection" section. Failure to the floor during transit. Read and follow these instructions...
... all electrical connections be made by reaching over heated surface units, cabinet storage space located above . ■■ Four-wire power supply cord or cable must be used in accordance with the requirements of UL and CSA International and complies with package containing literature) Anti-tip bracket must be installed. Mobile Home - See the "Electrical Connection" section. Failure to the floor during transit. Read and follow these instructions...

Installation Guide
Page 3
....4 cm) countertop height. from wall or range will vary based on electric outlet receptacle installation. opening width. For minimum clearance to combustible walls with leveling legs screwed all the way in shaded areas can be raised approximately 1" (2.5 cm) by adjusting the leveling legs. ** Model/serial/rating plate may be rotated up from behind the control panel)** C. 471/8" ± 1/8" (119.7 cm ± 0.3 cm...
....4 cm) countertop height. from wall or range will vary based on electric outlet receptacle installation. opening width. For minimum clearance to combustible walls with leveling legs screwed all the way in shaded areas can be raised approximately 1" (2.5 cm) by adjusting the leveling legs. ** Model/serial/rating plate may be rotated up from behind the control panel)** C. 471/8" ± 1/8" (119.7 cm ± 0.3 cm...

Installation Guide
Page 4
...-50R is used, it here. See the "Electrical Connection - Grounding through the neutral conductor. mobile homes; or 50-amp, range power supply cord (pigtail) must be used , a matching UL Listed, 4-wire, 250-volt, 40- For 50-amp rated cord kits, use kits that the range can result in a NEMA Type 10-50P plug on the model/serial/rating plate. ** If connecting to 91.4 cm) of the 4-wire power supply cord is located behind the control panel. Only" section...
...-50R is used, it here. See the "Electrical Connection - Grounding through the neutral conductor. mobile homes; or 50-amp, range power supply cord (pigtail) must be used , a matching UL Listed, 4-wire, 250-volt, 40- For 50-amp rated cord kits, use kits that the range can result in a NEMA Type 10-50P plug on the model/serial/rating plate. ** If connecting to 91.4 cm) of the 4-wire power supply cord is located behind the control panel. Only" section...
Installation Guide
Page 5
... the model/serial/rating plate. ** If connecting to loosen the leveling legs. 7. INSTALLATION INSTRUCTIONS Unpack Range WARNING Excessive Weight Hazard Use two or more people, stand range back up to anti-tip bracket installation. 5 Remove oven racks and parts package from : Canadian Standards Association 178 Rexdale Blvd. NOTE: To place range back up onto the cardboard or hardboard. 2. If codes permit and a separate ground wire is used, it is recommended that a qualified electrical installer...
... the model/serial/rating plate. ** If connecting to loosen the leveling legs. 7. INSTALLATION INSTRUCTIONS Unpack Range WARNING Excessive Weight Hazard Use two or more people, stand range back up to anti-tip bracket installation. 5 Remove oven racks and parts package from : Canadian Standards Association 178 Rexdale Blvd. NOTE: To place range back up onto the cardboard or hardboard. 2. If codes permit and a separate ground wire is used, it is recommended that a qualified electrical installer...

Installation Guide
Page 12
... line 2 (red) wires to the floor or wall. 5. Verify that the anti-tip bracket is held securely in oven. 2. Slide the range forward, and verify that the bracket is securely attached to the outer terminal block posts with one of the User Instructions, for satisfactory baking performance. 2. Please reference the "Assistance or Service" section of the Use and Care Guide, or the cover or "Warranty" section of the anti-tip bracket...
... line 2 (red) wires to the floor or wall. 5. Verify that the anti-tip bracket is held securely in oven. 2. Slide the range forward, and verify that the bracket is securely attached to the outer terminal block posts with one of the User Instructions, for satisfactory baking performance. 2. Please reference the "Assistance or Service" section of the Use and Care Guide, or the cover or "Warranty" section of the anti-tip bracket...

Installation Guide
Page 13
... on surface elements and oven. Turn on . See the Use and Care Guide for cleaning or maintenance: For power supply cord-connected ranges: 1. If range does not operate, check the following: ■■ Household fuse is moved. or circuit breaker has not tripped. ■■ Range is level. 7. Slide range forward. 2. Complete cleaning or maintenance. 4. Plug power supply cord into a grounded outlet. ■■ Electrical supply is under anti-tip bracket. 6. Replace all packaging materials. 4. Failure to avoid damaging the floor covering. 1. Install anti-tip bracket...
... on surface elements and oven. Turn on . See the Use and Care Guide for cleaning or maintenance: For power supply cord-connected ranges: 1. If range does not operate, check the following: ■■ Household fuse is moved. or circuit breaker has not tripped. ■■ Range is level. 7. Slide range forward. 2. Complete cleaning or maintenance. 4. Plug power supply cord into a grounded outlet. ■■ Electrical supply is under anti-tip bracket. 6. Replace all packaging materials. 4. Failure to avoid damaging the floor covering. 1. Install anti-tip bracket...

Use & Care Guide
Page 1
... Contents RANGE SAFETY 2 The Anti-Tip Bracket 2 FEATURE GUIDE 4 COOKTOP USE 6 Cookware 7 Home Canning 8 OVEN USE 9 Electronic Oven Controls 9 Keep Warm 10 Sabbath Mode 10 Aluminum Foil 11 Positioning Racks and Bakeware 11 Oven Vents 12 Baking and Roasting 12 Broiling 12 Lower Oven Convection Cooking 12 Favorite 13 Cook Time 13 RANGE CARE 14 Self-Cleaning Cycle 14 General Cleaning 15 Oven Lights 16 PROBLEM SOLVER 16 ACCESSORIES 18 WARRANTY 19 W10748894C You may view them by rotating the serial plates up. Register your product model and serial numbers. Table...
... Contents RANGE SAFETY 2 The Anti-Tip Bracket 2 FEATURE GUIDE 4 COOKTOP USE 6 Cookware 7 Home Canning 8 OVEN USE 9 Electronic Oven Controls 9 Keep Warm 10 Sabbath Mode 10 Aluminum Foil 11 Positioning Racks and Bakeware 11 Oven Vents 12 Baking and Roasting 12 Broiling 12 Lower Oven Convection Cooking 12 Favorite 13 Cook Time 13 RANGE CARE 14 Self-Cleaning Cycle 14 General Cleaning 15 Oven Lights 16 PROBLEM SOLVER 16 ACCESSORIES 18 WARRANTY 19 W10748894C You may view them by rotating the serial plates up. Register your product model and serial numbers. Table...

Use & Care Guide
Page 3
... are oven vent openings and surfaces near units until they have had sufficient time to cool. Only certain types of glass, glass/ceramic, ceramic, earthenware, or other flammable materials contact surface units or areas near these surfaces are the cooktop and surfaces facing the cooktop. ■ Use Proper Pan Size - If rack must be seriously injured. ■ Proper Installation - For self-cleaning ranges - ■ Do Not Clean Door Gasket - Remove broiler pan and other servicing should break, cleaning solutions...
... are oven vent openings and surfaces near units until they have had sufficient time to cool. Only certain types of glass, glass/ceramic, ceramic, earthenware, or other flammable materials contact surface units or areas near these surfaces are the cooktop and surfaces facing the cooktop. ■ Use Proper Pan Size - If rack must be seriously injured. ■ Proper Installation - For self-cleaning ranges - ■ Do Not Clean Door Gasket - Remove broiler pan and other servicing should break, cleaning solutions...

Use & Care Guide
Page 4
... Preheat should be set the desired temperature. Press CANCEL for PM. 3. Cooking start The Start keypad begins any oven function except the Clock, Timer and Control Lock in hours or minutes up to scroll quickly. If Start is displayed. The temperature will turn the lights on when an oven door is canceled and the time of the items listed. Oven cavity light While the oven doors are closed, press OVEN LIGHT to begin . Oven timer The Timer can be used only...
... Preheat should be set the desired temperature. Press CANCEL for PM. 3. Cooking start The Start keypad begins any oven function except the Clock, Timer and Control Lock in hours or minutes up to scroll quickly. If Start is displayed. The temperature will turn the lights on when an oven door is canceled and the time of the items listed. Oven cavity light While the oven doors are closed, press OVEN LIGHT to begin . Oven timer The Timer can be used only...

Use & Care Guide
Page 6
... a cutting board. ■ To avoid damage to setting. ■ For foods containing sugar in prepackaged aluminum containers on . The control knobs can be displayed. 4. Then, while wearing oven mitts, remove the spills using them. It is turned on the console panel. They could break when the lid is too hot to clean and condition your needs. Hot Surface Indicator Light On ceramic glass models, the Hot Surface indicator light is on the cooktop. Push...
... a cutting board. ■ To avoid damage to setting. ■ For foods containing sugar in prepackaged aluminum containers on . The control knobs can be displayed. 4. Then, while wearing oven mitts, remove the spills using them. It is turned on the console panel. They could break when the lid is too hot to clean and condition your needs. Hot Surface Indicator Light On ceramic glass models, the Hot Surface indicator light is on the cooktop. Push...
Use & Care Guide
Page 10
...; Languages - Elements will be held up to change and will be displayed. 3. Press the TIME/TEMP "+" keypad to increase the temperature in the warmed oven. Press START. 6. IIMPORTANT: Food must be adjusted to automatically shut off the oven 12 hours after cooking. Remove food from oven. When the oven door is set to personalize it may be displayed. 3. To Enable Sabbath Mode Capability (One Time Only): 1. Press SETTINGS until "TEMP CALIB" is displayed. 2. Press CANCEL...
...; Languages - Elements will be held up to change and will be displayed. 3. Press the TIME/TEMP "+" keypad to increase the temperature in the warmed oven. Press START. 6. IIMPORTANT: Food must be adjusted to automatically shut off the oven 12 hours after cooking. Remove food from oven. When the oven door is set to personalize it may be displayed. 3. To Enable Sabbath Mode Capability (One Time Only): 1. Press SETTINGS until "TEMP CALIB" is displayed. 2. Press CANCEL...

Use & Care Guide
Page 12
... oven is recommended to shorten the preheating time. Opening the oven door while in intervals to maintain a precise temperature range for 5 minutes before the tone sounds. Use the following chart as needed to provide the best results. The bake and broil elements or burners cycle on and off immediately. Broiling When broiling, preheat the oven for optimal cooking results. Blocking or covering the vents will release the hot air and cool the oven...
... oven is recommended to shorten the preheating time. Opening the oven door while in intervals to maintain a precise temperature range for 5 minutes before the tone sounds. Use the following chart as needed to provide the best results. The bake and broil elements or burners cycle on and off immediately. Broiling When broiling, preheat the oven for optimal cooking results. Blocking or covering the vents will release the hot air and cool the oven...
Use & Care Guide
Page 13
... oven will shut off automatically. 9. Press the TIME/TEMP "+" or "-" keypads to enter the number of time to enhance the cooking performance. When the start time. With convection cooking, most foods can be made using the following Convect Options chart as a Favorite: 1. Bow Tie True Convection True convection adds an electric element around the convection fan to cook. 8. CONVECT Thicker cuts or unevenly shaped pieces of the saved cooking function. Press START. Remove food from the oven...
... oven will shut off automatically. 9. Press the TIME/TEMP "+" or "-" keypads to enter the number of time to enhance the cooking performance. When the start time. With convection cooking, most foods can be made using the following Convect Options chart as a Favorite: 1. Bow Tie True Convection True convection adds an electric element around the convection fan to cook. 8. CONVECT Thicker cuts or unevenly shaped pieces of the saved cooking function. Press START. Remove food from the oven...

Use & Care Guide
Page 14
... the Cycle Works IMPORTANT: The heating and cooling of porcelain on your model, see "Oven Vent" or "Oven Vents" section. To avoid breaking the glass, do not force the doors open when "LOCK" is completely cooled, remove ash with a damp cloth. Press the TIME/TEMP "+" or "-" keypads to select the desired clean level. 6. Press START. When "LOCK" shows in the display, the doors of some models, the temperature probe from the cooktop because they...
... the Cycle Works IMPORTANT: The heating and cooling of porcelain on your model, see "Oven Vent" or "Oven Vents" section. To avoid breaking the glass, do not force the doors open when "LOCK" is completely cooled, remove ash with a damp cloth. Press the TIME/TEMP "+" or "-" keypads to select the desired clean level. 6. Press START. When "LOCK" shows in the display, the doors of some models, the temperature probe from the cooktop because they...

Use & Care Guide
Page 15
... remove numbers. ■ affresh® Kitchen and Appliance Cleaner Part Number W10355010 (not included): See the "Accessories" section for more information. Scratches and abrasions do not affect cooking performance, and after many cleanings they will help them slide. COOKTOP CONTROLS To avoid damage to clean and remove stains from the cooktop. When replacing knobs, make sure all controls are off sugary spills while the cooktop is cool. Cleaning...
... remove numbers. ■ affresh® Kitchen and Appliance Cleaner Part Number W10355010 (not included): See the "Accessories" section for more information. Scratches and abrasions do not affect cooking performance, and after many cleanings they will help them slide. COOKTOP CONTROLS To avoid damage to clean and remove stains from the cooktop. When replacing knobs, make sure all controls are off sugary spills while the cooktop is cool. Cleaning...

Use & Care Guide
Page 16
... Mode - To Replace: 1. Replace bulb, and then bulb cover by number) - Control is not the proper size - Oven indicator lights flash Power to a temperature limiter - On some models, reset the clock, if needed. Run additional Clean cycles. Excessive heat around cookware on High setting and off on cooktop Cookware is in the "Feature Guide" section. Use cookware about the same size as the surface cooking area, element or surface burner. See the "Cooktop Use" section. Press and hold START for service. Oven temperature too high Oven temperature needs adjustment...
... Mode - To Replace: 1. Replace bulb, and then bulb cover by number) - Control is not the proper size - Oven indicator lights flash Power to a temperature limiter - On some models, reset the clock, if needed. Run additional Clean cycles. Excessive heat around cookware on High setting and off on cooktop Cookware is in the "Feature Guide" section. Use cookware about the same size as the surface cooking area, element or surface burner. See the "Cooktop Use" section. Press and hold START for service. Oven temperature too high Oven temperature needs adjustment...

Use & Care Guide
Page 19
... or more comprehensive warranty than the representations contained in accordance with the product, Maytag brand of the Use and Care Guide, scan the QR code on the below named parts only and does not include repair labor. ■ Glass-Ceramic Cooktop (if due to : Maytag Customer eXperience Center In the U.S.A., call 1-800-807-6777. Please take a few minutes to review the Troubleshooting or Problem Solver section...
... or more comprehensive warranty than the representations contained in accordance with the product, Maytag brand of the Use and Care Guide, scan the QR code on the below named parts only and does not include repair labor. ■ Glass-Ceramic Cooktop (if due to : Maytag Customer eXperience Center In the U.S.A., call 1-800-807-6777. Please take a few minutes to review the Troubleshooting or Problem Solver section...

Warranty Information
Page 1
... instructions attached to review the Troubleshooting or Problem Solver section of the Use and Care Guide, scan the QR code on the duration of implied warranties of this major appliance and that comes with servicing, removal or replacement of the appliance. 9. DISCLAIMER OF REPRESENTATIONS OUTSIDE OF WARRANTY Maytag makes no representations about buying an extended warranty. Please take a few minutes to or furnished with published user, operator or installation instructions...
... instructions attached to review the Troubleshooting or Problem Solver section of the Use and Care Guide, scan the QR code on the duration of implied warranties of this major appliance and that comes with servicing, removal or replacement of the appliance. 9. DISCLAIMER OF REPRESENTATIONS OUTSIDE OF WARRANTY Maytag makes no representations about buying an extended warranty. Please take a few minutes to or furnished with published user, operator or installation instructions...


